UDT CLI Usage
The facilitation offered by Acceldata for the UDT CLI includes:
- A complete project skeleton, including sample code, build targets, and sample test cases.
- The Acceldata Unit Test Case suite, replicating the runtime environment for enhanced code confidence.
- The setup of a CI/CD pipeline using the ADOC CLI tool, with necessary commands for binary creation and platform deployment.
- Help with uploading binaries to common storage (e.g. S3, GCS) and creating or updating UDT definitions with the help of manifest files.
Prerequisites
- Zip and unzip software or command line utility
- Java 8
- Spark 2.4 or 3.2
- Scala 2.12.x in case of Spark 3.2 or Scala 2.11.x in case of Spark 2.4
- Gradle 7.4.2
- IDE (Integrated Development Environment) supports gradle projects (preferably IntelliJ)
At this time, you must get in touch with an Acceldata Support Representative to download this package.
The ADOC-CLI zipped bundle that you receive must first be extracted and put into a local folder. This bundle follows the pattern of ADOC release, OS, and processor. In accordance with those configurations, you must use the appropriate ADOC-CLI bundle.
The bundle needs to be unzipped using a command or unzip utility. The bundle contains two files:
- ADOC-CLI: This single executable will be used to manage every stage of the UDT repository package and definition's lifecycle.
- Packages.zip: This is a supporting file that is necessary for ADOC-CLI to perform initial setup; however, it must be placed in the same directory as ADOC-CLI.
unzip adoc-cli-2.6.0-release-4-mac-amd64.zipOverview of UDT CLI Commands
ADOC-CLI is a single command line interface for multiple features, so when you run the command without any parameters, the features are listed first. As of now, only UDT is available; however, it will soon be expanded.
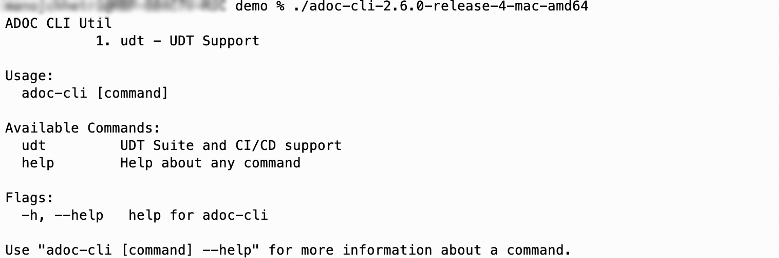
After choosing UDT, you can investigate or use the commands related to the UDT repository lifecycle. This article focuses primarily on how a developer can create a UDT project using samples and then move it into production after making changes in accordance to their need.
Below is a list of available commands that are displayed when you choose UDT as a feature option:
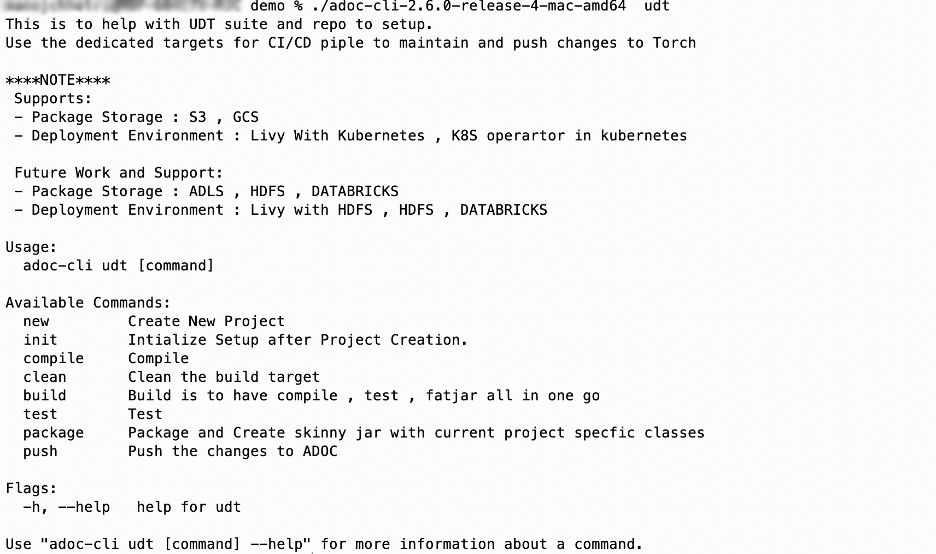
new
The new command can be used to create the initial project or skeleton and then commit it to the code repository. DevOps must also set up CI/CD pipeline for the same.
To create a new project, you must provide the following parameters:
| Parameter | Description |
|---|---|
| Language | Provide the language that is going to be used. Currently only Java and Scala are supported. |
| Project Name | Provide an appropriate name for the project. A project folder with the same name will be created, and a jar file with the same name will be generated later. |
| Spark Major Version | Provide the Spark Major Version; 24 - Spark Version 2.4 or 32 - Spark Version 3.2. |
| Destination Dir | Provide the destination directory where the project will be created. |
./adoc-cli-2.6.0-release-mac-amd64 udt new --language scala --project-name sample-udt-scala-app --spark-major-version 32 --destination-dir .Once the project is created, you can list the files that are included. The complete setup includes:
- build.gradle: To build the project
- libs: This contains the Acceldata SDK, which aids in the creation of UDT definitions by exposing interfaces and assisting you in writing test cases.
- src: In order to familiarize you with these definitions, the source directory src is pre-loaded with sample code and test cases.
- manifest files: This is a sample manifest file, and you can choose between S3 or GCS for storage. Here, you must enter all the necessary information, including the Torch Server API and Credentials Storage where binaries will be uploaded, as well as the Credentials Package Meta data, which includes the package name and binary location.
init
It's optional to run this command, which configures the initial gradle wrapper. If a gradle init project setup issue arises you can proceed to run. It is currently being used as part of the new command.
./adoc-cli-2.6.0-release-4-mac-amd64 udt initcompile
The project can be imported to any IDE. Then, you can run the compile command, which will compile all the classes.
./adoc-cli-2.6.0-release-4-mac-amd64 udt compiletest
Using the test command, you can run test cases. It produces the report in the build directory as shown below. It is beneficial for you to check the error logs and the test case to see if it succeeds or fails.
./adoc-cli-2.6.0-release-4-mac-amd64 udt testBelow is the location where the HTML test report will be generated for additional verification.

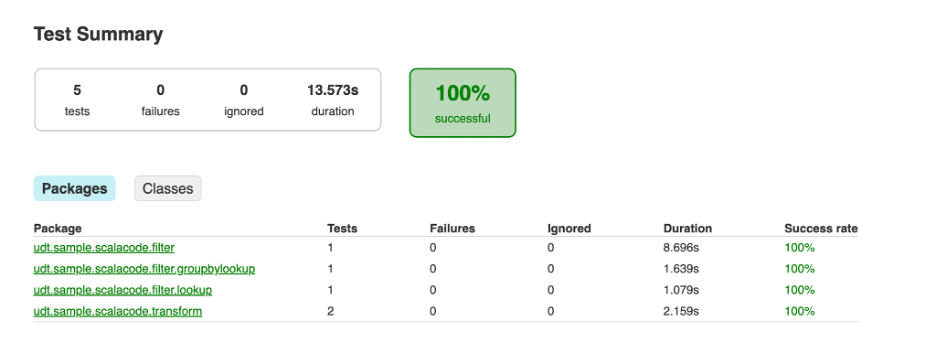
UI View of Test Case Report
Scala and Java binaries come in two types:
Skinny Jar: Only contains classes created in this repository.
Fat Jar: Classes from the current repository are used, along with dependent binaries listed in the build.gradle or build file.
It depends on the use case for a particular binary to be utilized.
package
If you require a Skinny Jar with only the classes that are needed for the current project, the package command can be used to create it. It is preferable to use this one because it is smaller and simpler to maintain.
./adoc-cli-2.6.0-release-4-mac-amd64 udt packagebuild
If a your current code in a repository depends on other third-party or open-source binaries, the build command can be used, which will not be included in Spark's standard packaging. Those can be put together to make a single Fat Jar. The Gradle documentation must be referred to in order to include it in the Fat Jar.
./adoc-cli-2.6.0-release-4-mac-amd64 udt buildYou must be cautious when using the Fat Jar to prevent problems from arising while it is running and to ensure that it is compatible with the Spark version and the relevant frameworks.
The target to create the Fat Jar has already been embedded in the gradle file, but you must update it to suit your needs. As it is a repository, you have full access to update the configuration as needed.
push
Once Skinny or Fat Jar have been created, to onboard the binaries and UDF definitions to the Acceldata Torch Platform, you can use the push command, which primarily accomplishes two things:
- Upload the binaries to a Global Store.
This Global Store is the same one that was set up when the Torch was installed because it needs to be accessible for the Spark Pod, Engine, and Torch to continue processing.
- Create or update the relevant server's UDF definition.
As per the current support, few samples have been provided. When creating a manifest, you can choose between an S3 or GCS template. This will enable you to create or update the definition and upload binaries. The Torch platform can be onboarded using the UDT repository and ADOC-CLI thanks to this process.
The content of the manifest will appear as shown below. You must provide configuration as needed.
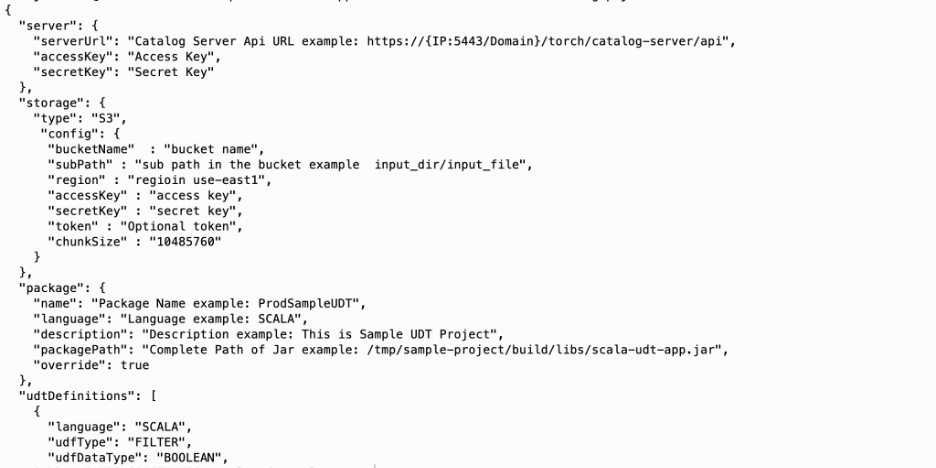
Manifest File Details
Once you have a manifest file with the UDT definition for skinny or fat binaries, you can then use the push command, which prompts for:
- e - the environment (e.g. dev, pre-prod, qa)
The placeholder for the above may be used later.
- m - the manifest file location
./adoc-cli-2.6.0-release-4-mac-amd64 udt push -e dev -m adoc-udt-manifest-gcp.json