Use the Ambari Cluster Install Wizard running in your browser to install, configure, and deploy your cluster by following the steps in the following sub-sections.
Start the Ambari Server
• Run the following command on the Ambari Server host: ambari-server start
xxxxxxxxxxroot@odp002:~# ambari-server startUsing python /usr/bin/pythonStarting ambari-serverAmbari Server running with administrator privileges.Organizing resource files at /var/lib/ambari-server/resources...Ambari database consistency check started...Server PID at: /var/run/ambari-server/ambari-server.pidServer out at: /var/log/ambari-server/ambari-server.outServer log at: /var/log/ambari-server/ambari-server.logWaiting for server start.............................................Server started listening on 8080 DB configs consistency check: no errors and warnings were found.Ambari Server 'start' completed successfully.• To check the Ambari Server processes: ambari-server status
• To stop the Ambari Server: ambari-server stop
On Ambari Server start, Ambari runs a database consistency check looking for issues. If any issues are found, Ambari Server start will abort and display the following message: DB configs consistency check failed.
Ambari writes more details about database consistency check results to the /var/log/ambari-server/ambari-server-check database.log file.
You can force Ambari Server to start by skipping this check with the following option: ambari-server start --skip-database-check
If you have database issues, by choosing to skip this check, do not make any changes to your cluster topology or perform a cluster upgrade until you correct the database consistency issues. Contact Acceldata Support and provide the ambari server-check-database.log output for assistance.
Log In to Apache Ambari
Prerequisites
Ambari Server must be running.
To log in to Ambari Web using a web browser:
Steps
- Point your web browser to
http://<your.ambari.server>:8080,where<your.ambari.server>is the name of your ambari server host.
For example, a default Ambari server host is located at http://odp002.acceldata.dev:8080.
- Log in to the Ambari Server using the default user name/password:
admin/admin. You can change these credentials later.
For a new cluster, the Cluster Install wizard displays a Welcome page.
Launch the Ambari Cluster Install Wizard
From the Ambari Welcome page, choose Launch Install Wizard.

Name Your Cluster
Steps
- In Name your cluster, type a name for the cluster you want to create. Use no white spaces or special characters in the name.
- Choose Next.
Select Version
In this Step, you will select the software version and method of delivery for your cluster. Using a Public Repository requires Internet connectivity. Using a Local Repository requires you have configured the software in a repository available in your network.
Choosing Stack
The available versions are shown in TABs. When you select a TAB, Ambari attempts to discover what specific version of that Stack is available. That list is shown in a DROPDOWN. For that specific version, the available Services are displayed, with their Versions shown in the TABLE.
Choosing Version
If Ambari has access to the Internet, the specific Versions will be listed as options in the DROPDOWN. Once you select the version from the drop-down, the repository URLs will be displayed. In the repository URLs, you must include the username:password (credentials).
If you have a Version Definition File for a version that is not listed, you can click Add Version… and upload the VDF file. If you are uploading the VDF file, make sure to append the credentials to the base URL. If you are providing the VDF URL, you must include the username:password in the URL.
In addition, a Default Version Definition is also included in the list if you do not have Internet access or are not sure which specific version to install.
For more information, see Opensuse Documentation
Choosing Repositories
Ambari gives you a choice to install the software from the Public Repositories (if you have Internet access) or Local Repositories. Regardless of your choice, you can edit the Base URL of the repositories. The available operating systems are displayed and you can add/remove operating systems from the list to fit your environment.
The UI displays repository Base URLs based on Operating System Family (OS Family). Be sure to set the correct OS Family based on the Operating System you are running.
redhat7 Red Hat 7, CentOS 7,
ubuntu20 Ubuntu 18/20
Advanced Options
There are advanced repository options available.
- Skip Repository Base URL validation (Advanced): When you click Next, Ambari will attempt to connect to the repository Base URLs and validate that you have entered a validate repository. If not, an error will be shown that you must correct before proceeding.
- Use RedHat Satellite/Spacewalk: This option will only be enabled when you plan to use a Local Repository. When you choose this option for the software repositories, you are responsible for configuring the repository channel in Satellite/Spacewalk and confirming the repositories for the selected stack version are available on the hosts in the cluster.
Using a local RedHat Satellite or Spacewalk Repository
Many Ambari users use RedHat Satellite or Spacewalk to manage Operating System repositories in their cluster. The general process to configure Ambari to work with your Satellite or Spacewalk infrastructure is to:
- Ensure you have created channels for the public repositories that correspond to the products you intend to use.
- Ensure the created channels are available on all machines in the cluster.
- Install the Ambari Server and start it.
- Before starting a cluster install, update Ambari so it knows not to delegate repository management to Satellite or Spacewalk, and use the appropriate channel names when installing or upgrading packages.
Configuring Ambari to use RedHat Satellite or Spacewalk
The Ambari Server uses Version Definition Files (VDF) to understand which product and component versions are included in a release. In order for Ambari to work well with Satellite or Spacewalk, you must create a custom VDF file for the specific Operating System versions in your cluster that tells Ambari which RedHat Satellite or Spacewalk channel names to use when installing or upgrading the cluster.
To create a custom VDF file, we recommend downloading an existing VDF from our ODP 3.2.3.1-3 Repositories table to your local desktop. Once downloaded, open the VDF file in your preferred editor and change the tags for each repository to match the Satellite or Spacewalk channel names previously configured. For this example, I’ve created the following channels in Satellite or Spacewalk:
Table 6.1. Example Channel Names for Acceldata Repositories
| Acceldata Repository | RedHat Satellite or Spacewalk Channel Name |
|---|---|
| ODP-3.2.2.0-1 | odp_3.2.2.0-1 |
| ODP-3.2-GPL* | odp_3.2_ gpl |
| ODP-UTILS-1.1.0.22 | odp_utils_ 1.1.0.22 |
If LZO compression is going to be used in your cluster, see Configuring LZO Compression for more information
xxxxxxxxxx<repository-info> <os family="redhat7"> <package-version>3_2_3_0_*</package-version> <repo> <baseurl> </baseurl> <repoid>ODP_3.2.3.1-3</repoid> <reponame>ODP</reponame> <unique>true</unique> </repo> <repo> <baseurl> </baseurl> <repoid>ODP_3.2.3.1-3_gpl</repoid> <reponame>ODP-GPL</reponame> <unique>true</unique> <tags> <tag>GPL</tag> </tags> </repo> <repo> <baseurl> </baseurl> <repoid>ODP-UTILS_1.1.0.22</repoid> <reponame>ODP-UTILS</reponame> <unique>false</unique> </repo> </os> </repository-info>Confirm Hosts
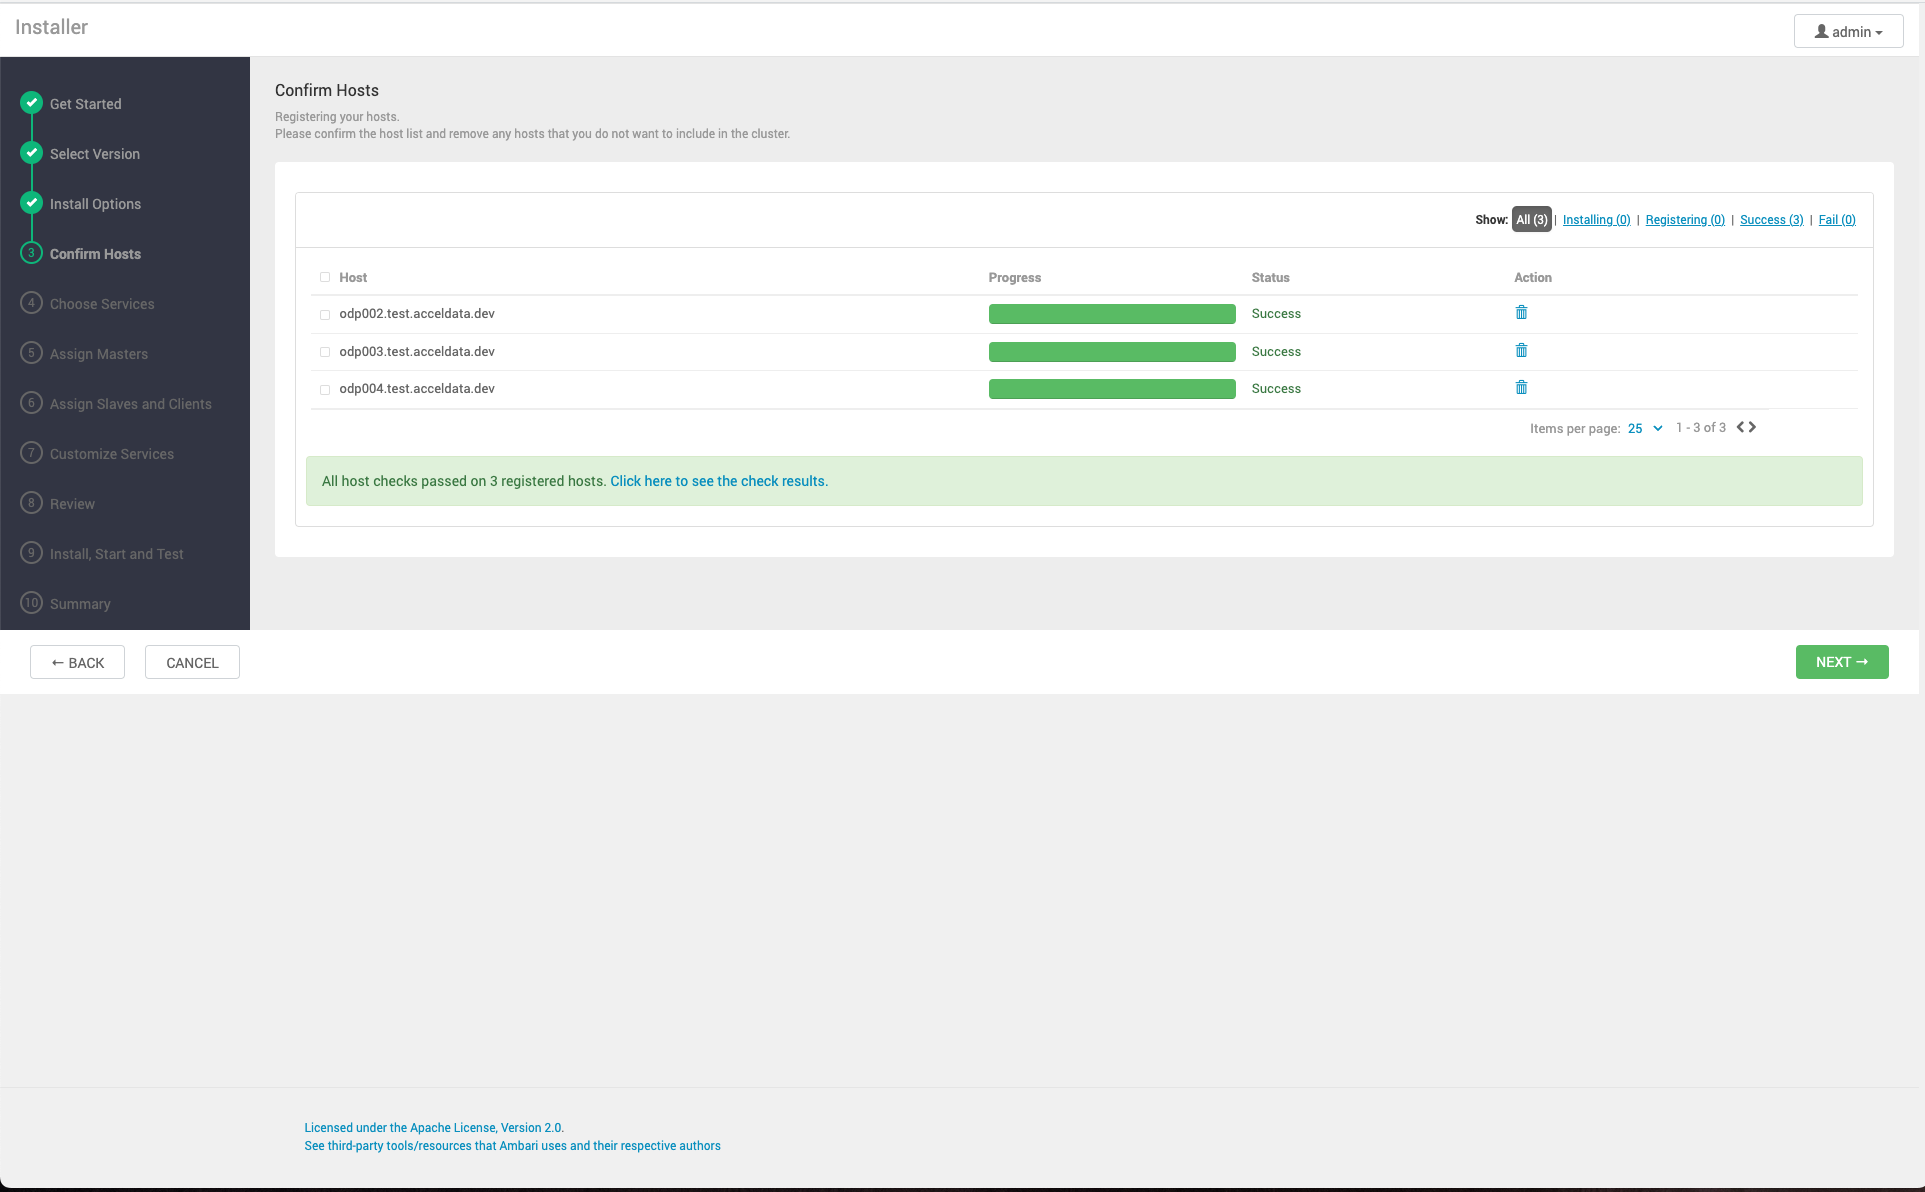
Confirm Hosts prompts you to confirm that Ambari has located the correct hosts for your cluster and to check those hosts to make sure they have the correct directories, packages, and processes required to continue the install.
If any hosts were selected in error, you can remove them by selecting the appropriate checkboxes and clicking the grey Remove Selected button. To remove a single host, click the small white Remove button in the Action column.
At the bottom of the screen, you may notice a yellow box that indicates some warnings were encountered during the check process. For example, your host may have already had a copy of wget or curl. Choose Click here to see the warnings to see a list of what was checked and what caused the warning. The warnings page also provides access to a python script that can help you clear any issues you may encounter and let you run
Rerun Checks
xxxxxxxxxxINFO 2014-04-02 04:25:22,669 NetUtil.py:55 - Failed to connect to https://<ambari-server>:8440/cert/ca due to [Errno 1] _ssl.c:492: error:100AE081:elliptic curve routines:EC_GROUP_new_by_curve_name:unknown groupWhen you are satisfied with the list of hosts, choose Next.
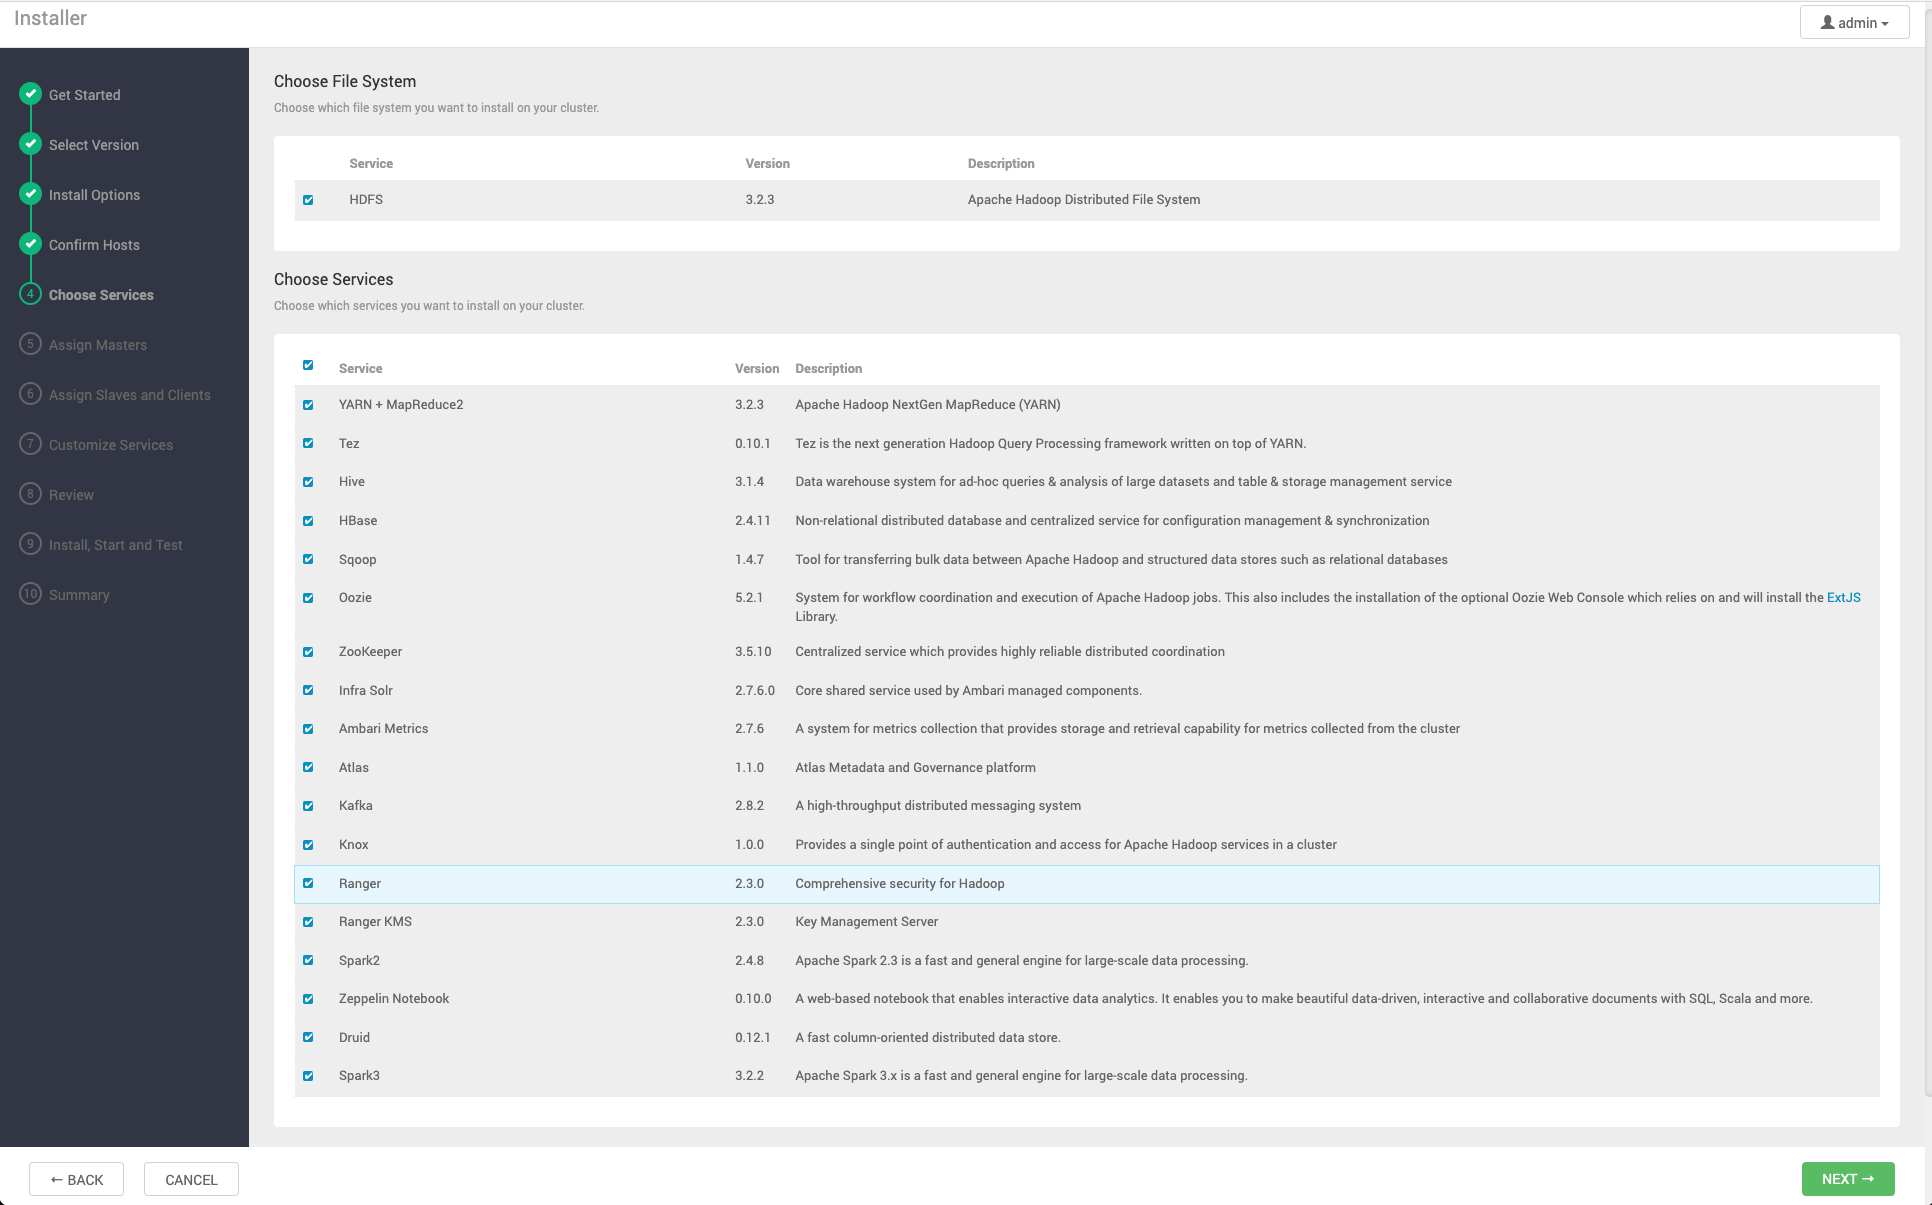
Choose Services
Based on the Stack chosen during the Select Stack step, you are presented with the choice of Services to install into the cluster. A Stack comprises many services. You may choose to install any other available services now, or to add services later. The Cluster Install wizard selects all available services for installation by default.
To choose the services that you want to deploy:
Steps
- Choose none to clear all selections, or choose all to select all listed services.
- Choose or clear individual check boxes to define a set of services to install now.
- After selecting the services to install now, choose Next.
Assign Masters
The Cluster Install wizard assigns the master components for selected services to appropriate hosts in your cluster and displays the assignments in Assign Masters. The left column shows services and current hosts. The right column shows current master component assignments by host, indicating the number of CPU cores and amount of RAM installed on each host.
- To change the host assignment for a service, select a host name from the drop-down menu for that service.
- To remove a ZooKeeper instance, click the green - icon next to the host address you want to remove.
- When you are satisfied with the assignments, choose Next.
Assign Slaves and Clients
The Cluster Install wizard assigns the slave components, such as DataNodes, NodeManagers, and RegionServers, to appropriate hosts in your cluster. It also attempts to select hosts for installing the appropriate set of clients.
Steps
- Use all or none to select all of the hosts in the column or none of the hosts, respectively. If a host has an asterisk next to it, that host is also running one or more master components. Hover your mouse over the asterisk to see which master components are on that host.
- Fine-tune your selections by using the check boxes next to specific hosts.
- When you are satisfied with your assignments, choose Next.
Customize Services
The Customize Services step presents you with a set of tabs that let you review and modify your cluster setup. The Cluster Install wizard attempts to set reasonable defaults for each of the options. You are strongly encouraged to review these settings as your requirements might be more advanced.
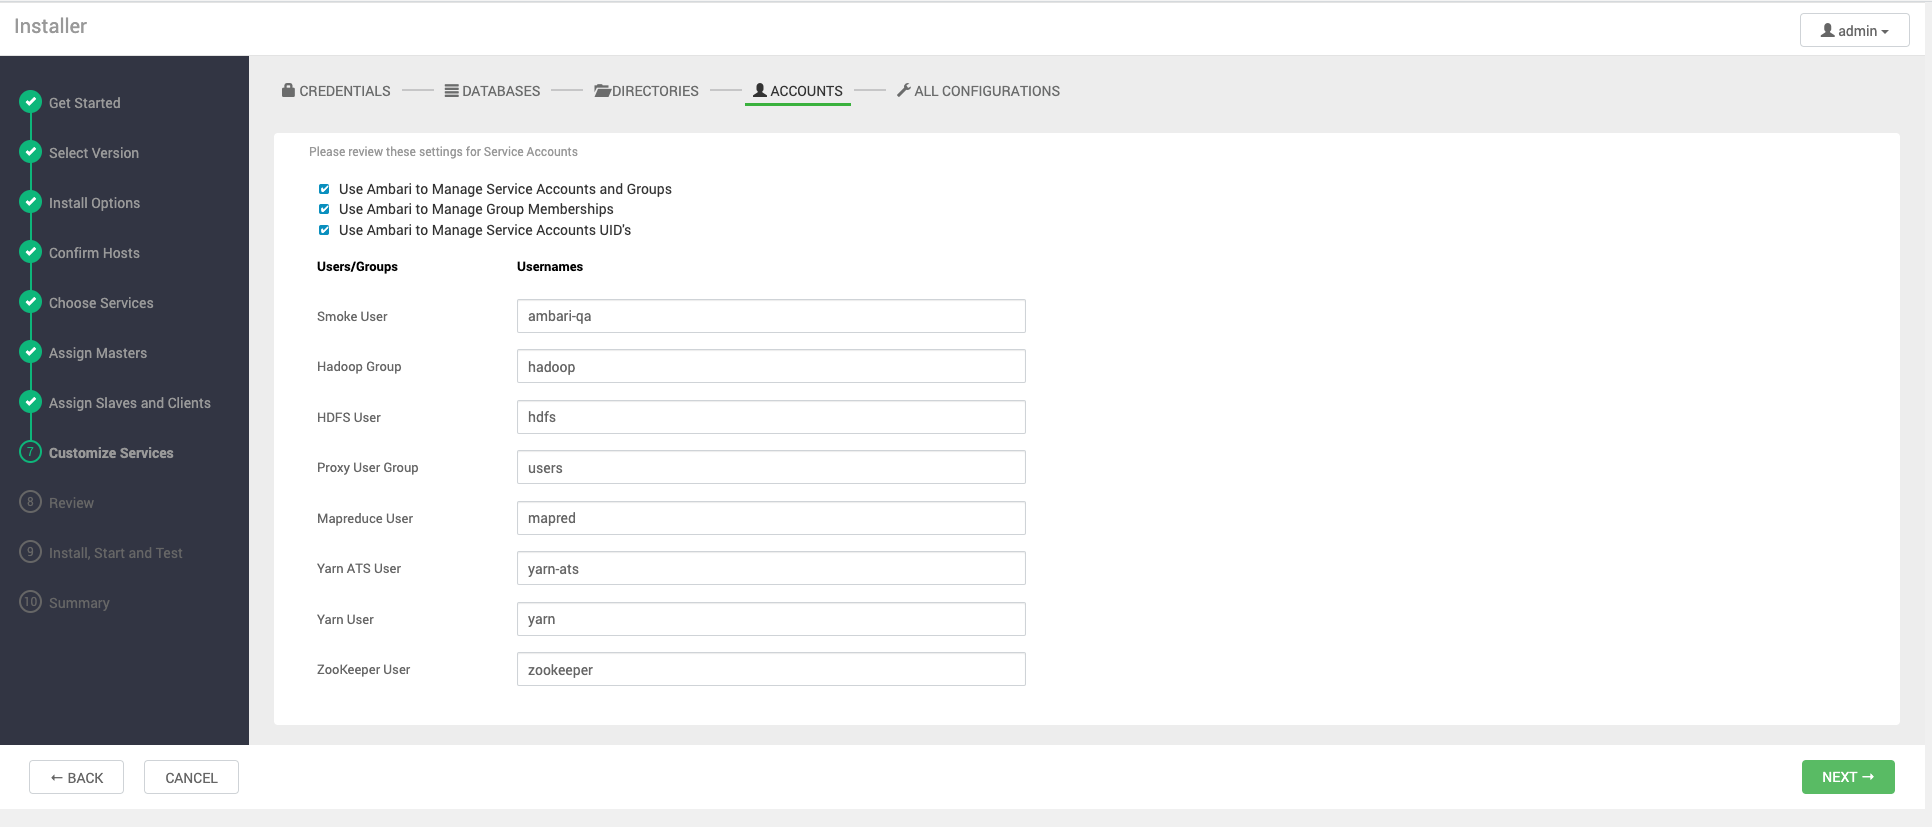
Ambari will group the commonly customized configuration elements together into four categories: Credentials, Databases, Directories, and Accounts. All other configuration will be available in the All Configurations section of the Installation Wizard
Credentials
Passwords for administrator and database accounts are grouped together for easy input. Depending on the services chosen, you will be prompted to input the required passwords for each item, and have the option to change the username used for administrator accounts.
Databases
Some services require a backing database to function. For each service that has been chosen for install that requires a database, you will be asked to select which database should be used and configure the connectivity details for the selected database.
Directories
Choosing the right directories for data and log storage is critical. Ambari chooses reasonable defaults based on the mount points available in your environment but you are strongly encouraged to review the default directory settings recommended by Ambari. In particular, confirm directories such as /tmp and /var are not being used for odpS NameNode directories and DataNode directories under the odpS tab.
Accounts
The service account users and groups are also configurable from the Accounts tab. These are the operating system accounts the service components will run as. If these users do not exist on your hosts, Ambari will automatically create the users and groups locally on the hosts. If these users already exist, Ambari will use those accounts.
Depending on how your environment is configured, you might not allow groupmod or usermod operations. If this is the case, there are multiple options to choose how Ambari should handle user creation and modification:
Use Ambari to Manage Service Accounts and Groups
- Use Ambari to Manage Group Memberships: Ambari will create the service accounts and groups that are required for each service if they do not exist in /etc/ password, and in /etc/group of the Ambari Managed hosts.
- Use Ambari to Manage Service Accounts UID's: Ambari will add or remove the service accounts from groups.
- All Configurations: Ambari will be able to change the UID’s of all service accounts.
Here you have an opportunity to review and revise the remaining configurations for your services. Browse through each configuration tab. Hovering your cursor over each of the properties, displays a brief description of what the property does. The number of service tabs shown here depends on the services you decided to install in your cluster. Any service with configuration issues that require attention will show up in the bell icon with the number properties that need attention.
The bell popover contains configurations that require your attention, configurations that are highly recommended to be reviewed and changed, and configurations that will be automatically changed based on Ambari’s recommendations unless you choose to opt out of those changes. Required Configuration must be addressed in order to proceed on to the next step in the Wizard. Carefully review the required and recommended settings and address issues before proceeding
After you complete Customizing Services, choose Next.
Review
Review displays the assignments you have made. Check to make sure everything is correct. If you need to make changes, use the left navigation bar to return to the appropriate screen.
To print your information for later reference, choose Print. To export the blueprint for this cluster, choose Generate Blueprint. When you are satisfied with your choices, choose Deploy.
Install, Start, and Test
The progress of the install displays on the screen. Ambari installs, starts, and runs a simple test on each component. Overall status of the process displays in progress bar at the top of the screen and host-by-host status displays in the main section. Do not refresh your browser during this process. Refreshing the browser may interrupt the progress indicators.
To see specific information on what tasks have been completed per host, click the link in the Message column for the appropriate host. In the Tasks pop-up, click the individual task to see the related log files. You can select filter conditions by using the Show drop-down list. To see a larger version of the log contents, click Open or to copy the contents to the clipboard, use Copy.
When Successfully installed and started the services appears, choose Next.
Complete
The Summary page provides you with a summary list of the accomplished tasks. Choose Complete. Ambari Web opens in your web browser.