
Management packs allow you to deploy a range of services to your Ambari-managed cluster. You can use a management pack to deploy a specific component or service.
Accessing ODP Repositories
The ODP mpacks can be accessed via the links listed below:
Installing Management Pack
In general, when working on installing management packs, perform the following steps :
Download Mpack file.
Install the management pack using
ambari-server install-mpack --mpack=[service_mpack.gz] --verbose.
Restart the Ambari Server
ambari-server restart.Add service from Ambari UI.
Select host(s) for respective component(s).
Start all stopped or required services.
Uninstalling Management Pack
To uninstall ambari mpack, perform the following steps:
Login to Ambari service UI and go to respective service section.
Stop respective service and delete permanently.
Uninstall the service from CLI using
ambari-server uninstall-mpack --mpack-name=[service_mpack.gz].
Restart the Ambari Server
ambari-server restart.
Hue
Install Hue with Ambari using the following management pack created by Acceldata for ODP clusters.
Component(s) | Component Version | ODP Stack Version |
|---|---|---|
Apache Ambari | 2.7.8.x | 3.2.3.3-2 |
Apache Hue | 4.10.0 | 3.2.3.3-2 |
Version Key: hue-4.10.0.3.2.3.3-2.tar.gz - Hue-4.10.0 mpack, compatible with ODP 3.2.3.3-2 release.
Usage Notes: Minimal installation requires Ambari, HDFS, Hive, Tez, Yarn, and Zookeeper.
Install Hue Mpack
To install Ambari Hue Mpack, perform the following:
Download the branch from the code and zip with tar.gz extension.
Upload the gzipped file to the ambari-server.
Execute the below command for installation:
Login to the Ambari UI and navigate to Add Hue service.
Select the hosts for Hue Server components.
Start all stopped or required services.
Hue Custom Database
To create a Hue custom database, perform the following:
Get the database details.
Create the Hue database and configure the Hue user along with your own password.
Example Using Hue with MySQL
Create a new user in MySQL:
Log in to MySQL as the root user:
Create a new database for Hue:
Create a new user for Hue:
Grant all privileges to the new user on all databases:
Flush privileges to apply changes:
Note Ensure to replace $HUEUSER with the desired Hue username and $HUEPASSWORD with the desired Hue user password.
Uninstall Hue Mpack
To uninstall Ambari Hue Mpack, perform the following steps:
Login to Ambari Service and Navigate to Hue Section:
Access the Ambari service web interface.
Navigate to the Hue section in the Ambari dashboard.
Stop the Hue Service and Delete Permanently:
Locate the option to stop the Hue service in the Ambari dashboard.
Stop the Hue service and confirm the action.
Delete the Hue service permanently from the Ambari dashboard.
Open a terminal or command prompt on the Ambari server.
Run the following command to uninstall the Hue Mpack:
Replace hue-ambari.mpack with the actual name of the Hue Mpack if it differs.
Restart the Ambari Server:
After uninstalling the Hue Mpack, restart the Ambari server to apply the changes.
These steps will uninstall the Ambari Hue Mpack from your Ambari service.
Troubleshooting Steps for Hue Known Issues
Issue 1: If you see the following error message in the Hue logs, set the configuration mentioned in the solution proposed below.
Solution: Uncomment and set the following config as shown in Advanced hue.ini.
Issue 2: Unable to find the mysql-devel package for Hue in RHEL 9.
Solution: Enable the CRB repository on the node where Hue is installed to fulfill the mysql-devel requirement, as it is provided by this repository.
Troubleshooting Hue KT Renewer Kerberos Issue
If you come across the following error message in Hue, there are chances that the max_renewable_life and max_life properties will be missing. Make sure to add these properties to the configuration file.
For CentOS/RHEL:
On the KDC host, add the
max_renewable_lifeandmax_lifeproperties in the configuration file.
Once added and saved, restart KDC and KAdmin (use the following commands) and regenerate keytabs followed by restarting the Hue service from the Ambari UI.
For Ubuntu:
On the KDC host, add the
max_renewable_lifeandmax_lifeproperties in the configuration file.
Once added and saved, restart KDC and KAdmin (use the following commands) and regenerate keytabs followed by restarting the Hue service from the Ambari UI.
The KT_Renewer is triggered only when the properties under [[kerberos]] in the hue.ini configuration in Ambari are properly filled with details either manually or using the latest Mpack, which auto-populates the properties.
Impala
Install Impala with Ambari using the following management pack created by Acceldata for ODP clusters.
Component(s) | Component Version | ODP Stack Version | Binary URL |
|---|---|---|---|
Apache Ambari | 2.7.8.x | 3.2.3.3-2 | |
Apache Impala | 4.1.2 | 3.2.3.3-2 |
Install Impala Mpack
To install Impala Mpack, perform the following steps:
Download the branch from the code repository and compress it into a tar.gz file.
Upload the compressed file to the Ambari server.
Execute the following command to install the Mpack:
Restart the Ambari server:
Log in to the Ambari UI and navigate to Add Impala service.
Select hosts for the Catalog and Statestore components.
Choose daemons from the host list and proceed with service deployment to complete the installation.
Start any stopped or required services to finalize the installation.
Uninstall Impala Mpack
To uninstall Ambari Impala Mpack, perform the following:
Login to Ambari Service and Navigate to Impala Section:
Access the Ambari service web interface.
Navigate to the Impala section in the Ambari dashboard.
Stop the Impala Service and Delete Permanently:
Locate the option to stop the Impala service in the Ambari dashboard.
Stop the Impala service and confirm the action.
Delete the Impala service permanently from the Ambari dashboard.
Execute Uninstallation Command:
Open a terminal or command prompt on the Ambari server.
Run the following command to uninstall the Impala Mpack:
Replace ambari-impala-mpack with the actual name of the Impala Mpack if it differs.
Restart the Ambari Server:
After uninstalling the Impala Mpack, restart the Ambari server to apply the changes:
These steps uninstall the Ambari Impala Mpack from your Ambari service.
Impala Authorization
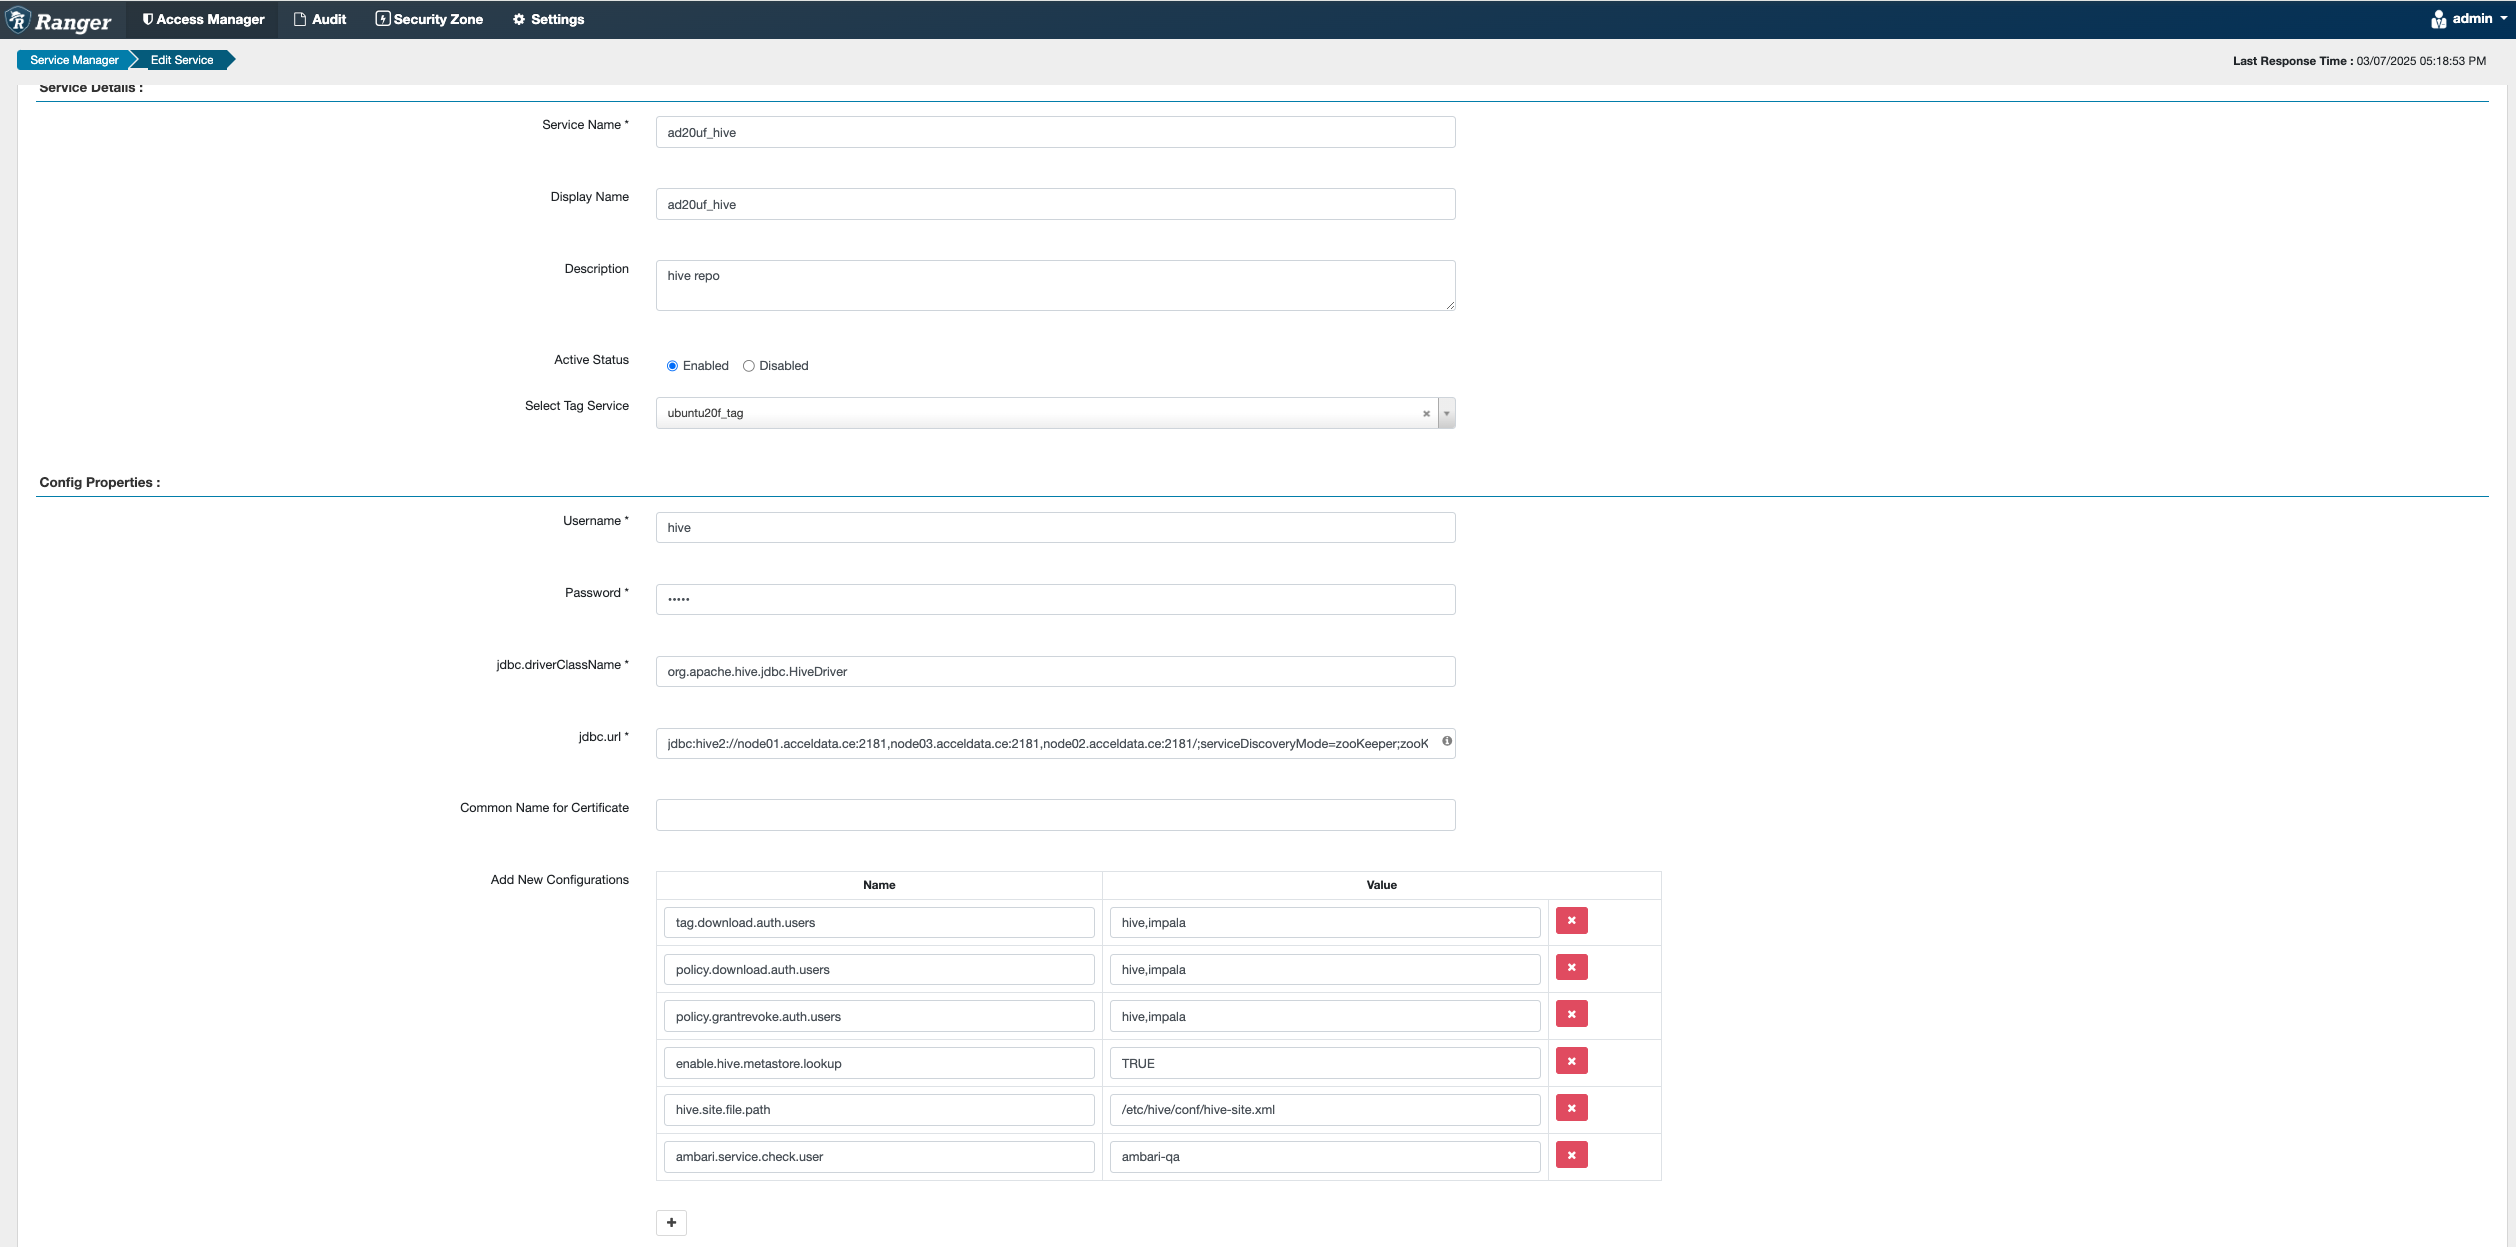
Impala supports the Ranger-based authorization. In the Ranger Service Manager, users can leverage the preloaded Hadoop SQL resource-based and tag-based services and policies to manage Impala access control. To ensure automatic population of service caches and policies, install the Hive Client on nodes hosting the Impala components. Additionally, configure and validate the Ranger Hadoop SQL service to enable the Impala user to download policies.
Troubleshooting Steps for Impala Known Issues
Issue 1: Ranger Authorization Enablement
The file ranger-hive-security.xml is missing in all daemons except on Hive servers, leading to start failures. Additionally, if audit is enabled, the file ranger-hive-audit.xml is also unavailable.
Solution
Copy the ranger-hive-security.xml and ranger-hive-audit.xml files from hive-servers to /etc/hive/conf/ as enabled with Ranger.
Issue 2: Solr Audit Enablement
When Solr is enabled for Ranger audit, daemons fail to start on infra-solr-clients due to broken symlinks in the underlying impala-solr libraries.
Solution
To resolve the issue of broken symlinks for Solr in the impala-solr libraries, install ambari-infra-solr on all daemons.
Issue 3: Missing Ranger Cache Policies
Missing cache policies on other launched daemons or Impala components.
Solution
Create Ranger policy cache directories under /etc/ranger/conf and copy the policy cache files from the respective policy directories.
Accessing Impala Web UI Consoles
Each of the Impala daemons (impalad, statestored, and catalogd) includes a built-in web server that displays diagnostic and status information.
Catalogd WebUI Console
The catalogd Web UI includes information about the databases, tables, and other objects managed by Impala, in addition to the resource usage and configuration settings of the catalogd. Because there is only a single instance of the catalogd within any Impala cluster, you access the Web UI only on the particular host that serves as the Impala Catalog Server.
Statesoted WebUI Console
The statestored Web UI includes information about memory usage, configuration settings, and ongoing health checks performed by statestored. Because there is only a single instance of the statestored within any Impala cluster, you can access the Web UI only on a particular host that serves as the Impala StateStore.
Impald WebUI Console
The impalad Web UI includes information about configuration settings, running and completed queries, and associated performance and resource usage for queries. In particular, the Details link for each query displays alternative views of the query including a graphical representation of the plan, and the output of the EXPLAIN, SUMMARY, and PROFILE statements from impala-shell. Each host that runs the impalad daemon has its own instance of the Web UI, with details about those queries for which that host served as the coordinator. The impalad Web UI is primarily used for diagnosing query problems that can be traced to a particular node.
For more information about accessing the Impala Web interface, see Impala Web User Interface for Debugging.
NiFi
Install NiFi with Ambari using the following management pack created by Acceldata for ODP clusters.
Component(s) | Component Version | ODP Stack Verison |
|---|---|---|
Apache Ambari | 2.7.8.x | 3.2.3.3-2 |
Apache NiFi | 1.23.2 | 3.2.3.3-2 |
Apache NiFi-Registry | 1.23.2 | 3.2.3.3-2 |
Version Key
nifi-1.23.2.tar.gz - nifi-1.23.2 mpack
Usage Notes
Minimal installation requires Ambari, HDFS, and Zookeeper.
Install NiFi Mpack
To install Ambari NiFi Mpack, perform the following steps:
Download the branch from the code repository and compress it into a tar.gz file.
Upload the compressed file to the Ambari server.
Execute the following command to install the Mpack:
Restart the Ambari server:
Log into the Ambari UI and navigate to Add NiFi service.
Select hosts for the NiFi components.
Start any stopped or required services to finalize the installation.
Uninstall NiFi Mpack
To uninstall Ambari NiFi Mpack, perform the following steps:
Login to Ambari Service and Navigate to NiFi Section:
Access the Ambari service web interface.
Navigate to the NiFi section in the Ambari dashboard.
Stop the NiFi Service and Delete Permanently:
Locate the option to stop the NiFi service in the Ambari dashboard.
Stop the NiFi service and confirm the action.
Delete the NiFi service permanently from the Ambari dashboard.
Execute Uninstallation Command:
Open a terminal or command prompt on the Ambari server.
Run the following command to uninstall the NiFi Mpack:
Restart the Ambari Server:
After uninstalling the NiFi Mpack, restart the Ambari server to apply the changes:
These steps will uninstall the Ambari NiFi Mpack from your Ambari service.
Troubleshooting Steps for NiFi Known Issues
Issue 1: User Group Management for Ambari 2.8 & ODP 3.x.
Solution
Run the following Python code before installing NiFi:
Replace the CLUSTER_NAME and CLUSTER_FQDN with the correct names.
Kafka 3
Install Kafka 3 with Ambari using this management pack created by Acceldata for ODP clusters.
Component | Component Version | ODP Version |
|---|---|---|
Kafka 3 | 3.7.1 | 3.2.3.3-2 |
Install Kafka 3 Mpack
To install Ambari Kafka 3 Mpack, perform the following steps:
Download the branch from the code repository and compress it into a tar.gz file.
Upload the compressed file to the Ambari server.
Execute the following command to install the Mpack.
After running above commands you can see this message.
The Ambari server restarts.
Log in to the Ambari UI and navigate to Add Kafka3 service.
Select hosts for the Kafka 3 Server and client components.
Start any stopped or required services to finalise the installation.
Uninstall Kafka 3 Mpack
To uninstall the Ambari Kafka 3 Mpack, perform the following steps:
Log in to the Ambari service and navigate to the Kafka 3 section:
Access the Ambari service web interface.
Navigate to the Kafka 3 section in the Ambari dashboard.
Stop the Kafka 3 service and delete it permanently:
Locate the option to stop the Kafka 3 service in the Ambari dashboard.
Stop the Kafka 3 service and confirm the action.
Delete the Kafka 3 service permanently from the Ambari dashboard.
Execute the Uninstallation command:
Open a terminal or command prompt on the Ambari server.
Run the following command to uninstall the Kafka 3 Mpack.
Restart the Ambari server:
After uninstalling the Kafka 3 Mpack, restart the Ambari server to apply the changes.
These steps uninstall the Ambari Kafka 3 Mpack from your Ambari service.
Flink
Install Flink with Ambari using this management pack created by Acceldata for ODP clusters.
Component | Component Version | ODP Stack Version |
|---|---|---|
Flink | 1.19.1 | 3.2.3.3-2 |
Install Flink Mpack
To install Ambari Flink Mpack, perform the following steps:
Download the branch from the code repository and compress it into a tar.gz file.
Upload the compressed file to the Ambari server.
Execute the following command to install the Mpack.
After running above commands you can see this message.
The Ambari server restarts.
Log into the Ambari UI and navigate to Add Flink service.
Select hosts for the Flink History Server and client components.
Start any stopped or required services to finalise the installation.
Uninstall Flink Mpack
To uninstall the Ambari Flink Mpack, perform the following steps:
Log in to the Ambari service and navigate to the Flink section:
Access the Ambari service web interface.
Navigate to the Flink section in the Ambari dashboard.
Stop the Flink service and delete it permanently:
Locate the option to stop the Flink service in the Ambari dashboard.
Stop the Flink service and confirm the action.
Delete the Flink service permanently from the Ambari dashboard.
Execute the Uninstallation command:
Open a terminal or command prompt on the Ambari server.
Run the following command to uninstall the Flink Mpack.
Restart the Ambari server:
After uninstalling the Flink Mpack, restart the Ambari server to apply the changes.
These steps uninstall the Ambari Flink Mpack from your Ambari service.
Spark 3
Install Spark3 with Ambari using this management pack created by Acceldata for ODP clusters.
Component(s) | Component Version | ODP Stack Version |
|---|---|---|
Apache Ambari | 2.7.8.x | 3.2.3.3-2 |
Apache Spark | 3.5.1 | 3.2.3.3-2 |
Version Key
spark3_mpack-3.5.1.tar.gz - Spark3.5.1 mpack, compatible with ODP 3.2.3.3-2 release.
Usage Notes
Minimal installation requires Ambari, HDFS, Hive, Tez, Yarn, and Zookeeper.
Install Spark 3 Mpack
To install Ambari Spark 3 Mpack, perform the following steps:
Download the branch from the code repository and compress it into a tar.gz file.
Upload the compressed file to the Ambari server.
Execute the following command to install the Mpack:
In case you find the following errors, run the following commands as mentioned:
In case of the above failures, run the installation command:
After running the above commands, the following message is shown:
Log in to the Ambari UI and navigate to Add Spark 3 service.
Select hosts for the Spark thrift and client components.
Start any stopped or required services to finalize the installation.
Uninstall Spark 3 Mpack
To uninstall Ambari Spark 3 Mpack, perform the following steps:
Login to Ambari Service and Navigate to Spark 3 Section:
Access the Ambari service web interface.
Navigate to the Spark 3 section in the Ambari dashboard.
Stop the Spark 3 Service and Delete Permanently:
Locate the option to stop the Spark 3 service in the Ambari dashboard.
Stop the Spark 3 service and confirm the action.
Delete the Spark 3 service permanently from the Ambari dashboard.
Execute Uninstallation Command:
Open a terminal or command prompt on the Ambari server.
Run the following command to uninstall the Spark 3 Mpack:
Restart the Ambari Server:
After uninstalling the Spark 3 Mpack, restart the Ambari server to apply the changes:
These steps will uninstall the Ambari Spark 3 Mpack from your Ambari service.
Troubleshooting Steps for Spark 3 Known Issues
Issue 1: Issue in User Group Management for Ambari 2.8 & ODP 3.x.
Solution
Run the following Python command before installing Spark 3:
Replace the [CLUSTER_NAME] __and __[CLUSTER_FQDN] in the command above with the correct names.
HttpFS
Component Version | ODP Stack Version | |
|---|---|---|
Apache | Ambari 2.7.8.x | 3.2.3.3-2 |
HttpFS | 2.7.1 | 3.2.3.3-2 |
Ambari HttpFS Service
This is a straightforward Ambari extension for the HttpFS HDFS service.
Supported Operating Systems: Any
Tested with Ambari Server 2.7.8.2-2.
Install HttpFS Mpack
To install Ambari HttpsFS Mpack, perform the following steps:
Download the branch from the code repository and compress it into a tar.gz file.
Upload the compressed file to the Ambari server.
Execute the following command to install the Mpack:
Restart the Ambari Service:
Log in to the Ambari UI and navigate to Add HttpFS service.
Select hosts for the Httpfs Server components.
Start any stopped or required services to finalize the installation.
Uninstall HttpFS Mpack
To uninstall Ambari HttpFS Mpack, perform the following steps:
Login to Ambari Service and Navigate to HttpFS Section:
Access the Ambari service web interface.
Navigate to the HttpFS section in the Ambari dashboard.
Stop the HttpFS Service and Delete Permanently:
Locate the option to stop the HttpFS service in the Ambari dashboard.
Stop the HttpFS service and confirm the action.
Delete the HttpFS service permanently from the Ambari dashboard.
Execute Uninstallation Command:
Open a terminal or command prompt on the Ambari server.
Run the following command to uninstall the HttpFS Mpack:
Restart the Ambari Server:
After uninstalling the Impala Mpack, restart the Ambari server to apply the changes:
These steps will uninstall the Ambari HttpFS Mpack from your Ambari service.
Troubleshooting Steps for HttpFS Known Issues
Issue 1 : Bug in User Group Management for Ambari 2.8 & ODP 3.x.
Solution
Run the following Python command before installing HttpFS:
Ensure the correct [CLUSTER_NAME] and [CLUSTER_FQDN] names are used.
License: Apache License version 2.0
Ozone
Install Ozone with Ambari using this management pack created by Acceldata. Note Ozone provided in this distribution supports HA only.
Version Key
ozone-1.4.0.tar.gz - Ozone 1.4.0 mpack, compatible from ODP v3.2.3.0-2 release onwards
Usage Notes
Minimal install required Ambari
For Authentication integration it is compatible with Kerberos
For Authorization integration it requires Ranger with auditing disabled due to performance issues in upstream.
Install Ozone Mpack
To install Ambari Ozone Mpack, perform the following steps:
Download the branch from the code repository and compress it into a tar.gz file.
Upload the compressed file to the Ambari server.
Execute the following command to install the Mpack:
After running the above commands, the following message is shown:
Create Service Symlink directory:
Restart the Ambari service:
Log in to the Ambari UI and navigate to Add Ozone service.
Select atleast three hosts for the Ozone Manager, three hosts for Storage Container Manager, hosts for S3 gateway, host for Recon server, and atleast three nodes for Data node.
Configure Ozone as per your use case and deploy the service.
Start any stopped or required services to finalize the installation.
Uninstall Ozone Mpack
To uninstall Ambari Ozone Mpack, perform the following steps:
Login to Ambari Service and Navigate to Ozone Section:
Access the Ambari service web interface.
Navigate to the Ozone section in the Ambari dashboard.
Stop the Ozone Service and Delete Permanently:
Locate the option to stop the Ozone service in the Ambari dashboard.
Stop the Ozone service and confirm the action.
Delete the Ozone service permanently from the Ambari dashboard.
Execute Uninstallation Command:
Open a terminal or command prompt on the Ambari server.
Run the following command to uninstall the Ozone Mpack:
Restart the Ambari Server:
After uninstalling the Ozone Mpack, restart the Ambari server to apply the changes:
Registry
Install Schema Registry with Ambari using this management pack created by Acceldata for ODP Clusters.
Version Key
registry-1.0.0.tar.gz - Registry 1.0.0 mpack, compatible from ODP v3.2.3.1-2 release onwards.
Usage Notes
Minimal installation requires Ambari.
For authentication integration it is compatible with Knox, OAUTH2 and Kerberos.
For authorization integration it requires Ranger and for audit enablement it requires HDFS.
Install Registry Mpack
To install Ambari Registry Mpack, perform the following steps:
Download the branch from the code repository and compress it into a tar.gz file.
Upload the compressed file to the Ambari server.
Execute the following command to install the Mpack:
After running the above commands, the following message is shown:
But it requires a few symlink changes before Ambari server restart:
Log in to the Ambari UI and navigate to Add Registry service.
Select hosts for the Registry Server components.
Start any stopped or required services to finalize the installation.
Uninstall Registry Mpack
To uninstall Ambari Schema Registry Mpack, perform the following steps:
Login to Ambari Service and Navigate to Schema Registry Section:
Access the Ambari service web interface.
Navigate to the Schema Registry section in the Ambari dashboard.
Stop the Spark 3 Service and Delete Permanently:
Locate the option to stop the Schema Registry service in the Ambari dashboard.
Stop the Registry service and confirm the action.
Delete the Registry service permanently from the Ambari dashboard.
Execute Uninstallation Command:
Open a terminal or command prompt on the Ambari server.
Run the following command to uninstall the Registry Mpack:
Restart the Ambari Server:
After uninstalling the Schema Registry Mpack, restart the Ambari server to apply the changes:
These steps uninstall the Schema Registry Mpack from your Ambari service.
Airflow
Install Apache Airflow with Ambari using this management pack created by Acceldata for ODP clusters.
Version Key
Apache Airflow 2.8.1 - Apache Airflow 1.0.0 mpack, compatible from ODP v3.3.0 release onwards.
Usage Notes
Minimal installation requires Ambari.
For Authentication integration it is compatible with LDAP and Kerberos
Install Apache Airflow Mpack
To install Airflow Mpack, perform the following steps:
Download the branch from the code repository and compress it into a tar.gz file.
Upload the compressed file to the Ambari server.
Execute the following command to install the Mpack:
After running the above command, the following message is shown:
Change Simlinks before restarting the Ambari Server:
Log in to the Ambari UI and navigate to Add Apache Airflow service.
Select hosts for the Apache Airflow server components.
Start any stopped or required services to finalize the installation.
Uninstall Ambari Airflow Mpack
To uninstall Ambari Airflow Mpack, perform the following steps:
Login to Ambari Service and Navigate to Apache Airflow Section:
Access the Ambari service web interface.
Navigate to the Apache Airflow section in the Ambari dashboard.
Stop the Apache Airflow Servers and Delete Permanently:
Locate the option to stop the Apache Airflow service in the Ambari dashboard.
Stop the Airflow service and confirm the action.
Delete the Airflow service permanently from the Ambari dashboard.
Execute Uninstallation Command:
Open a terminal or command prompt on the Ambari server.
Run the following command to uninstall the Apache Airflow Mpack:
Restart the Ambari Server:
After uninstalling the Airflow Mpack, restart the Ambari server to apply the changes:
Isilon OneFS
README for Isilon Ambari Management Pack 1.0.3.0 for OneFS
The Isilon Ambari Management Pack for OneFS is a software component that integrates OneFS as a service into a Hadoop cluster via Ambari. This management pack allows an Ambari administrator to manage OneFS as a HDFS storage service, providing native namenode and datanode capabilities similar to traditional HDFS. The management pack is OneFS release-independent and can be updated between releases if necessary.
Prerequisites
This management pack is compatible with the following OneFS versions:
OneFS 8.1.2
OneFS 8.2.0
OneFS 8.2.1
OneFS 8.2.2
OneFS 9.0.0
Install OneFS Mpack
To install the Isilon management pack, perform the following steps:
Run the installation command:
Update the symbolic links for the OneFS service:
Restart the Ambari Server:
After running the above commands, you will see the following message:
To uninstall the management pack, run the following command:
Then, remove the following directories:
Important Notes
A performance issue with OneFS and Ambari has been identified when Apache HBase is configured. Setting the
hbase.wal.providervalue tofilesystemresolves this issue.When installing the 1.0.3.0 Ambari Management Pack on a Hadoop cluster with a new deployment of ODP, the
hbase.wal.providervalue will be automatically set tofilesystem.If the Hadoop cluster already has Ambari and HBase configured, the
hbase.wal.providervalue must be manually configured in the Ambari UI. Follow these steps to configure it:Log in to the Ambari UI.
Click the 'HBase' service in the left panel, then click the Configs tab, and finally click the Advanced tab.
In the Custom hbase-site section, look for the
hbase.wal.providerkey. If it does not exist, add it by clicking Add Property.Enter the following in the Properties field:
hbase.wal.provider=filesystemClick ADD and then Save to save the configuration. Restart Ambari if prompted to apply the setting.
Resolved Issues
Setting the
hbase.wal.providervalue tofilesystemin the Ambari UI resolves the performance issue.The OneFS Release Notes can be found on the customer support site: Support for PowerScale OneFS | Overview | Dell US
The following documents, available on the customer support site, provide instructions for downloading and installing the Ambari Management Pack for Isilon OneFS:
Upgrade Isilon Mpack
Run the following commands to upgrade to Isilon Ambari Management Pack 1.0.3.0 and then to restart the Ambari server:
Kudu
Install Kudu with Ambari using this management pack created by Acceldata for ODP clusters.
Installing Kudu Mpack
To install Kudu Mpack, perform the following steps:
Download the branch from the code repository and compress it into a tar.gz file.
Upload the compressed file to the Ambari server.
Execute the following command to install the Mpack:
After running the above command, the following message is shown:
Log on to the Ambari UI and add the Kudu service.
Select the hosts for Kudu Masters and Tablet Servers. You must select at least one of each, with up to a recommendation of up to 100 tablet servers. You must select an odd number for a minimum of 3 master servers.
Uninstall Kudu Mpack
To uninstall Ambari Kudu Mpack, perform the following steps:
Log in to the Ambari UI and navigate to the Kudu section.
Stop the Kudu service, then delete the service.
Run the following command to remove the Kudu mpack.
Restart the Ambari Server to apply the changes.
Pinot
Install Pinot with Ambari using this management pack created by Acceldata for ODP clusters.
Install Pinot Mpack
To install Pinot Mpack, perform the following steps:
Component Version | ODP Stack Version | |
|---|---|---|
Apache | Ambari 2.7.8.x | 3.2.3.3-2 |
Pinot | 1.3.0 | 3.2.3.3-2 |
Download the branch from the code repository and compress it into a tar.gz file.
Upload the compressed file to the Ambari server.
Execute the following command to install the Mpack:
Log into the Ambari UI and add the Pinot service.
Select the hosts for Pinot Masters, Servers, Brokers, and Minions.
Uninstall Pinot Mpack
To uninstall Ambari Pinot Mpack, perform the following steps:
Log into the Ambari UI and navigate to the Pinot section.
Stop the Pinot service, then delete the service.
Run the following command to remove the Pinot mpack.
Restart the Ambari Server to apply the changes.
Trino
Install Trino with Ambari using this management pack created by Acceldata for ODP clusters.
Install Trino Mpack
To install Trino Mpack, perform the following steps:
Component Version | ODP Stack Version | |
|---|---|---|
Apache | Ambari 2.7.8.x | 3.2.3.3-2 |
Trino | 472 | 3.2.3.3-2 |
Download the branch from the code repository and compress it into a tar.gz file.
Upload the compressed file to the Ambari server.
Execute the following command to install the Mpack:
Log into the Ambari UI and add the Trino service.
Select the hosts for Trino Masters, Servers, Brokers, and Minions.
Uninstall Trino Mpack
To uninstall Ambari Trino Mpack, perform the following steps:
Log into the Ambari UI and navigate to the Trino section.
Stop the Trino service, then delete the service.
Run the following command to remove the Trino mpack.
Restart the Ambari Server to apply the changes.
JupyterHub
Install the JupyterHub with Ambari using this management pack created by Acceldata for ODP clusters.
Version Key
Jupyterhub 5.2.1 - Jupyterhub 5.2.1 mpack
Usage Notes
Minimal installation requires Ambari.
For Authentication integration it is compatible with LDAP and Kerberos
Install the JupyterHub Mpack
To install the JupyterHub Mpack, perform the following steps:
Component Version | ODP Stack Version | |
|---|---|---|
Apache | Ambari 2.7.8.x | 3.2.3.3-2 |
JupyterHub | 5.2.1 | 3.2.3.3-2 |
Download the branch from the code repository and compress it into a tar.gz file.
Upload the compressed file to the Ambari server.
Execute the following command to install the Mpack:
After running the above command, the following message is shown:
Log into the Ambari UI and navigate to add the JupyterHub service.
Select hosts for the JupyterHub server components.
Start any stopped or required services to finalize the installation.
For detailed steps about installing JupyterHub, see JupyterHub.
Uninstall Ambari JupyterHub Mpack
To uninstall JupyterHub Mpack, perform the following steps:
Login to Ambari Service and Navigate to JupyterHub Section:
Access the Ambari service web interface.
Navigate to the JupyterHub section in the Ambari dashboard.
Stop the Apache JupyterHub Servers and Delete Permanently:
Locate the option to stop the JupyterHub service in the Ambari dashboard.
Stop the JupyterHub service and confirm the action.
Delete the JupyterHub service permanently from the Ambari dashboard.
Execute Uninstallation Command:
Open a terminal or command prompt on the Ambari server.
Run the following command to uninstall the JupyterHub Mpack:
Restart the Ambari Server:
After uninstalling the JupyterHub Mpack, restart the Ambari server to apply the changes: