
Installing a Default Database
MySQL
Before you begin:
Determine the appropriate database version and obtain the release drivers and .jar file.
On the Ambari Server host, Download the MySQL Connector/JDBC driver from MySQL
Install the respective driver jar package.
Note Here is a sample installation guide for MySQL 8.x database and the respective connector jar.
RHEL 8/9:
Ubuntu 20/22:
After ensuring that the prerequisites have been met, proceed by following the provided steps below:
Configure and start the database service.
Edit binding-address from 127.0.0.1 to the host of database service, in
/etc/mysql/mysql.conf.d/mysqld.cnf.Start MySQL using the
service mysql start.Confirm that .jar is in the Java share directory. For example:
ls /usr/share/java/mysql- connector-java.jarMake sure the .jar file has the appropriate permissions - 644. For example:
chmod 644 /usr/share/java/mysql-connector-j-8.0.32.jar
Create a user for your service and grant it permissions using the MySQL database admin utility.
Postgres SQL
Before you begin
Determine the appropriate database version and obtain the release drivers and .jar file.
On the Ambari server host, Download the PostgreSQL JDBC Driver from PostgreSQL.
Install respective driver jar package.
Note Here is a sample installation for the Postgres 12.17 database, Postgres 15.5 database, and the respective connector jar.
RHEL 8/9:
Note You can also get the Postgres jdbc jar from https://jdbc.postgresql.org/download/postgresql-42.7.1.jar using the command wgethttps://jdbc.postgresql.org/download/postgresql-42.7.1.jar and then by moving the jar to /usr/share/java/.
Once the prerequisites are met, perform the following steps:
Configure and start the database service:
Edit
/var/lib/pgsql/12/data/postgresql.confto include
Note Additionally, in version 12.17, it is necessary to modify the authentication method from "indent" to "md5" in the configuration file located at /var/lib/pgsql/12/data/pg_hba.conf. This change switches the authentication method to use a password.
Start the service:
Create a user for your service and grant it the necessary permissions:
Edit
/var/lib/pgsql/12/data/pg_hba.confto include new service users
Here is an example:
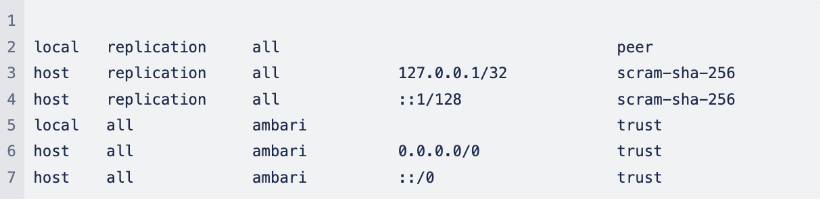
Note Restart the PostgreSQL service every time after editing the file /var/lib/pgsql/12/data/pg_hba.conf.
Maria DB
Before you begin
Determine the appropriate database version and obtain the release drivers and .jar file.
Install the respective driver jar package.
Note Here is a sample installation guide for the MariaDB database.
RHEL 8/9
Note All MySQL connectors work unchanged with MariaDB. Hence, refer to MySQL section to install the JDBC connector jar and provide the necessary permissions.
After the necessary permissions are given, create a user for your service and grant the necessary permissions as shown below:
OracleDB
Before you begin
Determine the appropriate database version and obtain the release drivers and .jar file.
On the Ambari server host, download the Oracle JDBC (OJDBC) Driver from Oracle.
Note Here is a sample installation and setup guide for the OracleDB database and the respective connector jar.
After performing the above shown action, configure and start the database. Following this, create a user for your service and grant the respective permissions as shown below:
Example: Install MariaDB for Use with Multiple Components
Before deploying an Ambari-managed cluster, set up a secure MariaDB database and db users for each component with sufficient permissions.
Before you begin
Determine the appropriate database version and obtain the release drivers and .jar file.
Note This example is specific for the RHEL 8/9 OS system. For production setups, please consider installing the database instance on a dedicated host and configuring master-slave replication.
Procedure
Once the prerequisites are met, perform the following steps:
On a dedicated host, download the MySQL Connector or JDBC driver from MySQL.
Install MySQL packages and configure them to start on boot as shown below:
Secure the installation.
/usr/bin/mysql_secure_installationCreate a database and users, as shown below. Here, "%" signifies any host on your domain. Add localhost permissions explicitly.
Install the driver on the Ambari host.
Using an Existing Database with Services
Ambari
Other than the embedded PostgreSQL database instance that Ambari Server uses by default, the Ambari Sever can be set up with externally installed databases.
Note Refer to the respective instructions for databases like MySQL, PostgreSQL, MariaDB, and OracleDB to perform the following steps.
Validate if the database service is installed and up.
On the Ambari Server host, stage the appropriate JDBC driver file.
Run
ambari-server setup --jdbc-db=<database> --jdbc-driver=/path/to/jdbc-driver.jarwhere <database> is ‘oracle’, ‘mysql’ or ‘postgres’.Create an Ambari service user and database, where [USERNAME] is the ambari user name, [PASSWORD] is the ambari user password, and [DATABASE_NAME] is the ambari user database.
Load the Ambari Server database schema.
You must pre-load the Ambari database schema into your MySQL or MariaDB database using the schema script. Run the script in the same location where you find the Ambari-DDL-MySQL-CREATE.sql file. You must find the Ambari-DDL-MySQL-CREATE.sql file in the /var/lib/ambari-server/resources/ directory of the Ambari Server host, after you install the Ambari Server.
MySQL/MariaDB
PostgreSQL
Oracle
Now, start the Ambari server using ambari-server start.
Hive
Note Refer to the respective instructions for databases like MySQL, PostgreSQL, MariaDB, and OracleDB to carry out the following steps:
Validate if the database service is installed and up.
On the Ambari Server host, stage the appropriate JDBC driver file.
Create a hive service user and database, where [USERNAME] is the hiveuser name, [PASSWORD] is the hive user password, and [DATABASE_NAME] is the hive user database.
NiFi Registry
Note Refer to the respective instructions for databases like MySQL, PostgreSQL, MariaDB, and OracleDB to carry out the following steps:
Validate if the database service is installed and up.
On the Ambari Server host, stage the appropriate JDBC driver file.
Create a registry service user and database where [USERNAME] is the registry user name, [PASSWORD] is the registry user password, and [DATABASE_NAME] is the registry user database.
Schema Registry
Note Refer to the respective instructions for databases like MySQL, PostgreSQL, MariaDB, and OracleDB to carry out the following steps:
Validate if the database service is installed and up.
On the Ambari Server host, stage the appropriate JDBC driver file.
Create a schema registry service user and database, where [USERNAME] is the schema registry user name, [PASSWORD] is the schema registry user password, and [DATABASE_NAME] is the schema registry user database.
Airflow
Note Refer to the respective instructions for databases like MySQL, PostgreSQL, MariaDB, and OracleDB to carry out the following steps:
Validate if the database service is installed and up.
On the Ambari Server host, stage the appropriate JDBC driver file.
Create an airflow service user and database where [USERNAME] is the airflow user name, [PASSWORD] is the airflow user password, and [DATABASE_NAME] is the airflow user database.
Ranger
Note Refer to the respective instructions for databases like MySQL, PostgreSQL, MariaDB, and OracleDB to carry out the following steps:
Validate if the database service is installed and up.
On the Ambari Server host, stage the appropriate JDBC driver file.
Create a ranger service user and database, where [USERNAME] is the ranger user name, [PASSWORD] is the ranger user password, and [DATABASE_NAME] is the ranger user database.
Ranger KMS
Note Refer to the respective instructions for databases like MySQL, PostgreSQL, MariaDB, and OracleDB to carry out the following steps:
Validate if the database service is installed and up.
On the Ambari Server host, stage the appropriate JDBC driver file.
Create a rangerkms service user and database, where [USERNAME] is the ranger user name, [PASSWORD] is the rangerkms user password, and [DATABASE_NAME] is the rangerkms user database.