
Overview
This documentation provides a comprehensive guide to setting up an HAProxy load balancer for HiveServer2 in a high-availability (HA) environment. This page covers installation, configuration, and optional Kerberos integration for secure deployments. Additionally, it addresses the necessity of using configs.py to update the Hive properties, as changes cannot be made directly via Ambari in this setup. Additionally, it highlights the importance of connecting to HiveServer2 exclusively through the load balancer due to Kerberos principal configurations.
Architecture Overview
Nodes Involved:
HiveServer2 Node 1: hive-node1.example.com
HiveServer2 Node 2: hive-node2.example.com
Load Balancer Node: lb-node.example.com
High-Level Diagram:
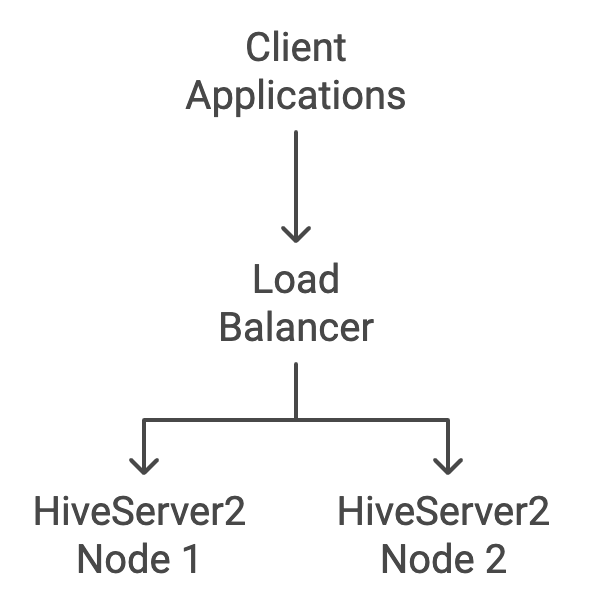
This diagram illustrates the flow of client requests through the load balancer to the HiveServer2 nodes.
Prerequisites
HAProxy Version: The latest version available in the repository.
Administrative Access: The root or sudo privileges.
Ambari Server Access: For updating configurations using configs.py.
Install HAProxy
Install HAProxy
Install HAProxy on the Load Balancer node (lb-node.example.com) using the following command.
Verify the installation
Verify the HAProxy installation using the following command.
You must see the HAProxy version information displayed.
Configure HAProxy
Back up the default configuration
Back up the original HAProxy configuration file before making changes.
Edit HAProxy Configuration
Open the HAProxy configuration file for editing:
Add HiveServer2 Load Balancing Configuration
Insert the following configuration into the file.
Save and Exit
Press Esc, then type :wq and press Enter to save the changes and exit the editor.
Configuration Breakdown
Global Section:
Sets global parameters like logging, maximum connections, and process IDs.
Defaults Section:
Defines the default settings for all frontends and backends, such as timeouts and logging.
Frontend ( hiveserver2_front ):
Listens on port 10000 for incoming HiveServer2 client connections.
Uses TCP mode for handling binary protocols.
Backend ( hiveserver2_back ):
Contains the list of HiveServer2 servers to load balance.
Uses source IP balancing to maintain session persistence
Kerberos Integration (Optional)
If your environment uses Kerberos authentication, follow these steps to integrate Kerberos with the load-balanced HiveServer2 setup.
Create Load Balancer Principal
Connect to your Kerberos Key Distribution Center (KDC) server and add a principal for the load balancer.
Within the kadmin.local prompt, execute:
Replace EXAMPLE.COM with your actual Kerberos realm.
Generate Keytab for Load Balancer
Still within the kadmin.local prompt:
Merge Keytabs
Gather the HiveServer2 keytabs from both nodes and the load balancer keytab. Use ktutil to merge them.
Collect Keytabs
From hive-node1.example.com :
/etc/security/keytabs/hive.service.keytabFrom hive-node2.example.com :
/etc/security/keytabs/hive.service.keytab(rename to hive.service.keytab_node2)From KDC Server:
/etc/security/keytabs/loadbalancer.keytab
Merge Using Ktutil
Set Permissions
Distribute Merged Keytab
Copy hive.ha.keytab to /etc/security/keytabs/ on both HiveServer2 nodes.
Update the Hive Configuration using Config.py
Directly updating the Hive properties via Ambari UI is not possible in this setup. Instead, use the configs.py script provided by Ambari to modify the configuration properties.
Locate Config.py
The configs.py script is typically located at: /var/lib/ambari-server/resources/scripts/configs.py.
Update the Hive Properties
You can use the following commands to update the Hive properties on the Ambari server.
Replace Variables
Replace
adminwith your Ambari admin username.Replace
admin_passwordwith your Ambari admin password.Replace
lb-node.example.comwith your Ambari server hostname.Replace
YOUR_CLUSTER_NAMEwith the name of your cluster.Replace
EXAMPLE.COMwith your Kerberos realm.
Update Kerberos Principal
Update the Kerberos Keytab Location
Verify the Configuration Changes
To ensure that the properties have been updated, you can retrieve the current configuration:
Finalizing the Setup
Restart the Hive Services via Ambari UI
After updating the configurations, restart the Hive services on both nodes via the Ambari UI to apply the changes.
Access Ambari UI:
Open a web browser and navigate to the Ambari web interface (e.g., http://lb-node.example.com:8080).
Log in to Ambari:
Enter your Ambari admin username and password.
Navigate to the Hive Service:
Click on the Hive service from the list of services.
Restart the Hive Service:
Click on the Service Actions button and select Restart All.
Confirm Restart:
Follow the prompts to confirm and initiate the restart process.
Start and Enable HAProxy
Start the HAProxy service and enable it to start on boot.
Verify the HAProxy Status
Check the status to ensure it's running without issues.
Test the Load Balancer
Use Beeline or a third-party tool to connect to HiveServer2 via the load balancer.
Beeline Example
Replace EXAMPLE.COM with your Kerberos realm, if applicable.
Due to Kerberos configuration, the HiveServer2 principal is updated to use the load balancer's hostname (lb-node.example.com). Therefore, direct connections to the individual HiveServer2 nodes (hive-node1.example.com or hive-node2.example.com) will not work with third-party tools or Beeline. Always connect to HiveServer2 through the load balancer (lb-node.example.com). All client applications must be configured to communicate exclusively with the load balancer to ensure proper load distribution and high availability.