
Overview
User Management or Role-Based Access Control (RBAC) in Pulse enables administrators to govern user access to Pulse and integrated services. With RBAC, administrators can limit the operations that other users perform. For example, an Apache Spark developer can only be given access to Spark-related integrations in the Hadoop stack.
Navigation
In the Pulse UI, go to Admin in the bottom-left pane.
Select Manage Accounts.
The Roles dashboard opens. You can select different tabs or switch to other dashboards.
The following table shows the roles and privileges given to that role.
Access | Admin | User |
|---|---|---|
Create role | ✅ | ❌ |
Create user | ✅ | ❌ |
Update ro | ✅ | ❌ |
Update user | ✅ | ❌ |
Assign page permissions | ✅ | ❌ |
Delete role | ✅ | ❌ |
Delete user | ✅ | ❌ |
Create SSH key | ✅ | ❌ |
Delete SSH key | ✅ | ❌ |
Create active directory groups and users | ✅ | ❌ |
View active directory groups and users | ✅ | ❌ |
View dashboard metrics | ✅ | ✅ |
View service status | ✅ | ✅ |
View alert notifications | ✅ | ✅ |
Roles Dashboard
The Roles dashboard displays the following tabs.
Roles
A role represents the level of privileges and authorization related to the user.
The following details are displayed in the Roles dashboard.
Column Name | Description |
|---|---|
Name | The name of the role |
YARN queues | The list of YARN queues the role is a part of |
YARN users | The list of YARN users |
AD groups | The list of active directory groups |
Creating a Role
To create a role, perform the following:
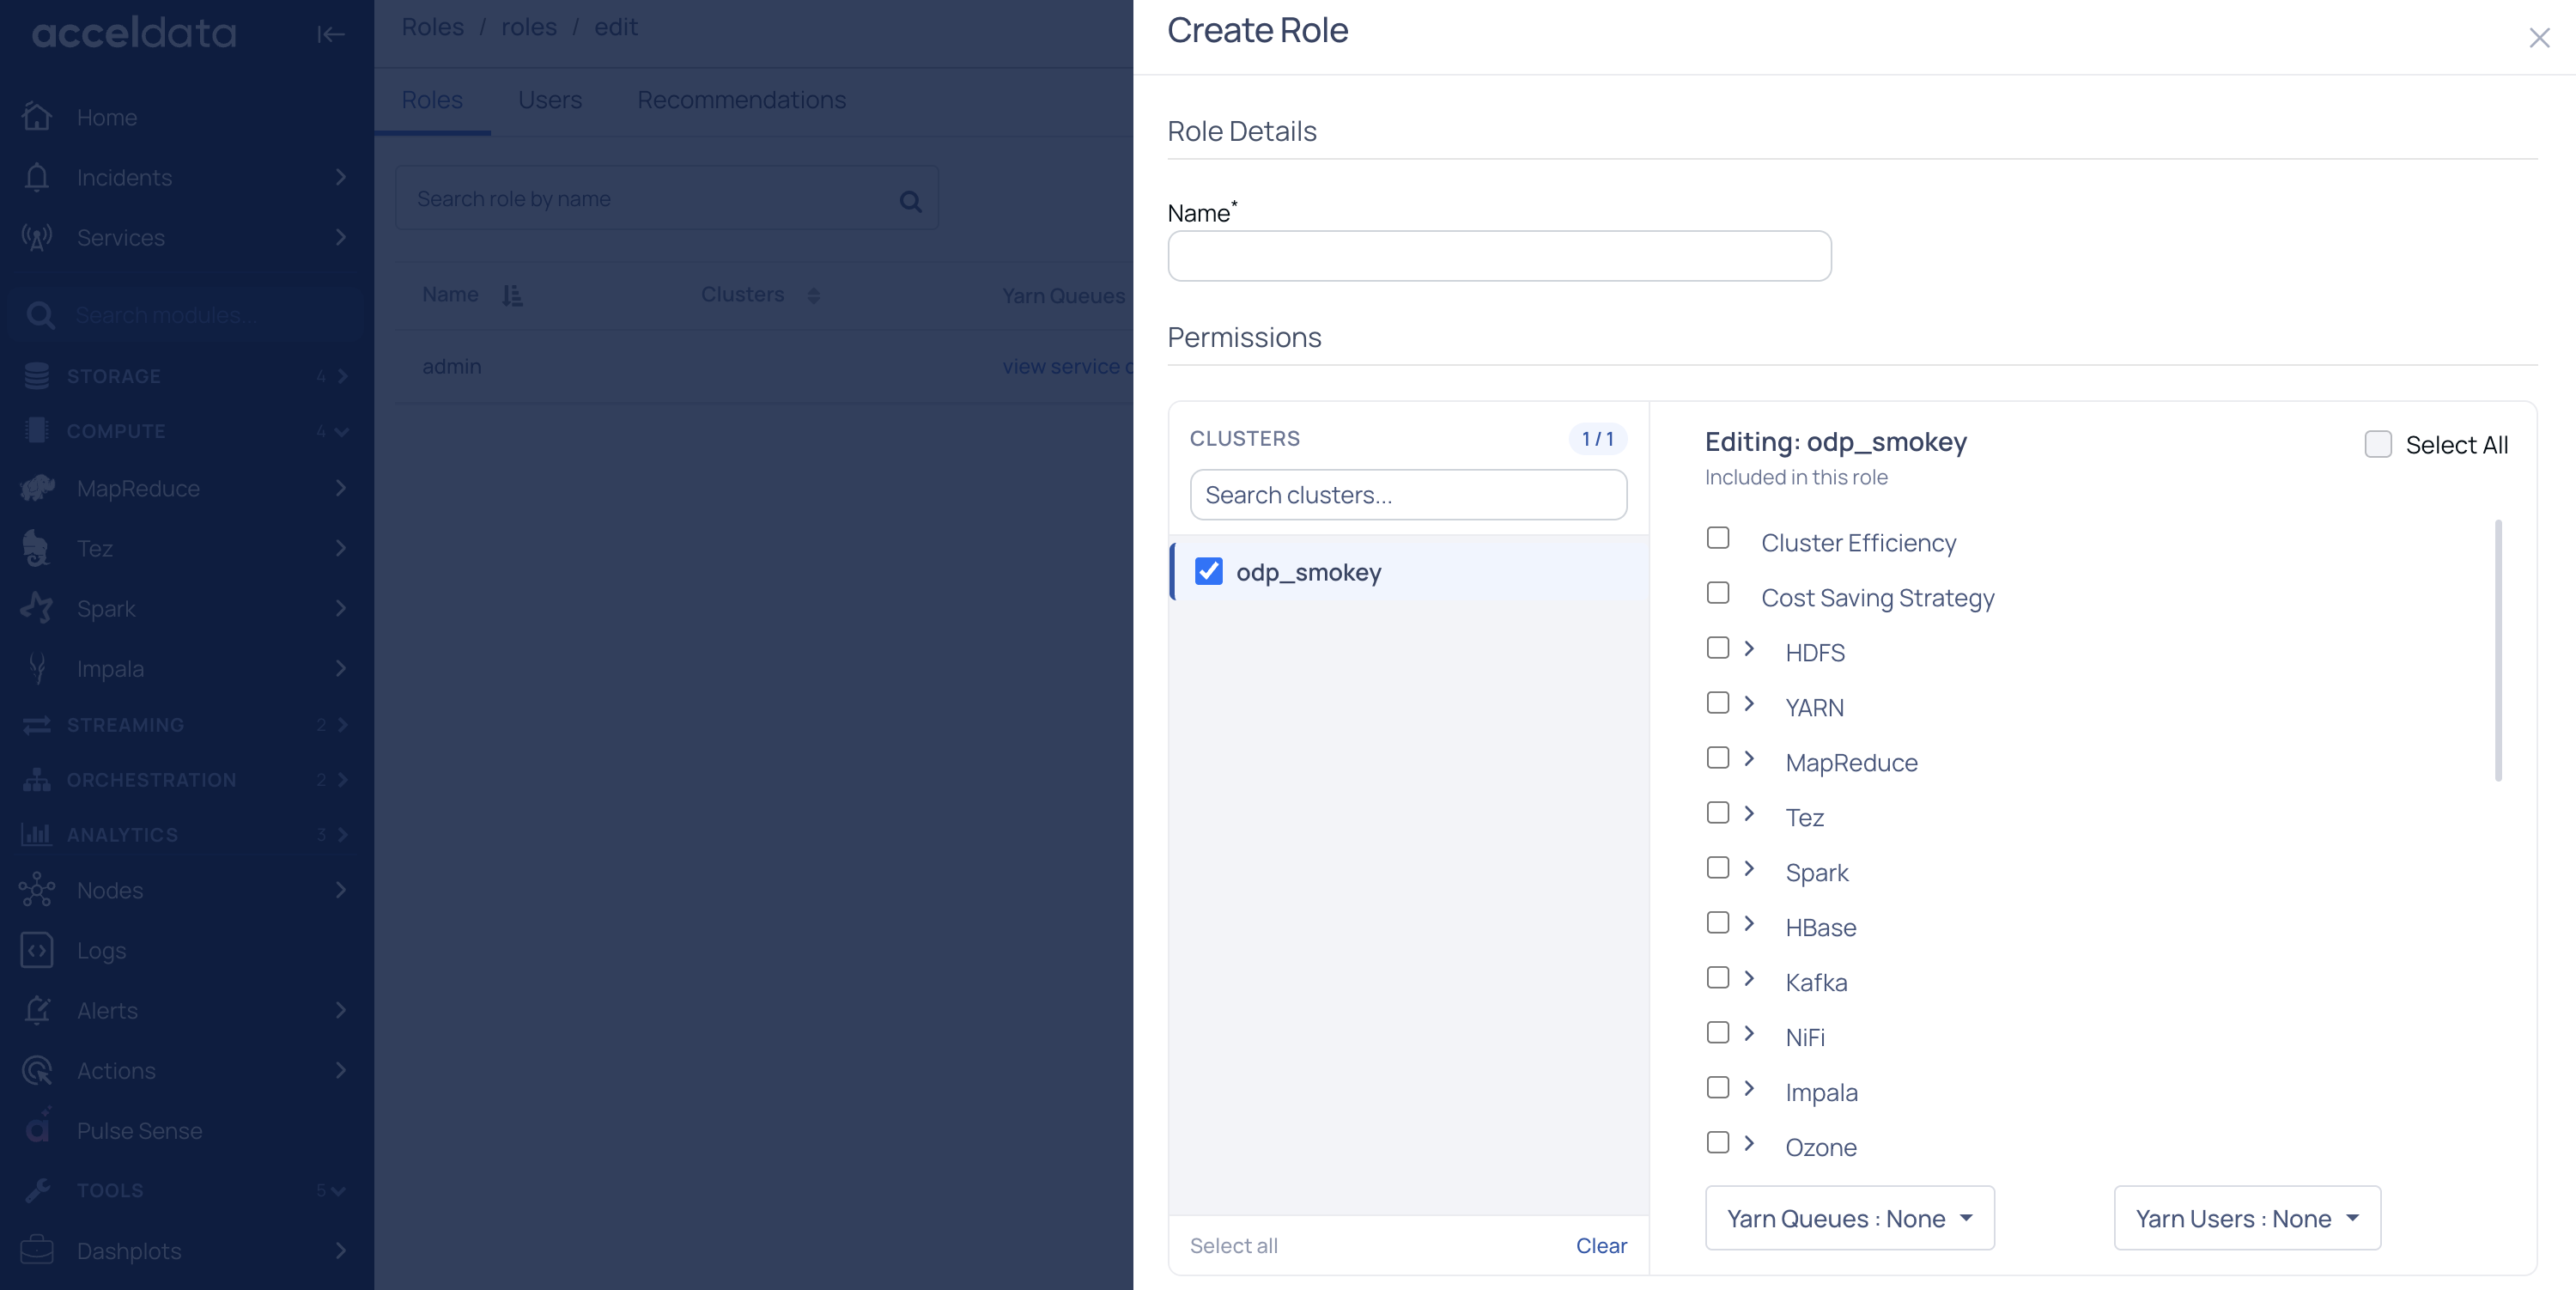
Click the Create Role button. The Create Role wizard is displayed.
Fill the following role assignment details.
Role Details
Name: The name of the role.
Permissions
Page Permissions: The list of services and pages to enable for the role. Click the checkbox next to these services and pages you want to enable. You can also expand the list of services and select specific modules to assign to that role.
All Clusters: Click the drop-down menu and select the clusters for which you would like to add queues and users for. Individual panels are displayed for the clusters selected.
Queues: The list of queues in YARN. Select the queue name from the list and press enter. You can assign multiple queues to a role.
Users: The list of users to assign to a role. Select the user from the list and press enter. You can assign multiple users to a role.
AD Mapping
Groups: The group of users in the Active Directory. Type the name of a group you want to add and press enter. You can add multiple groups to an active directory.
Click Save.
The new role is created.
Viewing Role details
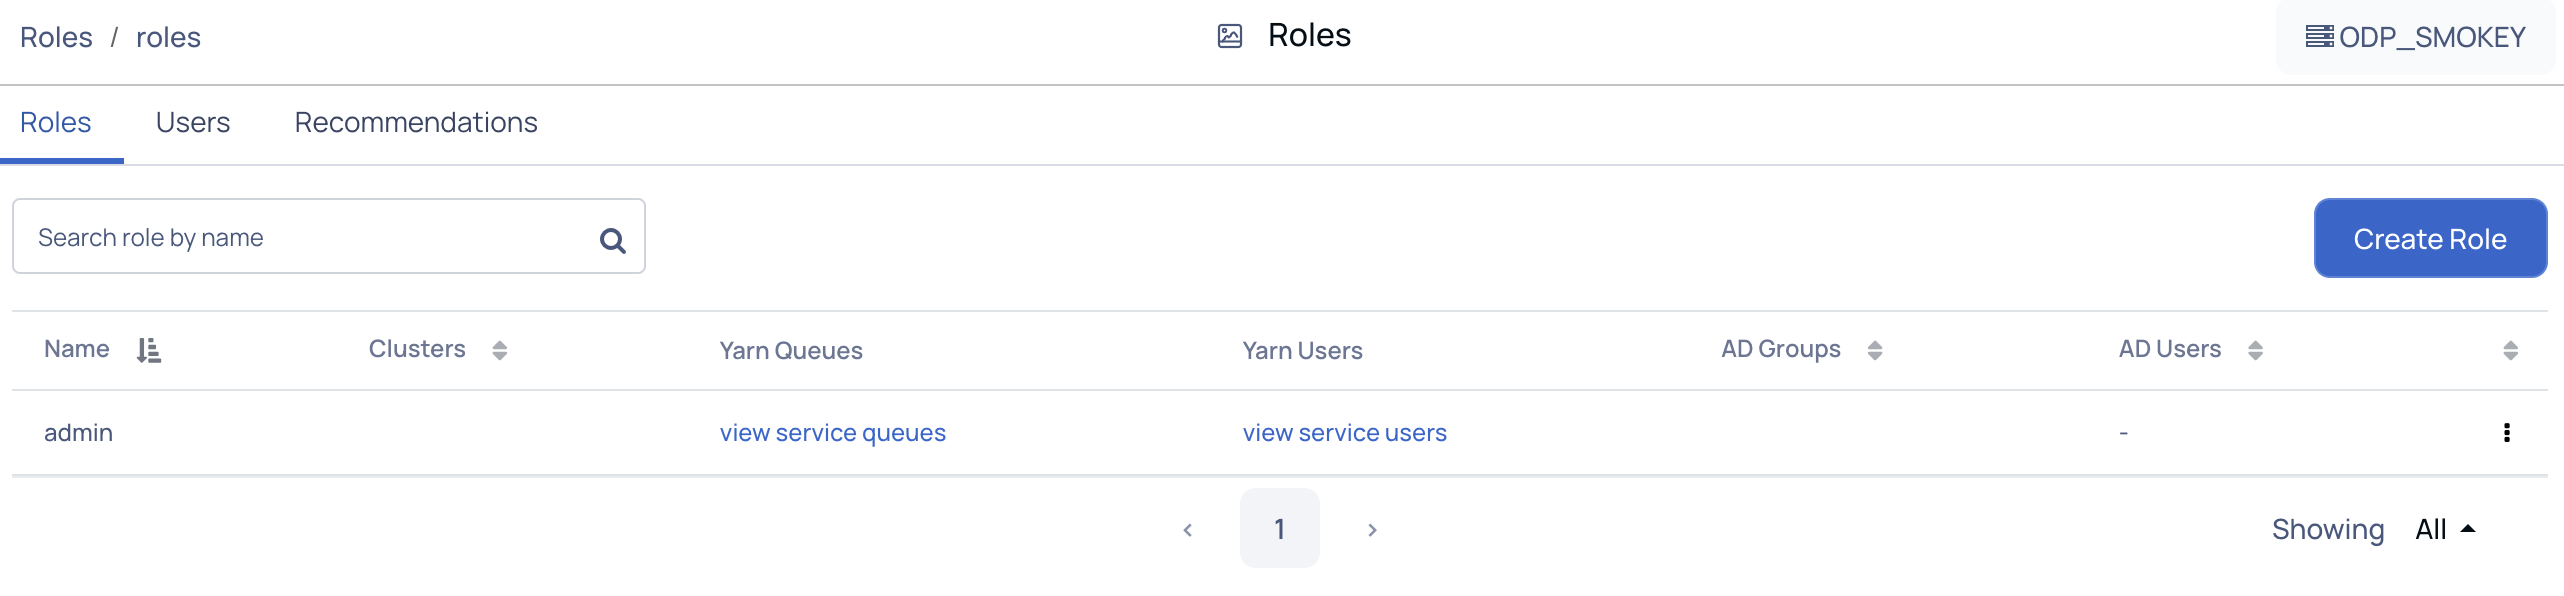
To view the details of all the roles that you just created, click the Roles icon from the main menu bar. The Roles page is displayed with the following table details:
Column Name | Description |
|---|---|
Name | Name of a role you created. |
Clusters | Comma separated list of clusters you selected while creating the role. |
Yarn Queues | The fundamental unit of Yarn is a queue. Click the view service queues link. A wizard is displayed with the cluster name and its respective queues. |
Yarn Users | The user is used to identify the person who submitted a job to a specific queue. Click the view service users link. A wizard is displayed with the cluster name and its respective queues. |
AD Groups | List of Acceldata groups that were mapped while creating a role. |
AD Users | List of Acceldata users that were mapped while creating a role. |
Click the icon beside any column name to display the list of roles in either ascending or descending order respectively.
Modify a Role
To modify a role, perform the following:
Click the role entry displayed in the Roles table.
Edit the fields you want to modify.
Click Save.
The role is modified.
Deleting a Role
To delete a role, perform the following:
Click the three dots icon towards the right of a role entry in the Roles table
Select Delete.
The role is deleted.
Users
A user represents a person interacting with Pulse, with certain privileges.
The following details are displayed in the Users dashboard:
Column Name | Description |
|---|---|
Name | The name of the user |
Roles | The roles assigned to the user |
Creating a User
To create a user, perform the following.
Click the Create Role button. The Create User wizard displays.
Fill the following user details.
User Name: Login name of the user. Enter a unique value.
Password: Password of the user to login with.
Confirm Password: Password of the user. Enter the same value as Password.
Role: The nature of authorization assigned to the user. Select a value from the list. You can add only one to a user. Note You can assign the Admin role to newly created users.
(Optional) LDAP User: User with directory services authentication.
Click Save.
The user is created.
Modifying a User
To modify a user, perform the following.
Click the user entry displayed in the Users table.
Edit the fields you want to modify. This also lets you change the role of a user.
Click Save.
The user details are modified.
Deleting a User
To delete a user, perform the following:
Click the three dots icon towards the right of a user entry in the Users table > Delete.
The user is deleted.
SSH Keys
SSH Key is key-based access method to the available clusters. SSH keys are used to individually manage the authorization and authentication methods.
The following details are displayed in the SSH Keys dashboard.
Column Name | Description |
|---|---|
Title | The title of the SSH key |
User | The user name to access the SSH key |
Created At | The time and date at which the SSH key was created |
Creating an SSH Key
To create an SSH key, perform the following.
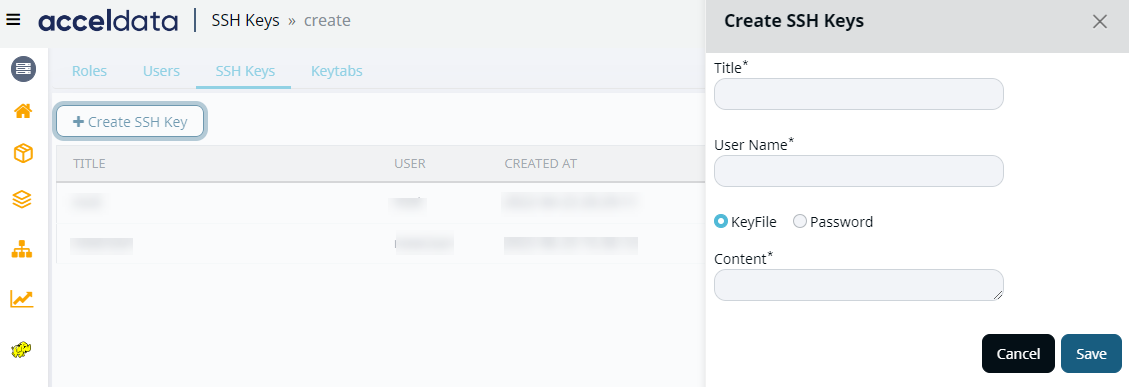
Click SSH Key button. The Create SSH Keys wizard displays.
Fill the following SSH keys details.
Title: The title of the SSH key.
User name: The user name of the SSH key to log in with.
Key File or Password: The radio button allows you to choose if you want to add a key file or a password enabled file.
Content: The content of the SSH key.
Click Save.
The SSH key has now been generated.
An SSH key once created cannot be modified.
Deleting an SSH Key
To delete an SSH key, perform the following.
Click the three dots icon towards the right of an SSH key entry in the Users table > Delete.
The SSH key entry is deleted.
Keytabs
A keytab is a file that contains Kerberos principals. Pulse requests the user to provide keytab path for authentication to execute the commands.
The following details are displayed in the Keytabs dashboard.
Column Name | Description |
|---|---|
Principle | The title of the Principle |
Created At | The time and date at which the Principle was created |
Uploading a Keytab
To upload the Keytab click on the +Upload Keytabs button. The following page is displayed at the right side of the screen.
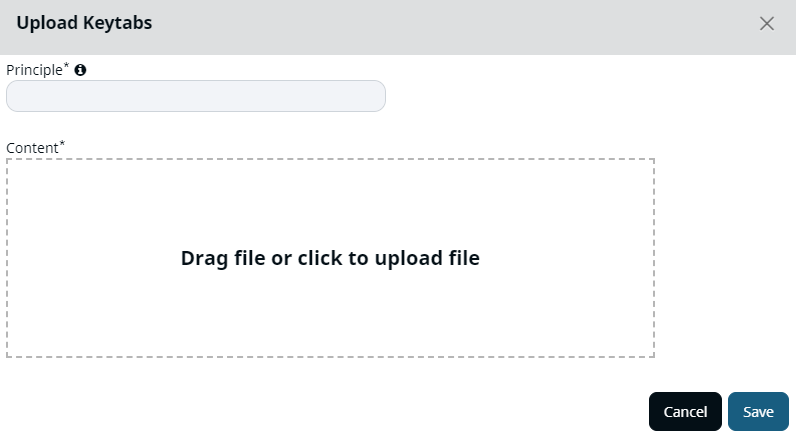
Add the Principle name.
To upload a file, use the mouse to drag and drop the file or click on a blank space to upload from your local system.
Click on Save to to upload the Keytab.
The Keytab is now uploaded.
Deleting the Keytab
To delete a Keytab, perform the following.
Click the three dots icon towards the right of an keytab entry in the table.
Select Delete to delete the Keytab.
The Keytab is deleted.
View Environment Details
You can view the details of your environment by clicking the (user) icon at the top right corner. The following table lists the details:
Detail Displayed | Description of the Detail |
|---|---|
Version | The version of your Pulse. |
Expiry Date | The expiry date of your Pulse license. |
Customer Name | Your registered name with Acceldata. |
Cluster Name | The current cluster name. |
Logged In As | Your role in Pulse. |
Refresh Configuration | Allows you to re-establish connection with database. Use this button when you add a new cluster. |
Logout | Click here to logout of Pulse. |