Snowflake
Snowflake is a cloud computing organization that offers various cloud services. You can host data-intensive applications in Snowflake without facing operational complexities. This document explains how you can add Snowflake as a Data Source in ADOC. Once you add Snowflake as a Data Source, ADOC can monitor your Snowflake account and display critical information and raise alerts, as configured.
Performance and Cost optimization on Snowflake
This section of the guide provides step by step instructions to set up Snowflake for performance monitoring and cost optimization using the ADOC. Follow the steps to ensure proper configuration and access to enable ADOC to effectively monitor your Snowflake account, display critical information and raise alerts as configured.
Prerequisites
- Ensure that you have the
ACCOUNT ADMINrole in Snowflake to execute the necessary command. - Remember to define variables at the start of the script as you will use them through out the configuration process.
- Following the instructions are crucial to fully utilize the ADOC capabilities in monitoring and optimizing your Snowflake account.
Step 1 : Define Variables
Begin by setting up essential variables for roles, warehouse, users, and databases that will be used throughout the script. These variables serves as identifiers in subsequent steps.
-- Role for compute reliability monitoringSET acceldata_role = 'AD_COMPUTE_MONITOR';-- Warehouse for compute tasksSET acceldata_warehouse = 'AD_COMPUTE_WH';-- User for compute reliability tasksSET acceldata_user = 'AD_USER';-- Password for the user (replace '<password>' with a strong password)SET acceldata_password = '<password>';-- Database for monitoring tasksSET acceldata_database = 'AD_MONITOR_DB';<password> with a secure password of your choice.
Step 2 : Create Role and Warehouse
Initialize the role and warehouse defined in Step 1.
- Switch to
ACCOUNTADMINRole: Use theACCOUNTADMINrole to create warehouses, grant permissions and create other roles.
-- Switch to ACCOUNTADMIN roleUSE ROLE ACCOUNTADMIN;- Create Warehouse: Create a warehouse with size
x-smallfor running lightweight queries to fetch metadata.
-- Create warehouse for compute tasksCREATE OR REPLACE WAREHOUSE IDENTIFIER($acceldata_warehouse) WAREHOUSE_SIZE = 'X-Small';- Configure Auto-suspend: Update the auto-suspend time to ensure minimal credit usage.
-- Set auto-suspend to 30 seconds to reduce costsALTER WAREHOUSE IDENTIFIER($acceldata_warehouse) SET AUTO_SUSPEND = 30;- Create Role: Create a role to be assigned to the user for fetching metadata.
-- Create role for compute reliability monitoringCREATE OR REPLACE ROLE IDENTIFIER($acceldata_role);Step 3 : Grant Necessary Privileges
Assign the required privileges for monitoring and accessing Snowflake resources.
- Grant Imported Privileges: Allow the role to access shared tables or views imported from the
SNOWFLAKEdatabase. This is crucial to enable resource monitoring and metadata access.
-- Grant access to imported privileges from the SNOWFLAKE databaseGRANT IMPORTED PRIVILEGES ON DATABASE SNOWFLAKE TO ROLE IDENTIFIER($acceldata_role);It allows the role acceldata_role to access the privileges imported from the SNOWFLAKE database.
Example: If the SNOWFLAKE database contains shared tables or views, theacceldata_role can now access them.
- Grant MONITOR Privilege on Account: Enable the role to monitor account-level metrics for resource usage and performance analysis.
-- Grant MONITOR privilege on the accountGRANT MONITOR ON ACCOUNT TO ROLE IDENTIFIER($acceldata_role);The MONITOR privilege is essential for:
- Monitoring Resource Usage: __A team or user needs access to account-level metrics to ensure efficient use of Snowflake resources (e.g., credits, storage, query performance.
- Performance Analysis: A team might want to analyze query and warehouse performance to optimize workloads.
- Grant USAGE on Warehouse: Allow the role to use the warehouse for query execution and operations.
-- Grant USAGE privilege on the warehouseGRANT USAGE ON WAREHOUSE IDENTIFIER($acceldata_warehouse) TO ROLE IDENTIFIER($acceldata_role);Shared tables or views in the SNOWFLAKE database may contain essential metadata or configurations that the role needs for monitoring purposes.
Step 4 : Create User
Create a user that will execute the monitoring tasks.
- Create User:
-- Create user with default warehouse, role, and namespaceCREATE OR REPLACE USER IDENTIFIER($acceldata_user) LOGIN_NAME = $acceldata_user PASSWORD = $acceldata_password DEFAULT_WAREHOUSE = $acceldata_warehouse DEFAULT_ROLE = $acceldata_role DEFAULT_NAMESPACE = SNOWFLAKE.ACCOUNT_USAGE;- Existing Users: If you have an existing user you wish to reuse, ensure all the default roles and settings are assigned.
-- Update default role, warehouse, and namespace for existing userALTER USER <username> SET DEFAULT_ROLE = <ROLE_NAME>;ALTER USER <username> SET DEFAULT_WAREHOUSE = <WAREHOUSE_NAME>;ALTER USER <username> SET DEFAULT_NAMESPACE = SNOWFLAKE.ACCOUNT_USAGE;- Grant Role to User : Assign the created role to the user.
-- Grant role to userGRANT ROLE IDENTIFIER($acceldata_role) TO USER IDENTIFIER($acceldata_user);Step 5 : Database and Schema Permissions
Ensure the necessary database and schema permissions are assigned to the role.
- Create Database (if none exists): Create the monitoring database to store grants and permissions for Snowflake warehouses and resource monitors.
-- Create the monitoring database if it doesn't existCREATE DATABASE IF NOT EXISTS IDENTIFIER($acceldata_database);- Grant Usage on Database: Allow the role to access the newly created database.
-- Grant USAGE privilege on the database to the roleGRANT USAGE ON DATABASE IDENTIFIER($acceldata_database) TO ROLE IDENTIFIER($acceldata_role);- Use the Database: Change the active database to the monitoring database for subsequent operations.
-- Switch to the monitoring databaseUSE DATABASE IDENTIFIER($acceldata_database);- Grant Schema Privileges: Assign necessary permissions on the
PUBLICschema of the database.
-- Grant necessary privileges on the PUBLIC schemaGRANT MONITOR, USAGE, CREATE FILE FORMAT, CREATE STAGE ON SCHEMA PUBLIC TO ROLE IDENTIFIER($acceldata_role);Step 6 : Execute Stored Procedure
Grant monitor privileges on all warehouses and resource monitors.
- Create Stored Procedure:
-- Create stored procedure to grant MONITOR privilege on all warehouses and resource monitorsCREATE OR REPLACE PROCEDURE grant_privileges_to_all_warehouses(ROLE_NAME VARCHAR) RETURNS VARCHAR LANGUAGE JAVASCRIPT AS $$ var warehouses = snowflake.createStatement({sqlText: "SHOW WAREHOUSES"}).execute(); while (warehouses.next()) { var warehouse_name = warehouses.getColumnValue(1); snowflake.createStatement({sqlText: "GRANT MONITOR ON WAREHOUSE " + warehouse_name + " TO ROLE " + ROLE_NAME}).execute(); } var resource_monitors = snowflake.createStatement({sqlText: "SHOW RESOURCE MONITORS IN ACCOUNT"}).execute(); while (resource_monitors.next()) { var monitor_name = resource_monitors.getColumnValue(1); snowflake.createStatement({sqlText: "GRANT MONITOR ON RESOURCE MONITOR " + monitor_name + " TO ROLE " + ROLE_NAME}).execute(); } return 'Granted monitor privilege to role ' + ROLE_NAME + ' on all warehouses and resource monitors'; $$;- Grant Usage on Procedure:
-- Grant USAGE on the procedure to the roleGRANT USAGE ON PROCEDURE grant_privileges_to_all_warehouses(VARCHAR) TO ROLE IDENTIFIER($acceldata_role);- Call Stored Procedure:
-- Call the stored procedure to grant privilegesCALL GRANT_PRIVILEGES_TO_ALL_WAREHOUSES($acceldata_role);Grant Monitor Privilege for All Warehouses: This allows the role to monitor the usage and performance of all warehouses.
Grant Monitor Privilege on All Resource Monitors: This allows the role to monitor all resource monitors for improved governance and audit processes.
- To authorize a certain role to monitor all warehouses and resource monitors.
- When creating roles for system administrators, auditors, and monitoring tools.
- When establishing governance or audit mechanisms to monitor resource utilization across the Snowflake account.
Optional Steps
Optional Step 1: Grant Create Integration Privilege
If you need to create integrations (e.g., for external stages using storage integration):
-- Grant CREATE INTEGRATION privilege to the roleGRANT CREATE INTEGRATION ON ACCOUNT TO ROLE IDENTIFIER($acceldata_role);This privilege allows the role to create integrations for secure connections with external services like AWS S3.
Optional Step 2: Enable ORGADMIN Role
-- Switch to ORGADMIN roleUSE ROLE ORGADMIN;-- Enable ORGADMIN privileges for the accountALTER ACCOUNT my_account1 SET IS_ORG_ADMIN = TRUE;The ORGADMIN role is required to access organization-level usage data.
Optional Step 3: OAuth & Snowflake API Client
For OAuth integration and additional configurations, refer to: Snowflake Integration with ADOC.
Troubleshooting Steps
- Adding Snowflake as a Data Source: For detailed procedure, see Adding Snowflake as a Data Source.
- Post configuration steps: Ensure all steps have been completed successfully by following the verification checklist. Also see Snowflake Checklist.
- Changing User Role After OAuth Configuration: f you need to change the role of an existing user -
-- Grant role to userGRANT ROLE <ROLE_NAME> TO USER <USER_NAME>;-- Show all rolesSHOW ROLES;-- Grant USAGE on database to roleGRANT USAGE ON DATABASE <DATABASE_NAME> TO ROLE <ROLE_NAME>;- Stage Creation Failure: If stage creation fails:
- Log in using
ACCOUNTADMIN. - Select the corresponding database used during onboarding.
- Run:
- Log in using
-- Show existing stagesSHOW STAGES;-- Grant ownership on the stage to the roleGRANT OWNERSHIP ON STAGE <STAGE_NAME> TO ROLE <ROLE_NAME>;When to Enable Storage Integration?
- Enable storage integration if your Snowflake account does not allow stage creation using AWS access and secret keys directly. Storage integration allows a secure connection without storing AWS secrets on Snowflake.
Re-authentication via OAuth: If the default role, warehouse, or namespace is not set for the user after configuration (OAuth flow), re-authenticate the user via the OAuth flow in the ADOC platform.
Why Enable the ORGADMIN Role?
- Enabling the
ORGADMINrole is necessary to access data from theORGANIZATION_USAGEschema, which provides organization-level usage metrics.
- Enabling the
If Stage Creation Fails in Snowflake: Ensure you have the necessary privileges and consider granting ownership of the stage to the appropriate role.
Data Reliability on Snowflake
Ensuring data reliability inside Snowflake systems is critical for enterprises to retain the integrity and availability of their data. ADOC enables enterprises to monitor, evaluate, and optimize data dependability in Snowflake, ensuring that data is accurate, consistent, and easily accessible.
Setting Up User and Role for Data Reliability
To leverage all functionalities of ADOC for Data Reliability operations on Snowflake, a specific user and role setup is required. This section outlines the minimal permissions necessary to achieve comprehensive data reliability monitoring and optimization with ADOC.
- Create a Custom Role: Begin by creating a custom role that will be assigned the necessary permissions for data reliability tasks within Snowflake. Optionally, you can add a comment to describe the role's purpose.
CREATE ROLE <custom_role_name> COMMENT = '<Optional comment>';- Grant Usage on Warehouse: The custom role must have usage permissions on the warehouse that will be used for Data Reliability operations. Replace <
warehouse_name> and <custom_role_name> with your specific details.
GRANT USAGE ON WAREHOUSE <warehouse_name> TO ROLE <custom_role_name>;- Grant Usage on Database: For each database that will be used for Data Reliability operations, grant usage permissions to the custom role. This step should be repeated for every relevant database.
GRANT USAGE ON DATABASE <database_name> TO ROLE <custom_role_name>;- Grant Usage on Schema: Within each database, schema-level usage permissions are required. Execute this command for each schema in the database involved in Data Reliability tasks.
GRANT USAGE ON SCHEMA <database>.<schema> TO ROLE <custom_role_name>;- Grant Select on All Tables Within the Schema : To perform data reliability checks, the custom role needs select permissions on all tables within the target schema.
GRANT SELECT ON ALL TABLES IN SCHEMA <database>.<schema> TO ROLE <custom_role_name>;- Create Users: Create a new user that will be associated with the custom role. This ensures that every session initiated by this user will automatically utilize the specified role.
CREATE USER aduser DEFAULT_ROLE = <custom_role_name>;- Set Password for the User: For authentication purposes, define a password for the newly created user. While this example uses simple username/password authentication, Snowflake supports various authentication methods, including Multi-Factor Authentication (MFA).
ALTER USER aduser SET PASSWORD = '<password>';- Grant the custom role to the User: Finally, assign the previously created custom role to the user to enable them to perform Data Reliability operations within Snowflake.
GRANT ROLE <custom_role_name> TO USER aduser;Following these steps will prepare your Snowflake setup for integration, resulting in complete monitoring and data reliability optimization.
Adding Snowflake as a Data Source
To add Snowflake as a Data source:
- Click Register from the left pane.
- Click Add Data Source.
- Select the Snowflake Data Source. The Snowflake Data Source basic Details page is displayed.
The following table describes parameters to be entered in the Enter Connection Details window:
- Enter a name for the data source in the Data Source name field.
- (Optional) Enter a description for the Data Source in the Description field.
- (Optional) Enable the Compute capability by switching on the Compute toggle switch.
- (Optional) Enable the Data Reliability capability by switching on the Data Reliability toggle switch.
You must enable either the Compute or Data Reliability capability. You cannot add Snowflake as a Data Source without enabling at least one of these capabilities.
- Select a Data Plane from the Select Data Plane drop-down menu.
To create a new Data Plane, click Setup Dataplane.
You must either create a Data Plane or use an existing Data Plane to enable the Data Reliability capability.
- Click Next. The Snowflake Connection Details page is displayed.
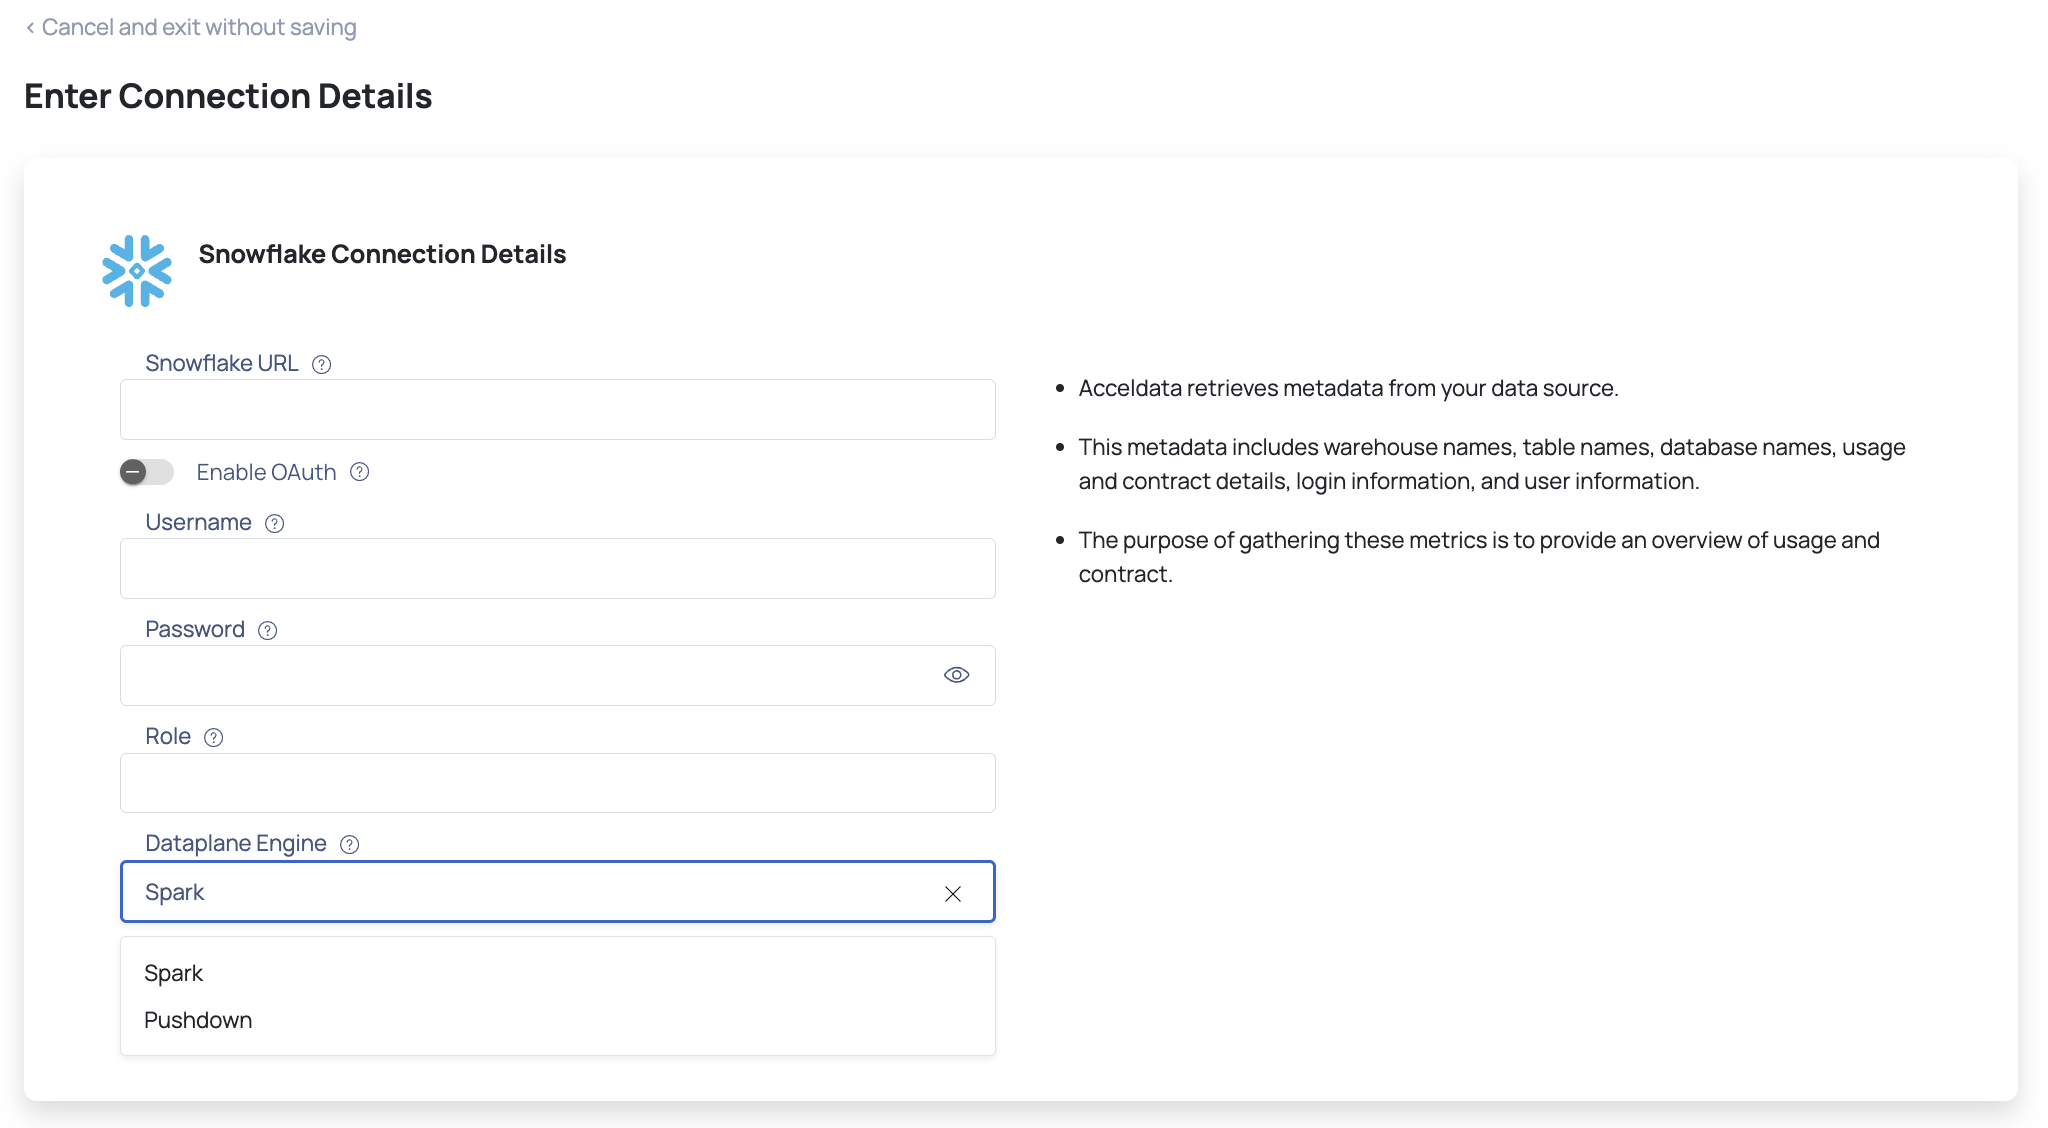
- Specify the Snowflake URL which is used to locate the database schema in the Snowflake URL field.
- (Optional) Enable Snowflake OAuth by toggling the Enable OAuth switch.
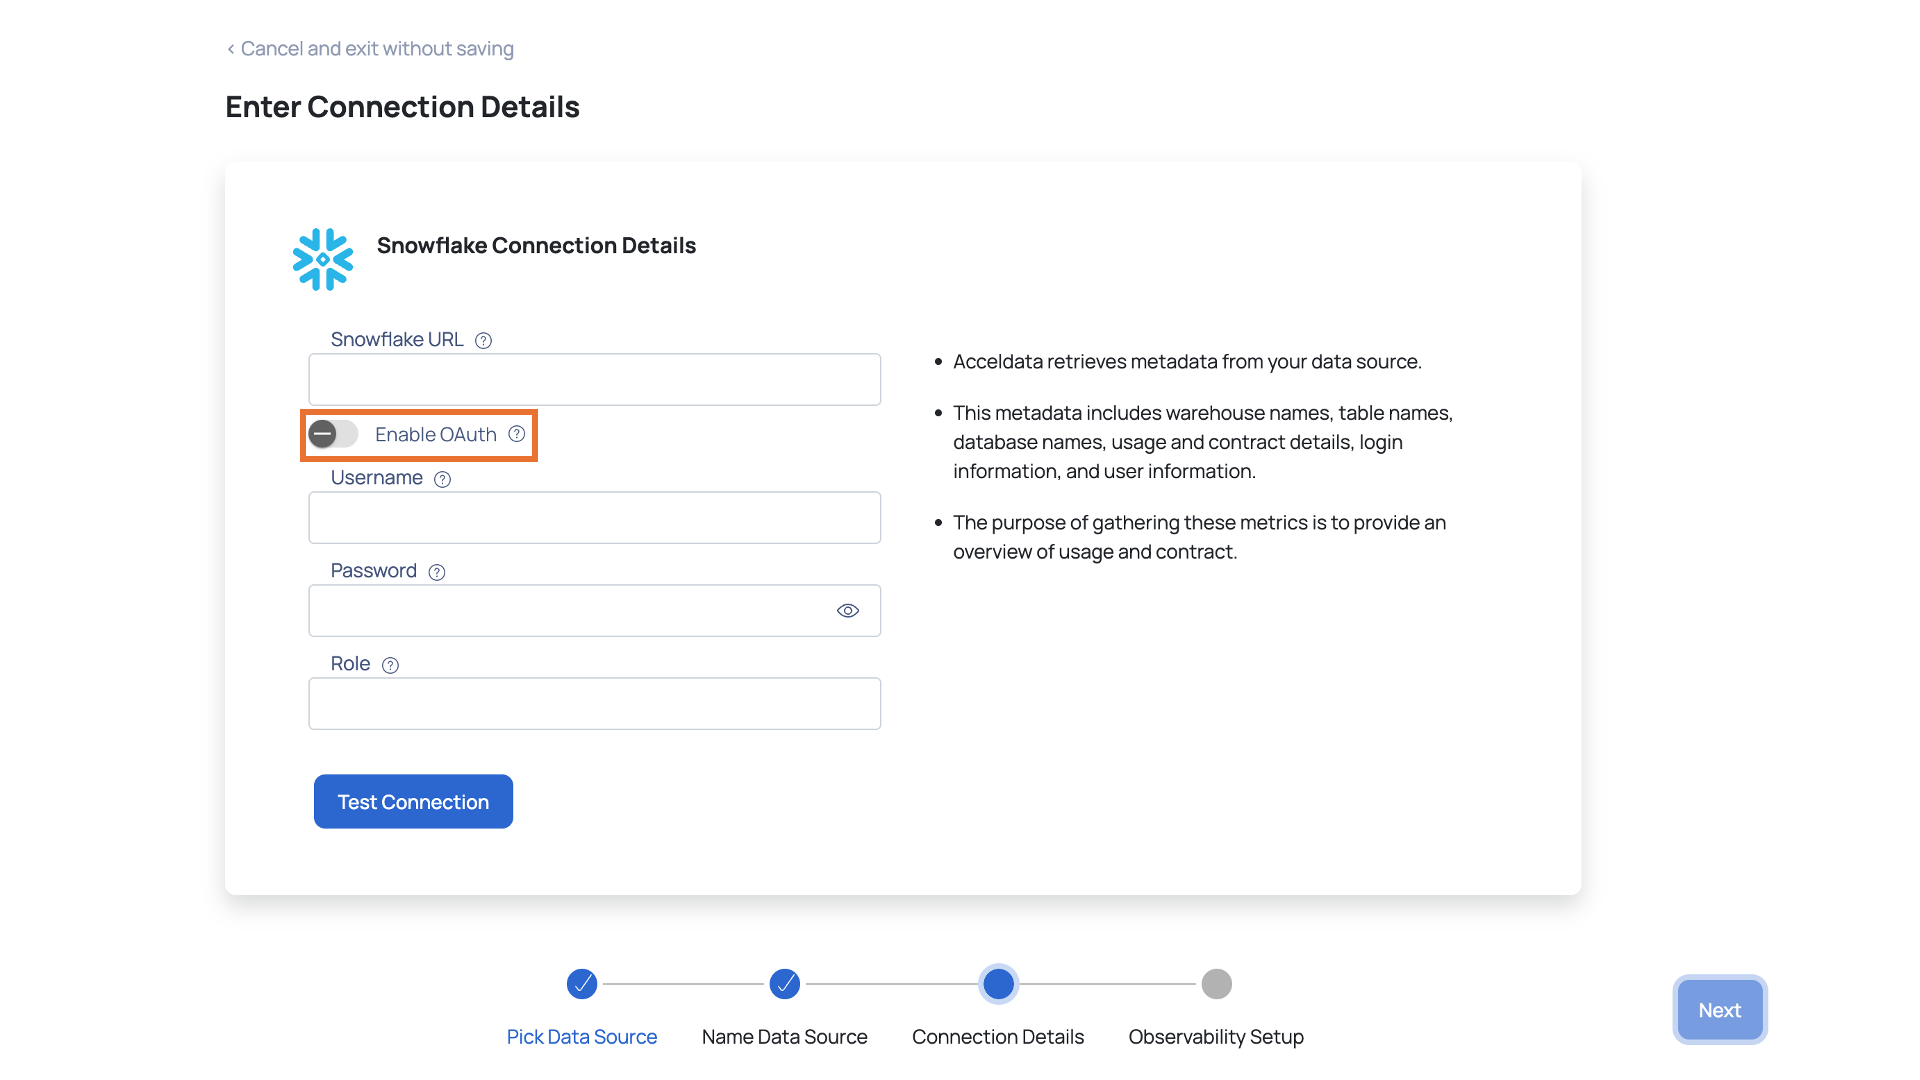
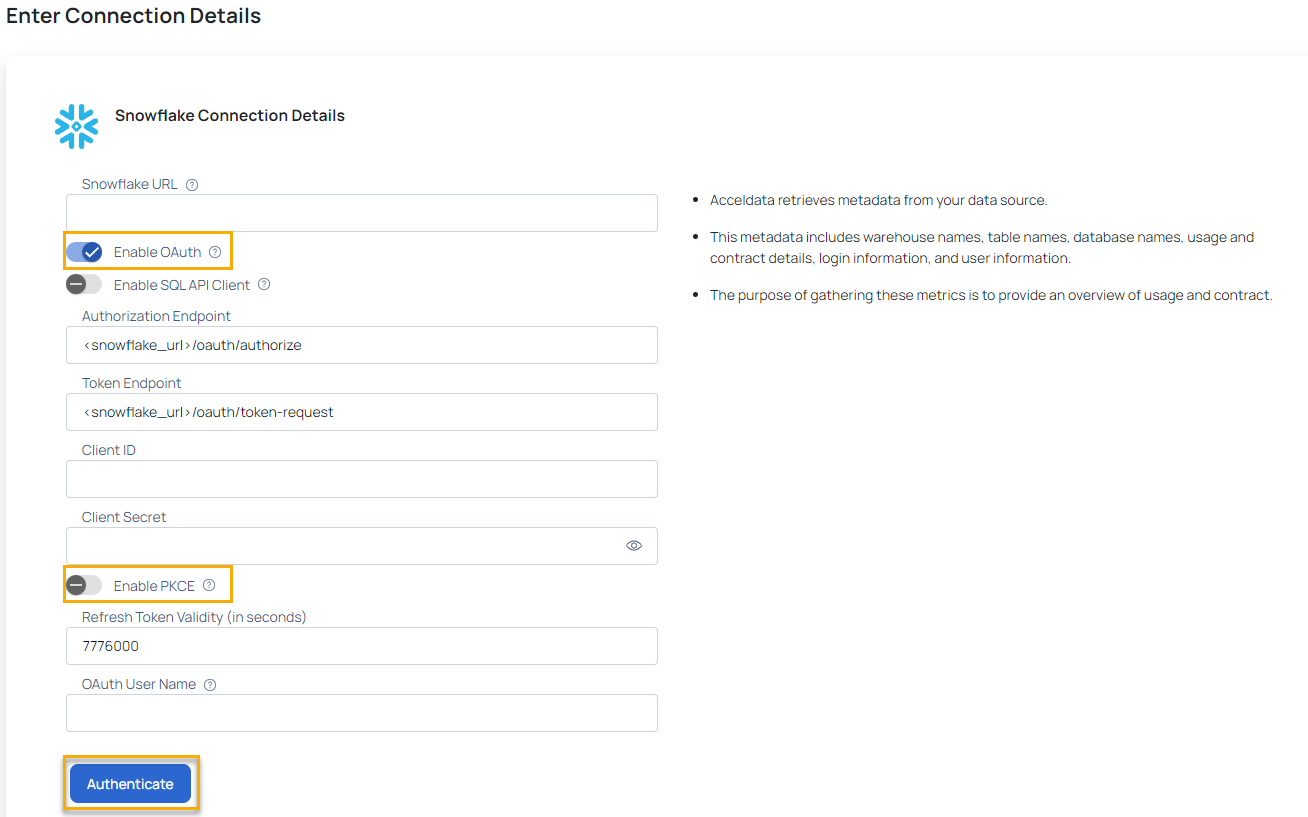
You can connect to your Snowflake account with SQL APIs rather than JDBC by clicking the toggle button and entering the Authorization Endpoint and Token Endpoint.
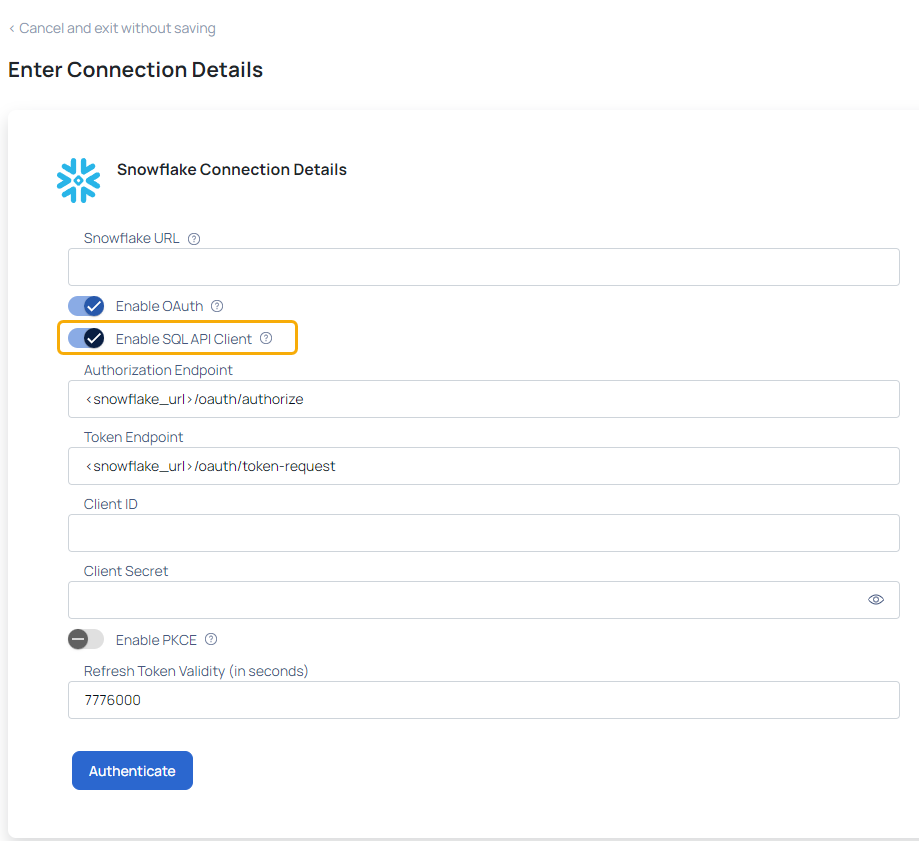
From ADOC v3.6.0 onwards, Proof Key for Code Exchange (PKCE) is supported.
To enable PKCE:
- Toggle the Enable PKCE switch to enable Proof Key for Code Exchange (PKCE) for enhanced security.
- Set the Refresh Token Validity (in seconds) as needed, for example, 7776000 seconds for a 90-day validity period.
- (Optional) Provide the following information to configure Snowflake OAuth:
- Authorization Endpoint: This is the URL where Snowflake redirects users to authenticate and authorize access to their data.
- Token Endpoint: This is the URL where Snowflake exchanges authorization credentials for an access token.
- Client ID: This is a unique identifier assigned to your application by Snowflake when you register it for OAuth.
- Client Secret: This is a secret key known only to the application and Snowflake, used to authenticate the identity of the application to the authorization server.
- Refresh Token Validity: This specifies the duration for which a refresh token issued by Snowflake remains valid before it expires and needs to be renewed.
- OAuth User Name: The user name used for authentication.
12.1. Once you have entered all the details, click the Authenticate button, and you'll be directed to the sign-in page for Snowflake.
12.2. Enter your Username and Password. Upon successful sign-in, the data source will be authenticated.
These details are typically found in the OAuth configuration section or application settings within the Snowflake platform. If you're unable to locate this information, you need to consult Snowflake's documentation or contact their support for assistance.
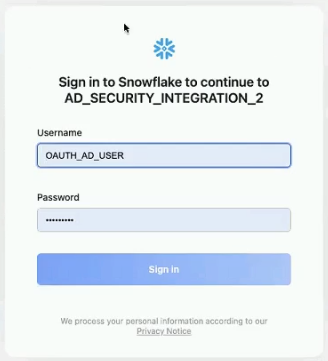
Ensure that the OAuth User does not have account admin role assigned. User with account admin role assigned will not be able to sign-in during authorization.
- Specify the username with access to the Snowflake account in the Username field.
The user must have a default warehouse assigned on Snowflake and must have access to the databases that are expected to be connected from ADOC, along with everything in the hierarchy of those databases (including information schema). You must not add a user who is configured with multi factor authentication in Snowflake. ADOC cannot fetch data from such user accounts.
- Specify the password to connect to the Snowflake database in the Password field.
- Enter the user role in the Role field.
- Select the Dataplane Engine, either Spark or Pushdown Data Engine, for profiling and data quality.
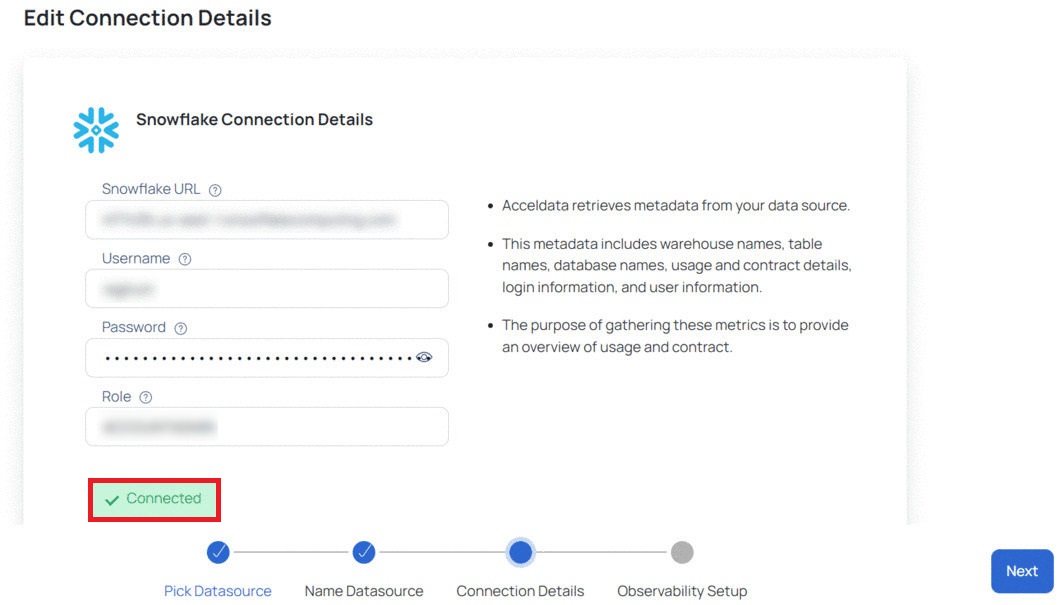
- Click Test Connection to check if the connection created is working.
If the connection is successful, you can view a Connected message, as shown in the following image. If there is an error, you must verify the Snowflake details provided and enter the correct details.
Observability Set Up
The Set Up Observability page allows you to setup Compute and Data Reliability capabilities. These sections are active only if you enabled them on the Snowflake Data Source basic Details page.
This section has the following panels:
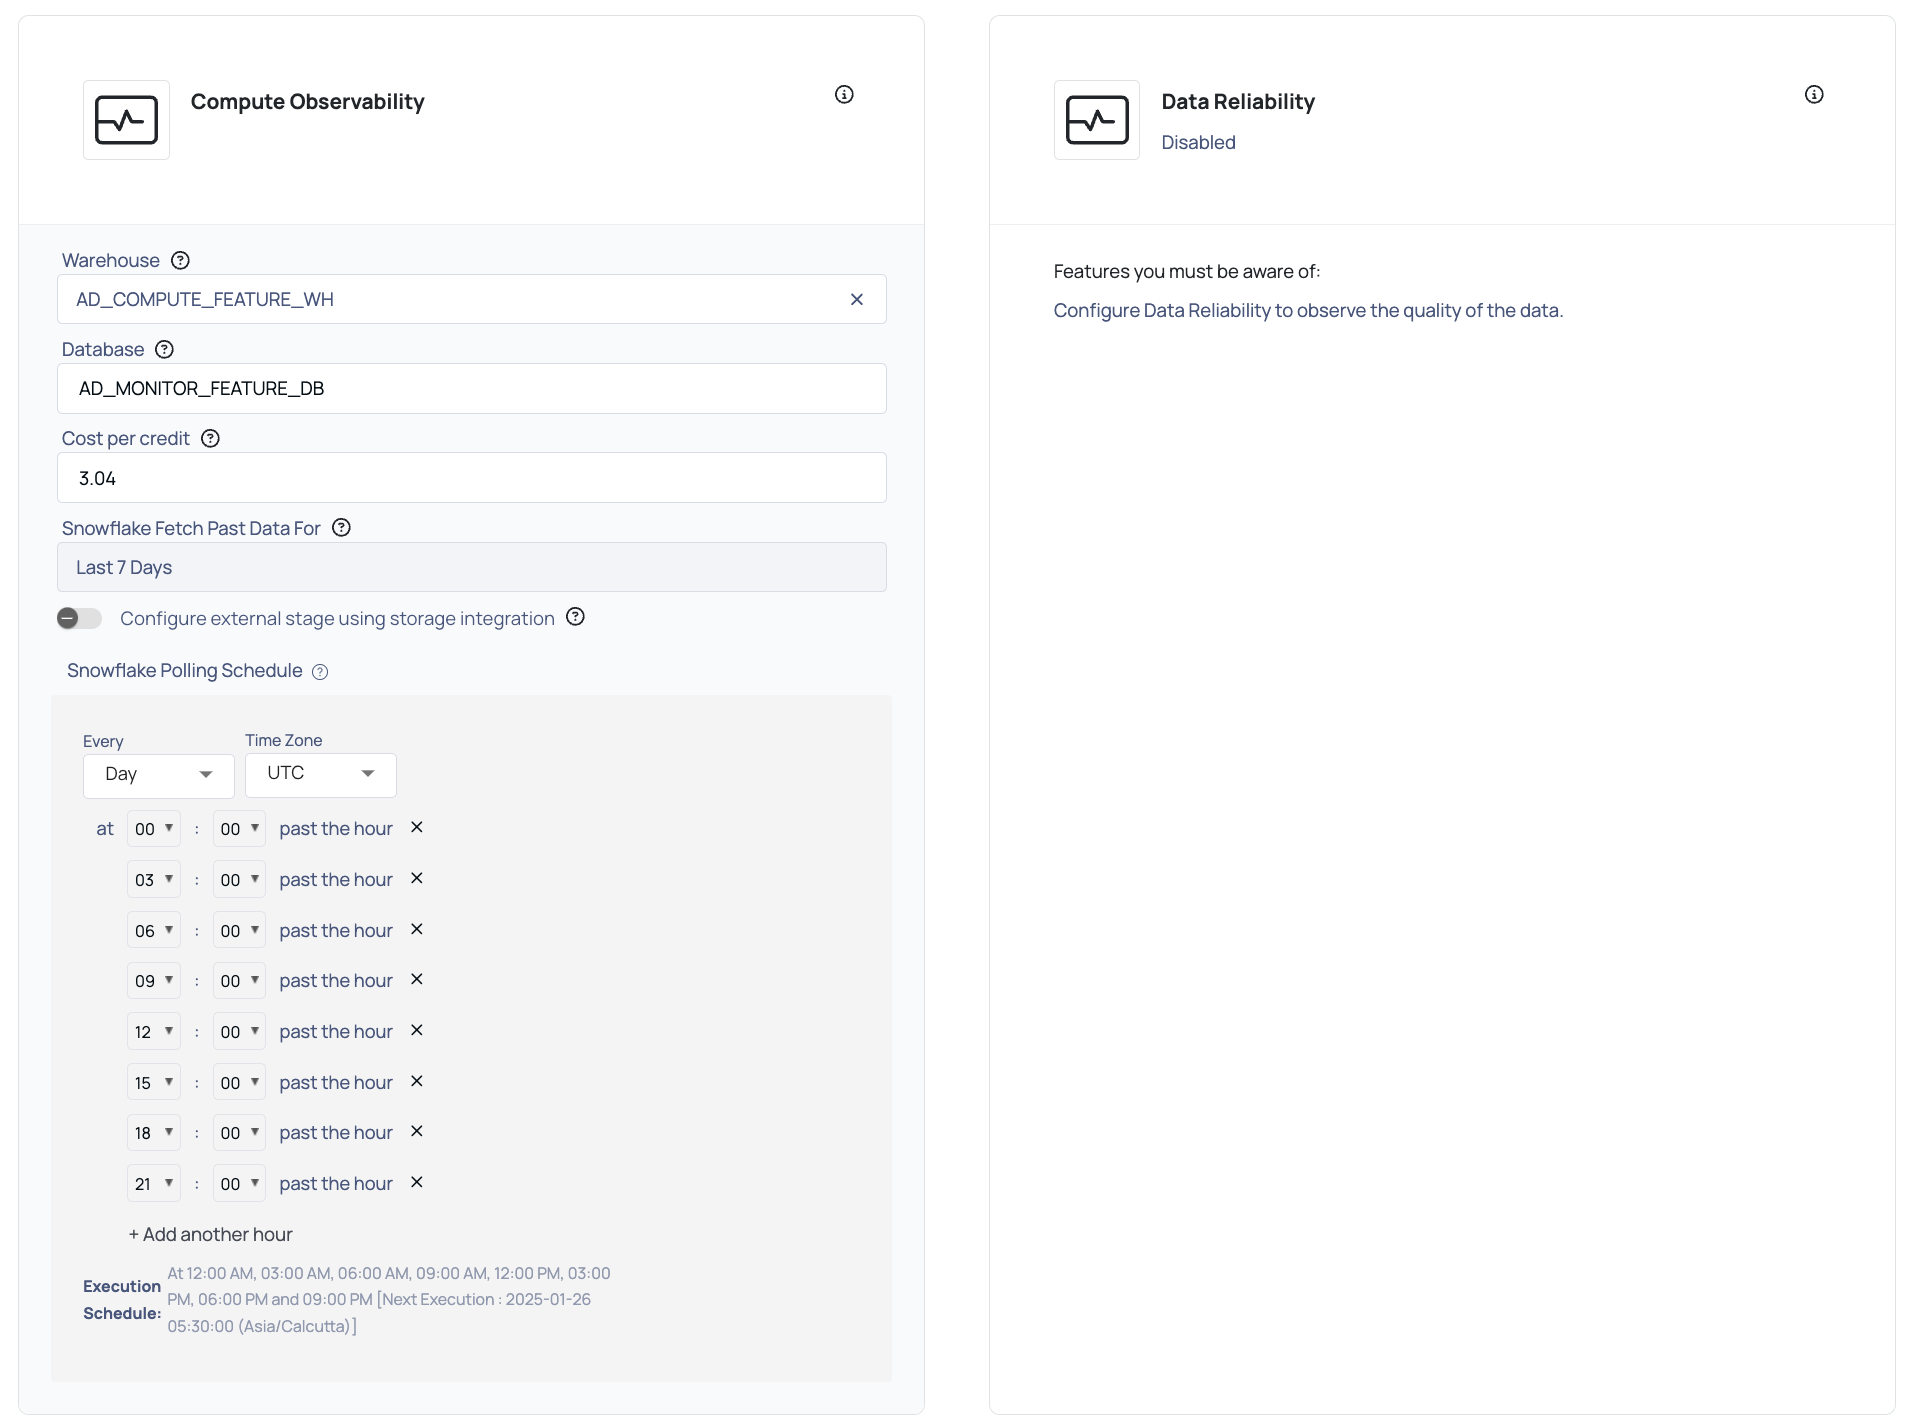
Compute Observability: Enter the following details to set up Compute Capabilities:
Warehouse: Select the warehouses from the drop-down list for which you want to set up Compute Observability.
Database: Enter the name of the database whose public schema could be used to configure external storage. By default, the database name is AD_MONITOR_DB.
Cost per Credit: Enter the cost per credit for your Snowflake account.
Snowflake Fetch Past Data From: Select the historical time period for which you want to fetch the data from Snowflake. The available options are Last 15 Days, Last 30 Days, Last 60 Days, Last 90 Days, Last 180 Days, and Last 1 Year.
Snowflake Polling Schedule: Configure the polling schedule to determine when data is fetched from Snowflake. By default, the polling time is set to 12:00 AM (00:00) in the selected time zone (e.g., UTC). Additional timings can be added and customized as per your requirements.
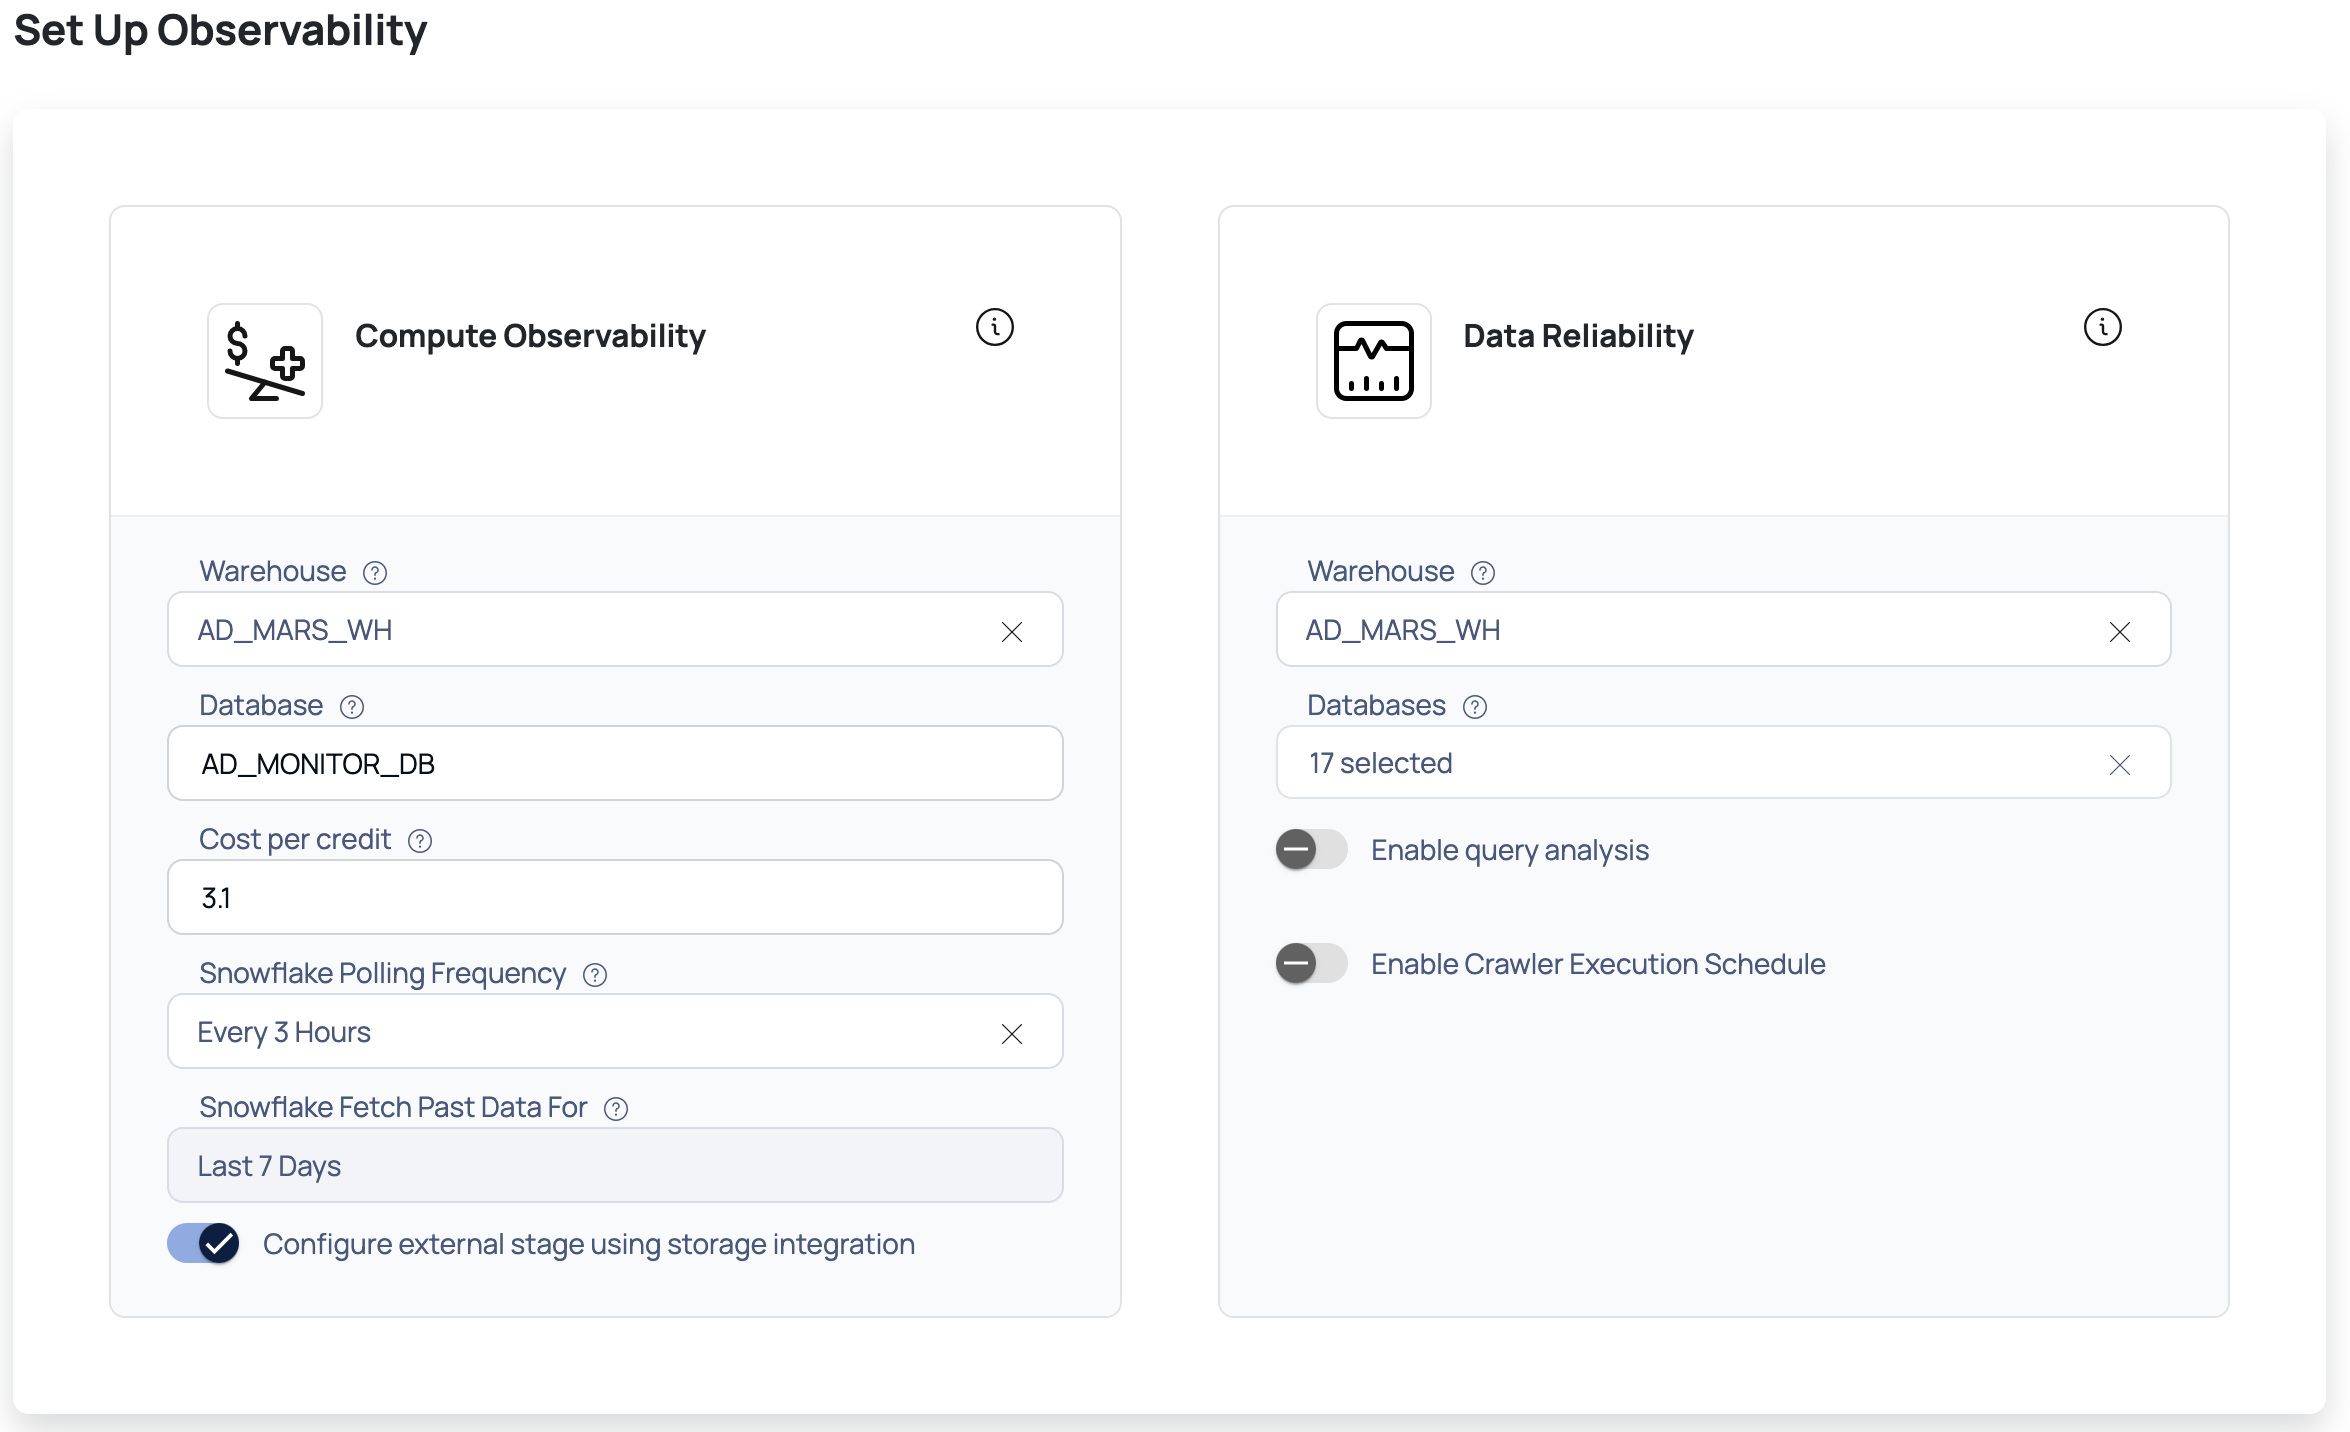
(Optional) Configure external stage using storage integration: Enable this toggle button to configure an external stage that references a Snowflake storage integration. On clicking the Submit button, the following privileges on a role are checked by ADOC:
- CREATE INTEGRATION privilege
- CREATE FILE FORMAT privilege on given schema
- CREATE STAGE privilege on given schema
- USAGE privilege on given database
If Configure external stage using integration toggle is not enabled then the following privileges on a role are checked by ADOC:
- CREATE FILE FORMAT privilege on given schema
- CREATE STAGE privilege on given schema
- USAGE privilege on given database
Relying on a single Cost per Credit (CPC) for all Snowflake services can result in inaccurate cost attribution when varying rates are applied. To address this, the system retrieves service-specific rates directly from Snowflake metadata for more accurate calculations. If these rates are unavailable, the user-provided CPC serves as a fallback.
- If a role possesses the OWNERSHIP privilege for a database, it automatically gains the CREATE FILE FORMAT and CREATE STAGE privileges for the associated schema, as well as the USAGE privilege on that database.
- Similarly, if a role possesses the OWNERSHIP privilege for a schema, it automatically gains the CREATE FILE FORMAT and CREATE STAGE privileges specific to that schema.
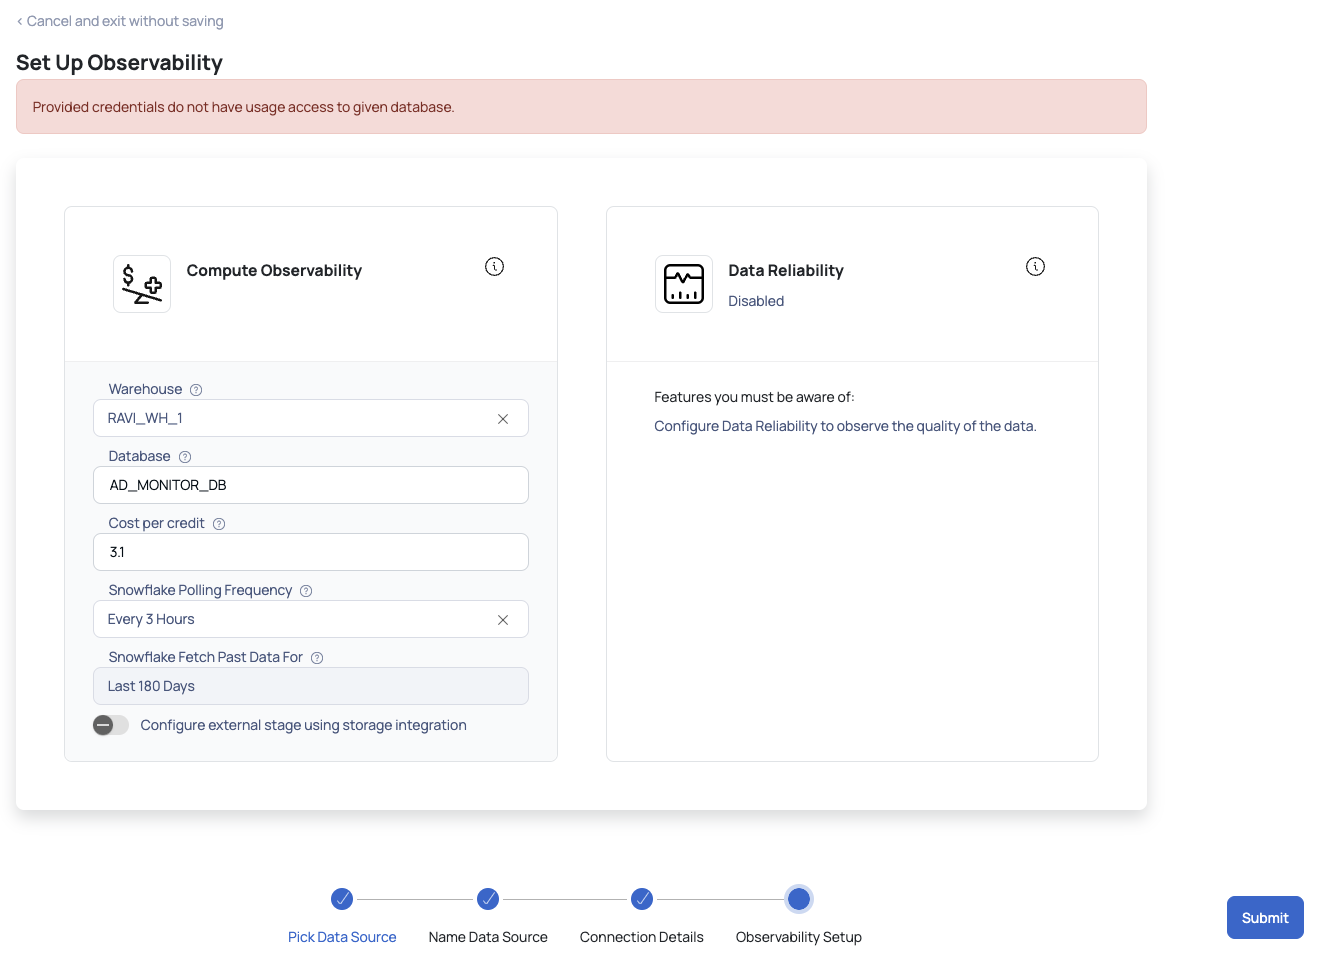
Set Up Observability Error on Submit
On clicking the submit button, the above privileges are checked by ADOC, and if any one of the privileges are not met, then an error is displayed.
- Data Reliability: Enter the following details to set up Data Reliability:
- Warehouse: Select the warehouses from the drop-down list for which you want to set up Data reliability.
- Databases: Select the database(s) from the drop-down list for which you want to set up Data reliability.
- Enable Query Analysis: Turn on this toggle switch to enable query analysis on your queries.
- Enable Crawler Execution Schedule: Turn on this toggle switch to select a time tag and time zone to schedule the execution of crawlers for Data Reliability.
- Click the Submit button.
Snowflake is now added as a Data Source. You can choose to crawl your Snowflake account now or later.
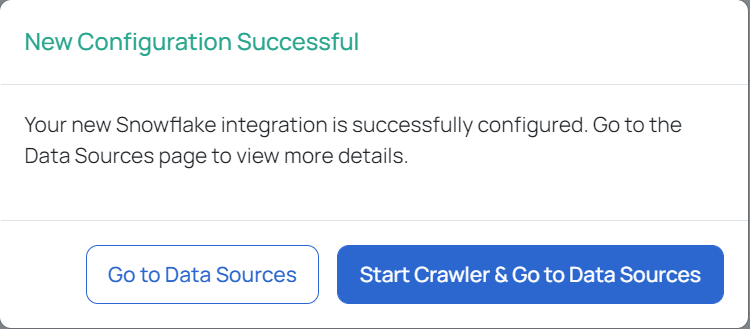
You can navigate to the manage page to view the options available after adding the Data Source.
Optimizing Data Partitioning
Controlling the partition size of data being loaded is critical for improving performance and scalability in ADOC's Snowflake integration. The environment option SNOWFLAKE_PARTITION_SIZE_IN_MB allows you to fine-tune the partition size, which affects how the Snowflake connection generates data-loading tasks. This section explains how to set up this environment variable to increase parallelism and data processing efficiency.
| ADOC Default Behavior | Description |
|---|---|
| Environment Variable: | SNOWFLAKE_PARTITION_SIZE_IN_MB |
| Default Value | 2000 MB |
| Functionality | Determines the size of each partition that the Snowflake connection attempts to construct, with each partition handling 2000 MB of uncompressed data. |
| Purpose | To balance the number of partitions with the amount of data processed by each partition, which affects the parallelism and performance of Snowflake data operations in ADOC. |
The SNOWFLAKE_PARTITION_SIZE_IN_MB parameter can be adjusted to increase or reduce partition sizes based on the client's individual data volume and processing requirements. Lowering the number from the usual 2000 MB can result in more partitions being created, which is especially useful for huge datasets that require better parallelism.
Determine Optimal Size: Choose an optimal partition size based on the size of your dataset and the processing needs. Decreasing the size will result in more partitions and possibly improved parallelism.
Set Environment Variable: Within the analysis service of your ADOC data plane, set the SNOWFLAKE_PARTITION_SIZE_IN_MB environment variable to the desired partition size.
Example: To change the partition size to 10 MB,
SNOWFLAKE_PARTITION_SIZE_IN_MB=10Reproducing and Monitoring Changes
- Initial Data Processing: Run a profile or data quality (DQ) job on a dataset size in GBs. Note the number of partitions and the parallelism level achieved.
- Modify Partition Size: Adjust the
SNOWFLAKE_PARTITION_SIZE_IN_MBto a value lower than 2000, such as 10 MB, to increase the number of partitions. - Observe Performance Improvement:
- Run the same profile/DQ job.
- Compare the number of partitions and parallelism level to the initial run. A significant increase in partition count and parallelism should be observed, improving job performance.
After updating the SNOWFLAKE_PARTITION_SIZE_IN_MB to 10 in the analysis service, a notable increase in partition count from 1 to 15 was observed for the same job, enhancing parallelism and reducing job completion time.
Partition Count Before: **1** | Partition Count After: **15**
Performance Metrics: Data compression size, uncompressed size, query time, and query ID metrics improved significantly, proving the efficiency of altering partition sizes.
Note: The performance is based on ADOC running in a specific environment and may vary depending on factors and environmental data.
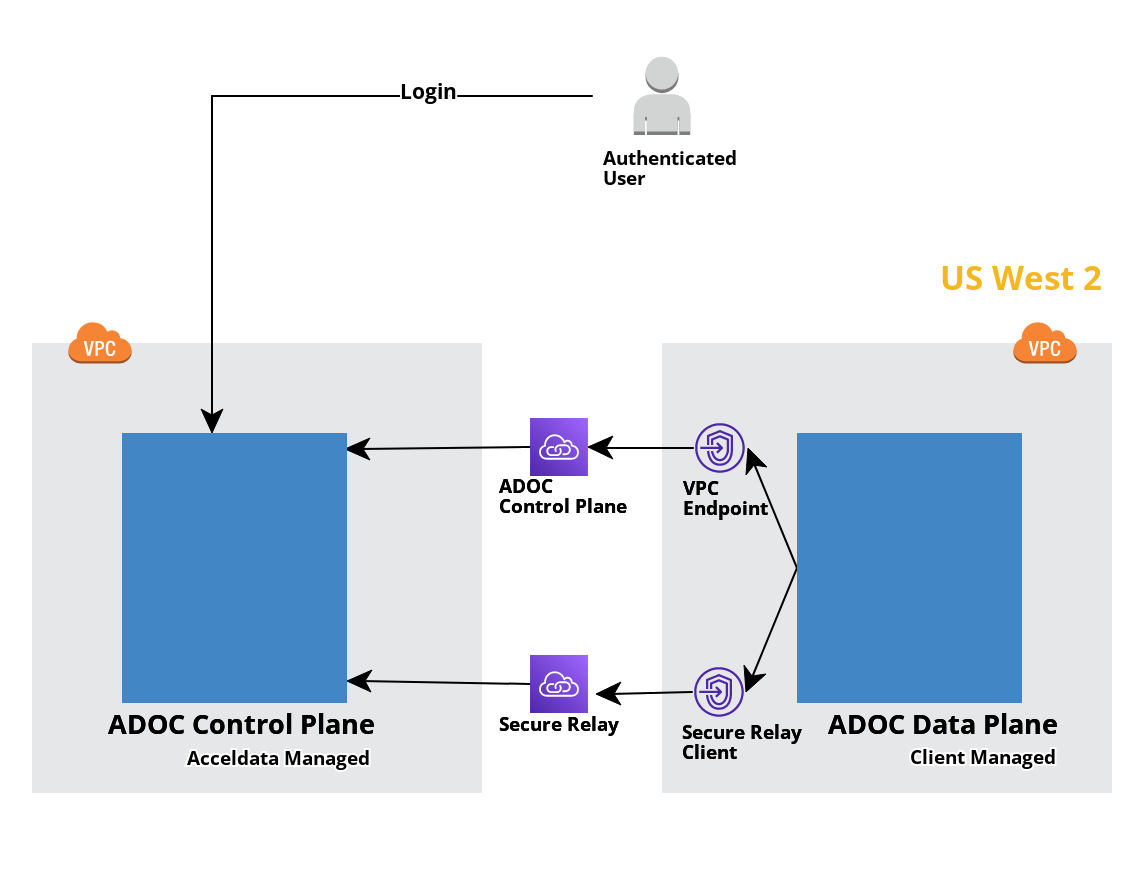
PrivateLink Setup for Snowflake Connection
This guide provides step-by-step instructions to set up AWS Private Link for secure connectivity between Snowflake and Acceldata platform in the USW2 region
Prerequisites
- AWS Account with necessary permissions.
- Snowflake account configured
- VPC setup in USW2 region
Step 1: Authorize PrivateLink Access
- Share AWS Account ID:
- Provide your AWS account ID to the Acceldata support team to authorize PrivateLink from that account.
Step 2: Create VPC Endpoints
Navigate to VPC Console:
- Open the Amazon VPC console.
Create Endpoints:
- Create two VPC endpoints with the following details:
Note: Our assistance is restricted to the US - West-2 region.
1. ADOC Control Plane: com.amazonaws.vpce.us-west-2.vpce-svc-091c001843d33bbaa
2. Secure Relay: com.amazonaws.vpce.us-west-2.vpce-svc-02830f09899d40f01
Step 3: Configure Route53 DNS
Set Up DNS Routing:
Configure Route 53 with the following records:
ADOC Control Plane:
- Record Type: A
- Record Name: <tenant>.acceldata.app
- Value: PrivateLink interface IP of ADOC Control Plane VPC Endpoint
Secure Relay:
- Record Type: A
- Record Name: dataplane.acceldata.app
- Value: PrivateLink interface IP of Secure Relay VPC Endpoint
Security Considerations
Custom ARN: Utilize a custom ARN with least/restricted access.
IAM Roles and Policies: Ensure proper IAM roles and policies are in place for secure access.
For additional reference and help see here.
Take a look at this video which explains the process of adding Snowflake as a data source.
Try our demo here.
