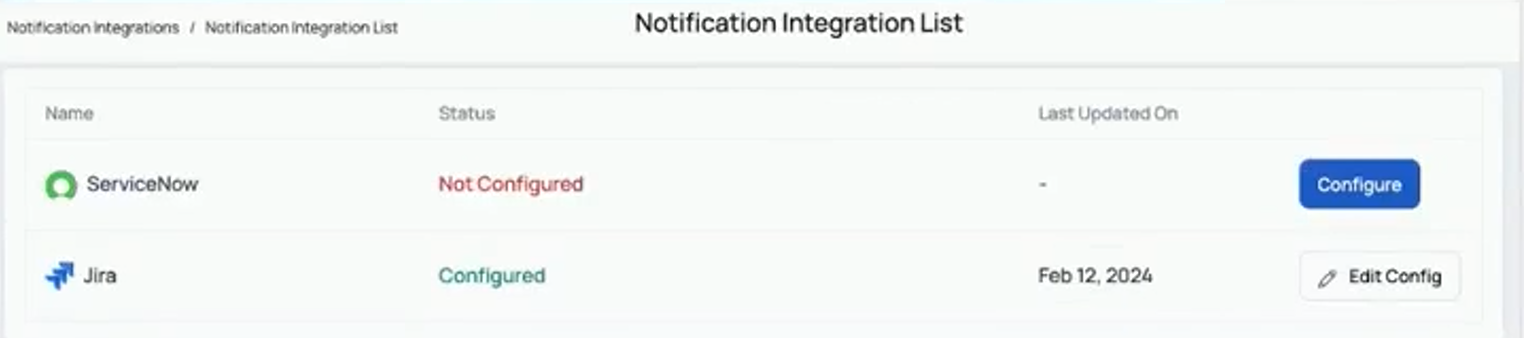
Notifications Integrations
Notifications integrations help to connect different applications or systems to enable the flow of notifications. The notifications integration that is supported on ADOC is ServiceNow.
It enables users to receive critical updates, notifications, and messages from a single application or system that they already use.
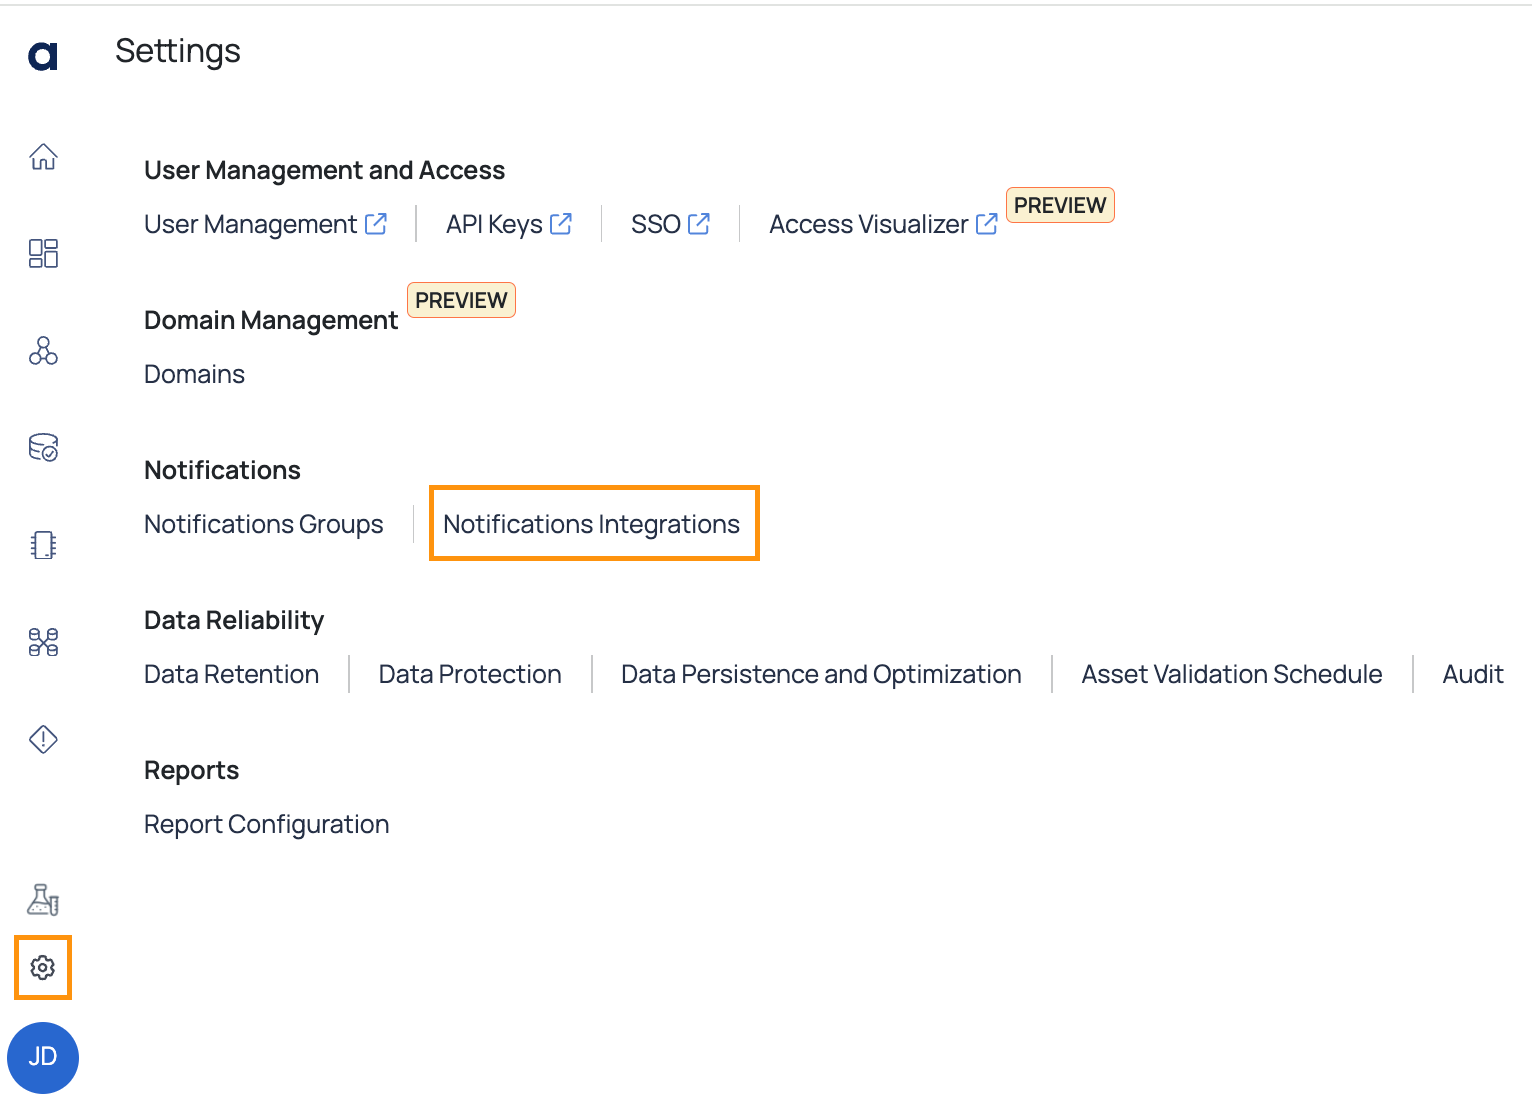
To navigate to the Notifications page, execute the following steps.
- Log in to your ADOC account.
- Click the Settings icon.
- Click Notifications Integrations.
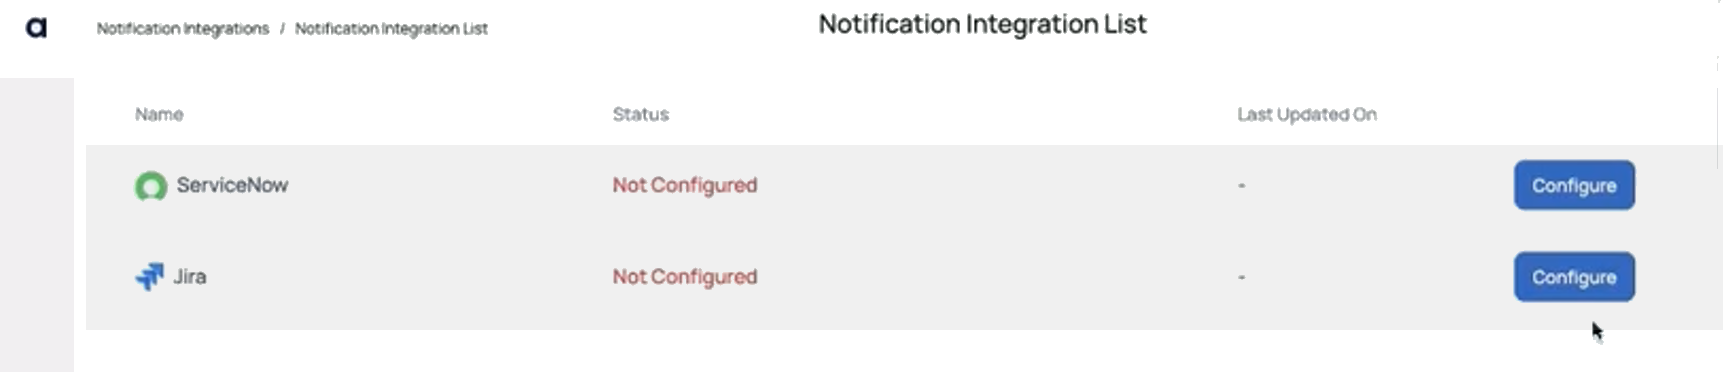
| Fields | Description |
|---|---|
| Name | Name of the notification integration. |
| Status | Status of the integration, if it is configured or not. |
| Last Updated On | Date when the integration was last updated. |
| Edit Config | Can edit the fields such as URL, User name and Password. |

Edit Config
As a ADOC user, you can now choose between a standard integration and an OAuth integration. Many major platforms and applications use OAuth integration because it allows users to offer limited access to their resources without exposing their login details. This not only improves security but also provides a more seamless user experience by eliminating the need for users to enter their credentials manually for each integration.
Standard integration employs direct credentials for authentication and authorization, whereas OAuth integration uses access tokens to decouple authentication from resource access. If credentials are compromised, regular integration can offer security problems, whereas OAuth enables a more safe and controlled means to access resources without sharing the user's credentials.
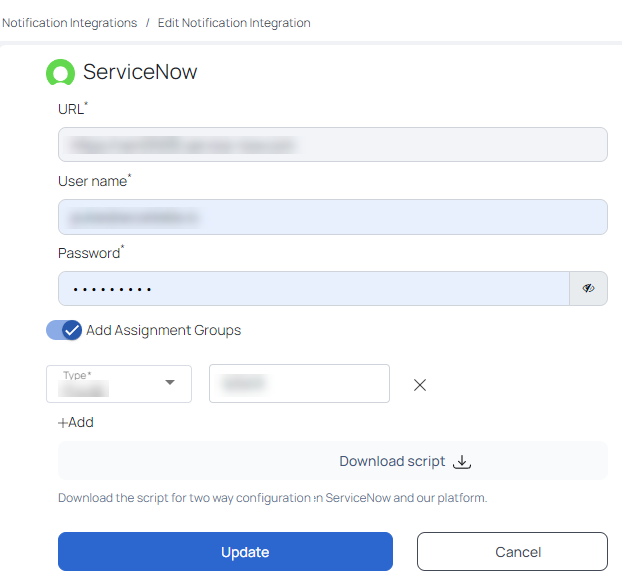
The standard integration makes use of direct credentials for both authentication and authorization.
Ensure that you have the ServiceNow URL readily available.
Check that the ITIL role is enabled in the ServiceNow User Role.
To make changes to the integration, click the Edit Config button in ADOC.
ADOC directs you to the following page.
| Name | Type | Description |
|---|---|---|
| URL | Mandatory | Provide the ServiceNow URL in the field. |
| User name | Mandatory | Enter your username in the designated field. |
| Password | Mandatory | Enter the password in the designated field. |
| Add Assignment Groups | Optional | Toggle this option on to add groups to which notifications should be allocated. |
| Type | Mandatory | The field appears if you have switched on the Add Assignment Groups. Mention the Type |
| Assignment Group ID | Optional | To activate, click the toggle button and include the group ID for assignment. The ID must be generated in the ServiceNow instance and then updated here. To generate the ID:
|
| +Add | Optional | To add more Type and Assignment ID's, click the +Add button. |
| Download script | - | Download the script for two-way configuration between ServiceNow and ADOC. |
To integrate the configuration, click the Update button. When the integration is successful, a popup message appears.
Integrate ServiceNow two-way Configuration
Follow these steps to integrate the two-way configuration between
- Following a successful integration, click the Download script
button. A file named business-rule.txthas now been downloaded to your system. - Open the
business-rule.txtfile and copy the contents.
Perform the following steps in the ServiceNow Server-side scripting page
For the two-way integration between ADOC and ServiceNow to function correctly, the user must have Update permissions on the ServiceNow side. This ensures that the necessary actions can be performed within ServiceNow based on data received from ADOC.
- Open a separate browser and look for 'Business Rules' in the System Administrator tab of ServiceNow Service Management. For more information, see ServiceNow Help Guide.
- Navigate to System Definition > Business Rules from the All menu.
- Click the New button.
- Fill out the Name field with a name for the business rule.
- Choose the Table on which the business rule runs. Example: Incident.
- To enable the business rule and view the enhanced version of the form, check the Active and Advanced check boxes.
- Select the appropriate fields in the When to run tab based on your choices.
- Select the auto-populated Script in the Advanced tab and paste the contents of the downloaded
business-rule.txtfile. - Click on the Submit button.
You have now activated the ServiceNow and ADOC two-way configuration.
Severity Mapping ADOC and ServiceNow
The following is the severity mapping between ADOC and ServiceNow.
| ADOC Severity | ServiceNow |
|---|---|
| CRITICAL | Impact: High Urgency: High Priority: Critical |
| HIGH | Impact: High Urgency: Medium Priority: High |
| MEDIUM | Impact: Medium Urgency: Medium Priority: Moderate |
| LOW | Impact: Medium Urgency: Low Priority: Low |
Jira Integration
ADOC V3.1 and later versions allow Jira integration. Integrating JIRA and Acceldata Data Observability Cloud (ADOC) improves incident management by automating the creation and tracking of JIRA tickets for ADOC incidents.
This integration simplifies workflow, improves collaboration across teams, and ensures efficient resolution of incidents. By leveraging JIRA's robust project management capabilities directly within ADOC, users can maintain better oversight of incident lifecycles, from detection to resolution, directly linking operational insights with actionable tasks. This section guides you through setting up JIRA integration, ensuring a seamless connection between ADOC incidents and JIRA project tracking.
- Project Consistency: Once you associate a Jira project with a notification group in ADOC, avoid changing it. Updating the project for an active notification group can lead to new incidents creating separate Jira tickets, causing confusion and tracking issues with previously linked tickets.
- Single Project Notification: Do not configure multiple notification groups with different Jira projects for the same monitor or policy. This practice can result in the creation of multiple Jira issues for a single ADOC incident, complicating ticket management.
- Monitor Configuration: Ensure that your monitor is active before integrating it with new notification settings. This ensures seamless updates and incident tracking through the chosen Jira project.
1. Prerequisites
For the
- Basic Authentication : The user must generate an API Token in JIRA.
Ensure the user account associated with the API token has the following JIRA project permissions:
- Browse Projects
- Create Issues
- Edit Issues
- OAuth Authentication : The user needs to create OAuth2.0 app in JIRA.
- Create Your OAuth App: Visit the Atlassian Developer Portal and create an app for ADOC integration. This will be your bridge between ADOC and JIRA.
- Configure OAuth: In your app settings, go to Authorization and set up OAuth 2.0(3LO), including adding your ADOC tenant's address as the Callback URL. (Example:
https://<tenant_name>.<acceldata_base_domain>/ui/oauth-success) - Set Permissions: Ensure your app has the necessary JIRA API permissions by adding
read:jira-work,read:jira-user, andwrite:jira-workscopes.
2. Notification Integration Setup
Clicking the Configure buttons takes you to the Configure Notification Integration page.
For a standard authentication you must include the following fields.
| Fields | Description. |
|---|---|
| Server URL | The server URL or the base URL of your JIRA Instance. Use the structure https://<siteName>.atlassian.net. Ensure there's no trailing slash ('/') at the end of the URL. |
| Username | The JIRA account username that ADOC will use to authenticate. This should be the username associated with the API token provided. |
| API Token | A secure token generated in JIRA and used by ADOC to authenticate the connection. This token serves as a password, providing safe communication between ADOC and JIRA while protecting user credentials. |
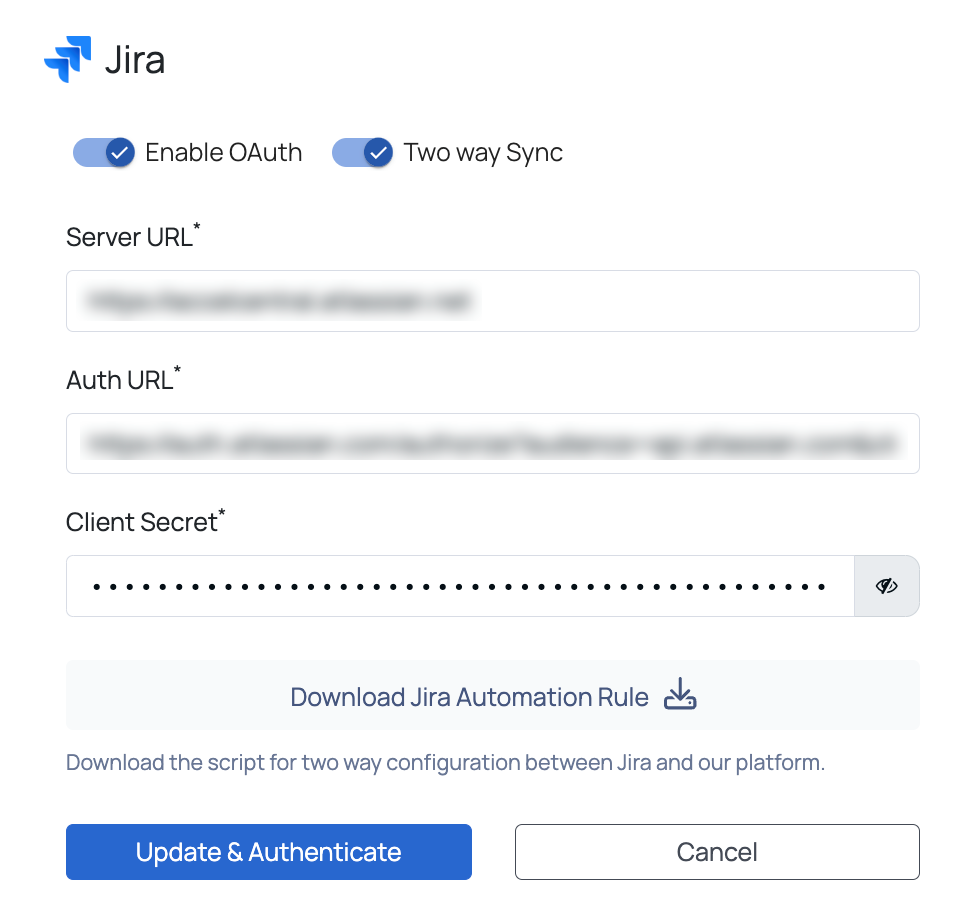
For a OAuth authentication you must include the following fields and click on Update button:
| Server URL | The base URL of your JIRA instance, necessary for ADOC to locate and communicate with your JIRA server. |
| Auth URL | You may obtain this URL by navigating to your app in the developer interface, selecting Authorization, and then Configure to OAuth 2.0 (3LO). The endpoint for OAuth authentication, used by ADOC to initiate the OAuth flow and obtain authorization from the JIRA server. |
| Client Secret | A confidential string shared between ADOC and JIRA to authenticate the OAuth connection. This secret ensures that the communication is secure and that only authorized requests are accepted. This can be found in your app's settings in the developer console. |
Do:
- Before you update the monitor with new notification integration, make sure it is enabled.
- Ensure that the person producing the API Token has the necessary access to browse projects, create issues, and edit them.
Don't:
- Change the Jira project in a notification group after it is used in monitors or policies to avoid losing track of old tickets.
- Use two notification groups with distinct Jira project setups in the same monitor or policy to avoid creating duplicate issues and losing track of tickets.
The Jira configuration is now complete.
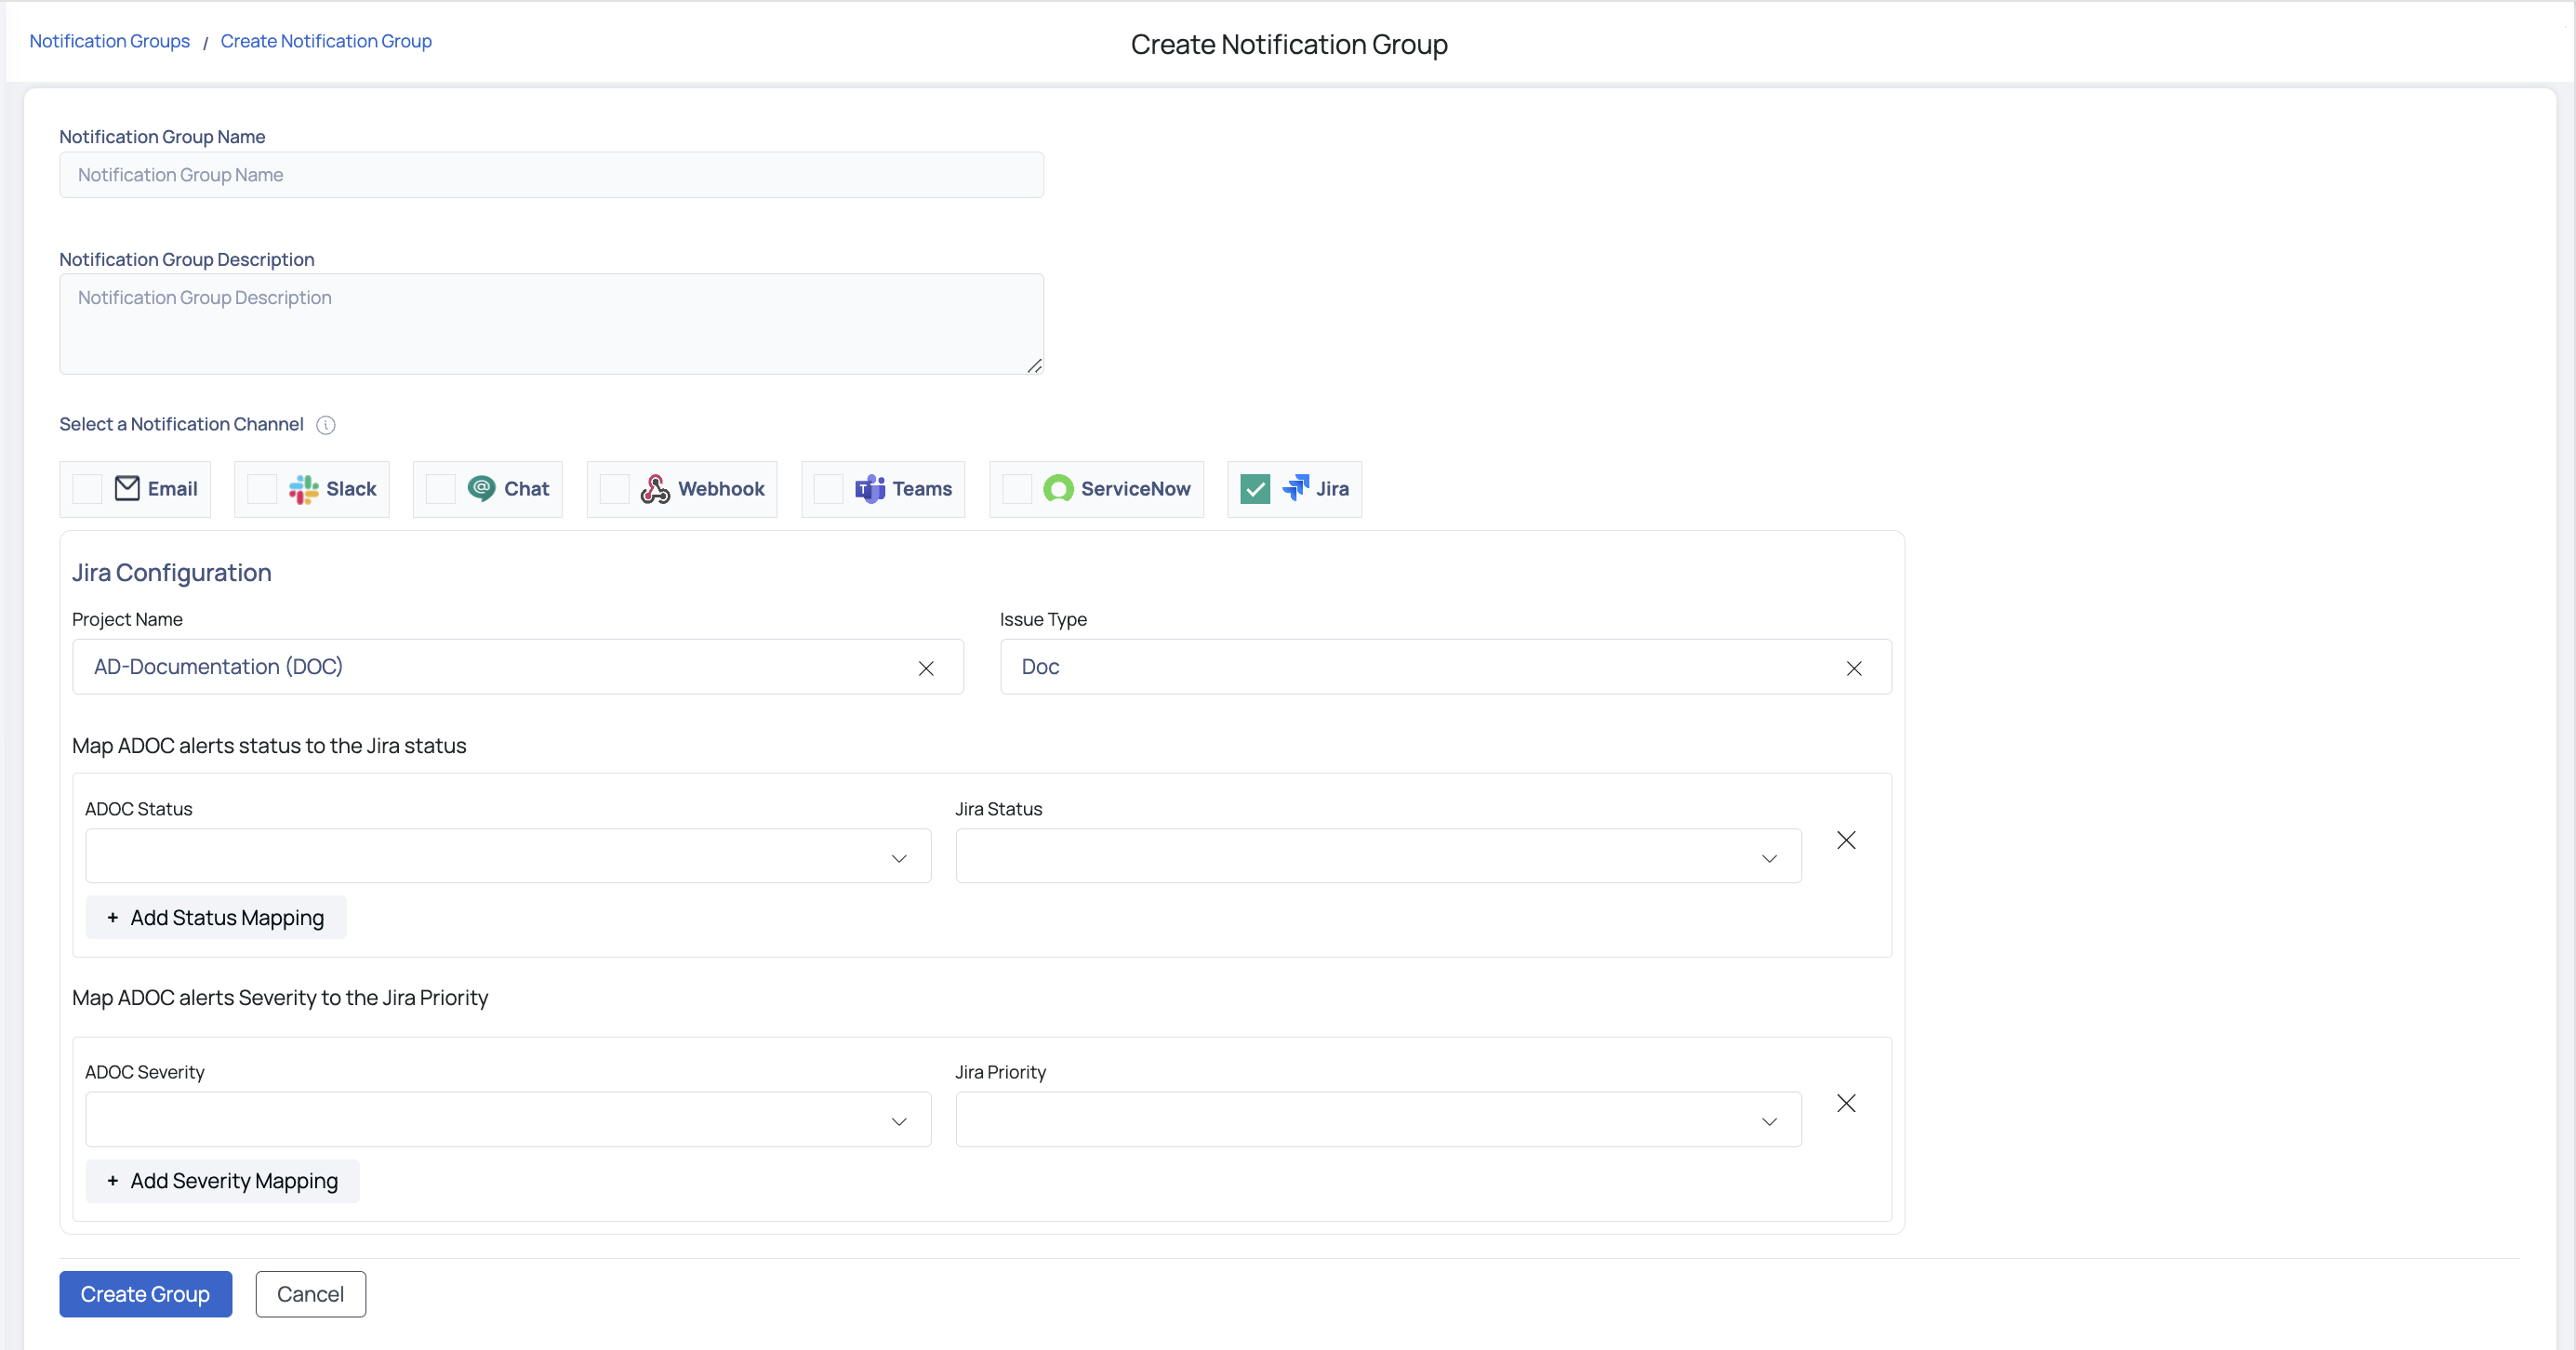
3. Creating a Notification Group
From the settings page, navigate to the Notifications Group, and then click on the button Create Notification Group. For additional details regarding the fields and the description, refer to the Notification Group.
To establish the Notification Group, you need to specify the Jira Project and Issue Type, configure the Status and Severity mappings, and then click the Create Group button to finalize the setup.
4. Applying it to Monitors
4.1. Navigate to the Monitors sections in ADOC and select the monitor you wish to integrate with Jira.
4.2. Within the monitor's settings, find the option to select a notification group. Choose the JIRA notification group you created earlier.
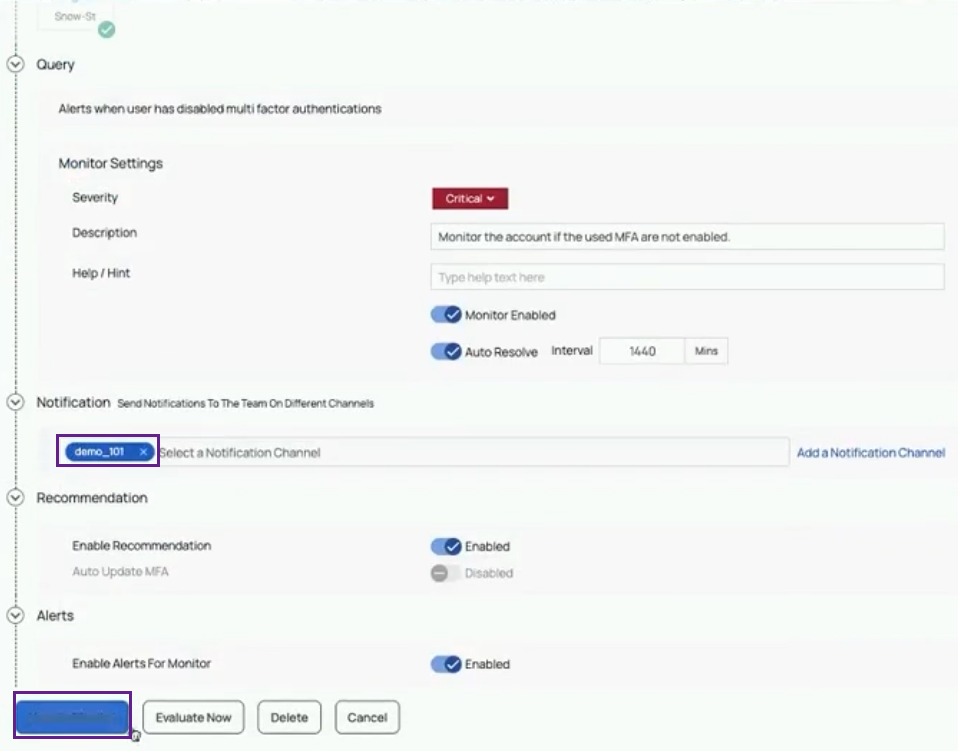
4.3. For the selected monitor, set thresholds that determine when an incident triggers a JIRA ticket creation. This could be based on specific metrics or conditions monitored by ADOC.
4.4 Click on Evaluate Now button to view if any threshold has been breached.
JIRA's interface with ADOC V3.1 and later versions improves incident management by optimizing workflows, improving team collaboration, and ensuring rapid incident resolution. Users can manage incident lifecycles from detection to resolution using JIRA's extensive project management features in ADOC, integrating operational insights to actionable tasks. This guide covered prerequisites, notification integration, and application to monitors for this integration. After JIRA integration, ADOC users may manage incidents seamlessly and efficiently, improving productivity and incident response.
Jira Two-Way Sync Integration with ADOC
Jira Two-Way Sync integration allows users to synchronize issue status and priority changes between ADOC and Jira. With this integration, users can:
- Map Jira fields to ADOC status and severity fields.
- Ensure that any status or severity change of an alert in ADOC reflects in the Jira issue.
- Ensure that Jira status or priority changes in a Jira ticket are reflected back in ADOC alerts.
Prerequisites
Before setting up two-way sync, ensure the following:
- You have Jira administrator permissions to manage automation rules.
- You have an API Token for authentication in Jira.
- You are using ADOC v3.1 or later, which supports Jira integration.
Step 1: Enable Two-Way Sync in ADOC
- Log in to ADOC and navigate to Settings > Notification Integrations.
- Select Jira from the available integrations.
- Toggle Two-Way Sync to enable it.
- Enter the Jira Server URL, Username, and API Token.
- Click Download Jira Automation Rule to get the JSON configuration file.
- Click Update to save the configuration
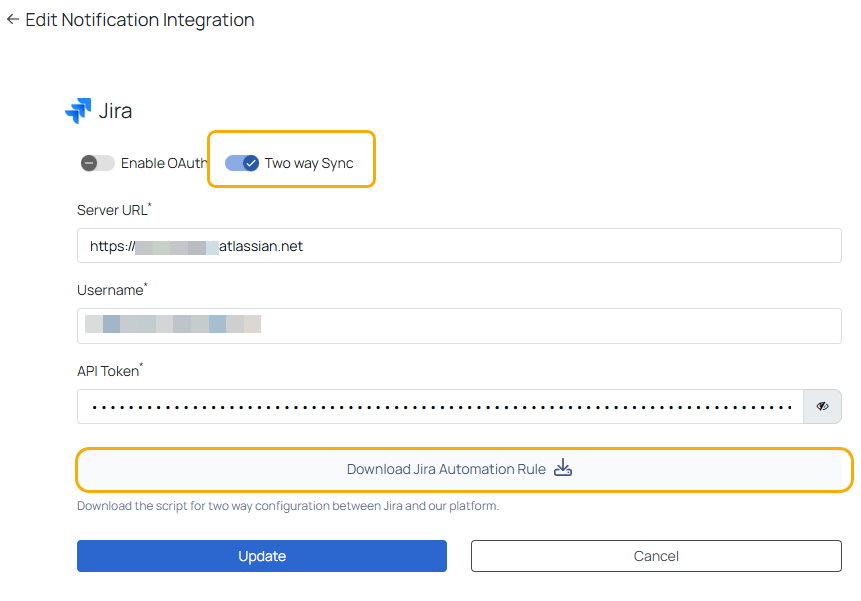
The downloaded JSON file contains predefined automation rules to facilitate two-way communication between Jira and ADOC.
Step 2: Import Jira Automation Rules
- Log in to your Jira account.
- Navigate to Settings > System > Global Automation.
- Click the ellipsis (⋮) menu in the top right corner.
- Select Import Rules.
- Click Upload JSON and select the file downloaded from ADOC.
- Choose the appropriate Jira project where you want the integration to apply.
- Select Import Rule Owners to retain the correct ownership structure.
- Click Next, then Done to complete the import.
The automation rule enables Jira to send updates back to ADOC when a status or priority changes in Jira.
Step 3: Enable the Imported Rule in Jira
Go to Jira > Settings > Global Automation.
Locate the rule you just imported .
Toggle the Enabled switch to activate the rule.
Click on the rule to review its configuration:
- Trigger: When status or priority changes in Jira.
- Action: Send a webhook request to ADOC to update the corresponding alert.
Save and exit.
By default, imported automation rules in Jira are disabled. You must manually enable them for two-way sync to work.
With the Jira Two-Way Sync integration in ADOC, users can streamline issue tracking and resolution by ensuring bidirectional updates between their monitoring system and project management tool. By setting up automation rules in Jira, status and priority changes can be reflected seamlessly across both platforms.
For more details on Jira Automation, refer to: