
Securing NiFi with CA Certificates without NiFi LDAP authentication:
In this scenario, a commercial Certificate Authority (CA) is being used, although it could alternatively involve an enterprise CA that is equipped with an internal CA certificate that is set up to be trusted by corporate devices. Many commercial vendors provide signed certificates, and TinyCert is chosen here due to its no-cost nature. Another option, Let’s Encrypt, also offers free certificates but requires hostname ownership verification, which involves additional steps not detailed in this scenario.
All certificates and keys in this setup will follow the Privacy-Enhanced Mail (PEM) format, which is a widely accepted standard for certificates and keys. PEM uses Base64 encoding for file contents, allowing for seamless transmission across various mediums and storage systems. The contents can be easily viewed using plain text editors, while tools like openssl and keytool are capable of parsing them.
Example PEM file:
Example parsed contents:
The prerequisites for this scenario, as issued by the IT department, include:
A signed NiFi server certificate for the specified host (secure.nifi in this example) in PEM format (
nifi.pem)The corresponding private key in PEM format (
nifi.key)A signed client certificate for the specified user (
CN=my_username, etc. in this example) in PEM format (client.pem)The corresponding private key in PEM format (
client.key)The CA certificate in PEM format (
cacert.pem)
For more information on converting certificates between various formats, refer to the Toolkit Guide: Additional Certificate Commands.
The final setup will include a self-signed external CA (the root), a keystore and truststore containing the necessary certificates for the NiFi instance to operate, and a client certificate for a human user to access NiFi.
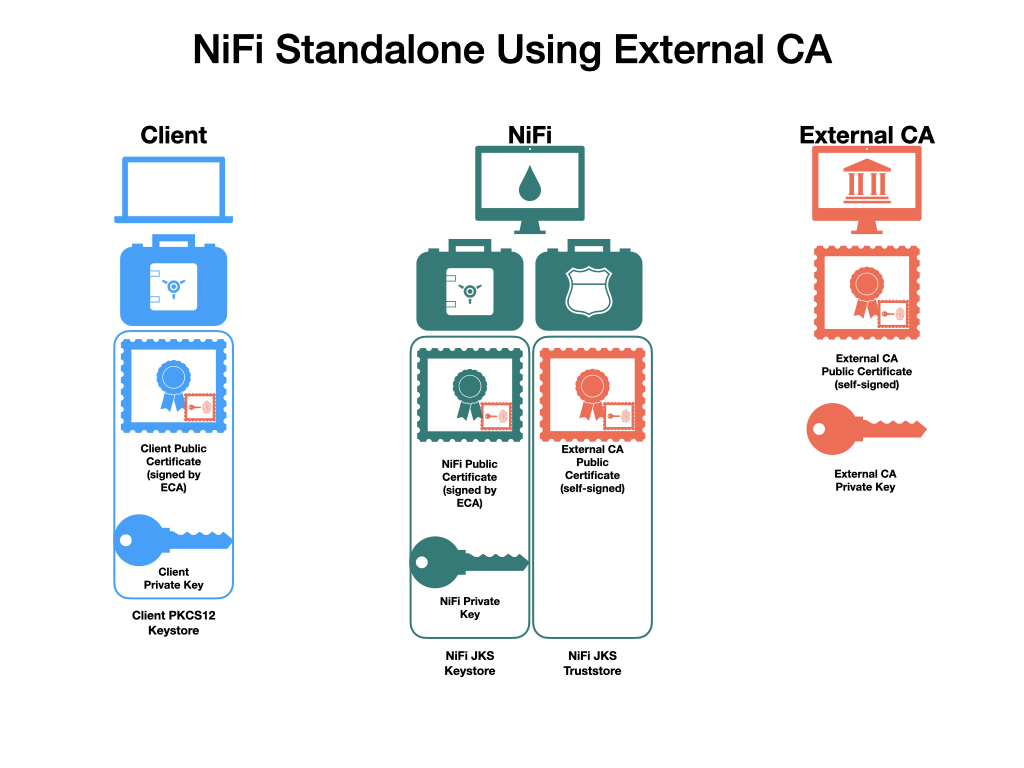
Certificate Requirements
Ensure compliance with the following certificate requirements, maintaining the sequence while shuffling the order:
The certificate's X509v3 ExtendedKeyUsages segment must include the following attributes:
clientAuth: Intended for TLS web client authentication.
serverAuth: Intended for TLS web server authentication.
Avoid the use of wildcard certificates. Each cluster node should have its own certificate. When NiFi or NiFi Registry operates behind Knox, do not use wildcard certificates for Knox.
The certificate's signature algorithm must use sha256WithRSAEncryption (SHA-256).
Subject Alternate Names (SANs) are mandatory and must include at least the Fully Qualified Domain Name (FQDN) of the host.
Additional names for the certificate/host can be added as SANs.
Include the FQDN used for the Common Name (CN) as a DNS SAN entry.
If considering the use of a load balancer for the NiFi service, include the FQDN of the load balancer as a DNS SAN entry.
The certificate's X509v3 KeyUsage segment should include the following attributes:
DigitalSignature
Key_Encipherment
The KeyStore should only contain a single PrivateKeyEntry. Using multiple private keys within one KeyStore is not recommended.
Ensure that the KeyStore password and the key/certificate password either match or are unset.
Consistency in KeyStore password and key/certificate password is crucial across all different KeyStores used on each NiFi cluster node. Individual passwords for NiFi hosts are not supported by Ambari.
Generate keystore.jksand truststore.jks for NiFi Hosts:
Determine if the server certificate (
nifi.pem) contains the complete certificate chain or just the server certificate. If the sequence-----BEGIN CERTIFICATE-----occurs only once, this is just the server certificate. If it occurs multiple times, the certificate chain is present. If the certificate chain is present, continue with Step 3. If it is not present, continue to Step 2.
Concatenate the server certificate and CA certificate to form the certificate chain.
Form the PKCS12 keystore from the certificate chain and private key.
Generates the PKCS12 keystore containing the private key and certificate chain under the alias nifi-key. The command will prompt for an export password. Choose a secure password and enter it twice for confirmation.
Convert the PKCS12 keystore for the NiFi instance into the Java KeyStore file (
keystore.jks). PKCS12 keystores are usable by NiFi, but JKS format is handled more robustly and causes fewer edge cases. JKS keystores cannot be formed directly from PEM files, so the PKCS12 keystore serves as an intermediate form.
Converts the PKCS12 keystore to a JKS keystore. This command will prompt for a new keystore password twice, then prompt for the password set on the PKCS12 keystore from the previous step.
Convert the CA certificate into the NiFi truststore (
truststore.jks) to allow trusted incoming connections.
Imports the CA certificate into the truststore. This command will prompt for a new truststore password twice.
Optionally, move the
keystore.jksandtruststore.jksfiles into theconf/directory. This step is not required but helps with organization.Generate client certificates and add them to the machine browser to access the NiFi UI.
Generate the client certificate keystore from the client certificate and key.
Creates the PKCS12 keystore containing the client certificate and private key. This command prompts for an export password twice.
From this point, the instructions are identical to those using the TLS Toolkit, starting at Loading the client certificate in the browser.
Enable SSL with Existing Certificates (Using Ranger for Authorization)
Navigate to Ambari UI > NiFi > Configs > Advanced > Advanced nifi-ambari-ssl-config and check the Enable SSL? box.
Configure the following values:
Keystore path:
/etc/nifi/conf/keystore.jksKeystore password
Keystore type
Configure the following values:
Truststore path:
/etc/nifi/conf/truststore.jksTruststore password
Truststore type
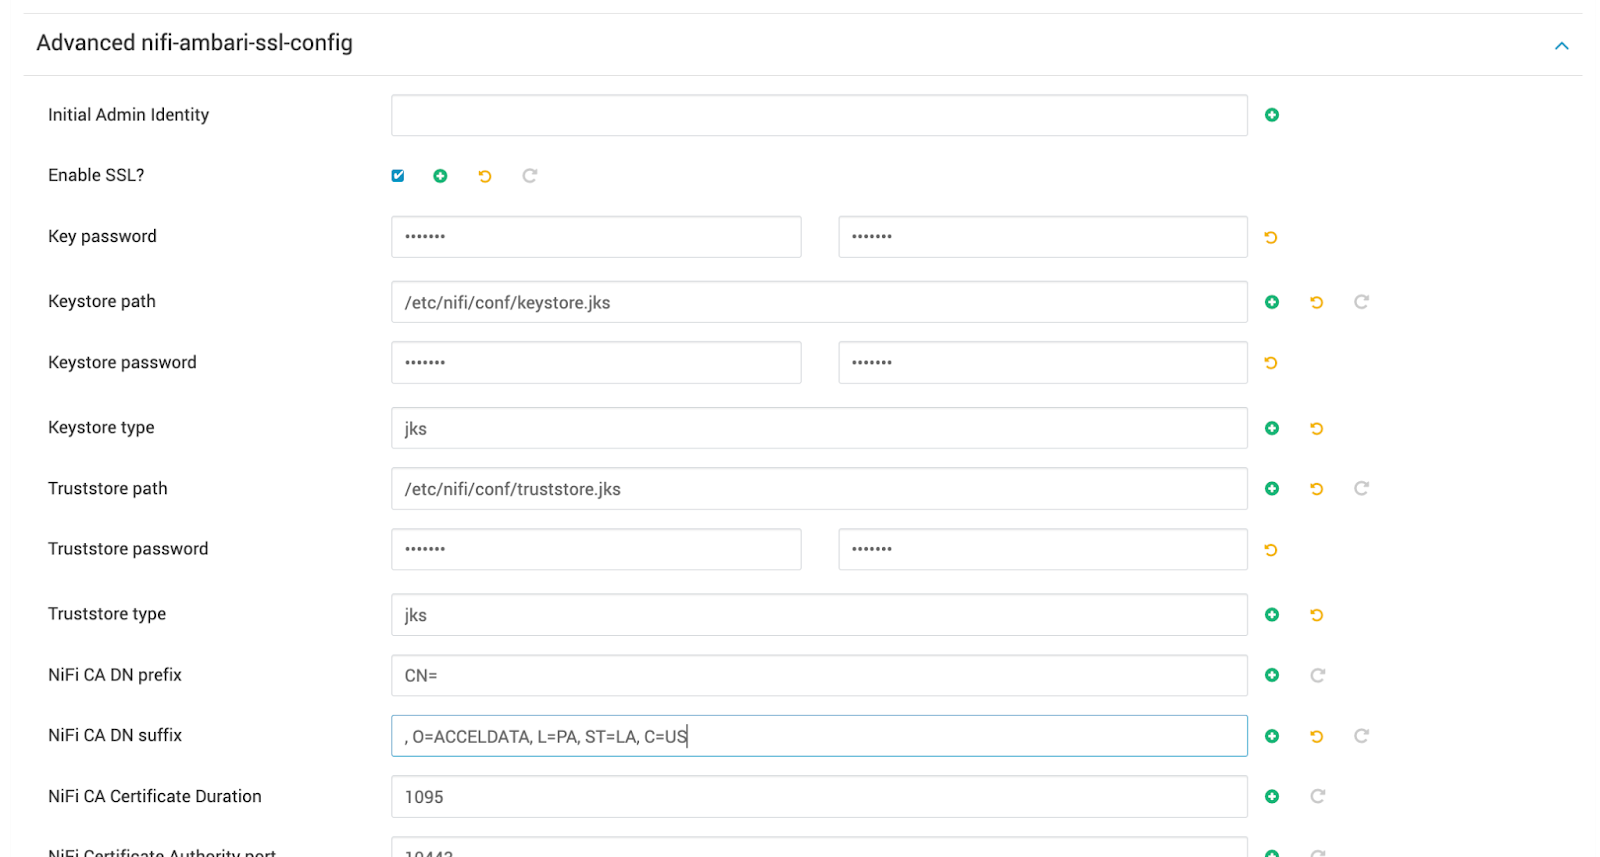
Setting Up Identity Mapping
Identity mapping properties can be configured to standardize user identities across different authentication methods in NiFi. Once set up, NiFi treats identities authenticated by various identity providers (such as certificates, LDAP, Kerberos) uniformly. This helps avoid creating duplicate users and ensures that user-specific configurations, such as authorizations, only need to be set up once per user.
Perform the following steps:
Navigate to the NiFi service Configs tab and click on Advanced nifi-properties.
Use the Filter box to search for
nifi.security.identity.mapping.pattern.Enter the following values:
Field | Sample Value |
|---|---|
nifi.security.identity.mapping.pattern.dn |
|
nifi.security.identity.mapping.value.dn |
|
nifi.security.identity.mapping.pattern.kerb |
|
nifi.security.identity.mapping.value.kerb |
|
Click Save.
Restart NiFi using the "Restart all Required" option from the Action menu.
Example
The following examples demonstrate normalizing Distinguished Names (DNs) from certificates and principals from Kerberos:
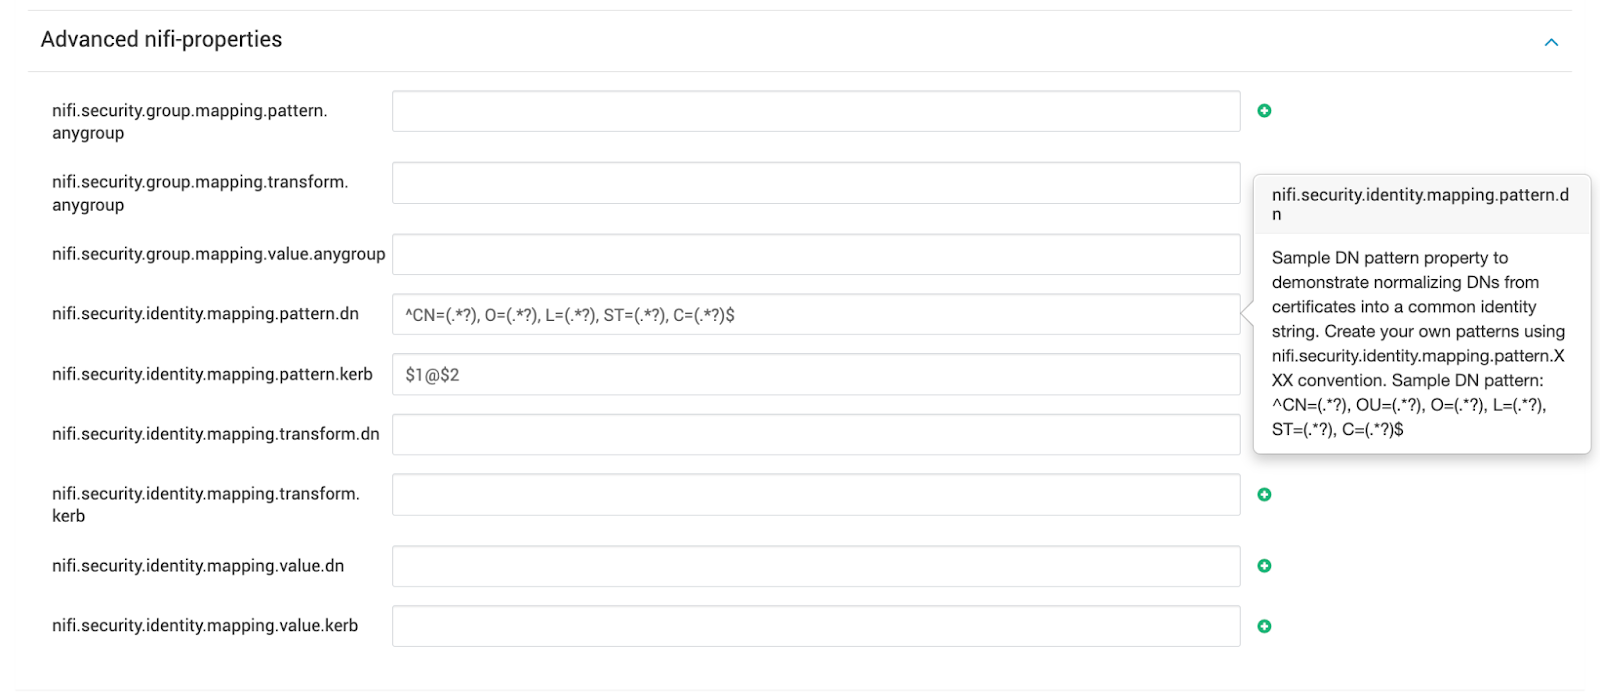
Logging into NiFi After Enabling SSL
After enabling SSL in NiFi, follow these steps to securely log in:
Open NiFi from the Ambari Quick Links menu.
When prompted by your browser, select the certificate you recently imported. Use incognito mode if the certificate prompt does not appear.
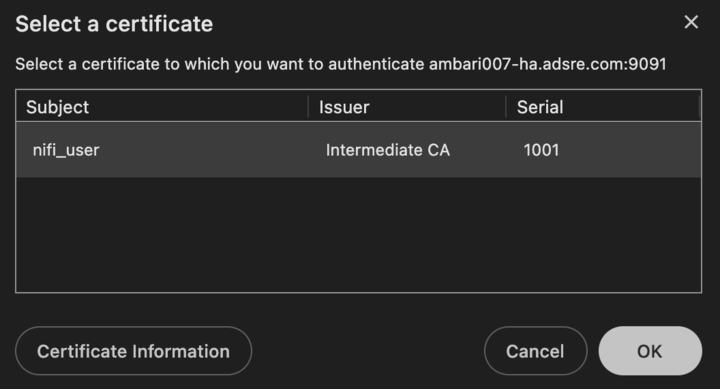
Note When NiFi is running on a host with Ambari and SSL enabled, the default URL becomes secure: https://<local-host>:9091/nifi.
Additional Steps
Ranger Test Connection Failure Due to SSL:
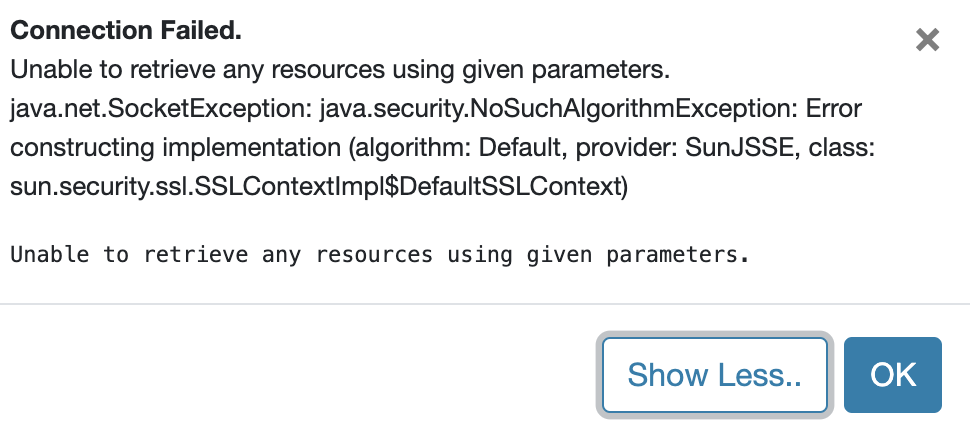
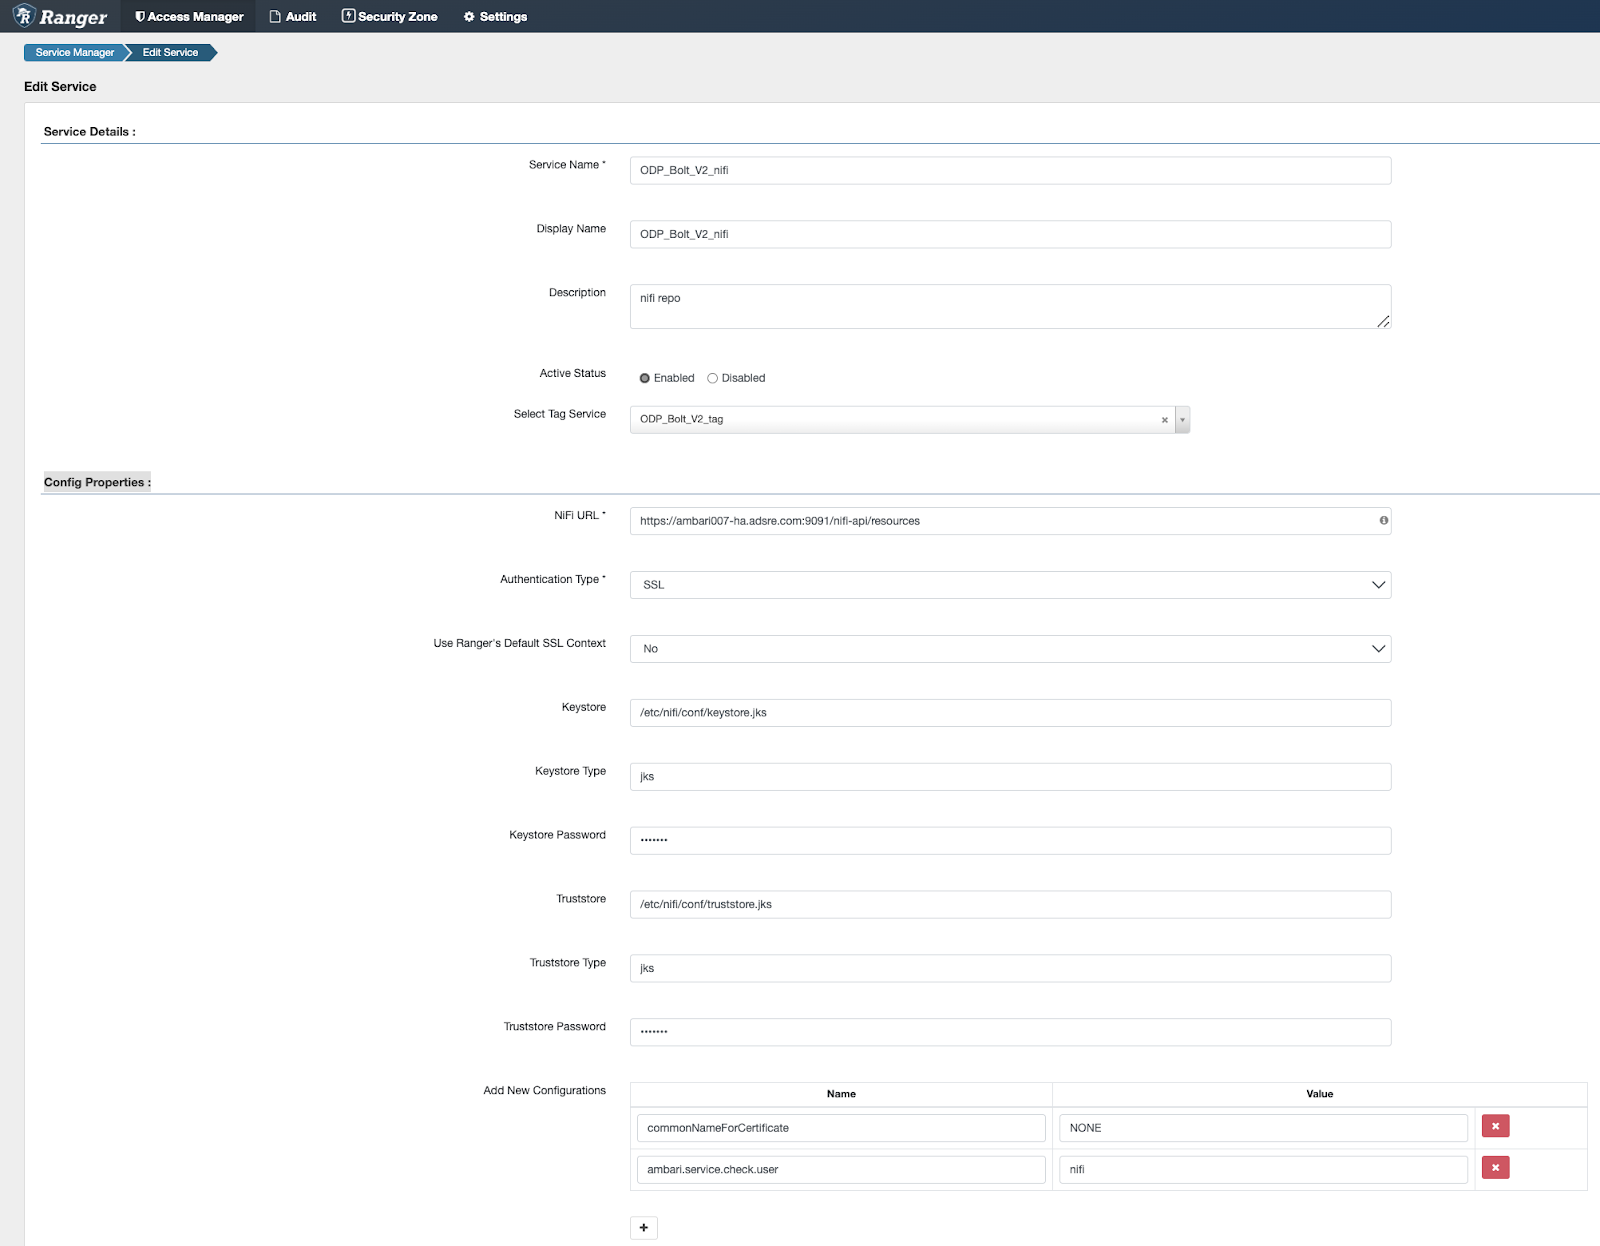
→ Configurations to Review: Log into the Ranger UI -> Edit NiFi Service Repo, and review the following:
NiFi URL
Ensure that the Config Properties"are added or updated correctly.
Ranger Test Connection Failure Due to 403 Forbidden Permission:
→ Review NiFi nifi-user.log
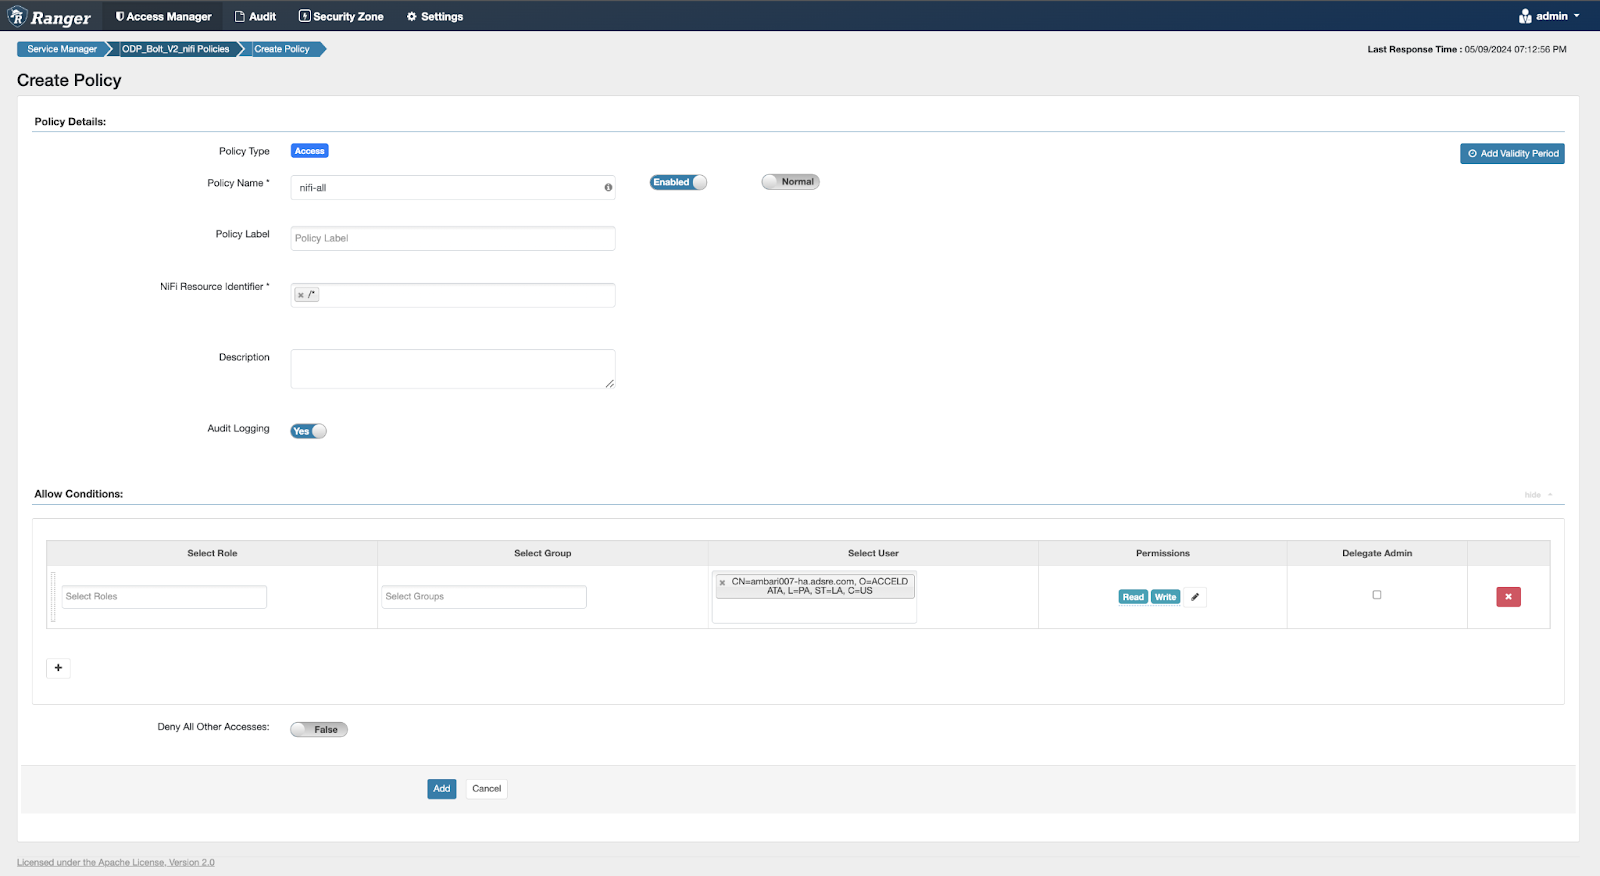
Solution: Add Complete Certificate DN in Ranger User section and Add to Respective NiFi Policy.
Example: [CN=ambari007-ha.adsre.com, O=ACCELDATA, L=PA, ST=LA, C=US]
Log into Ranger UI > Settings > Users > Add New User > Update User Name and New Password (dummy password, Meets password requirement) > Save it.
Go to Ranger NiFi Policy → Add user to existing Policy or Create new One: Add new Policy Example:
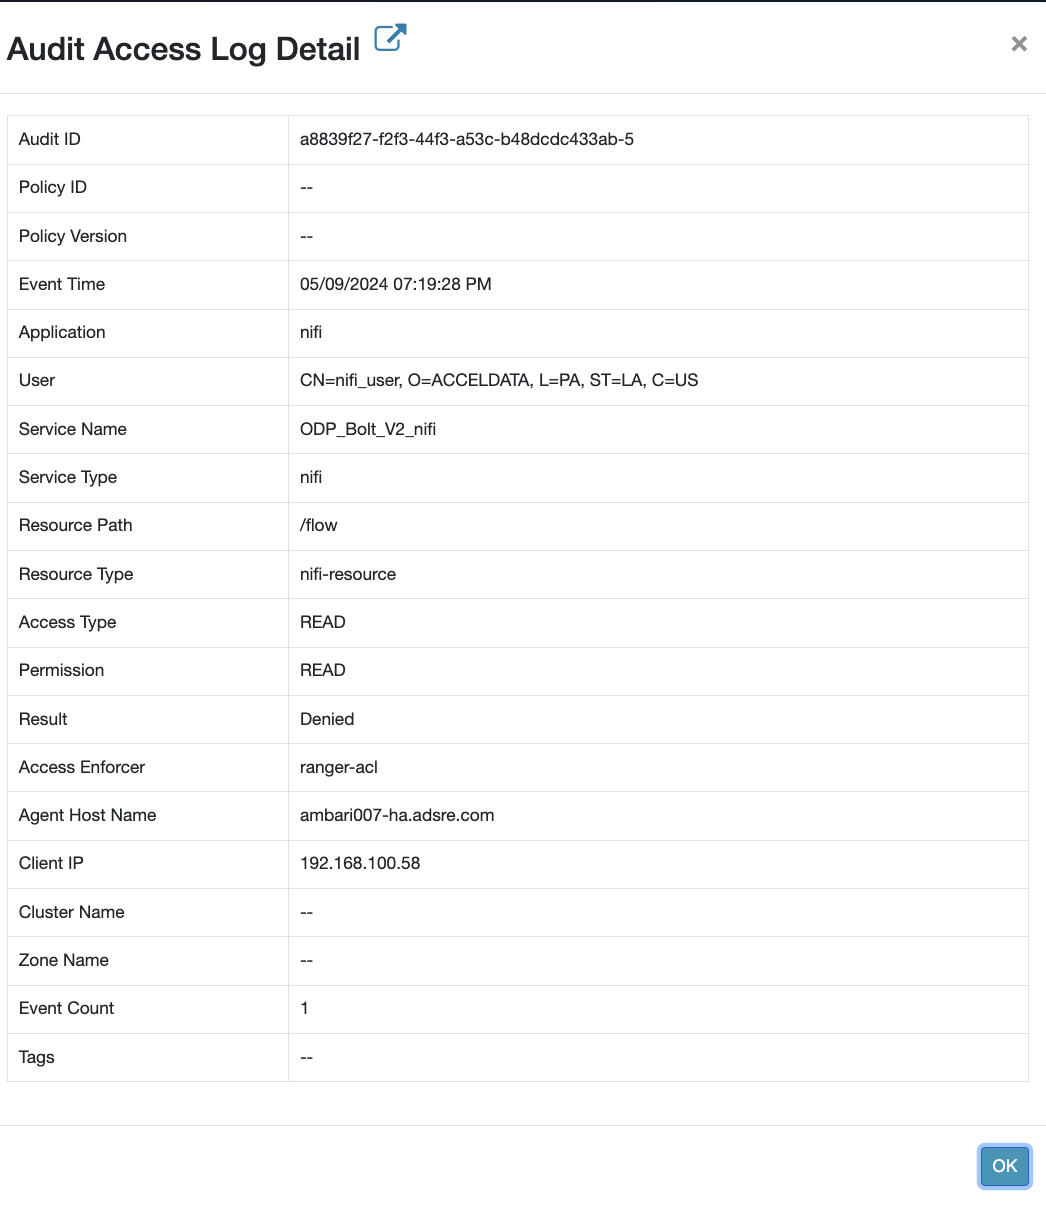
Insufficient Permission | No applicable policy could be found:
→ Review NiFi Ranger Audits

Solution: Add a Ranger policy for the client certificate.
User: CN=nifi_user, O=ACCELDATA, L=PA, ST=LA, C=US
Add user
CN=nifi_user, O=ACCELDATA, L=PA, ST=LA, C=USin Ranger:Log into Ranger UI > Settings > Users > Add New User
Update User Name and New Password (dummy password, meets password requirements).
Save it.
Go to Ranger NiFi Policy > Add user to an existing policy or create a new one: Add new Policy Example:
Enable SSL with Existing Certificates (Without Using Ranger for Authorization)
Check the Enable SSL? checkbox.
Specify the following values for Keystore path, Keystore password, and Keystore type:
Keystore path:
/etc/nifi/conf/keystore.jksKeystore password
Keystore type
Set the Truststore path, Truststore password, and Truststore type:
Truststore path:
/etc/nifi/conf/truststore.jksTruststore password
Truststore type
Provide the Initial Admin Identity details.
The Initial Admin Identity represents the first administrator, enabling access to the UI and the ability to create additional users, groups, and policies. This information is mandatory unless you are using the Ranger plugin for NiFi authorization.
Format for the Initial Admin Identity:
CN=admin, OU=NIFI. After adding the Initial Admin Identity, it is necessary to promptly generate a certificate for this user.
Define the Node Identities.
Specify the identity of each node in the NiFi cluster to facilitate communication between clustered nodes. This information is compulsory unless you are using the Ranger plugin for NiFi authorization.
Example:
<property name="Node Identity 1">CN=node1.fqdn, OU=NIFI</property><property name="Node Identity 2">CN=node2.fqdn, OU=NIFI</property><property name="Node Identity 3">CN=node3.fqdn, OU=NIFI</property>Replace
node1.fqdn,node2.fqdn, andnode3.fqdnwith their respective fully qualified domain names.