Explanation (Core Concepts)
What is Governance?
Governance is the centralized data access control plane of Acceldata xDP. It lets platform administrators define who can read, write, and manage every catalog, schema, table, and fileset across the platform — and proves, through audit logs, that those rules are enforced. Governance solves the perennial enterprise problem of fragmented, per-engine permissions by giving you a single place to author policies, manage identities, and verify your own effective access.
Under the hood, Governance is powered by an Apache Ranger policy engine that runs on your tenant's dedicated XCentral plane. Every compute and storage cluster in your tenant connects to this same governance plane, so a policy you write once is enforced consistently wherever your data lives.
Key Concepts
Data Governance — The policies, roles, and processes that ensure data integrity, confidentiality, and compliant access. In xDP, governance is expressed as access policies attached to data resources.
Policy — A named rule that grants or denies a set of permissions (for example,
select_table,read_fileset) to specific users or groups on a scoped resource. Policies can layer grants, exclusions, denials, and break-glass exceptions.Service — The governed system a policy applies to. In xDP, each xStore (catalog cluster) is automatically registered as a governance service, making its metalakes, catalogs, schemas, tables, and filesets available as policy targets.
Identity (User / Group) — The principals that policies grant permissions to. Users and groups are managed centrally and reused across every policy.
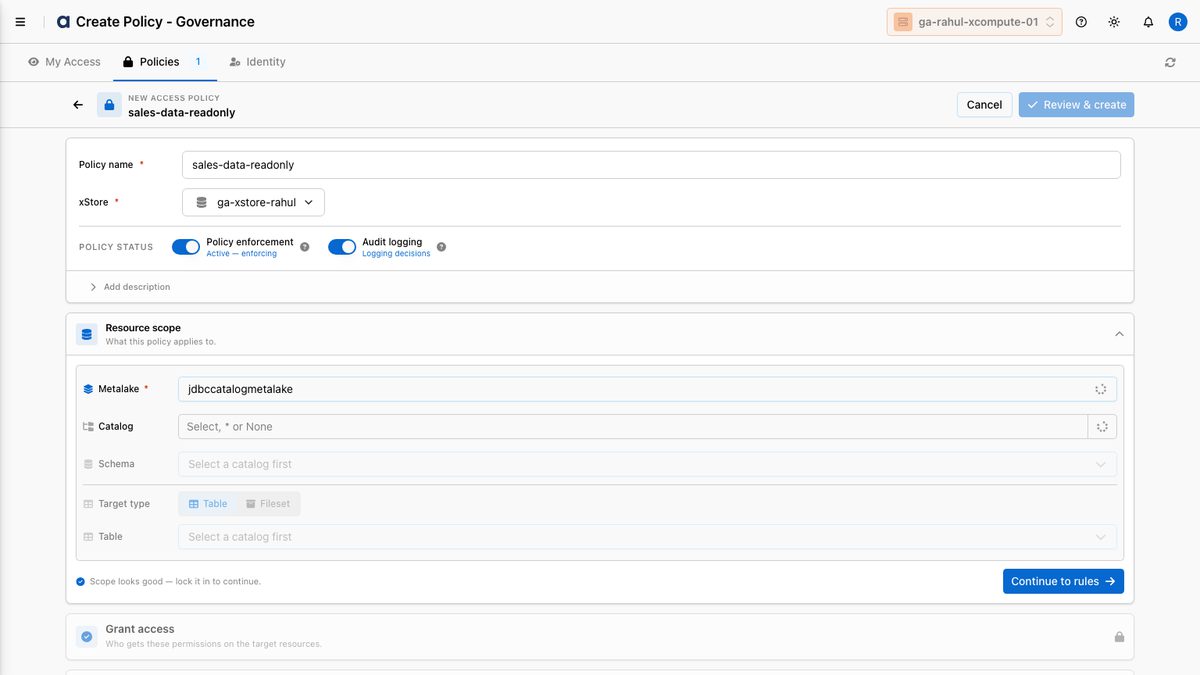
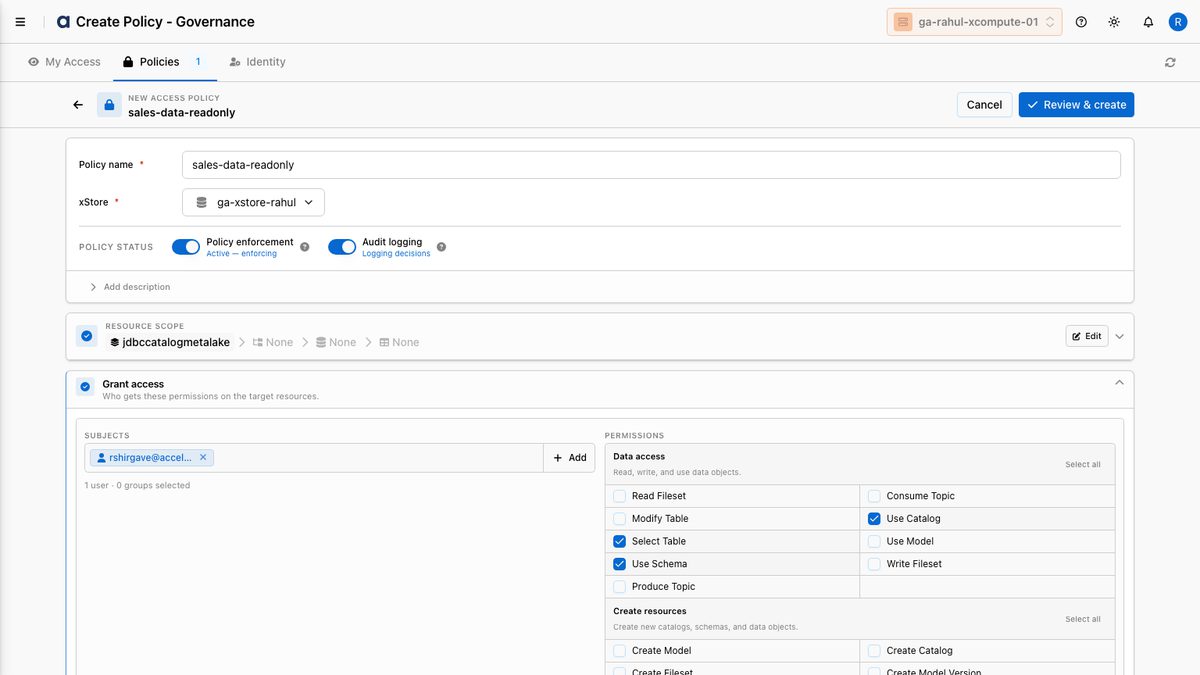
Resource Scope — The hierarchical target of a policy, from broad to narrow: metalake → catalog → schema → table/fileset. You select each level in sequence, and the choice at one level filters the options available at the next.
Capabilities
Governance is organized into three working areas, each addressing a distinct use case:
My Access (monitoring) — See the effective access policies assigned to you, so you can confirm what data you are entitled to before you run a job or query.
Policies (configuration) — Author, filter, and manage the access-control policies that govern catalogs, schemas, tables, and filesets across your xStores.
Identity (provisioning) — Create and manage the users and groups that policies grant permissions to.
Tutorial (Getting Started)
Prerequisites
Before you can author governance policies, confirm the following are in place:
An XCentral governance plane is provisioned for your tenant (one per tenant, mandatory). This hosts the Apache Ranger policy engine.
At least one xStore (catalog) cluster is created and linked to XCentral. The xStore is automatically registered as a governance service and becomes selectable when you create a policy.
You have an administrator role with permission to manage governance.
The users or groups you intend to grant access to exist in the Identity tab (or you create them as part of this workflow).
Note: If no xStore service is registered yet, the Policies tab shows "No policies found — Create a service first, then add policies." Create and link an xStore before authoring policies.
Your First Workflow
This walkthrough takes you from an empty governance plane to a working access policy. The video below shows the full policy-authoring flow end to end — defining the scope, granting access, layering a deny and exclusion, and reviewing before you save:
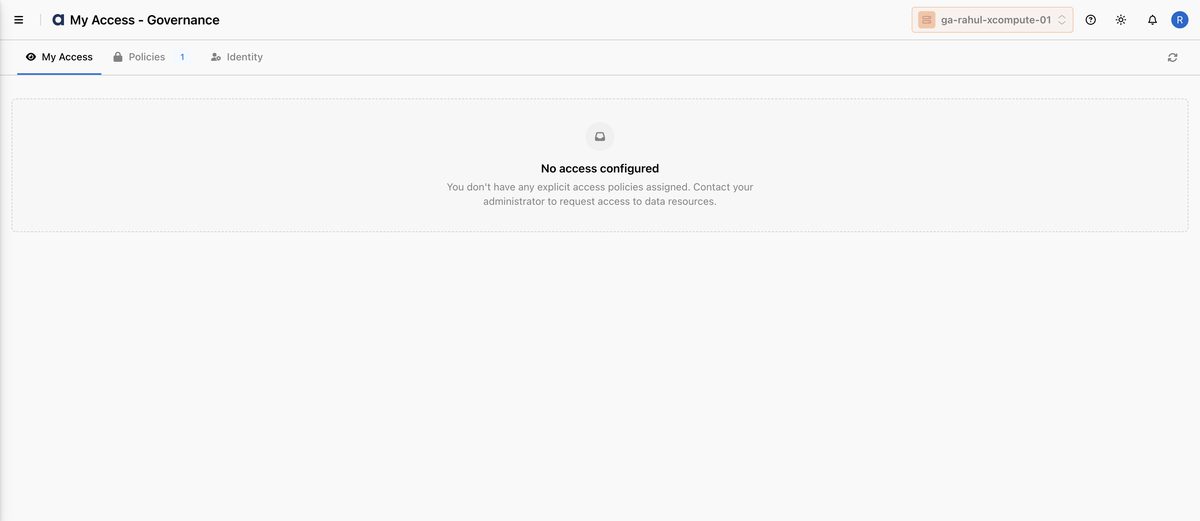
In the left navigation, select Governance. The page opens on the My Access tab, which lists any policies that currently apply to you.
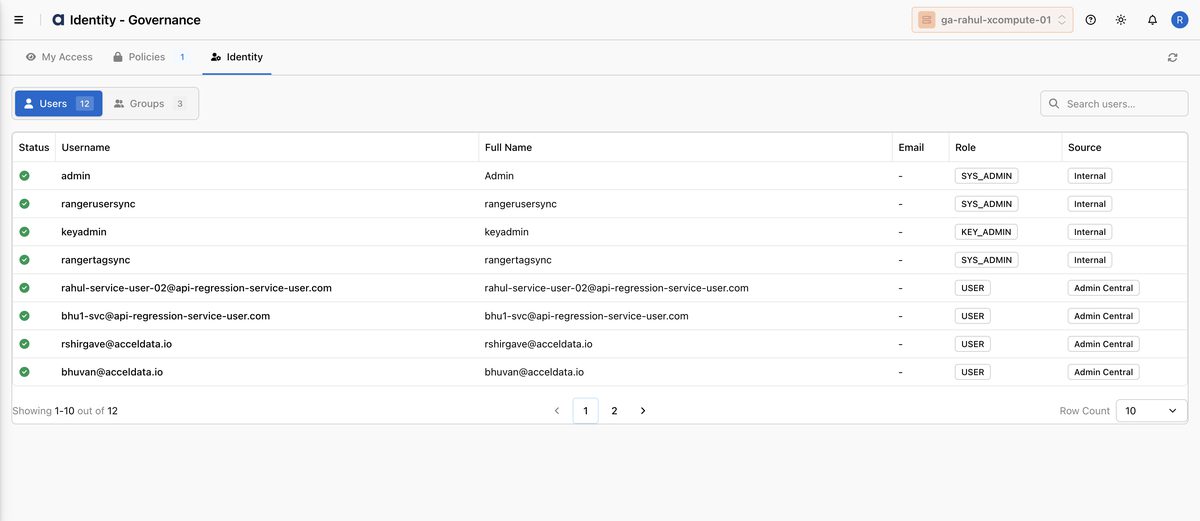
Select the Identity tab. Use the Users and Groups sub-tabs to review existing principals, and create any user or group you plan to grant access to. Use the search box to quickly locate an existing principal.
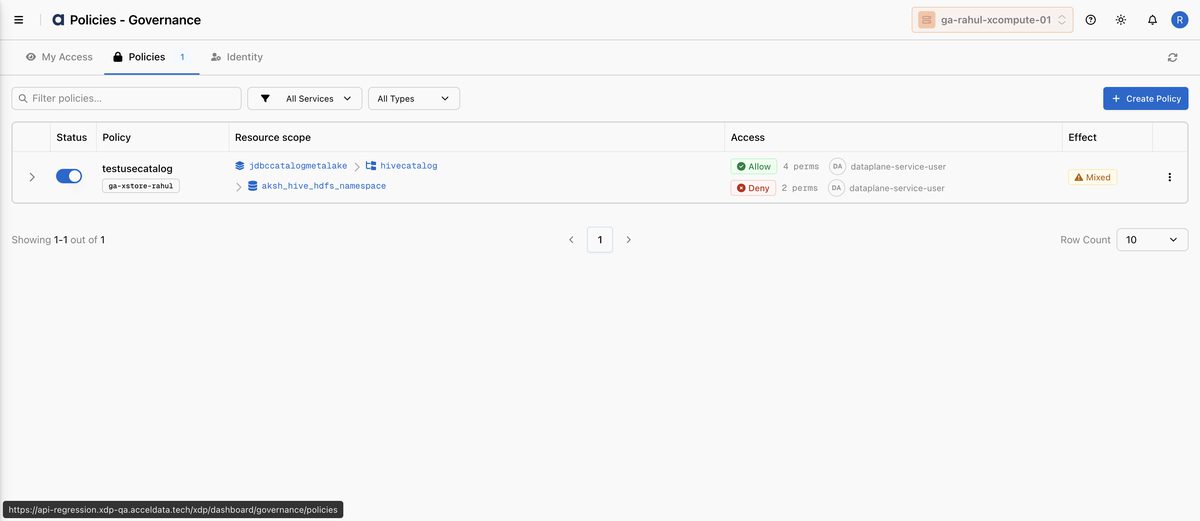
Select the Policies tab. This is where every access rule lives. Filter the list by service (xStore) or policy type, or search by name.
Select Create Policy. Give the policy a descriptive name, choose the target xStore, and confirm Policy enforcement and Audit logging are on.
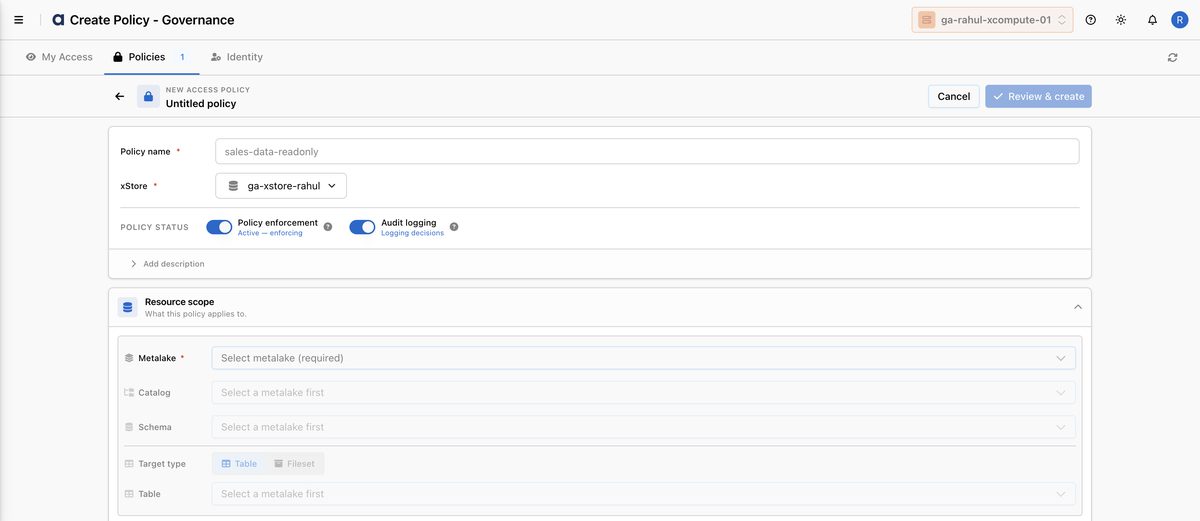
Under Resource scope, select the Metalake (required), then optionally narrow to a Catalog and Schema. Choose the Target type — Table or Fileset — to scope the policy to the right kind of leaf resource.
Select Continue to rules. Add a Grant access rule: pick the user or group, then check the permissions they receive (for example Select Table,
Use Catalog, and Use Schema). Select Save rule when the grant is complete.
Select Review & create. Confirm the scope, subjects, and permissions in the summary, then create the policy.

Return to My Access to confirm the new entitlement appears for the affected user.
Example: Your analytics team needs read-only access to the sales schema in your warehouse catalog. Create a policy named sales-data-readonly, scope it to the metalake's warehouse catalog and sales schema with Target type = Table, grant the analytics group the select_table permission, and save. Every Trino query and Spark job that team runs is now governed by that single rule.
How-to Guides
Create an access policy for an xStore
Open Governance → Policies and select Create Policy.
Enter a Policy name (for example,
sales-data-readonly).Select the target xStore from the dropdown.
Leave Policy enforcement enabled to actively enforce the rule, and Audit logging enabled to record every access decision.
Under Resource scope, select the Metalake, then drill into the
Catalog and Schema, and pick the Target type (Table or Fileset) to target the exact resources.
Select Continue to rules, add a Grant access rule listing the users or groups and the permissions they receive.
Select Review & create.
Confirm the new policy appears in the Policies list. Each row shows a
Status toggle, the Resource scope, the Access summary (Allow and Deny permission counts per subject), and an Effect column (Allow, Deny, or Mixed). Use the row toggle to enable or disable a policy without deleting it.
Tip: Use the broad-to-narrow hierarchy intentionally — grant at the catalog level for team-wide access, and reserve table/column scopes for sensitive data.
Layer denials and break-glass exceptions on a policy
Open the policy in Policies and edit its rules.
Add a Deny access rule to create an explicit denial that overrides grants from this and other policies. Pick the subject and the permission to deny (for example, deny Modify Table to a user who should have read-only access).
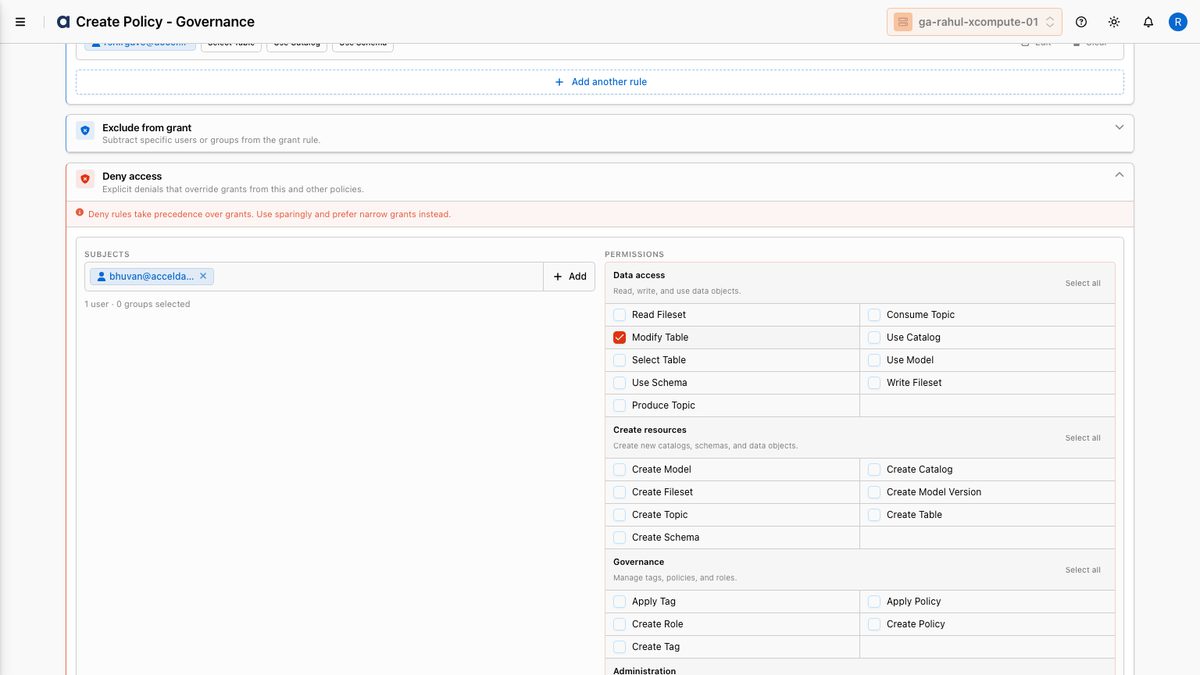
Add an Exclude from grant entry to subtract specific users or groups from a grant rule — they keep every other grant but lose the excluded permission on this resource.
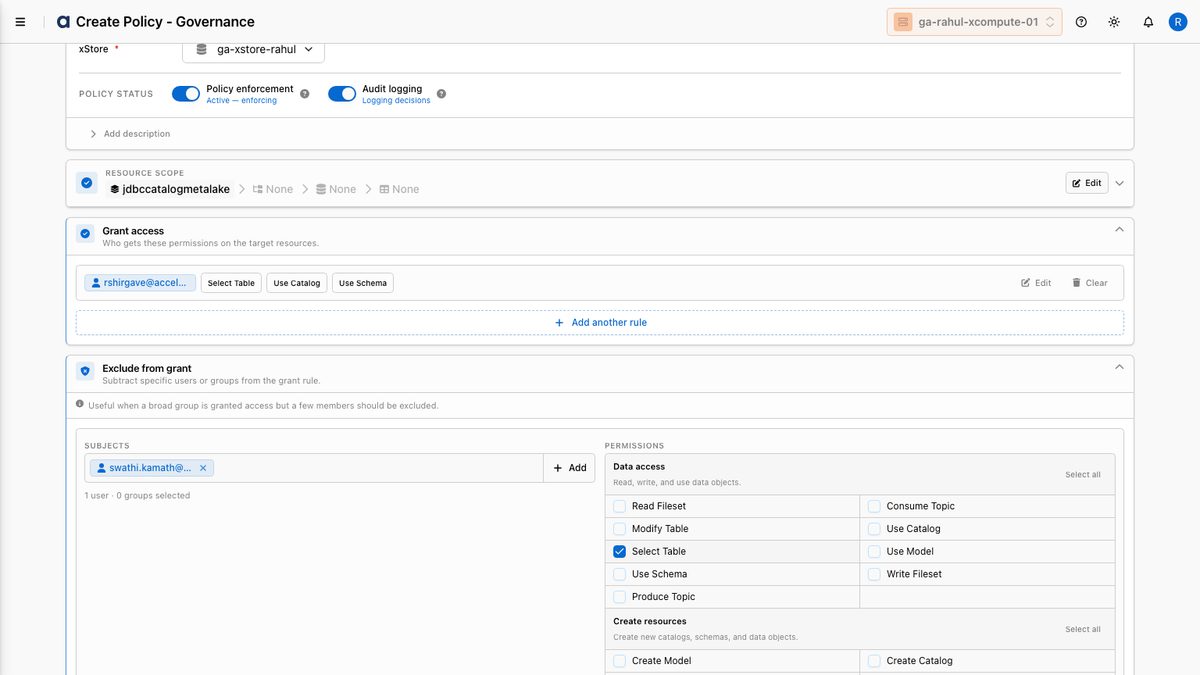
Add an Exclude from deny entry to create a break-glass exception that lets named subjects bypass the deny rule.
Save and verify the resulting effective access in My Access.
Warning: Deny rules override grants globally. Review the affected principals in My Access before saving a deny rule to avoid unintentionally locking out a team.
Manage users and groups
Open Governance → Identity.
On the Users sub-tab, review each principal's Role (for example,
SYS_ADMIN,KEY_ADMIN, orUSER) and Source (Internalfor built-in service accounts,Admin Centralfor centrally managed identities). Create a user to make it available as a policy principal; on the Groups sub-tab, create a group to grant access to many users at once.Use the search box to filter by name.
To remove a principal, delete it and confirm in the dialog.
Confirm the user or group count updates in the tab header (for example,
Users 12 / Groups 3).
Note: xDP hides Ranger's synthetic placeholder principals ({USER}, {OWNER}) from the Identity list — they are used internally by dynamic policy expressions and are not editable users.
Review your own effective access
Open Governance → My Access.
Review the list of policies that grant you access to data resources.
If you expect access that is missing, contact your administrator to request a policy — the empty state reads "No access configured."
Reference
Policy configuration options
Parameter | Description | Default | Required |
|---|---|---|---|
Policy name | Unique, descriptive identifier for the policy. | — | Yes |
xStore | The catalog service the policy governs. | — | Yes |
Policy enforcement | Whether the policy actively enforces access decisions. | Enabled | No |
Audit logging | Whether each access decision is recorded for audit. | Enabled | No |
Metalake | Top-level resource scope. Required to define the policy target. | — | Yes |
Catalog | Catalog within the metalake to scope the policy to. | — | No |
Schema | Schema within the catalog to scope the policy to. | — | No |
Target type | The leaf resource kind the policy applies to: Table or Fileset. | Table | No |
Resource scope hierarchy
Policies target a hierarchy of governed resources. Each level inherits from the one above it:
Common permission types
The permissions available depend on the resource level. Representative examples:
Resource level | Example permissions |
|---|---|
Catalog |
|
Schema |
|
Table |
|
Fileset |
|
Note: The exact permission set is sourced from the xStore service definition. If the service definition is unavailable, xDP falls back to a built-in default permission list per resource level.
Best Practices
Tip: Author policies at the broadest safe scope (catalog or schema) and use groups rather than individual users. This keeps the policy count low and access reviews simple.
Keep audit logging on. Audit trails are essential for compliance reviews and incident investigation — leave logging enabled unless you have a specific reason not to.
Prefer groups over users. Granting to groups scales access management and reduces churn when team membership changes.
Use deny rules sparingly. Because denials override grants globally, reserve them for sensitive data and always pair them with documented break-glass exceptions.
Name policies for intent. A name like
sales-data-readonlycommunicates scope and intent at a glance, which speeds up audits.Validate with My Access. After changing a policy, confirm the resulting effective access from an affected user's My Access view before considering the change complete.