Databricks
Databricks is a cloud-based big data processing platform. You can use Databricks to easily configure and deploy data processing clusters with a few clicks.
This document explains how to add Databricks on Azure as a data source in the Acceldata Data Observability Cloud (ADOC). Once you add Databricks as a data source, you can monitor your cluster health, notebook status, and costs incurred. You can view all this data in visual format. You can also create alerts on various Databricks entities.
Take a look at this video which explains the process of adding Databricks as a data source.
Steps to Add Databricks as a Data Source
To add Databricks as a data source in ADOC, follow these steps:
Prerequisites
Before you begin, ensure you have:
- An account with the necessary permissions for your cloud provider(Azure or AWS).
- Access to the Azure Portal.
- Access to your Databricks workspace.
- Access to the ADOC platform.
- Relevant credentials depending on your cloud provider:
- Azure: Subscription ID, Tenant ID, Resource Group, Managed Resource Group.
- AWS: IAM user credentials (Access Key, Secret Key) with necessary Cost Explorer and Pricing permissions.
Azure
1. Creating a Service Principal
A Service Principal is required to enable API access and authenticate with Databricks.
Go to Azure Portal: Navigate to https://portal.azure.com/ and log in.
Access Microsoft Entra ID (Azure Active Directory): From the left-hand menu, select Microsoft Entra ID.
Register a New Application
In the Manage section, select App registrations.
Click on New registration.
Provide the following details:
- Name: e.g., ADOC Databricks Integration.
- Supported account types: Accounts in this organizational directory only.
Click Register.
Create a Client Secret
- In the application's Overview page, select Certificates & secrets from the Manage section.
- Click on New client secret.
- Enter a description and select an expiration period.
- Click Add.
- Important: Copy the Value of the client secret. This is your Azure Client Secret Value. Save it securely, as it is visible only once.
2. Creating a Custom Role and Assign It to the Service Principal
Access Control (IAM) in Azure
Navigate to Your Subscription: Select Subscriptions from the left-hand menu and choose your subscription.
Access Control (IAM): In the subscription menu, click Access control (IAM).
Create a Custom Role
- Click Add and select Add custom role.
- Provide a Custom role name (e.g., Cost Management Reader).
- In the Basics tab, enter a description if desired.
Add Permissions
Go to the Permissions tab.
Click Add permissions.
In the Add permissions pane:
- Provider: Select Microsoft.CostManagement.
- Permission: Search for and add the following permissions:
- Microsoft.CostManagement/exports/read
- Microsoft.CostManagement/query/read
Click Add.
Review and Create
- Click Review + create.
- Review the details and click Create.
Assign the Custom Role to the Service Principal
Return to Access Control (IAM): Ensure you're in the Access control (IAM) section of your subscription.
Add Role Assignment: Click Add and select Add role assignment.
Assign the Custom Role
- In the Role dropdown, select the custom role you created.
- Click Next.
Select Members
- Under Members, choose User, group, or service principal.
- Click Select members.
- Search for your Service Principal by name.
- Select it and click Select.
Review and Assign
- Click Review + assign.
- Confirm and click Assign.
3. Adding the Service Principal to the Databricks Workspace
Log In to Databricks Workspace: Navigate to your Databricks workspace URL.
Access Service Principals
- Click on the Settings icon (⚙️) in the lower-left corner.
- Select Admin Console.
- Go to the Service Principals tab.
Add Service Principal
- Click Add Service Principal.
- Select Microsoft Entra ID managed.
- Enter the Application (client) ID of your Service Principal.
- Provide a Display name (can be any meaningful name).
- Click Add.
4. Provide Workspace Admin Access to the Service Principal
Access the Admin Group
- In the Admin Console, select the Groups tab.
- Click on the admins group.
Add the Service Principal to the Admin Group
- Click Add Members.
- Search for your Service Principal.
Select it and click Confirm.
5. Retrieve Azure Tenant ID and Other Credentials
You will need the following information:
| Information Required | How to retrieve it? |
|---|---|
| Azure Tenant ID |
|
| Azure Subscription ID |
|
| Azure Client ID | This is the Application (client) ID of your Service Principal. |
| Azure Client Secret Value | The secret value you saved earlier. |
| Azure Resource Group | The resource group where your Databricks workspace is created. |
| Azure Managed Resource Group | In your Databricks workspace Overview, find the Managed Resource Group. |
AWS
1. Creating an IAM User with Cost Explorer and Pricing Permissions
To retrieve cost data from AWS, you need an IAM user with the required permissions:
- Log in to the AWS Management Console.
- Create an IAM user with the following permissions (Cost Explorer and Pricing):
{ "Version": "2012-10-17", "Statement": [ { "Sid": "VisualEditor0", "Effect": "Allow", "Action": [ "ce:GetCostAndUsage", "ce:GetReservationPurchaseRecommendation", "ce:GetPreferences", "ce:ListSavingsPlansPurchaseRecommendationGeneration", "ce:ListTagsForResource", "ce:GetReservationUtilization", "ce:GetCostCategories", "ce:GetSavingsPlansPurchaseRecommendation", "ce:GetSavingsPlansUtilizationDetails", "ce:GetDimensionValues", "ce:GetAnomalySubscriptions", "ce:DescribeReport", "ce:GetReservationCoverage", "ce:GetAnomalyMonitors", "ce:GetUsageForecast", "ce:DescribeNotificationSubscription", "ce:DescribeCostCategoryDefinition", "ce:GetRightsizingRecommendation", "ce:GetSavingsPlansUtilization", "ce:GetAnomalies", "ce:ListCostCategoryDefinitions", "ce:GetCostForecast", "ce:GetApproximateUsageRecords", "ce:GetCostAndUsageWithResources", "ce:ListCostAllocationTags", "ce:GetSavingsPlanPurchaseRecommendationDetails", "ce:GetSavingsPlansCoverage", "ce:GetConsoleActionSetEnforced", "ce:GetTags", "ce:ListCostAllocationTagBackfillHistory", "pricing:DescribeServices", "pricing:GetAttributeValues", "pricing:GetProducts", "pricing:*" ], "Resource": "*" } ]}- This IAM user will provide the AWS Access Key ID and Secret Access Key for cost retrieval.
2. Creating a Personal Access Token in Databricks
For AWS Databricks integration, you must use a personal access token to connect to system tables (for billing data and metadata):
- Log in to your Databricks workspace.
- Create a Personal Access Token if you do not already have one.
- If you have a service principal, you can also create a personal access token from that principal.
- Keep this token secure, as it will be required during ADOC data source registration.
3. Configuring the ADOC Platform
- Log in to ADOC.
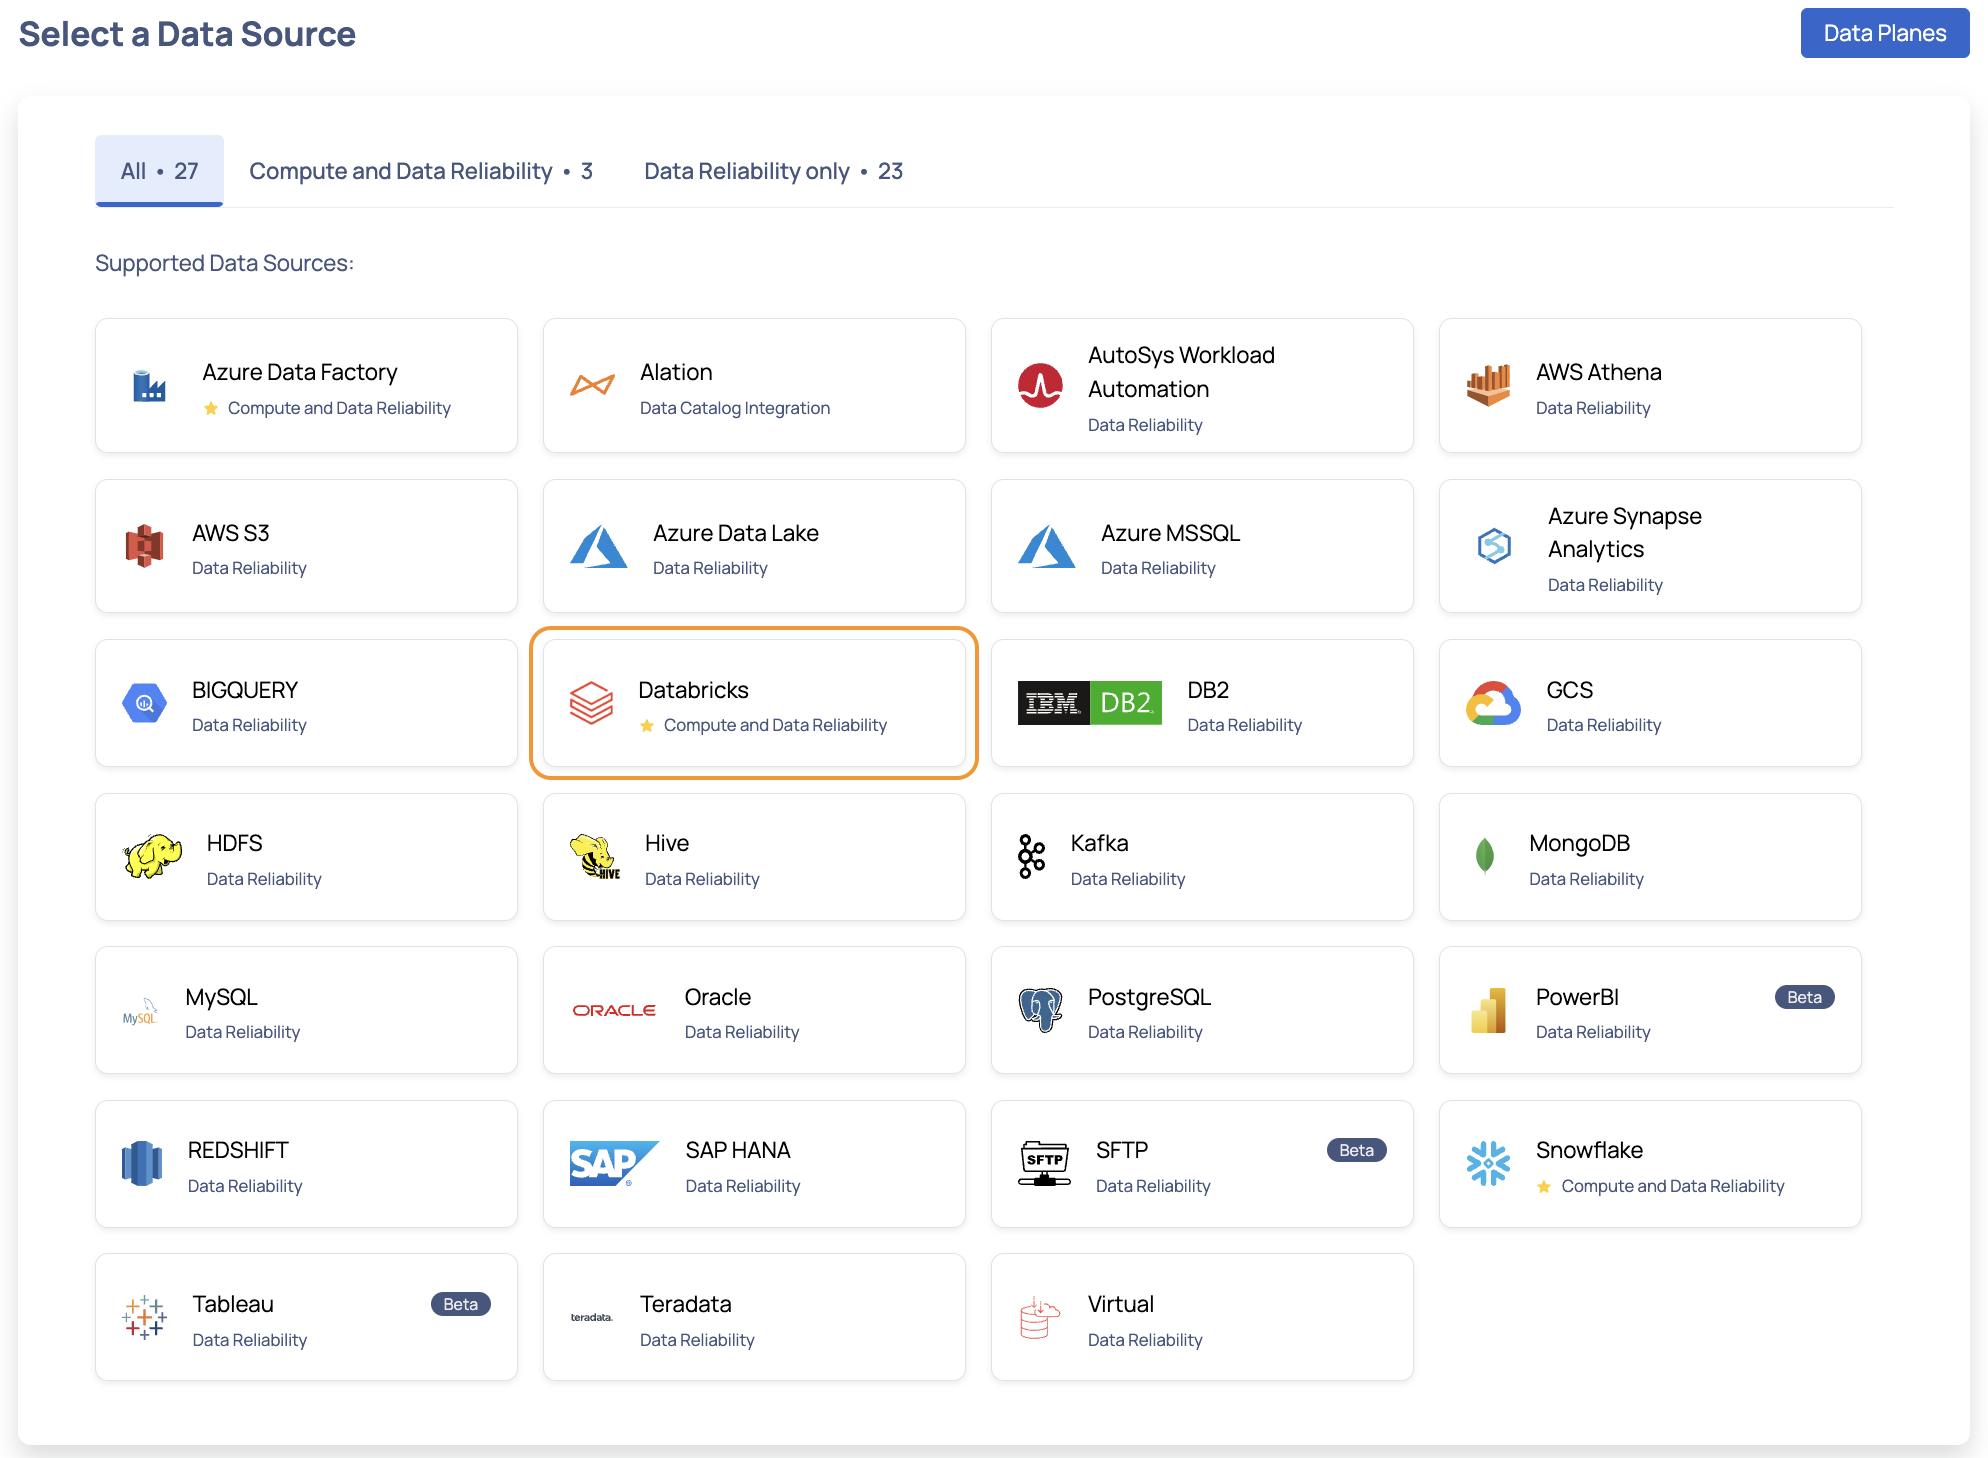
- Click Register on the left pane, then Add Data Source.
- Select Databricks.
- Enter Basic Details:
| Field | Description |
|---|---|
| Data Source Name | Provide a name for your data source. |
| Description (Optional) | Provide brief description to identify |
| Enable Compute Observability | Toggle On to use Compute functionality. |
- Enter Databricks Connection Details for AWS:
| Field | Description |
|---|---|
| Workspace Name | Enter the Databricks Workspace Name. |
| Databricks URL | Provide the full URL of your Databricks workspace. |
| Authentication Method | For AWS, use a Personal Access Token. |
| Token | Enter the personal access token created above. |
| Databricks Warehouse ID (AWS Only) | Required for fetching metadata from system tables.
|
| Databricks Workspace ID (AWS Only) | Required to establish the connection for billing data.
|
Click Test Connection. If connected, click Next.
4. Setting Up Global Init Script
- In the final step of data source registration, you can enable setting up a global init script.
- By enabling this option, an init script is deployed from Acceldata to your Databricks workspace environment.
- The init script contains details of agent binaries deployed on the customer’s Databricks environment for pushing spark-related compute metrics to ADOC.
5. Providing DBU Values for Estimated Cost Calculation
Provide DBU values (such as Jobs Compute, Jobs Photon Compute, DLT, All-Purpose Photon Compute) as per the Databricks contract. These values are used for cost estimation of the current day based on DBUs.
6. Configuring AWS Cloud Provider Details and Cost Retrieval
Cloud Provider Cost Discount Percentage: Enter the discount percentage provided by AWS to the customer.
Cloud Provider: Select AWS.
Cloud Region: Provide the AWS region where your Databricks workspace is deployed. To find the region:
- Go to your Databricks workspace.
- Click on the workspace name at the top-right corner.
- The region will be displayed.
Cost Fetch Method: Select API.
AWS Access Key ID and Secret: Enter the credentials of the IAM user created in Step 1. This allows ADOC to retrieve cloud vendor billing information.
Click Submit to complete the setup.
Also see, Create IAM user.
Configuring the ADOC Platform
Onboarding a New Datasource or Updating an Existing One
- Click Register from the left pane.
- Click Add Data Source.
- Select the Databricks Data Source. The Databricks Data Source basic Details page is displayed.
- Enter a name for the data source in the Data Source name field.
- (Optional) Enter a description for the Data Source in the Description field.
- (Optional) Enable the Compute capability by switching on the Compute toggle switch.
- (Optional) Enable the Data Reliability capability by switching on the Data Reliability toggle switch.
You must enable either the Compute or Data Reliability capability. You cannot add Databricks as a Data Source without enabling at least one of these capabilities.
- Select a Data Plane from the Select Data Plane drop-down menu.
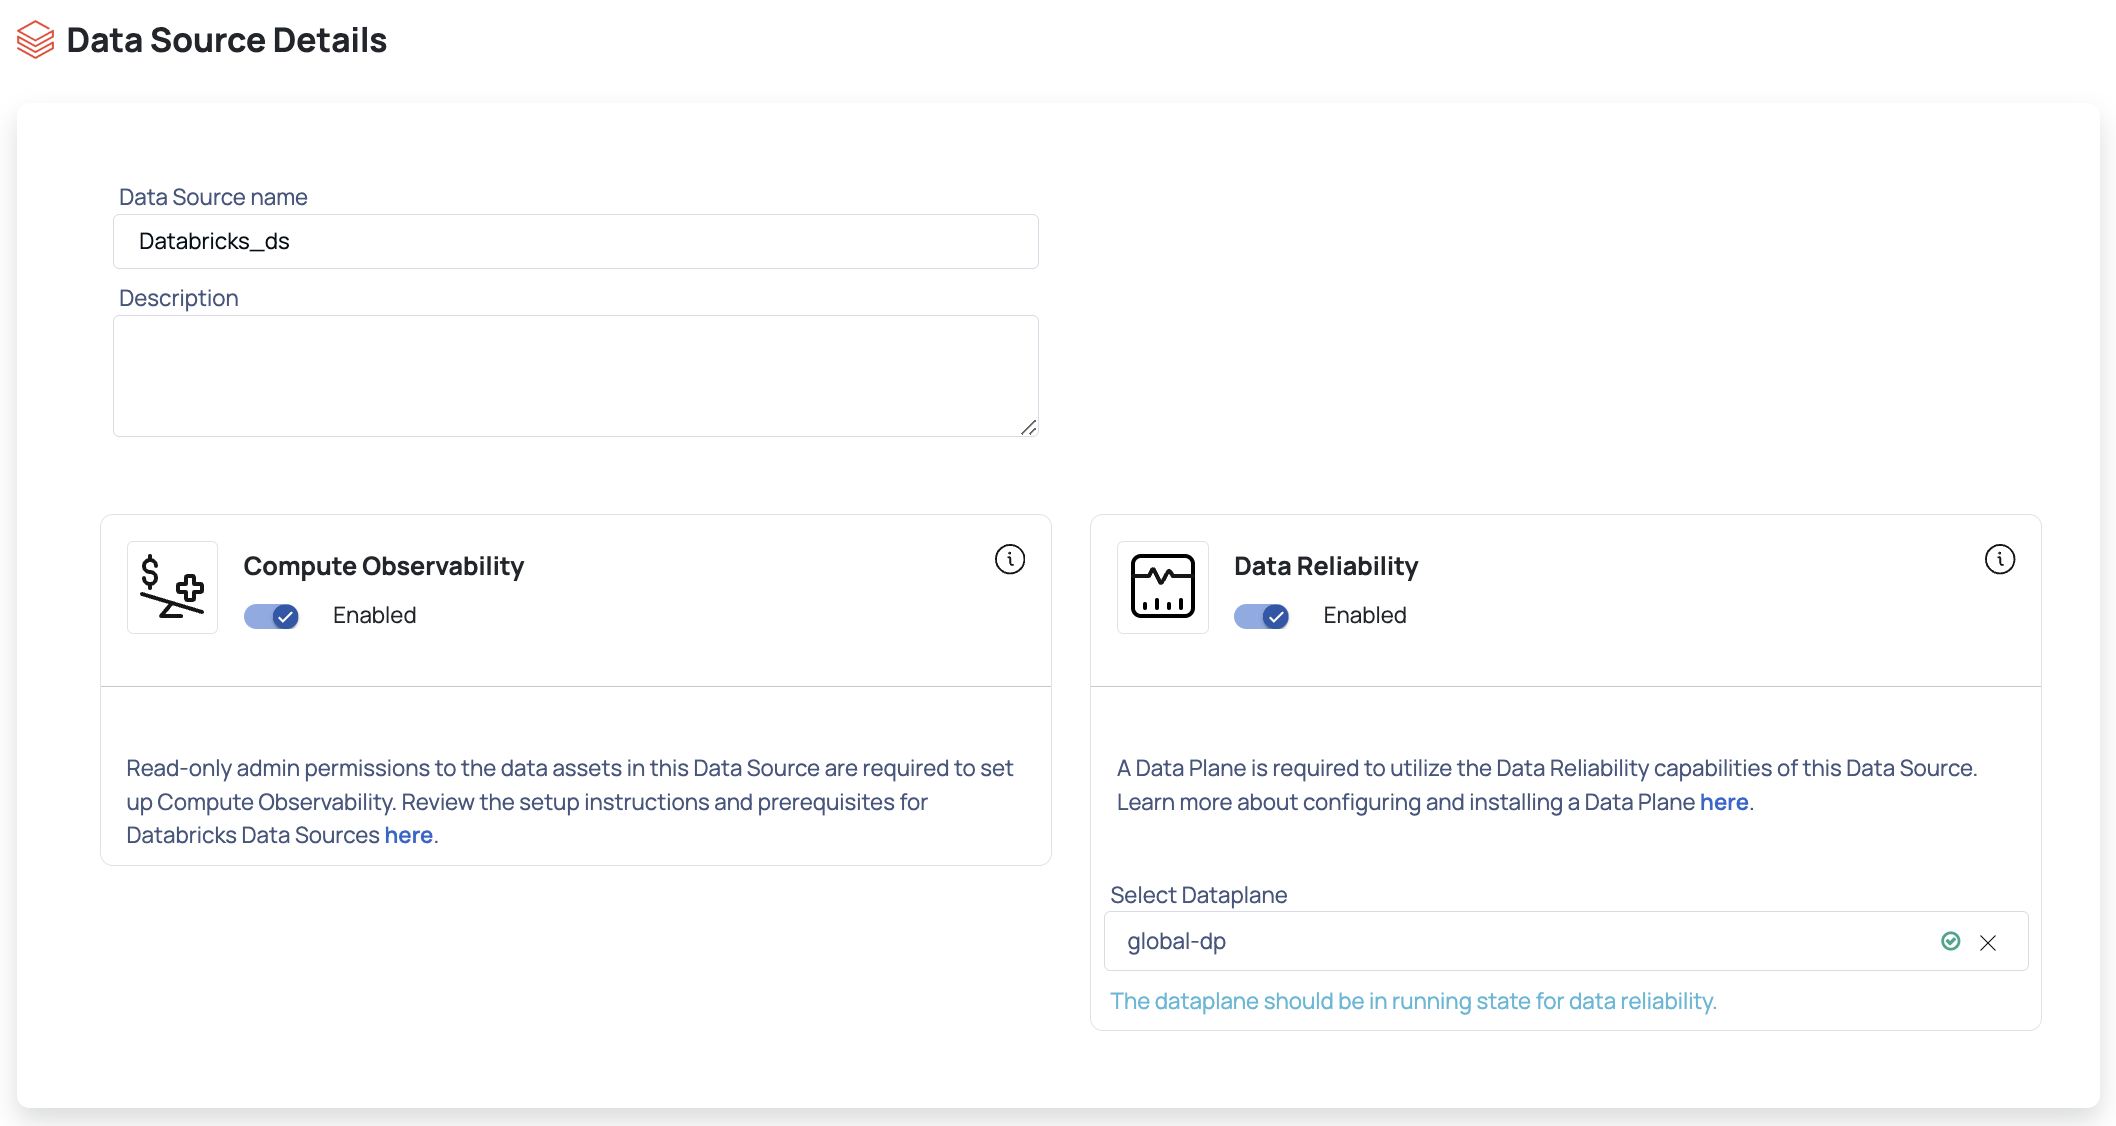
To create a new Data Plane, click Setup Dataplane.
You must either create a Data Plane or use an existing Data Plane to enable the Data Reliability capability.
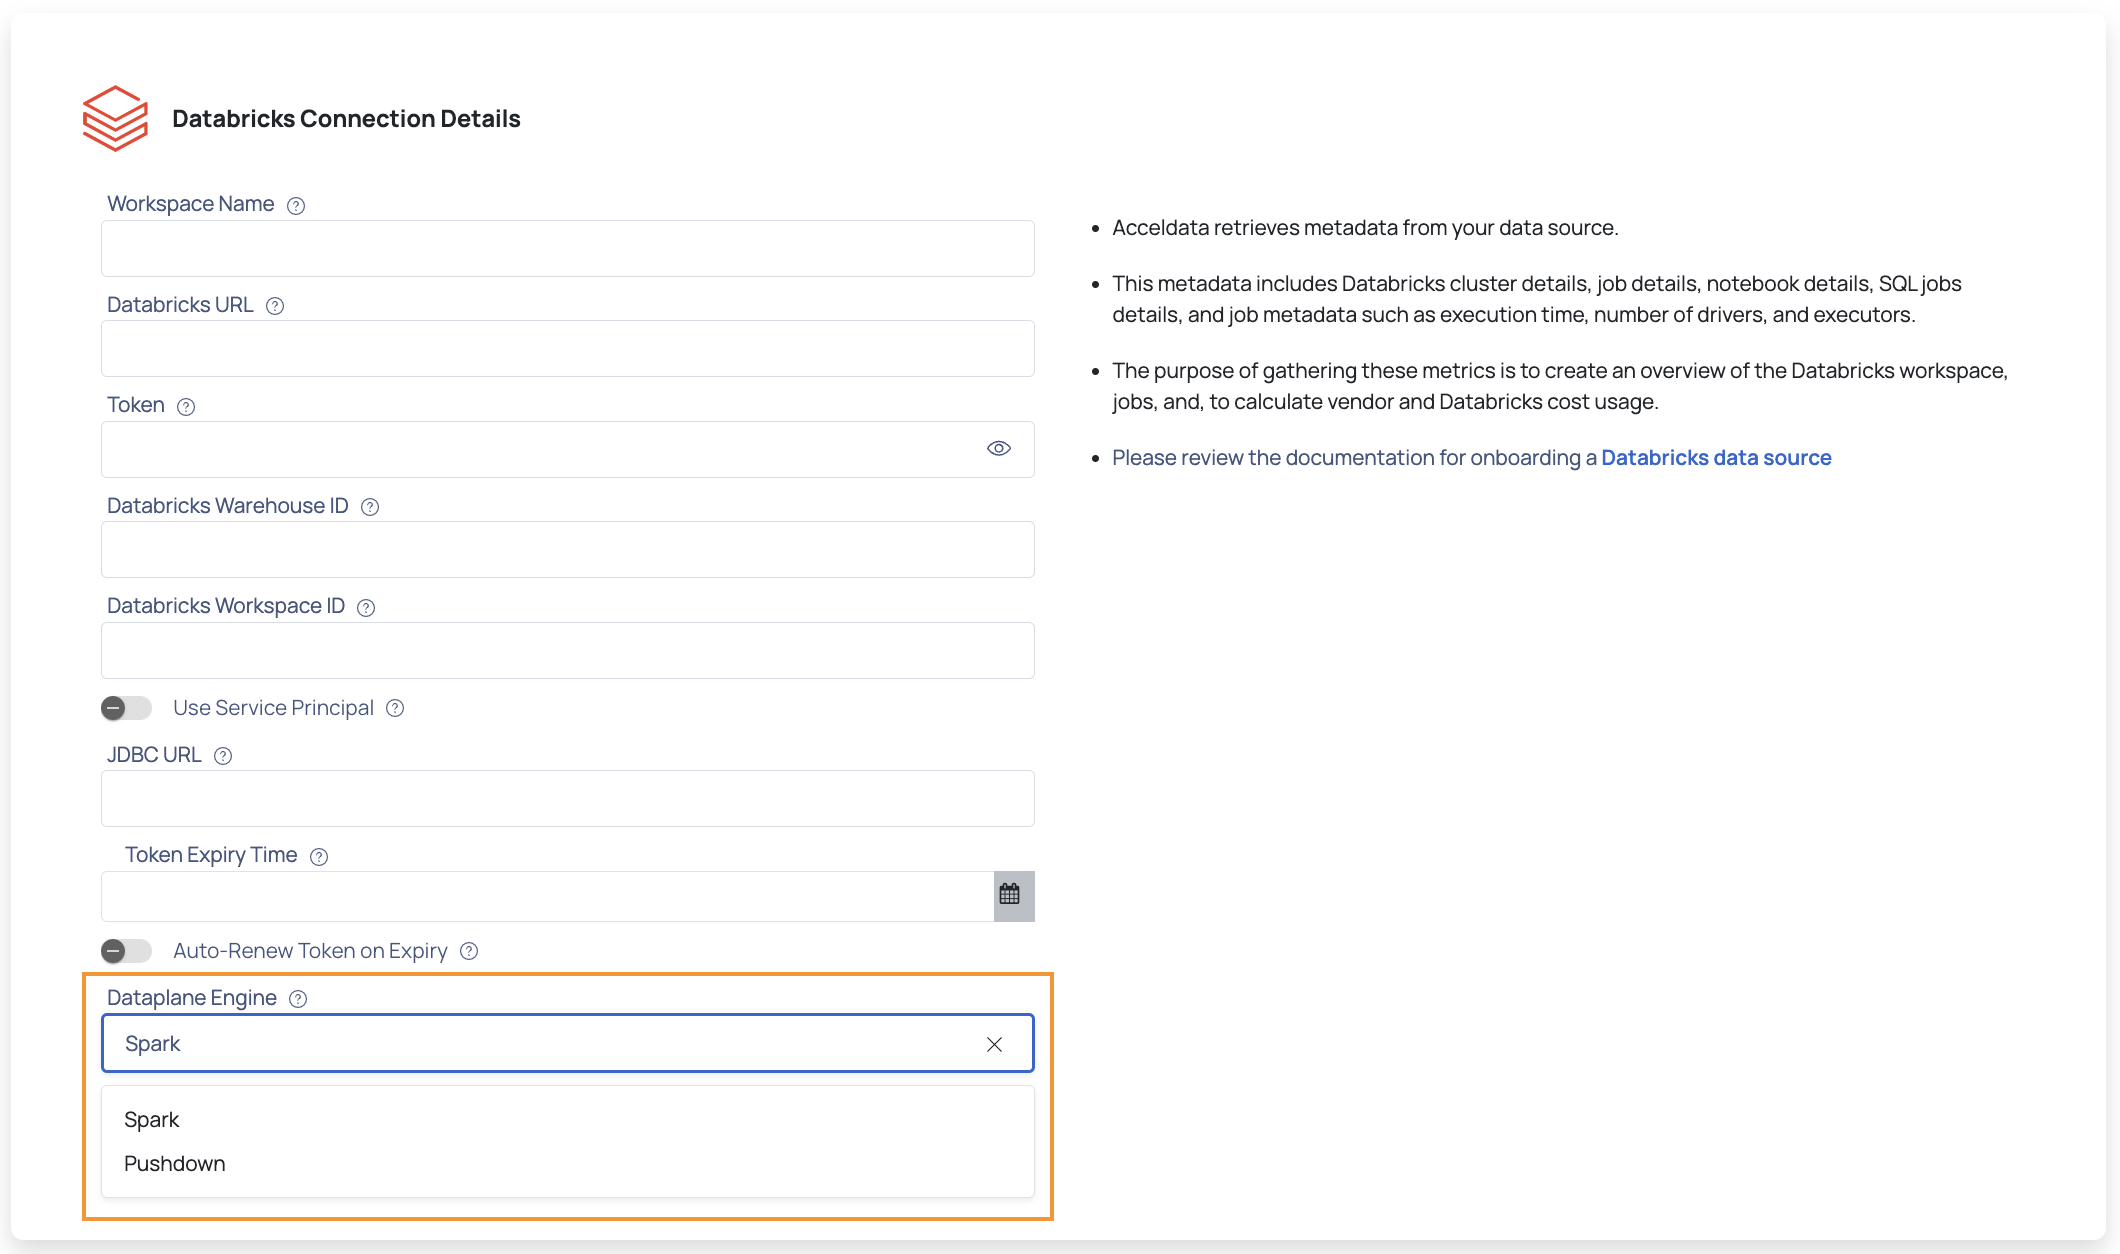
- Click Next. The Databricks Connection Details page is displayed.
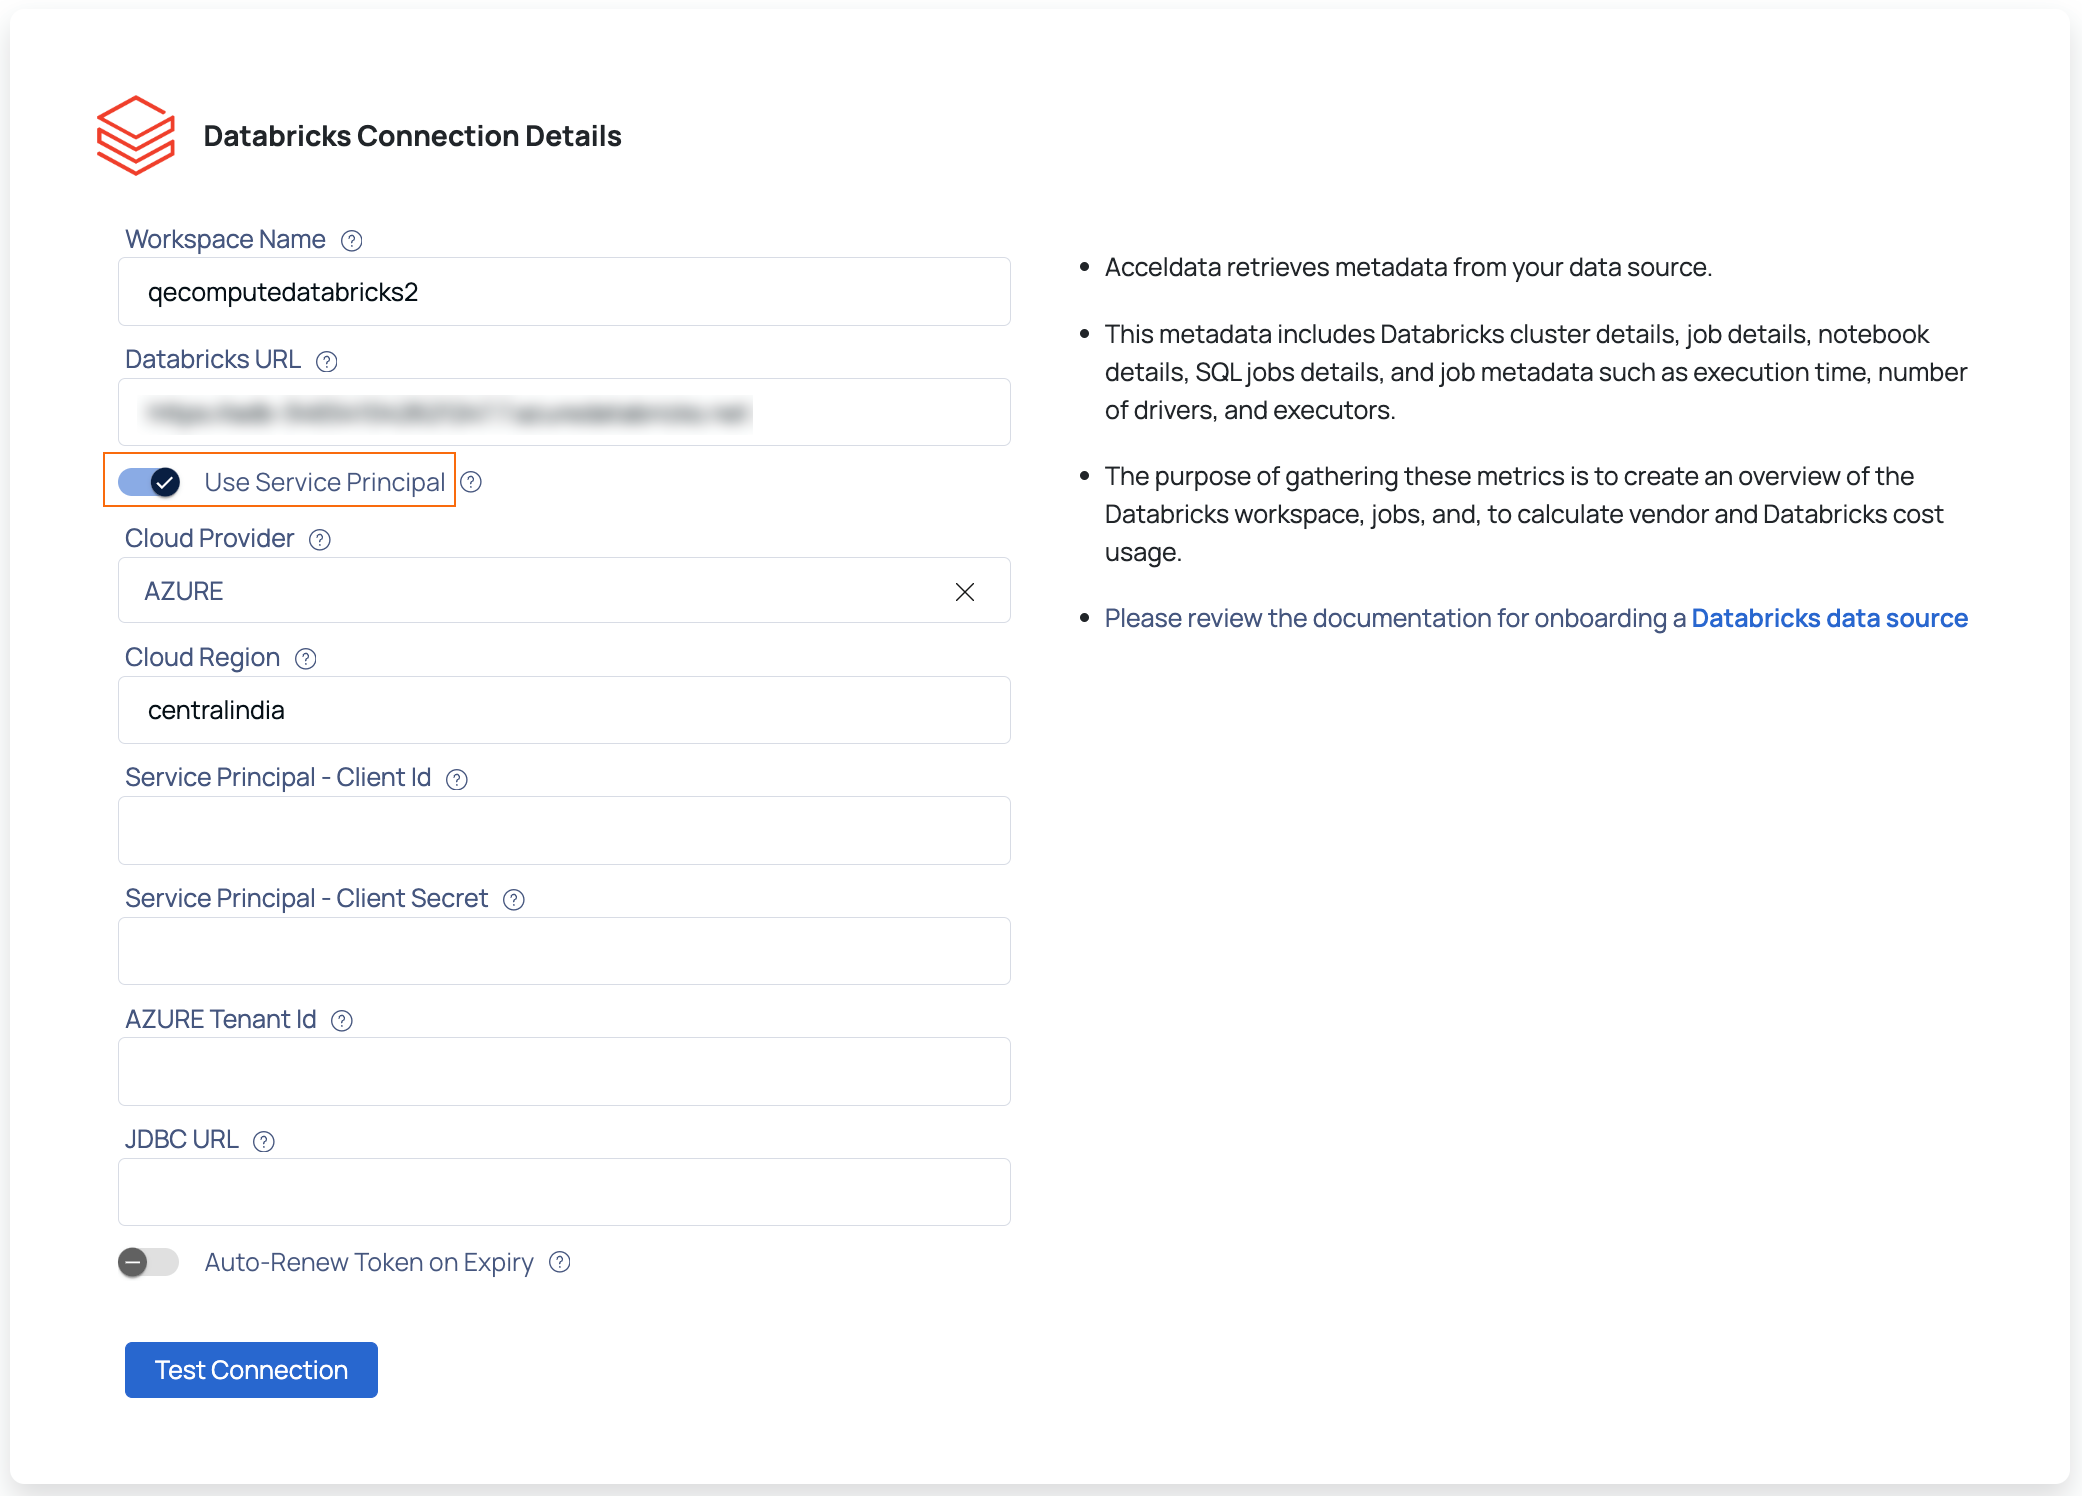
- Enter the name for your Databricks workspace in the Workspace Name field.
- Enter the URL of your Databricks account in the Databricks URL field. To learn more about workspaces, refer this Databricks document.
- Enter the access token for your Databricks account in the Token field or enable the Use Service Principal toggle button and provide the below details. To learn more about Tokens, refer this Databricks document.
- Select one of the following cloud provider for your Databricks workspace from the drop-down: AWS or Azure.
- Provide the Service Principal Client Id to connect to your Databricks workspace.
- Provide the Service Principal Client Secret key.
- Provide the Service Principal Tenant Id or Account Id for the cloud provider selected in step 12 (a).
Within the Databricks connector, a new auto-renew token feature has been implemented as a solution to the problems that have been associated with the visibility of token expiration.
You can now opt for this option during data source registration.
Upon registering a data source and activating the auto-renew token feature upon expiration, the system generates an 'accel-token' using the provided token. To prevent unexpected expirations, a new 'accel-token' is automatically generated five days before the current one is set to expire.
- If you enabled the Data Reliability capability, you must enter the JDBC URL in the JDBC URL field. This field is displayed only if you enabled Data Reliability in step 7.
- Choose the Dataplane Engine—either Spark or Pushdown—for profiling, data quality checks, and SQL operations.
Note Token-based authentication is currently the only supported method for the Pushdown engine on AWS and Azure. For more information, see Pushdown Data Engine. - Click Test Connection to validate your credentials and establish a connection with your Databricks account.
If the connection is successful, a Connected message is displayed. If there is an error, you must verify the Databricks details provided and enter the correct details.
- Click Next to proceed to the Observability Set Up page.
All actions are supported with the Spark Data Engine; however, with the auto$, you can perform only the following actions on your data:
- Enforce data quality policies
- Perform data profiling
- Create SQL views
- View sample data
- Conduct Row Count reconciliation
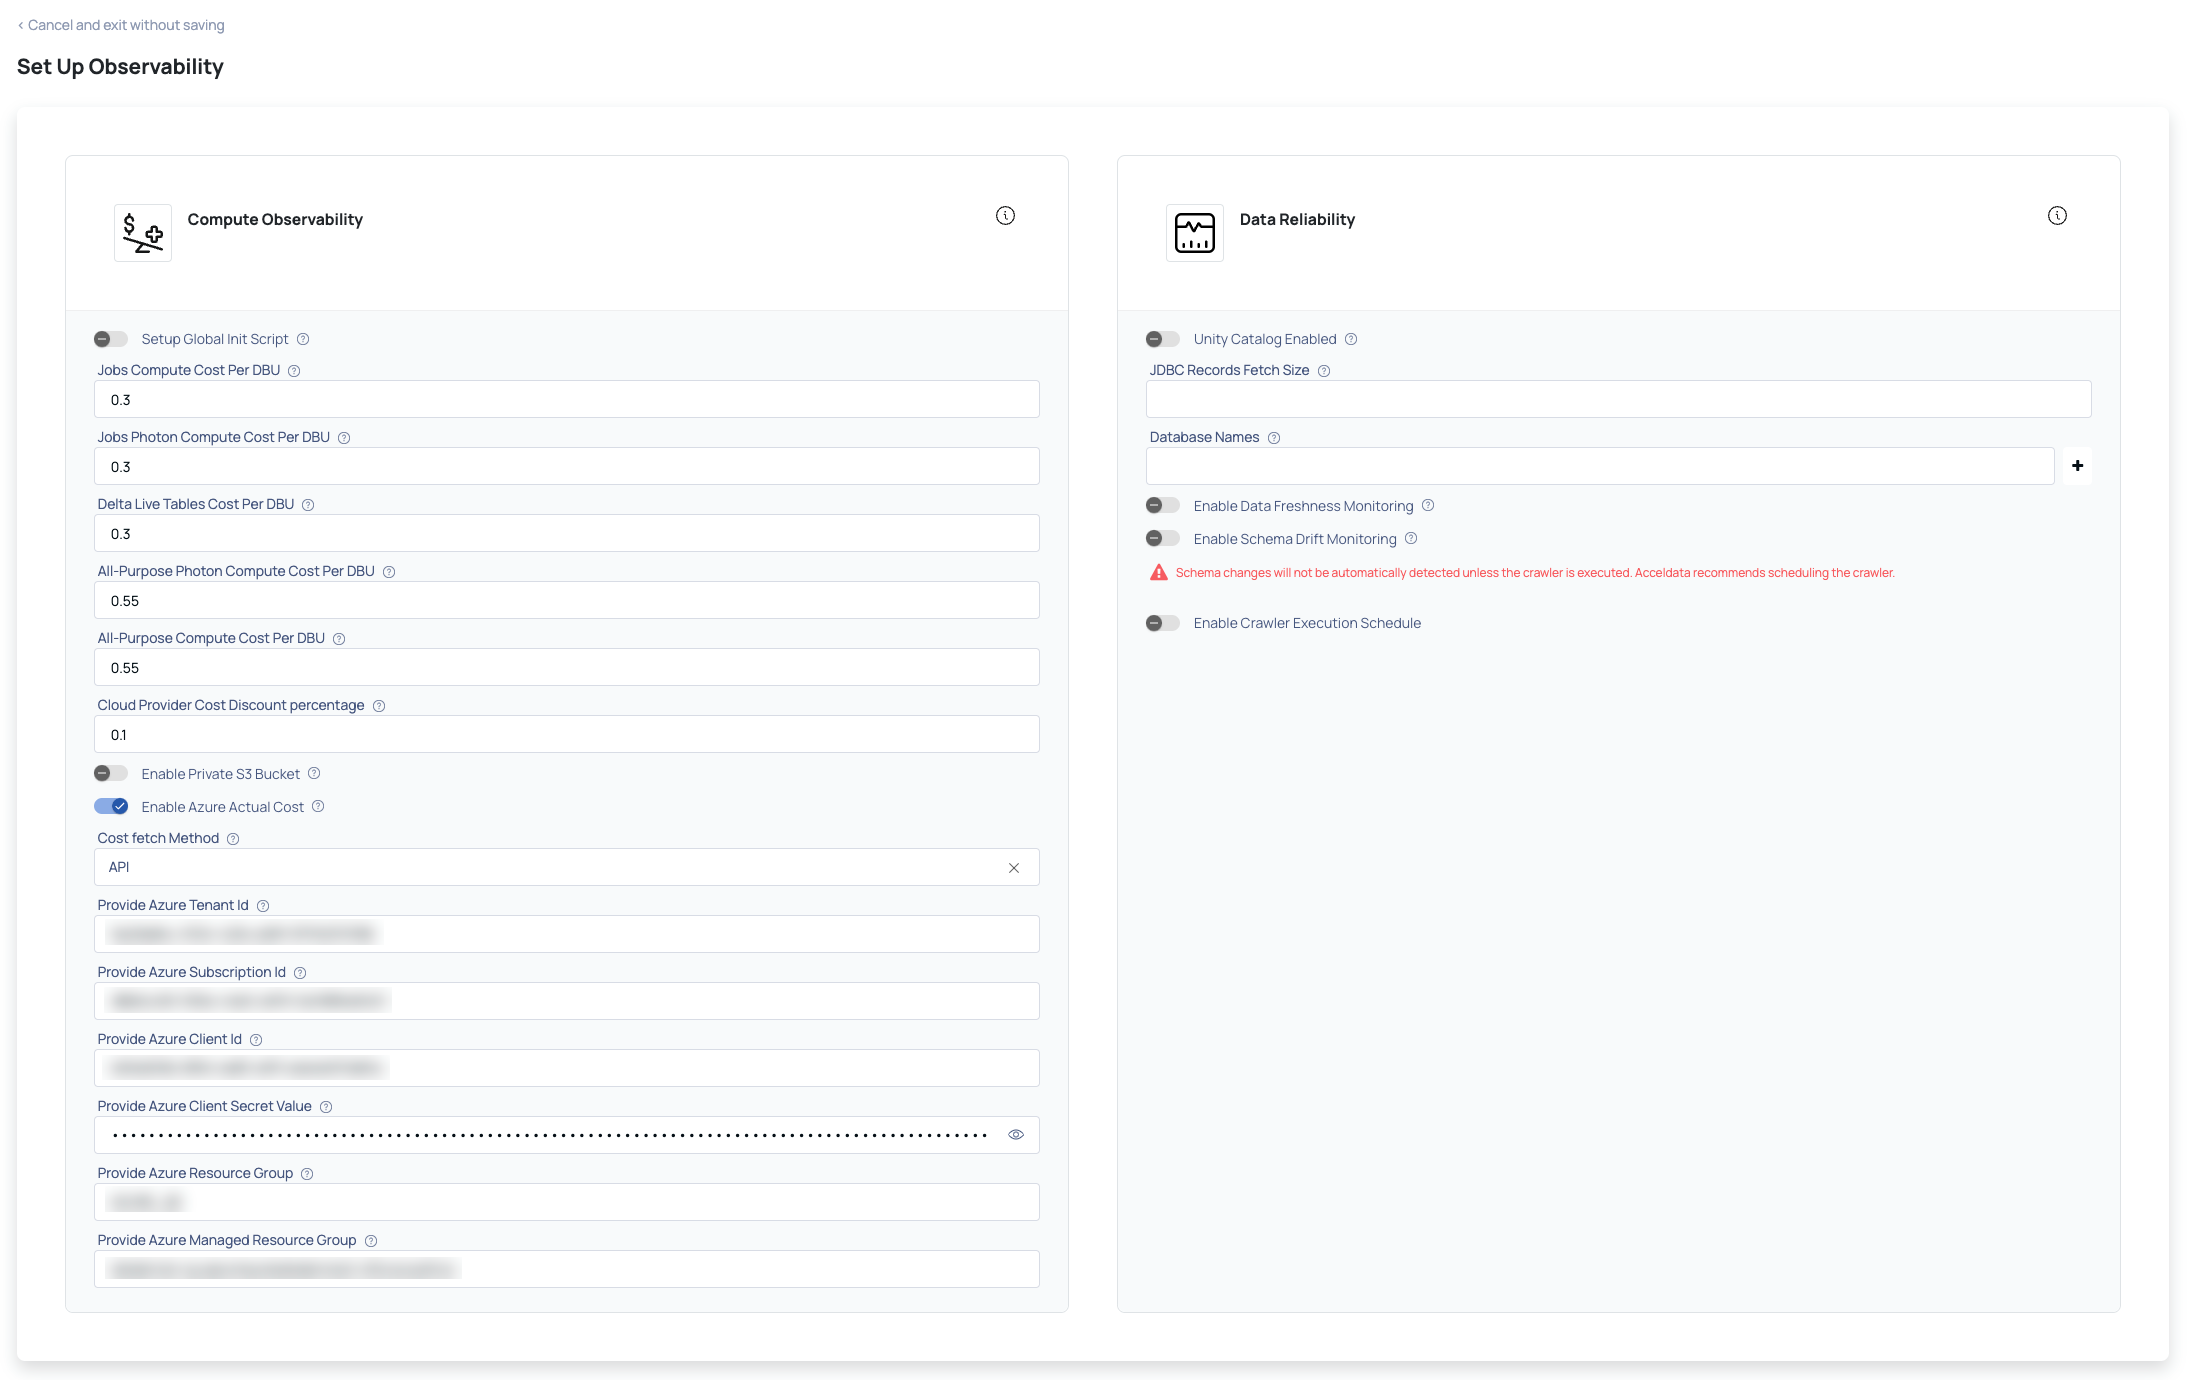
Observability Set Up
The Observability Set Up page allows you to configure Compute and Data Reliability capabilities. These sections are active only if you enabled them on the Databricks Data Source Basic Details page.
This section includes the following panels:
Compute
Provide the following details to calculate compute costs for your Databricks workspace in ADOC.
| Parameter | Description |
|---|---|
| Jobs Compute Cost per DBU | This refers to the cost incurred for using compute resources in Databricks Jobs, measured per Databricks Unit (DBU). DBUs are a normalized unit of processing capability that combines CPU, memory, and I/O resources. |
| Delta Live Tables Cost per DBU | This represents the cost associated with utilizing compute resources for managing and querying Delta Live Tables in Databricks. The cost is calculated per Databricks Unit (DBU), which encompasses various resource factors. |
| SQL Classic Cost per DBU | SQL Classic Cost per DBU pertains to the expenditure tied to executing SQL queries using Databricks' classic SQL interface. The cost is quantified per Databricks Unit (DBU), which captures multiple resource dimensions. |
| All Purpose Cluster Cost per DBU | This indicates the cost attributed to operating an all-purpose cluster in Databricks, computed per Databricks Unit (DBU). All-purpose clusters provide general-purpose compute capacity for a wide range of tasks. |
| Cloud Provider Cost Discount percentage | This percentage signifies the reduction in cloud provider costs when using Databricks. It reflects the amount by which Databricks is able to offer discounted cloud infrastructure expenses through efficient resource allocation and optimization. |
If you want to retrieve actual cost values, then toggle the Enable Azure Actual Cost button and provide the following details.
Make sure to generate a service principal in your Azure portal so that you can input the necessary parameter values listed below.
All dashboards and visualizations pertaining to costs will reflect the real-time expenses incurred from your utilization of Azure workspace resources.
| Parameter | Description |
|---|---|
| Azure Tenant Id | Access Tenant Properties in the Azure Portal and copy the corresponding Tenant Id. |
| Azure Subscription Id | Visit the Subscriptions section in the Azure Portal and copy the relevant Subscription Id. |
| Azure Client Id | Generate this yourself by performing the following steps:
|
| Azure Client Secret Value | Within the above registered application, perform the following steps:
Ensure you grant read permissions to the application on the Access Control (IAM) page if not already provided. |
| Azure Resource Group | Locate the desired workspace by name in the Azure Portal, and from the Overview page, copy the Resource Group. |
| Azure Managed Resource Group | Similar to the above, find the workspace by name in the Azure Portal, and from the Overview page, copy the Managed Resource Group. |
Data Reliability
Enter the following details to set up Data Reliability:
- Unity Catalog Enabled: Turn on this toggle switch to enable Unity Catalog in Databricks.
- JDBC Records Fetch Size: Enter the number of records to be fetched from JDBC.
- Enable Crawler Execution Schedule: Turn on this toggle switch to select a time tag and time zone to schedule the execution of crawlers for Data Reliability.
Click the Submit button.
Databricks is now added as a Data Source. You can choose to crawl your Databricks account now or later.

If you have enabled only the Compute capability, the Start Crawler & Go to Data Sources button is not displayed. You can only view the Go to Data Sources button. The Data Sources crawl option is not applicable for the Compute data sources.
Authentication Mechanism: Service Principals
ADOC introduces an improved authentication process for Databricks by transitioning from personal access tokens to a more secure and managed Service Principal approach.
Improved Security: Service principals enable improved security standards, allowing for greater control over permissions and quicker revocation.
Simplified Management: Managing service principal credentials is easier, lowering the overhead associated with token rollovers.
Configuring Service Principals
- Establish a Service Principal: Follow the steps outlined in the Creating a Service Principal section above.
- Assign Roles and Permissions: Configure the service principal's roles and permissions at the workspace level to ensure access to the relevant resources. This involves creating a custom role and assigning it to the service principal as described earlier.
- Add the Service Principal to Databricks Workspace: Add the service principal to your Databricks workspace by following the steps in the Adding the Service Principal to the Databricks Workspace section.
- Provide Workspace Admin Access: Provide admin access to the service principal in your Databricks workspace as described in the Provide Workspace Admin Access to the Service Principal section.
- Configure in ADOC: When adding or editing a Databricks data source in ADOC, select the Use Service Principal option and provide the service principal details.
All data activities, including data crawling, data profiling, and sampling, now use the service principal for authentication, ensuring secure and consistent access.
Cloud Vendor Cost Retrieval via API Method
This section explains how to integrate Azure Databricks with the ADOC platform and collect cloud vendor costs via the API method.
Prerequisites
Before you begin, make sure you have:
- An Azure account with the required permissions.
- Access the ADOC platform.
- Azure Databricks workspace created within a resource group.
1. Creating a Service Principal: Refer to the 1. Creating a Service Principal section above.
2. Creating a Custom Role and Assign It to the Service Principal Refer to the 2. Creating a Custom Role and Assign It to the Service Principal above.
- ** Access Control (IAM) in Azure :Ensure that the service principal has the necessary permissions to access cost management data by assigning the custom role in your subscription's Access Control (IAM) settings.
- *
- ** Assign the Custom Role to the Service Principal: Refer to the section Assign custom role to the Service Principal above.
- *
3. Configuring the ADOC Platform: After the Service Principal is set up, configure the ADOC platform to use the API method for cost retrieval.
Onboarding a New Datasource or Updating an Existing One:
Open the ADOC platform and select Register from the left pane.
Add or Edit a Datasource
- For a new Datasource: Click Add Data Source.
- To update an existing Datasource: Click the three dots in the top right corner of the Datasource and select Edit Configuration.
Configure the Cost Retrieval Method: Provide the following information:
| Field | Description |
|---|---|
| Cost Fetch Method | Select the API method |
| Azure Tenant ID | Enter the Tenant ID for the Service Principal |
| Azure Subscription ID | Enter the Azure Subscription ID |
| Azure Client ID | Enter the Client ID for the Service Principal. |
| Azure Client Secret Value | Enter the Secret value for the Service |
| Azure Resource Group | Specify the Resource Group where the Databricks workspace is created. |
| Azure Managed Resource Group | Specify the Managed Resource Group for the Databricks Workspace. |
- Complete the Setup: Click Submit to save the configuration.
After completing these steps, your ADOC platform will be configured to retrieve cloud vendor costs via the Azure API method. This integration allows for more accurate cost tracking and management within the ADOC environment.
Known Limitations
| Known Limitations | Details | Recommendations/Impact |
|---|---|---|
| System Time Adjustment | To have an exact match in cost data against the Azure Portal, users need to change their system time to UTC. | Ensure that your system's time zone is set to UTC before comparing cost data with the Azure Portal. |
| Job Studio Page Mismatch | There may be a slight mismatch in the filter facet count between the Job Studio page and the Databricks Job runs page. This is due to the different update frequencies. | Users may notice discrepancies in job counts when filtering data. |
| Cloud Vendor Cost Calculation Delay | Cloud Vendor cost calculations in Azure Portal can take up to 24-48 hours, causing a slight mismatch (below 0.5%) in the reported costs. | It might take up to 48 hours to get the exact Cloud Vendor cost as shown in the Azure Portal. |
| Initial API Data Retrieval | After enabling the API approach for the first time, it will take up to 24 hours to retrieve cost data for the last 30 days (Databricks and Cloud Vendor costs). | Users may experience a delay in accessing historical cost data immediately after setup. |
| All Purpose Cluster Cost Display | Costs on the All Purpose Cluster page are displayed on a daily basis. Selecting a date range ≤ 24 hours will not show cost data. | Users should select a date range greater than 24 hours to view cost data on the All Purpose Cluster page. |