Advanced Usage of Policies
This section explains the advanced features which you can use on data policies. The advanced features on data policies are as follows:
Segmented Analysis
The Data Reliability function in Acceldata Data Observability Cloud(ADOC) allows you to apply polices on assets, to maintain data quality in your assets.
Some assets can be large in size. Analyzing policy outcomes for such large assets can be very tedious. To overcome this drawback, you can use the Segmented Analysis feature in ADOC.
The prerequisite to use this feature is that the asset must be profiled.
Segmentation
- With Segmented Analysis, you can slice and dice your asset into multiple modules.
- Each module is called a Segment.
- Each segment has a unique name, which you can define while creating a segment.
- You can select multiple columns of an asset to create your segment. You can include a maximum of three columns in a single segment.
- Once you create the segment and select the required columns, you can define filters on how the segment must be created.
- ADOC provides you multiple options to define your segments after selecting the columns. You can define filters to create segments from the columns.
- All the data matching your filters form the part of segment.
- Once you create the segment, you can include your segment in policies.
- When the policy is executed, you can view policy execution results at the segment level.
Filters
ADOC filters are different for different data types. This section describes the filters for each data type.
String
You can use this filter to create filters which are in the string data type format. For example: Selecting a specific set of countries or geographical regions. The following parameters allow you to set up your required segment:
- Limit By: In this filter, you can provide a numerical value. This filter limits the number of records populated to the numeric value provided by you. You can set the maximum limit value of 20 which selects the top 20 records. For example, if there are 100 records and if you select Limit by 10, the top 10 records form the part of the segment.
- Include Only: This filter allows you to select rows with exact matching values. For example, if you define the filter as INCLUDE ONLY [Snowflake], only those rows which have the value as Snowflake are selected. If a row has a value Snowflake1, it is rejected, since it does not exactly match the given string. You can also include multiple strings. For example, if you define the filter as INCLUDE ONLY [Snowflake ; Databricks ], all the rows which have data as either Snowflake or Databricks, are selected.
Numeric
You can use this filter to create filters which are in the numeric data type format. For example: Selecting the people belonging to a specific age group (like 20-30). The following parameters allow you to set up your required segment:
- Limit By: In this filter, you can provide a numerical value. This filter limits the number of records to the numeric value provided by you. For example, if there are 100 records and if you select Limit by 10, the top 10 records form the part of the segment.
- Range Between X and Y: In this filter, you must define two numerical values; maximum and minimum. All the data between the maximum and minimum values are part of the segment. For example, if you define the filters as RANGE between [20] and [30], all the values between 20 and 30 are selected. You can also select a single value as the range. For example, if you define the filter as RANGE between [20] and [#empty], all the values greater than 20 are selected to be the part of segment. In this scenario, only a single segment is created. This segment has all the values which match the filter.
- Include Only: This filter allows you to select rows with exact matching values. For example, if you define the filter as INCLUDE ONLY [10], only those rows which have the value as 10 are selected.
Boolean
You can use this filter to create filters which are in the boolean data type format (true/false). For example: selecting the people of a particular gender.
You can select either all the true values or all the false values to be part of the segment. You can also create the segment by including both the true and the false values.
Segment Operations
Once you create a segment, and define the filters, you can perform one of the following operations on the segment.
- Edit: Edit the filters or create or delete segments.
- Delete: Delete the segment.
- Duplicate: Create a duplicate copy of the segment.
Include Segments in Policies
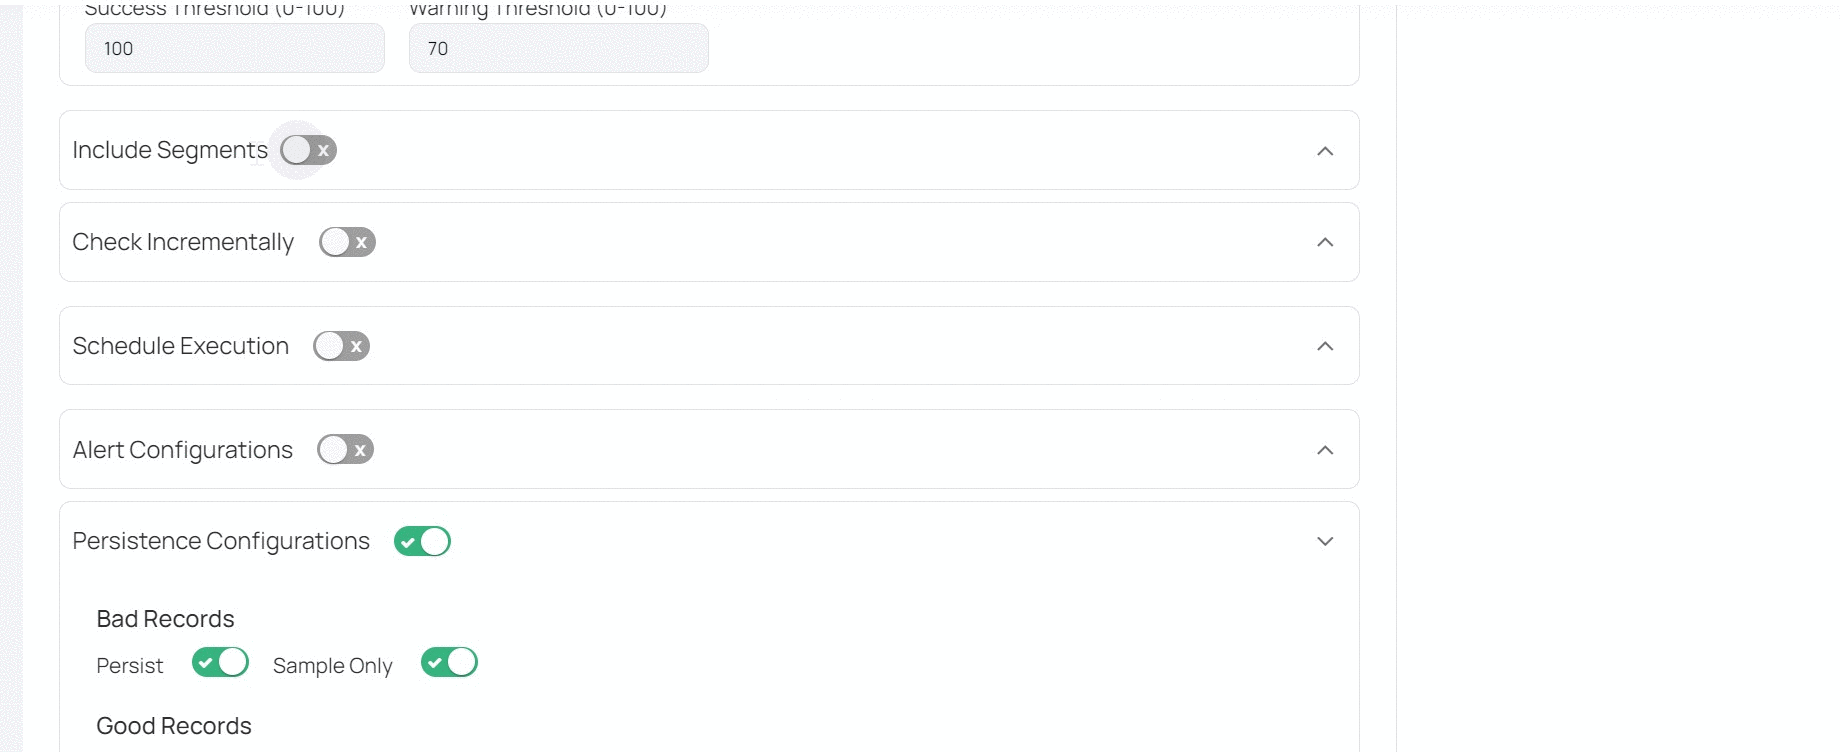
Once you create all the required segments on the assets, you can add the segment to policies. ADOC provides a toggle switch to include or exclude segments during policy executions. When you turn on the toggle switch, the segment is included in the policy. If you have created multiple segments, you can choose as to which segments can be part of a policy.
View Segment Results
Once you include a segment in a policy and execute the policy, you can check the results of individual segments. Since the results are segregated into various segments, you can easily view the segments which have quality issues with the data. You can view the segment results on the Segmented Analysis tab. This tab is displayed only if a policy in which segments have been enabled, is executed. On the segment results page, you can view the columns included in the segment, Quality Score for a segment, number of rules passed and failed, and the percentage of records included in the segment. You can also expand a segment results to view the details.
Using Segments
To leverage the Segmented analysis feature, you must perform three tasks.
- You must first create the segment on an asset, by defining the rules.
- You must include your segment in the policies and execute the policy.
- Once the policy is executed, you can view the results of segment in the Policy Execution results page.
Creating Segments
In this section, you can create Segments on the Asset.
This section exists only for profiled assets.
- To add Segments, click the ADD SEGMENTS button.
- Select the columns from which the Segment must be created. You can add a maximum of three columns.
- Enter a Segment name. The Segment name must be unique.
- Apply filter rules to create Segments.
- Click Save.
- Click Manage Segments to edit, delete, or duplicate Segments. You can also add multiple segments by using this button.
Including Segments in Policies
In this section, you can include Segments as part of policy execution. You must turn on the Include Segments toggle to include the segment in the policy executions. Once you turn on the toggle switch, you can see the list of segments created. Each segment is displayed as a card. You can select the required segments, by clicking the check box on the segment card. All the selected segments are executed during policy execution. You can see the results on the Segmented Analysis tab in policy execution results page.
Viewing Segment Results
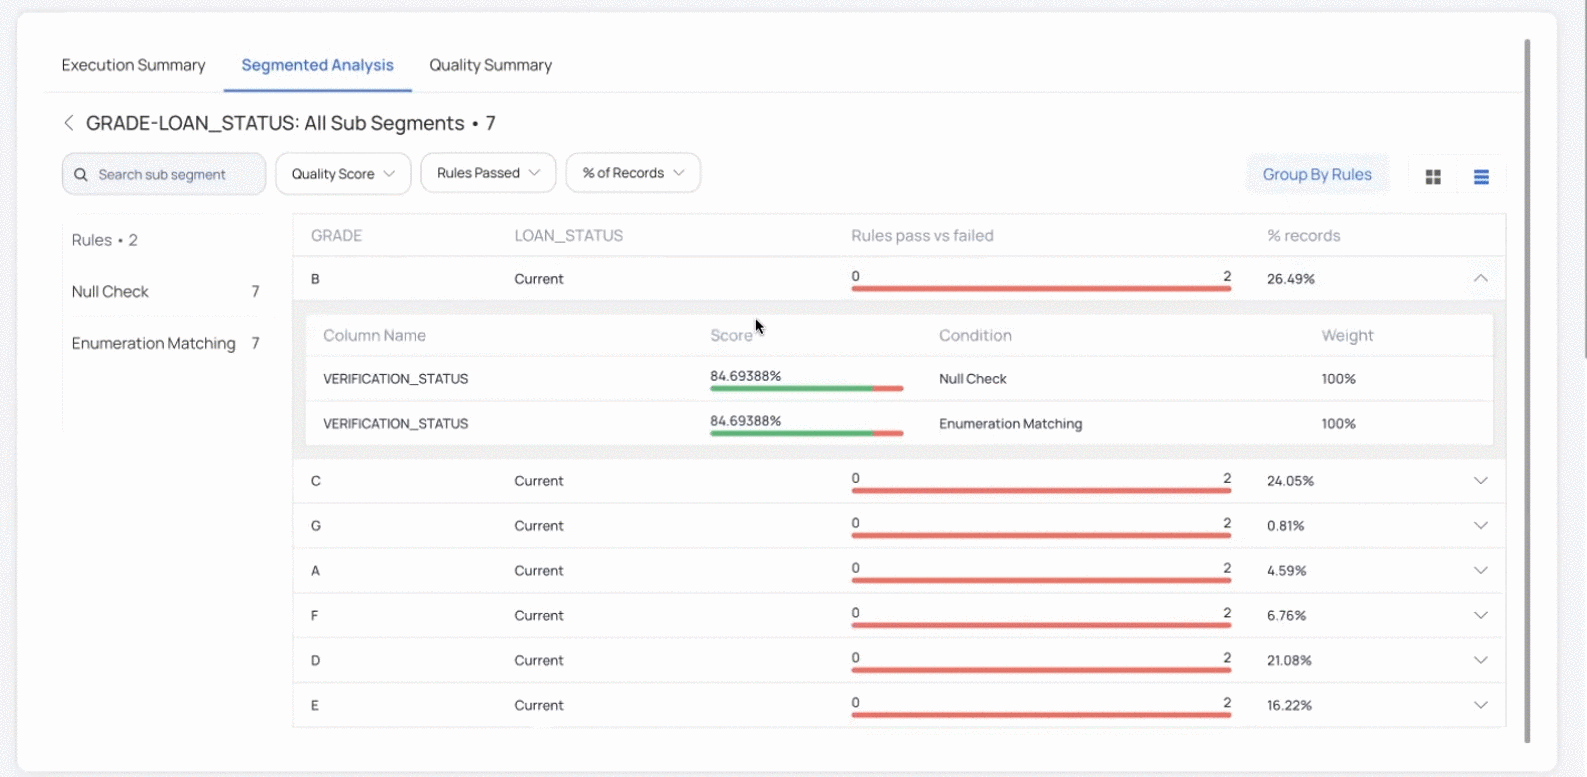
You can view the segment results on the Segmented Analysis tab on policy execution results page. you can view this tab only if you have executed a policy that has segments included in it.
You can view details like Quality Score for each Segment, number of passed and failed rules, and the percentage of records included in a Segment. You can expand a Segment to view detailed results. you can use the Group By Rules button to group the results as per the rules defined on the policy.
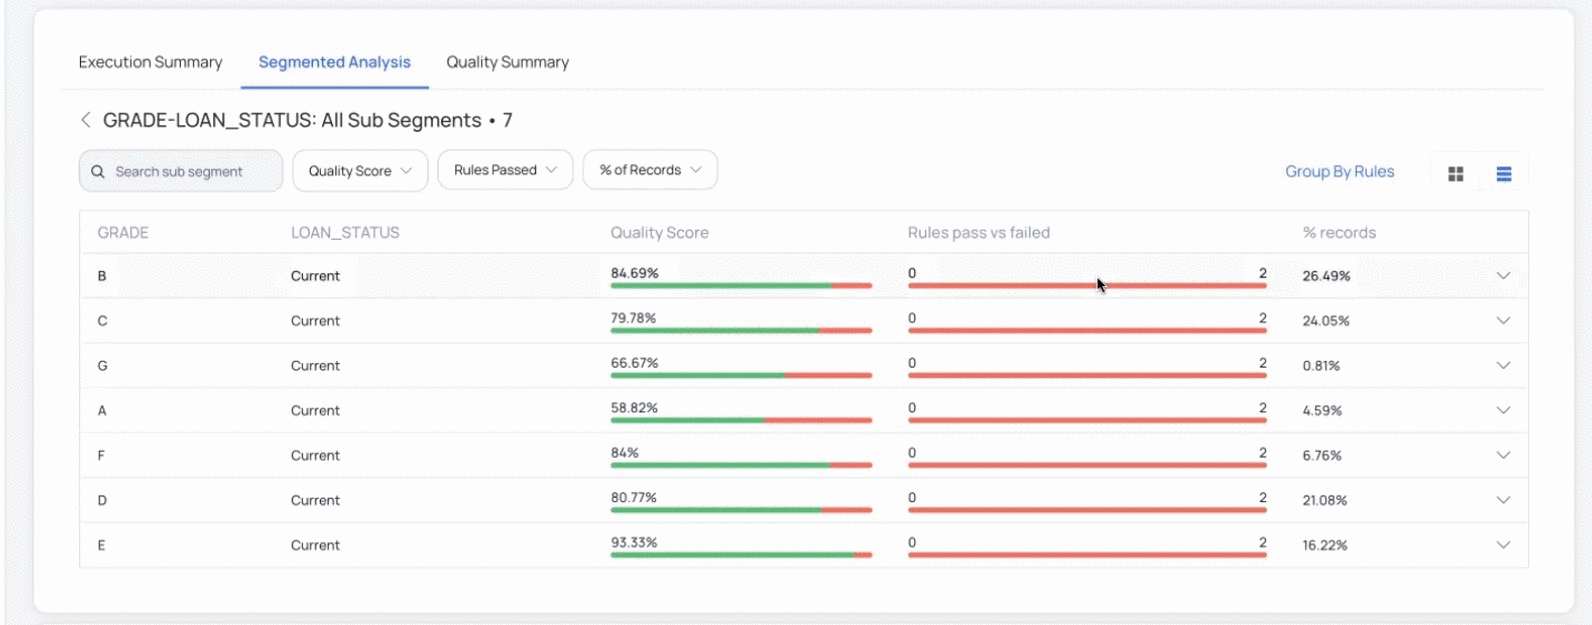
You can also apply filters based on Quality Score, Rules Passed, and percentage of records included in the Segment. You can switch between list view and card view.
If you modify segment filter criteria, the subsequent policy execution after the modification includes the modified segment results. You can still view the previous results based on old Segment criteria even after modifying the segments and executing the policies as per the new segment filters.
Lookup Data Quality Policy
When you fetch data from multiple data sources, two columns of different assets may be expected to have the same values. With this rule, you can perform a lookup on any column of the target asset. The Lookup feature allows you to compare the target asset's column values with another asset's (called reference asset) columns. The reference asset has standard data and you can check if the target column has the same standard data, or if any data is inconsistent.
The Lookup rule in Data Quality policy allows you to ensure that two such related columns always have the same data stored in them.
Working of Lookup Rule
- The Lookup Policy rule allows you to compare data from two or more columns which are part of different assets.
- The first column known as the target column (for example, foreign key column) is suspected to have inconsistent data. The second column known as the reference column (for example, primary key column) has ideal data.
- When you execute a policy which has lookup rule configured, ADOC looks up (searches) the values of target column in the values of reference column.
- If all the data in target column is present in the reference column, the lookup rule returns a 100% success rate.
- If the target column has data that does not match with the reference column, the quality score of the policy decreases as per the weightage given to the lookup rule.
- You can view the Data Violations section on the policy execution page to check the target column's data that does not match with the reference column's data.
Setting an Asset as Reference Asset
You must set an asset that have consistent data as reference asset before using the lookup rules. You can apply the lookup rule only on the columns of those assets which are successfully validated as reference assets.
To set an asset as a reference asset:
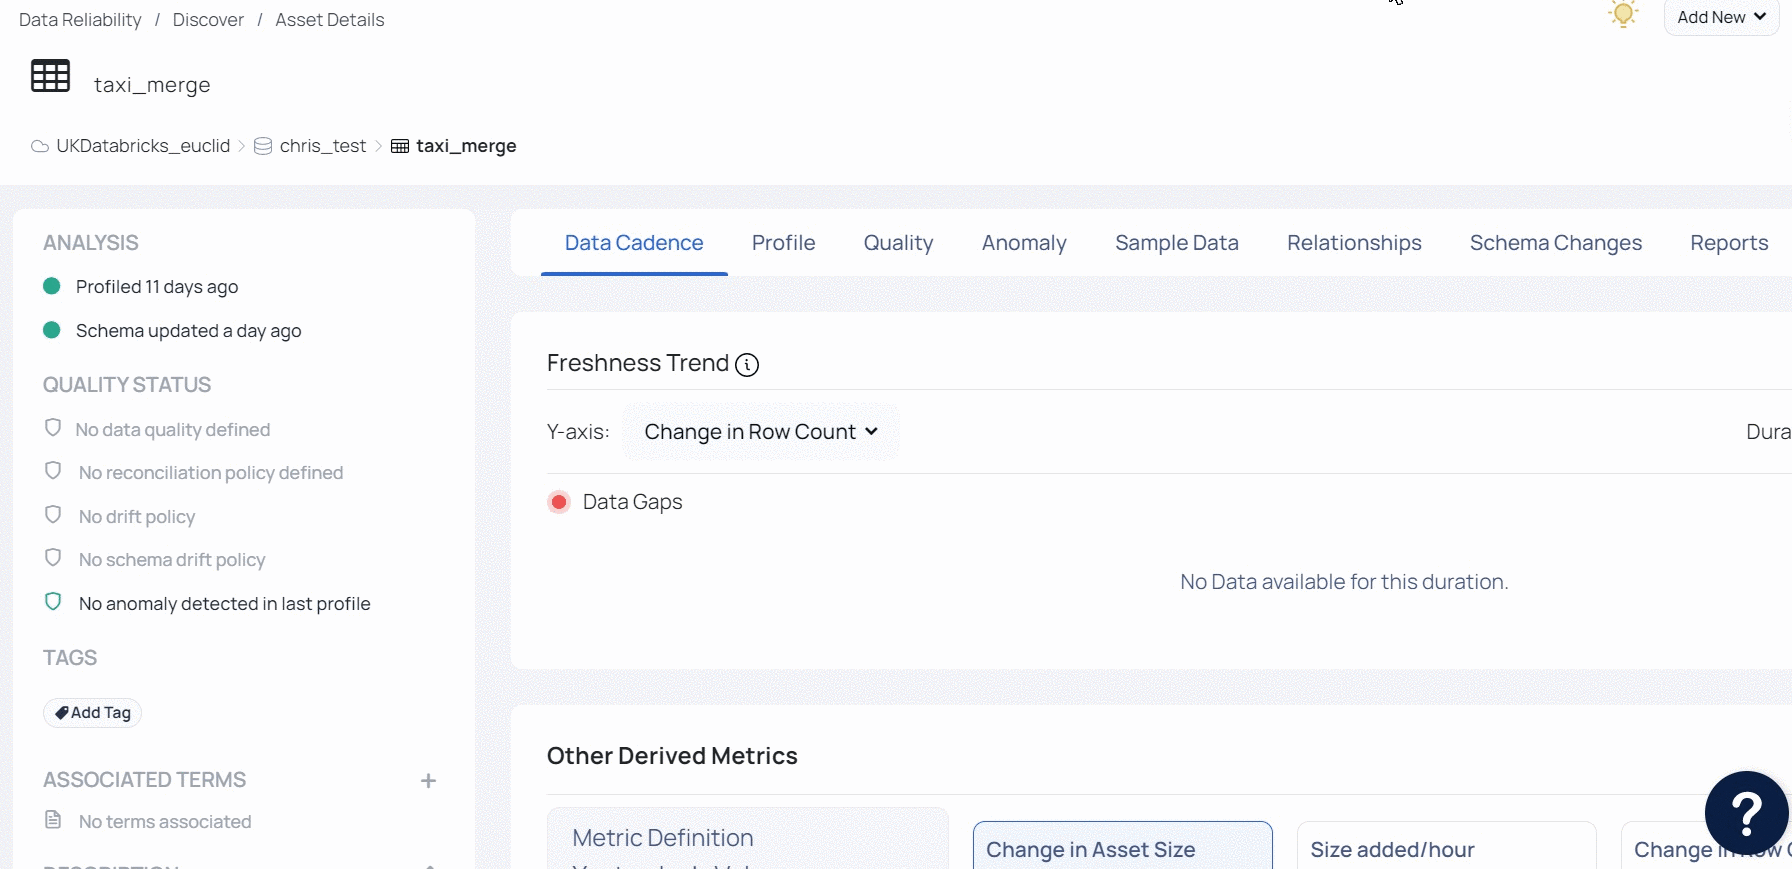
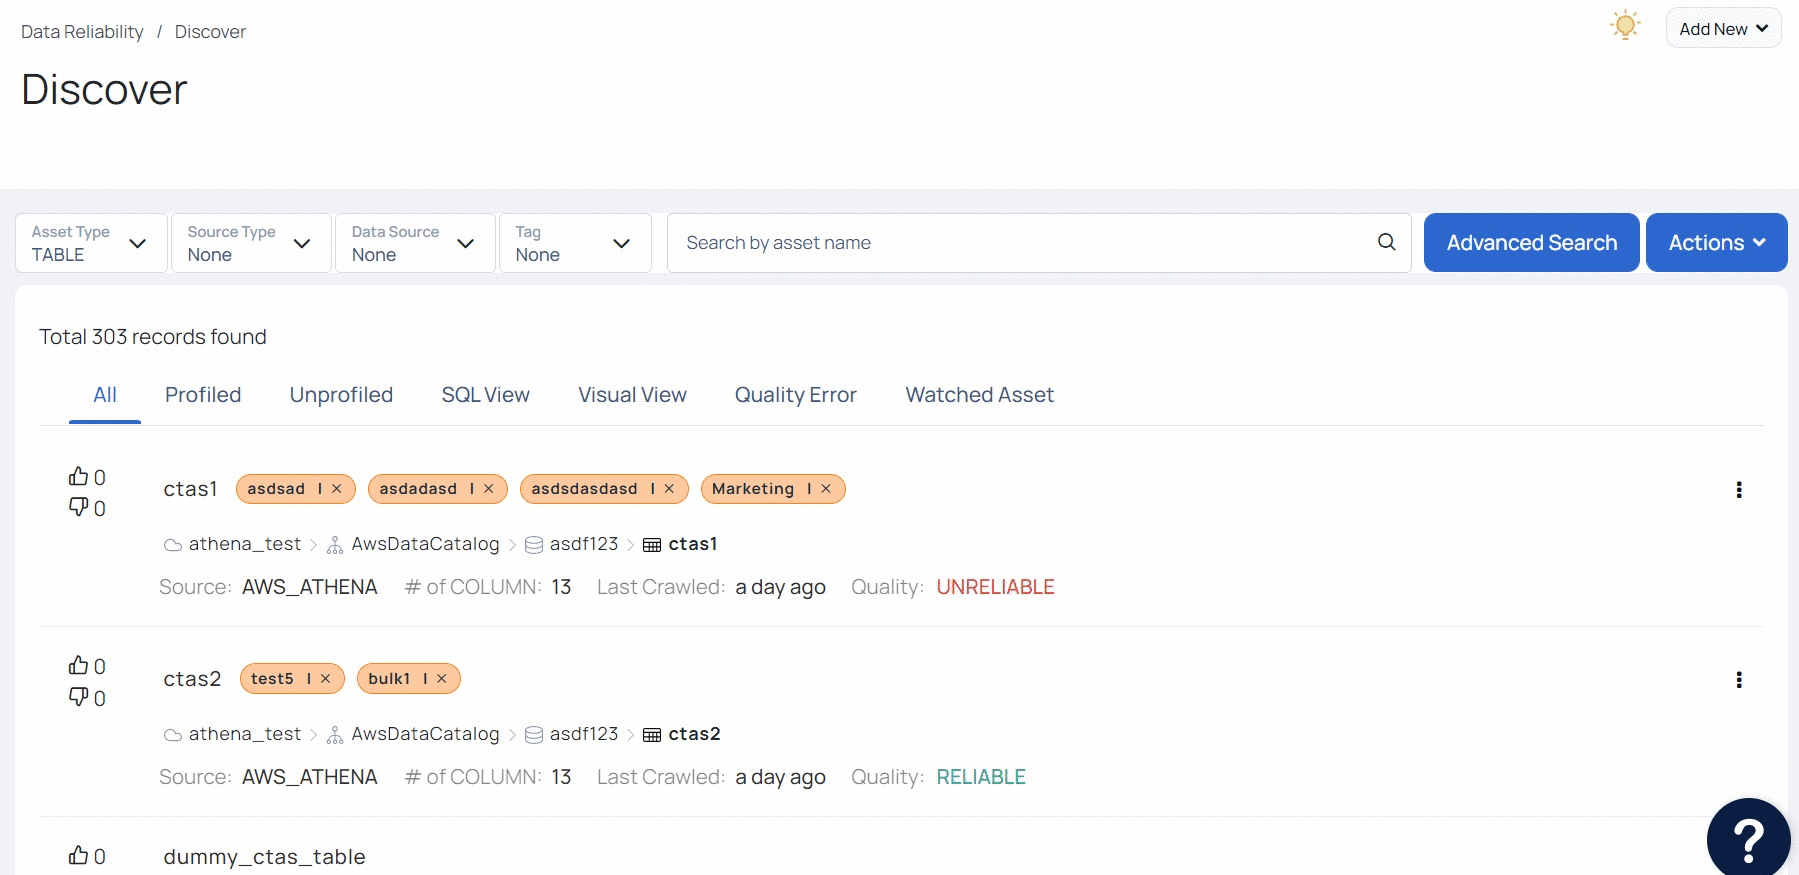
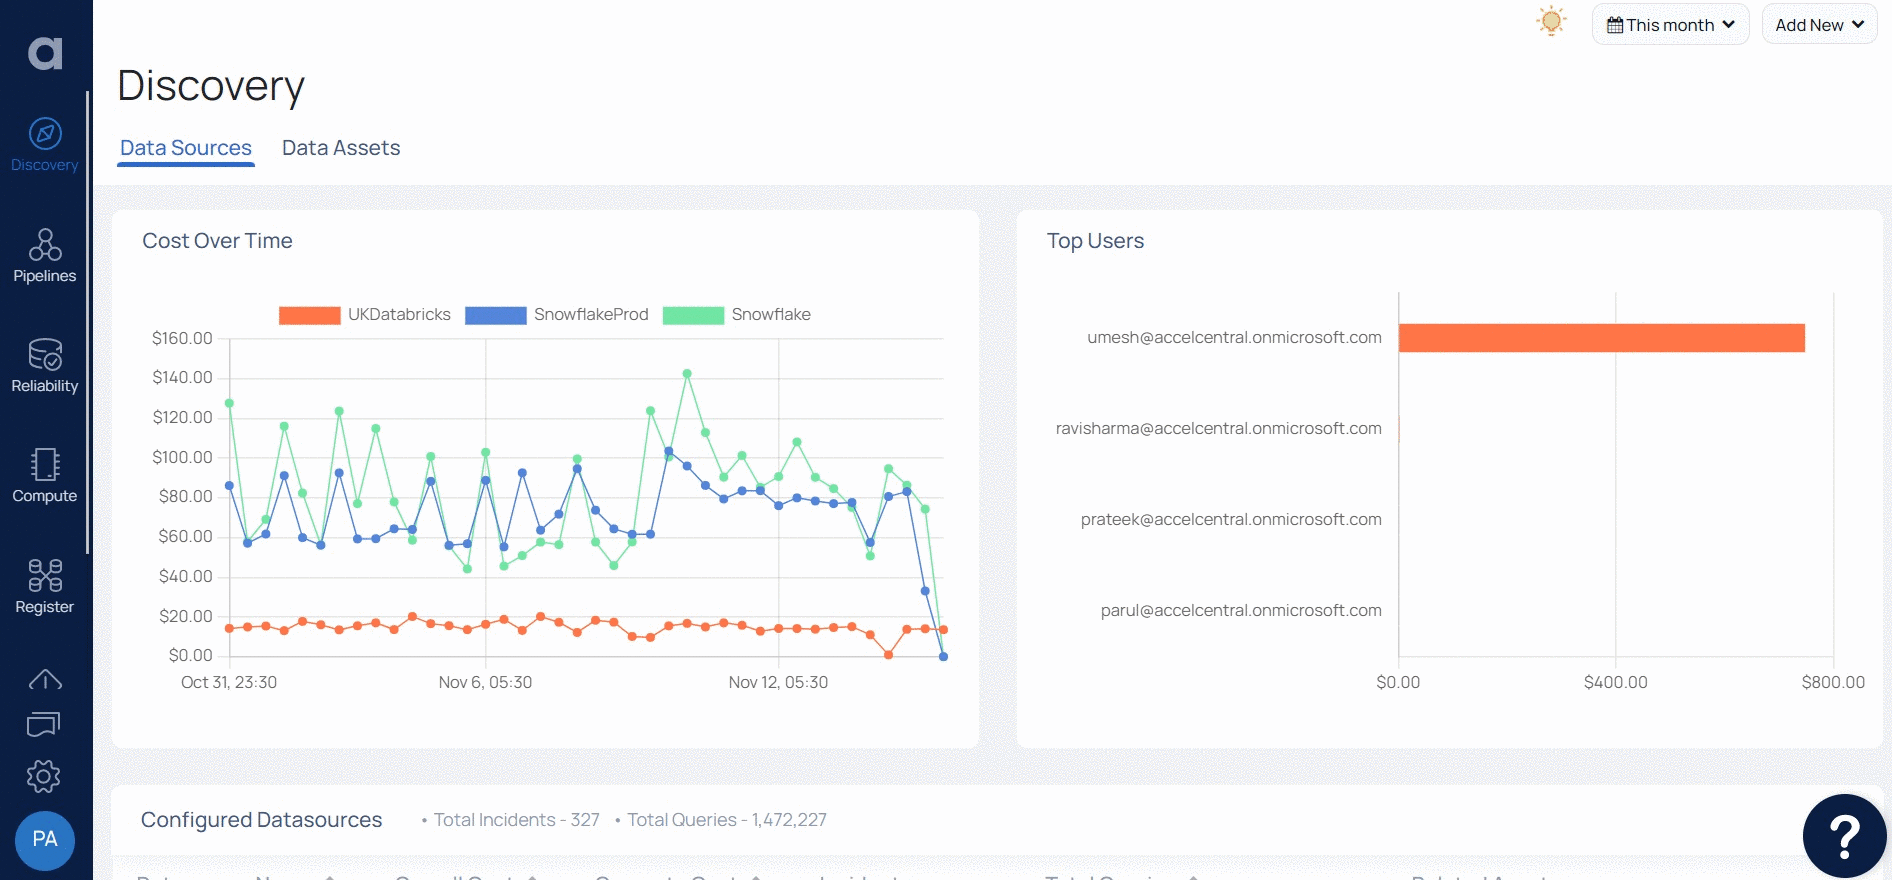
- Navigate to Data Reliability.
- Click Data Discovery.
- Navigate to asset detail view for the asset whose column needs to be set as a reference column.
- Click the Settings tab.
- Click Reference Asset.
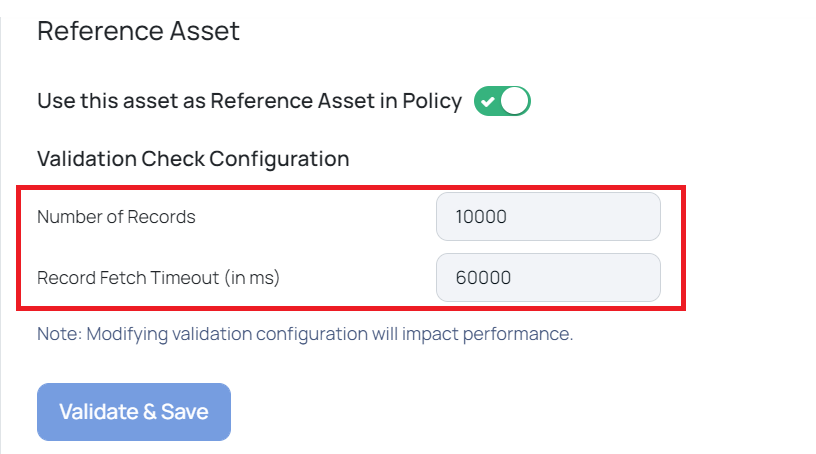
- Turn on the Use this asset as Reference Asset in Policy toggle switch.
- Click Validate & Save if you modify the default values for the Number of records or Record Fetch Timeout fields.
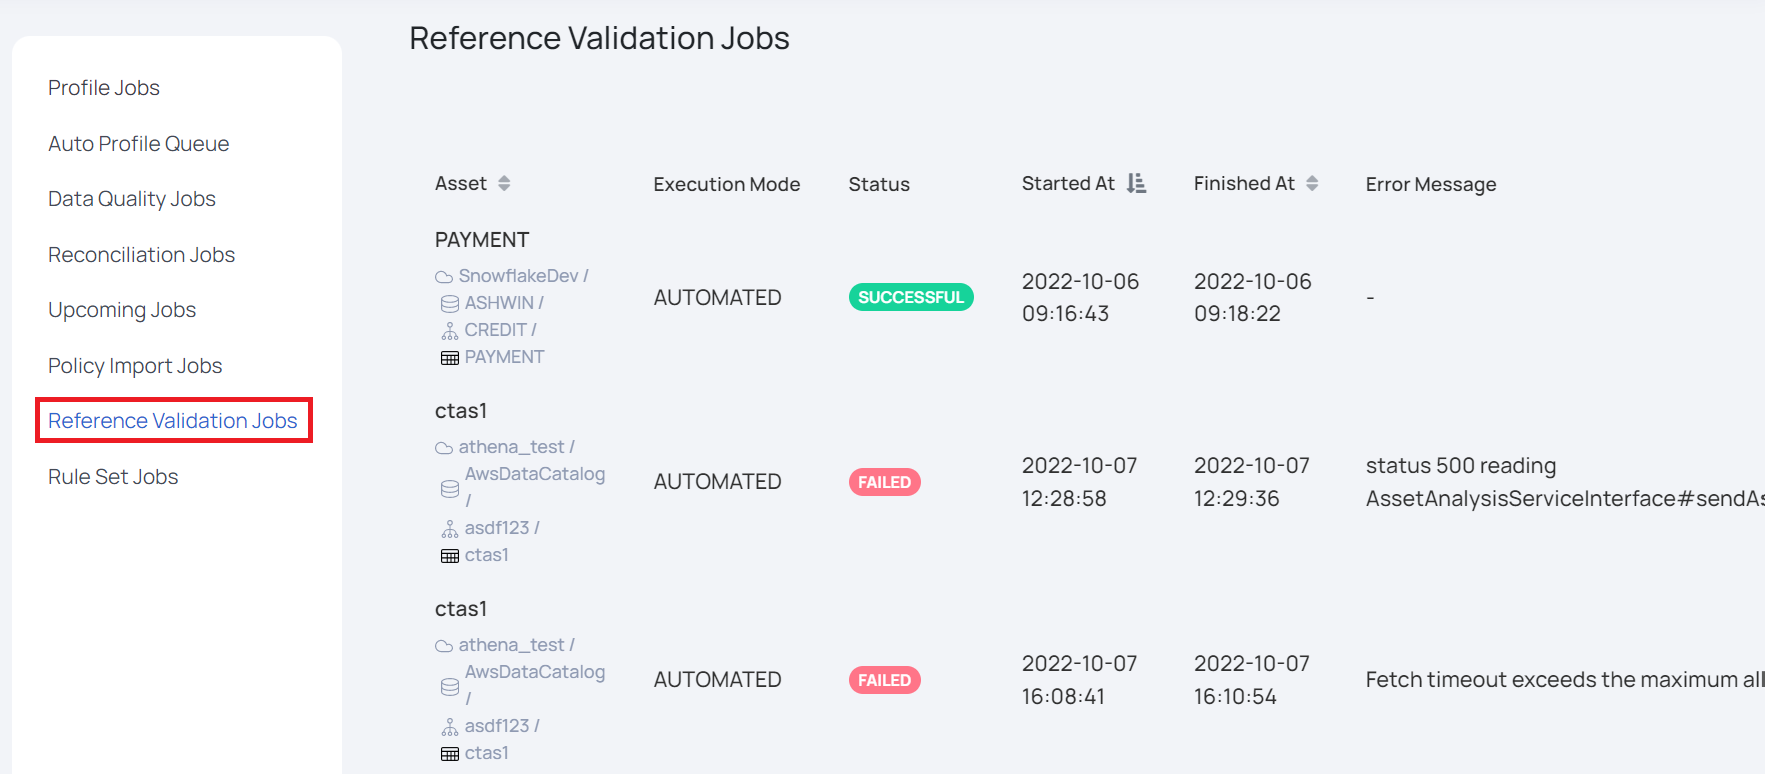
Reference Validation Jobs
To mark an asset as a reference asset, you must validate it by clicking the Validate & Save button. Each time you click the Validate & Save button, a new job is created in the Reference Validation Jobs section of the Jobs page. You can go this section to check if a validation job succeeded. Only those assets whose validation jobs succeed are marked as Reference assets. For the failed Reference Validation jobs you can check the reason for failure and validate the asset again after performing the required corrections.
Lookup Usage Rule Methods
You can use the lookup rule in three ways. The following sections explain the three methods.
UI Driven Lookup Method
You can use this method in two ways as explained below. The first method allows you to perform a lookup on target column directly. In the second method, the target column's data is transformed to clean data and then you perform a lookup on this cleaned data.
The following sections explain both the UI driven Lookup methods.
Single Lookup on Target Column
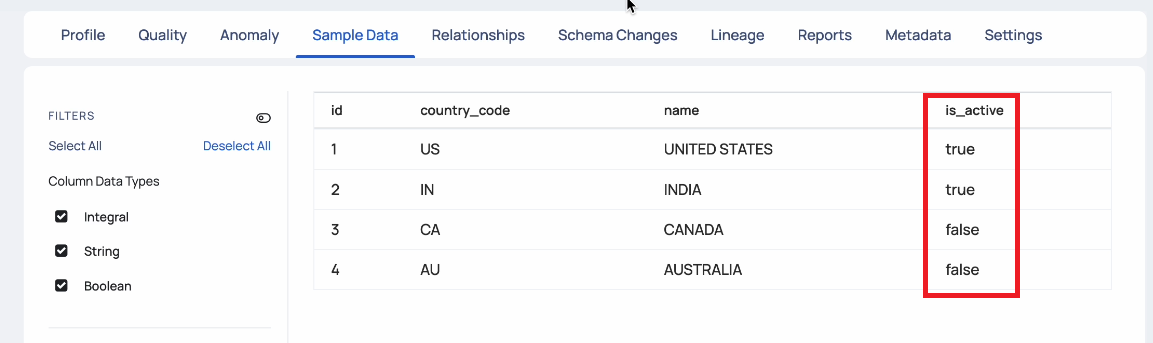
You use this method to perform lookup on raw column which is suspected to have inconsistent data. Apart from performing the lookup, in reference asset, you can have a Boolean data type which can define if a particular row's values are valid or invalid. You can then use this Boolean filed in the SQL Filter field while configuring the lookup rule to only match those values which are true.
For example, in the following image, you can see that there is a is_active Boolean data type field. If you use this table as the reference table, you can use the is_active column in the SQL filter field of the lookup rule configuration. In this case, only US and IN values are considered as good records since they are set to true.
To use this method:
- Set the reference column for lookup.
- Click Add New and select Quality Policy.
- Select the asset that has the target column.
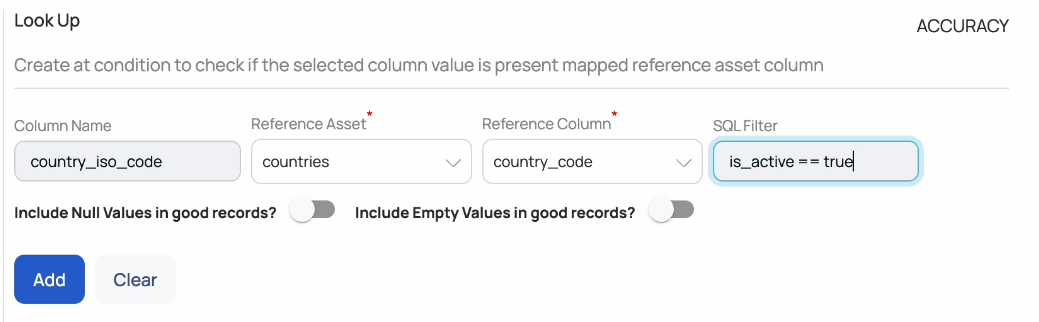
- In the Rule Definitions section, click Look Up.
- Select the column in the Column Name field. This column is the target column.
- Select an asset in the Reference Asset field. All the assets which have at least one column with successful reference validate are listed here.
- Select the reference column in the Reference Column field. The selected column is considered to be the the reference column.
- (Optional) Enter the Boolean field expression in the SQL Filter field to validate only true records. You can add multiple expressions by using the AND or OR logical expressions.
- (Optional) Turn on the Include Null Values in good records? toggle switch to consider null values of target columns as good records.
- (Optional) Turn on the Include Empty Values in good records? toggle switch to consider empty values of target columns as good records.
- Click Add.
- (Optional) To add multiple lookup rules, execute steps 5 to 10. All the Lookup rules that you have added are displayed at the bottom.
- Enable and save the policy.
- Execute the policy.
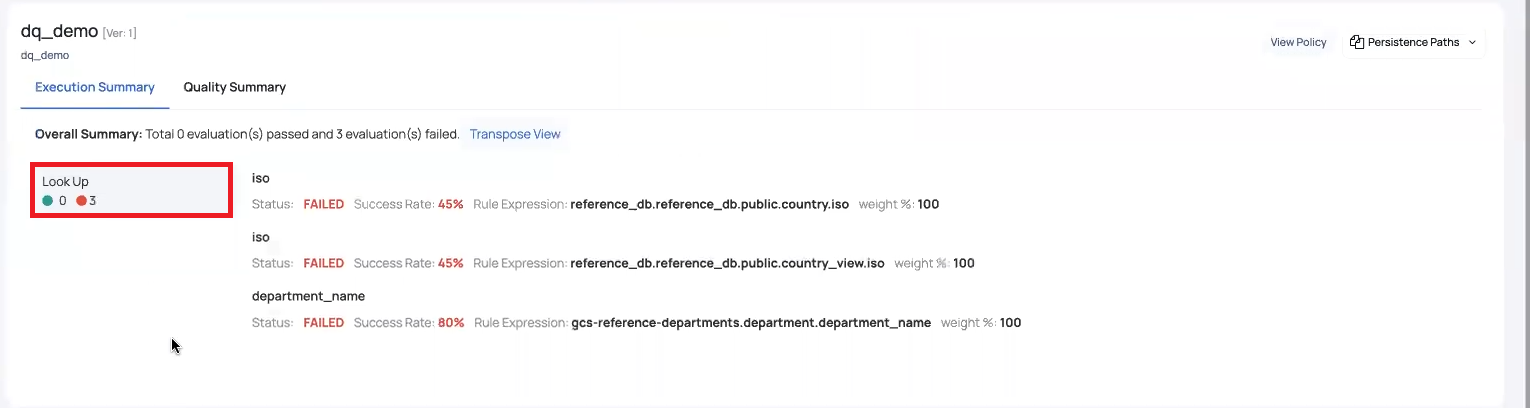
When you execute the policy, you can check the results of the Lookup rule in the Execution Summary tab, The Look Up section displays the results of the Lookup rule.
In the following image, the Data Violations tab displays all CA codes to be invalid since we used the SQL Filter field and the reference table had the Boolean field set to false for the CA row.

Single Lookup with Transformed Column
In this method, you can transform a suspected target column's data to consistent data by using the User Defined Templates and then create a Direct Lookup rule by using the transformed column as the target column. This method is a modified version of the previous method where in you use a cleaned up column as the target column. This method allows you to double check your target column to ensure that all the records are consistent with respect to reference column.
You must write custom code for Transform UDF in one of the ADOC supported languages (Scala, Java, Javascript, or Python). This code uses the data in target column and creates a new column. The new column has transformed consistent data from the target column. You can then create Single lookup rule by using the transformed column as the target column and perform lookup on it. This ensures that the transformed column has fully consistent data.
To use this method:
- Click Settings.
- Click User Defined Templates.
- Click Create New.
- Click Transform UDF.
- Click Continue.
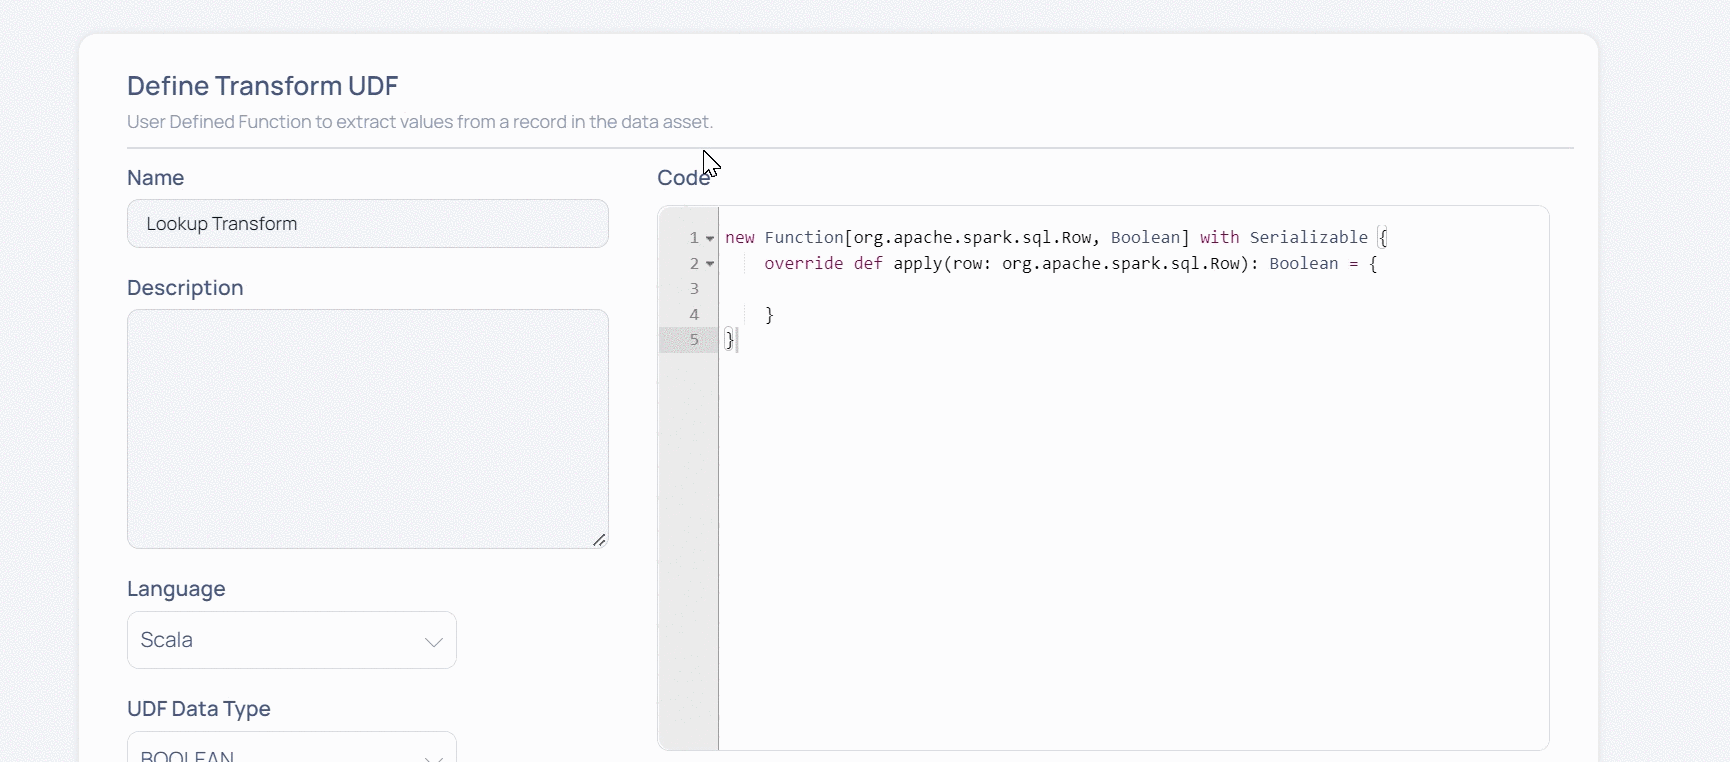
- Enter a name for the UDF in the Name field.
- (Optional) Enter a description in the Description field.
- Select the language in which you would write the code, in the Language field.
- Select the data type of the lookup column in the UDF Data Type field.
- Type the code in the Code field. Enclose the reference variables in triple braces {{{ }}}.
ADOC considers all variables in your code which are enclosed in triple braces as reference variables. The Reference Variables field is automatically populated with the reference variable names based on the code.
- Click Validate and select either Manual or Asset based validation to ensure that your code works accurately.
If you select Asset based validation, you must enter the name of the target column that needs to be transformed, in the Override Value field.
The transformation is now completed. You must now create a data quality policy and include this transformation UDF in it. While adding the transform UDF, you must provide the name of the target column and enter a name for the new transformed column that will be used in the lookup rule.
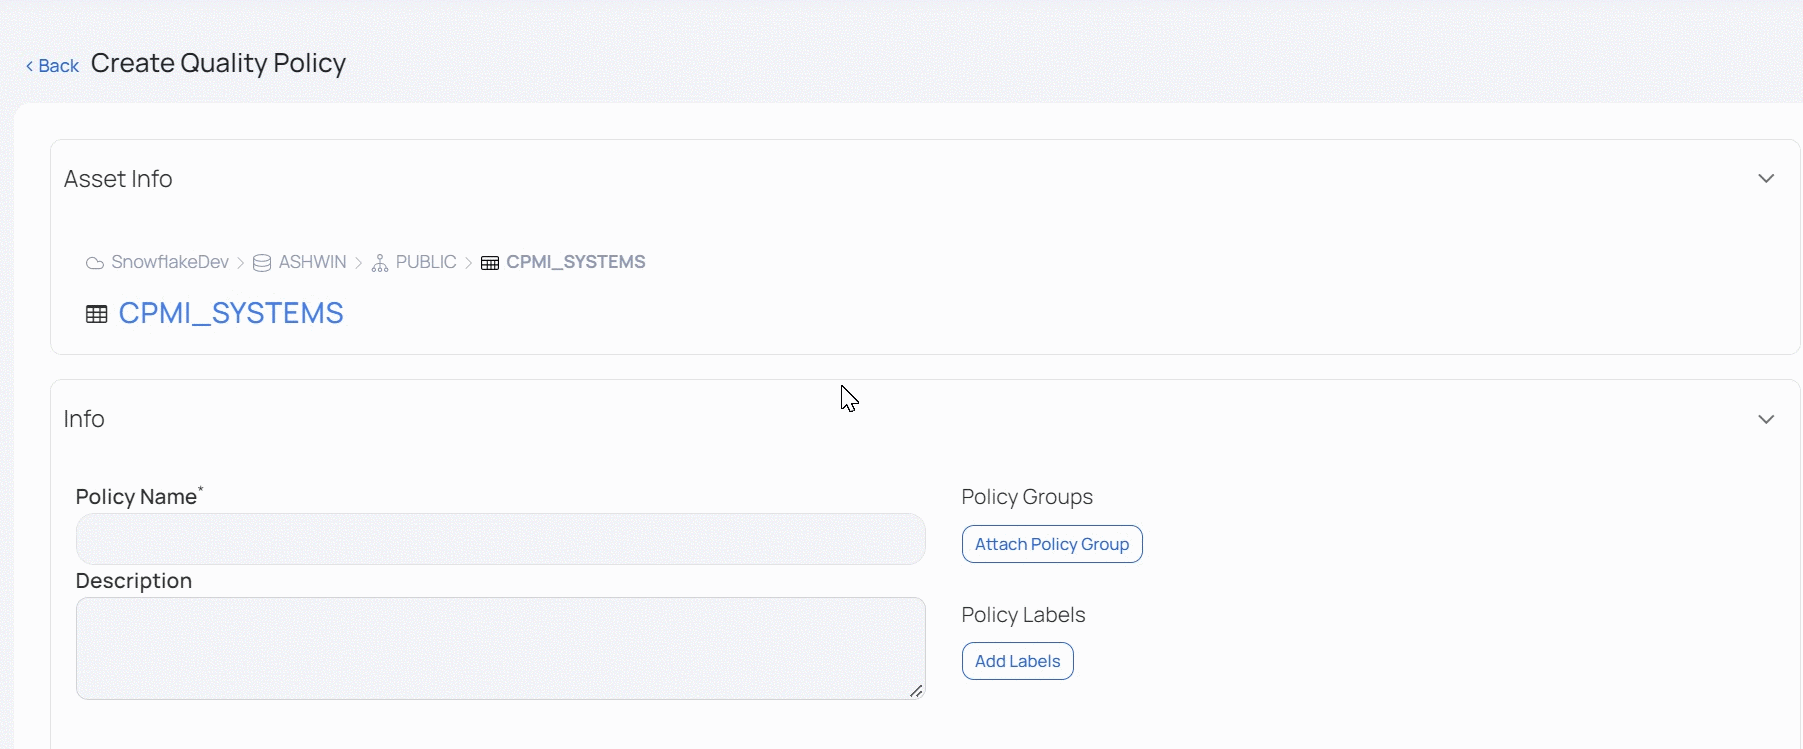
- Click Add New and select Quality Policy.
- Select the asset on which you want to create the quality policy (asset which has the target column).
- Click Add Transformation under the User Defined Transformations section.
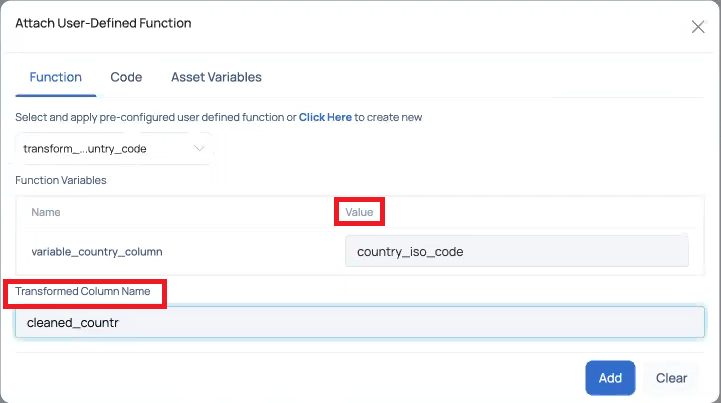
- Select the UDF function created in the above steps.
- Enter the name of the target column in the Value field.
- Enter a name for the transformed column in the Transformed Column Name field. This field must be used in the Lookup rule.
- Click Add.
Validation UDF Driven Template Lookup Rule
You can use the User Defined Templates to create lookup rule that compares multiple target columns with multiple reference columns. You can perform a lookup on a single target column's values against multiple reference column's values or you can perform lookup on multiple target column's values against multiple reference columns. You can also use the group by feature for grouping. The details of group by function syntax is provided in the table which follows the bullet points.
- You must create a template using Validation UDF to perform this type of lookup.
- The Validation UDF has a toggle switch called Lookup Type.
- When you enable this toggle switch, ADOC recognizes that the Validation UDF would be used in a Lookup rule in Data Quality policy.
- ADOC also provides you an appropriate base code for your template when you turn on the Lookup Type toggle switch. You can modify the code to achieve your business requirements.
- The code template generated by ADOC has a parameter called store. This is a map object that holds data of the assets.
- The content of the store object depends on the programming language selected by you. The following table explains store object for various languages.
- You must use alias in the code to address the reference asset.
The following tables displays the various supported APIs for creating your validation UDF code. Each tab represents a programming language. You can switch to the tab of your choice based on the programming language you use. You can also view an example for each API in the final column (scroll right if it is not visible).
Javascript
| APIs | Description | API Return Type | Syntax | Example |
|---|---|---|---|---|
| store.lookup | Get the Reference Asset from Store | LookUp Object | var assetLookup = store.lookup("<<asset_alias>>") | var countryLookup = store.lookup("country_alias") |
| store.lookup.items | Fetch Column’s Unique value as List for Reference asset | Java Script List | var assetLookup = store.lookup("<<asset_alias>>") var columnValues = assetLookup.items("<<column_name>>") | var countryLookup = store.lookup("country_alias") var countries = countryLookUp.items("country_code") |
| store.lookup.contains | Check if the data is present in Reference Column's Value | Java Script Boolean | var assetLookup = store.lookup("<<asset_alias>>") var isPresent = assetLookup.contains("<<column_name>>", <<Value to check>>) | var countryLookup = store.lookup(“country_alias”) var isPresent = countryLookup.contains("iso", "US") |
| store.lookup.get | Group by on Master Column and Get aggregated list of value with single column at a time | Java Script List | val assetLookup = store.lookup(“<<asset_alias>>”) val aggeregatedValuesPerGroupByCol = assetLookup.get("<<group_by_column_name>", <<Group By Column Value>> , "<<Aggregated Column Name>>") | var countryLookup = store.lookup(“country_alias”) var aggeregatedStatesPerUSCountry = countryLookup.get("country_code", "US" , "state_name") |
| store.lookup.getAll | Group by on Master Column and Get aggregated list with all other columns as map | Java Script List of Dictionary | val assetLookup = store.lookup(“<<asset_alias>>”) val aggeregatedValuesForAllOtherColumnsPerGroupByCol = assetLookup.get("<<group_by_column_name>", <<Group By Column Value>>) | var countryLookup = store.lookup(“country_alias”) var aggeregatedMapOfColumnsPerUSCountry = countryLookup.get("country_code", "US") |
Python
| APIs | Description | API Return Type | Syntax | Example |
|---|---|---|---|---|
| store.lookup | Get the Reference Asset from Store | LookUp Object | assetLookup = store.lookup("<<asset_alias>>") | countryLookUp = store.lookup("country_alias") |
| store.lookup.items | Fetch Column’s Unique value as List for Reference asset | Python List | assetLookup = store.lookup("<<asset_alias>>") columnValues = assetLookup.items("<<column_name>>") | countryLookup = store.lookup("location_alias") countries = countryLookUp.items("country_code") |
| store.lookup.contains | Check if the data is present in Reference Column's Value | Python Boolean | assetLookup = store.lookup("<<asset_alias>>") isPresent = assetLookup.contains("<<column_name>>", <<Value to check>>) | countryLookup = store.lookup(“country_alias”) isPresent = countryLookup.contains("iso", "US") |
| store.lookup.get | Group by on Master Column and Get aggregated list of value with single column at a time | Python List | val assetLookup = store.lookup(“<<asset_alias>>”) val aggeregatedValuesPerGroupByCol = assetLookup.get("<<group_by_column_name>", <<Group By Column Value>> , "<<Aggregated Column Name>>") | countryLookup = store.lookup(“country_alias”) aggeregatedStatesPerUSCountry = countryLookup.get("country_code", "US" , "state_name") |
| store.lookup.getAll | Group by on Master Column and Get aggregated list with all other columns as map | Python List of Dictionary | val assetLookup = store.lookup(“<<asset_alias>>”) val aggeregatedValuesForAllOtherColumnsPerGroupByCol = assetLookup.get("<<group_by_column_name>", <<Group By Column Value>>) | countryLookup = store.lookup(“country_alias”) aggeregatedMapOfColumnsPerUSCountry = countryLookup.get("country_code", "US") |
Java
| APIs | Description | API Return Type | Syntax | Example |
|---|---|---|---|---|
| store.lookup | Get the Reference Asset from Store | LookUp Object | LookUp assetLookup = store.lookup(“<<asset_alias>>”) | LookUp countryLookUp = store.lookup(“country_alias”) |
| store.lookup.items | Fetch Column’s Unique value as List for Reference asset | Java List | LookUp assetLookup = store.lookup(“<<asset_alias>>”); List<Object> columnValues = locationLookUp.items("<<column_name>>"); | LookUp countryLookup = store.lookup(“country_alias”); List<Object> countryCodes = countryLookup.items("country_code"); |
| store.lookup.contains | Check if the data is present in Reference Column's Value | Boolean | LookUp assetLookup = store.lookup(“<<asset_alias>>”); Boolean isPresent = assetLookup.contains("<<column_name>", <<Value to check>>); | LookUp countryLookup = store.lookup(“country_alias”); Boolean isPresent = countryLookup.contains("iso", "US"); |
| store.lookup.get | Group by on Master Column and Get aggregated list of value with single column at a time | Java List | LookUp assetLookup = store.lookup(“<<asset_alias>>”); List<Object> aggeregatedValuesPerGroupByCol = assetLookup.get("<<group_by_column_name>", <<Group By Column Value>> , "<<Aggregated Column Name>>"); | LookUp countryLookup = store.lookup(“country_alias”); List<Object> aggeregatedStatesPerUSCountry = countryLookup.get("country_code", "US" , "state_name"); |
| store.lookup.getAll | Group by on Master Column and Get aggregated list with all other columns as map | Java List Of Map | val assetLookup = store.lookup(“<<asset_alias>>”) val aggeregatedValuesForAllOtherColumnsPerGroupByCol = assetLookup.get("<<group_by_column_name>", <<Group By Column Value>>) | LookUp countryLookup = store.lookup(“country_alias”); val aggeregatedMapOfColumnsPerUSCountry = countryLookup.get("country_code", "US"); |
Scala
| APIs | Description | API Return Type | Syntax | Example |
|---|---|---|---|---|
| store.lookup | Get the Reference Asset from Store | LookUp Object | val assetLookup = store.lookup(“<<asset_alias>>”) | val countryLookUp = store.lookup(“country_alias”) |
| store.lookup.items | Fetch Column’s Unique value as List for Reference asset | Scala List | val assetLookup = store.lookup(“<<asset_alias>>”) val columnValues = assetLookup.items(“<<column_name>>”) | val countryLookup = store.lookup(“country_alias”) val countryCodes = countryLookup.items(“iso”) |
| store.lookup.contains | Check if the data is present in Reference Column's Value | Boolean | val assetLookup = store.lookup(“<<asset_alias>>”) val isPresent = assetLookup.contains("<<column_name>", <<Value to check>>) | val countryLookup = store.lookup(“country_alias”) val isPresent = countryLookup.contains("iso", "US") |
| store.lookup.getAll | Group by on Master Column and Get aggregated list with all other columns as map | Scala List of Map | val assetLookup = store.lookup(“<<asset_alias>>”) val aggeregatedValuesPerGroupByCol = assetLookup.get("<<group_by_column_name>", <<Group By Column Value>> , "<<Aggregated Column Name>>") | val countryLookup = store.lookup(“country_alias”) val aggeregatedStatesPerUSCountry = countryLookup.get("country_code", "US" , "state_name") |
| store.lookup.getAll | Group by on Master Column and Get aggregated list with all other columns as map | Scala List of Map | val assetLookup = store.lookup(“<<asset_alias>>”) val aggeregatedValuesForAllOtherColumnsPerGroupByCol = assetLookup.get("<<group_by_column_name>", <<Group By Column Value>>) | val countryLookup = store.lookup(“country_alias”) val aggeregatedMapOfColumnsPerUSCountry = countryLookup.get("country_code", "US") |
To use this variant of lookup rule:
- Click Settings.
- Click User Defined Templates.
- Click Create New.
- Click Validation UDF.
- Click Continue.
- Enter a name for the UDF in the Name field.
- (Optional) Enter a description in the Description field.
- Select the language in which you would write the code, in the Language field.
- Enable the Lookup Type toggle switch. This changes the base code. You can see the introduction of the store parameter, used to store asset details.
- Modify the base code in the Code field, as per your organization's business requirements.
- Click Validate and select With Asset.
- Select the target asset on which the validation must be performed.
- Reference Variables : If your code has variables, you must resolve the variables by providing the expected values.
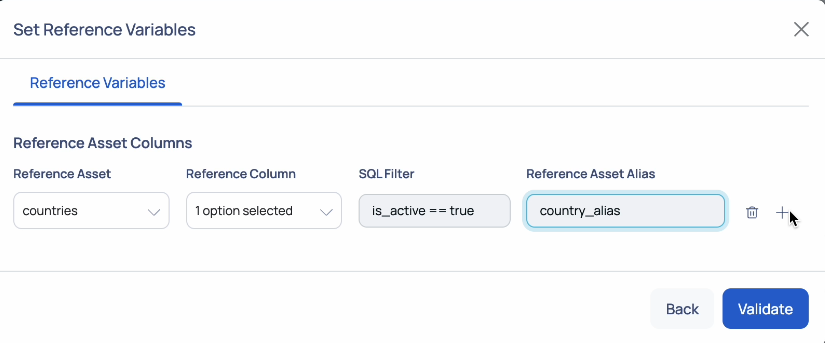
- Reference Asset Columns : You must add all the reference asset and it’s respective column which will be used in UDF validation with respective alias used in the code.

- Select the reference asset from Reference Asset drop down.
- Select the columns of the reference asset. You can select either a single column or multiple columns to perform the lookup.
- Provide the alias name used in your code for reference asset, in the Reference Asset Alias field.
- Save the template.
You must now create a user defined rule in a data quality policy by using this template.
To create user defined rule:
- Click Add New and select Quality Policy.
- Select the asset that has the target column.
- In the Rule Definition section, click User Defined.
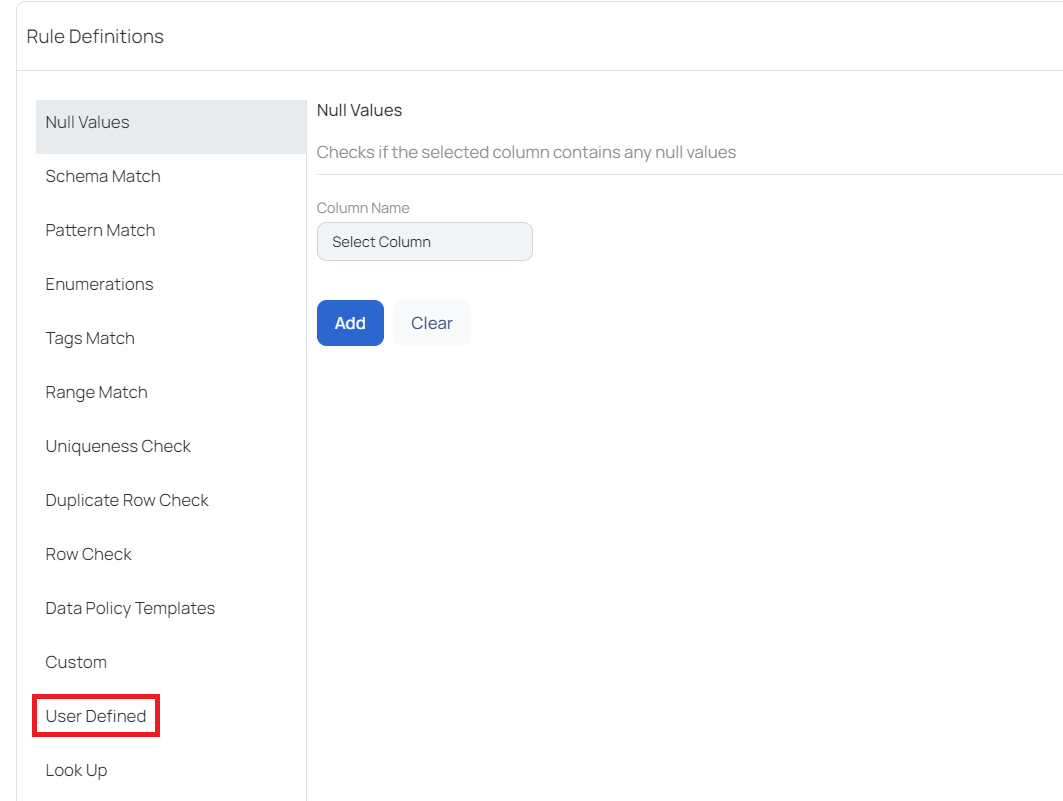
- Click Add Rule.
- Select the UDF template created above.
- Turn on the Only Lookup? toggle switch.
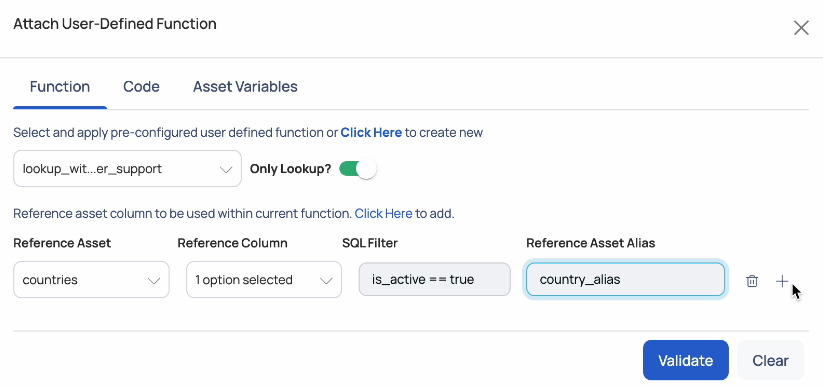
- Resolve the variables in code and attach the reference asset. This is similar to the validation performed during template creation.
- Click Validate.
- Click Add.
- Execute the policy.
You can check the policy results to check for inconsistent data.
Lookup Data Quality Rule Restrictions
This feature has the following restrictions.
- All the primitive data type except date and timestamp are supported for reference's asset columns.
- Validation UDF template only has the option to create UDF template with lookup, as it is intended for Data Quality rule perspective.
Import and Export Lookup Rules
You can export and import policies which have lookup rule. When you import a policy that has lookup rule, all the reference asset settings and policy templates are automatically configured by ADOC.
SQL Rule
The Structured Query Language (SQL) rule in Data Quality Policy allows you to create User Defined Template in SQL Expression format. Once you create a template in SQL expression format, you can use it in the SQL rule of any Data quality policy rule. You can create both Transform UDT and Validation UDT and use them in SQL rules of data quality policies. ADOC recommends you to read the User Defined Template and then proceed with this document.
Working Method
To leverage this feature, you must perform the following tasks:
- Tag Columns and Tables: Assign relevant tags to your columns and tables.
- Create SQL Expression Template: You must fist create an SQL expression in User Defined Templates. This can either be Transform UDT or Validation UDT.
- Create SQL Rule: You must then create an SQL rule in data quality policy by using the template created above.
Creating SQL Expression Template
You must create the SQL expression template in UDT.
- Click the Settings icon.
- Click User Defined Templates.
- Click Create New.
- Select Transform UDT or Validation UDT.
- Click Continue.
- Enter a name for the UDT in the Name field.
- (Optional) Enter a description in the Description field.
- Select SQL Expression in the Language field.
- Select data type in the UDF Data Type field.
- Enter the SQL expression in the Code field.
- Click Validate and select either Manual or With Asset option and validate if your SQL expression is working as expected.
- Click Save to save the template.
Applying SQL Rule
Once you create the UDF template, you must apply the template to a SQL rule in Data Quality policy.
Currently, ADOC does not support the following Spark SQL expressions in UDT.
- Aggregate functions.
- Functions which return more than one column or rows as output.
- Functions which return other than primitive types.
- Click the Add New button and select Quality Policy.
- Select the asset for which the policy must be created.
- Navigate to the Rule Definitions section and select SQL Rule.
- Click Add Rule.
- Select the SQL Expression template from the Template tab.
- (Optional) View the Template code and Asset variables on the Code and Asset Variables tab, respectively.
- Enter the column name.
- Click Validate.
Once the validation is successful, the rule is added. You can execute the policy to check the results.
Using the SQL Rule
This tutorial explains an example of how you can use the SQL rule in ADOC. The table to be used in this tutorial has the following sample data.
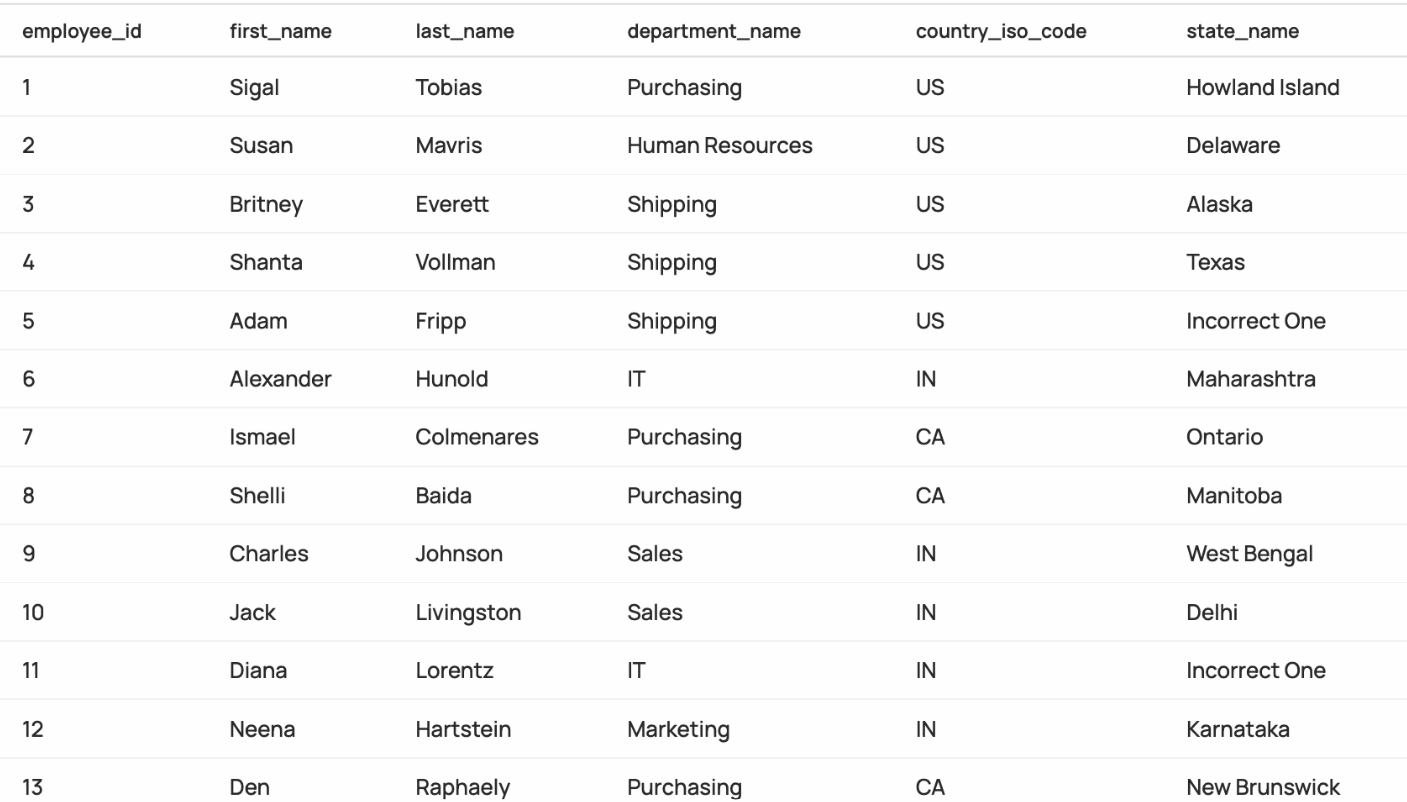
In this tutorial, we will use the Transform UDT to combine the data of first_name and last_name columns into a single column. We will also use the Validate UDT to validate the values of the country__iso__code columns.
For this you must first establish a Transform UDT, then a Validate UDT, and finally a Data Quality policy, with these templates added to the SQL rule section of the policy.
Suppose you want to validate that certain columns are not null across multiple tables. This feature is supported from ADOC V3.12.0 onwards.
Tagging Columns: Assign a tag like
not_nullto all columns you want to validate.Creating Validation UDT:This expression checks that the column is not null.
Creating SQL Rule:
- In the Column Tags field, enter
not_null. - The rule will apply to all columns tagged with
not_null.
- In the Column Tags field, enter
Applying the Policy:
- When the policy is executed, it automatically maps the rule to all tagged columns.
By using dynamic column mapping in SQL Rules:
- You save time by not having to specify columns manually.
- Rules become more flexible and easier to maintain.
- Policies can adapt to changes in your data schema with minimal adjustments.
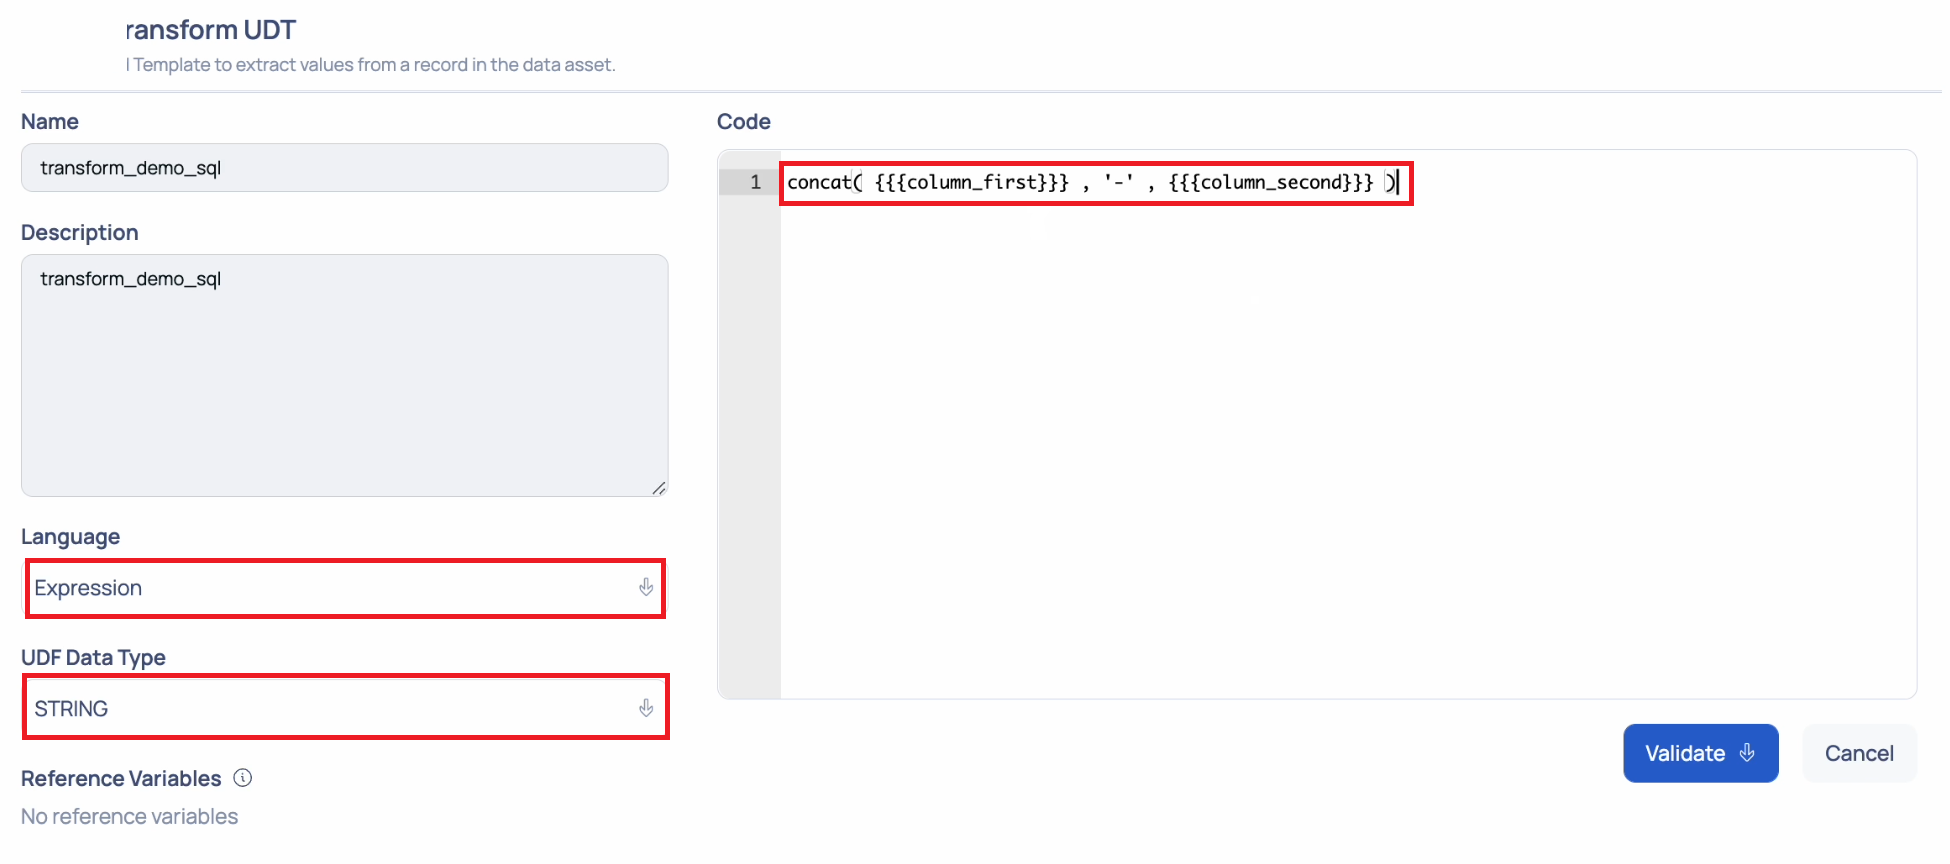
Creating Transform UDT
In this section, we create a transform UDT which combines the data from the first_name and last_name columns into a single column.
- Click the Settings icon.
- Click User Defined Templates.
- Click Create New.
- Select Transform UDT.
- Click Continue.
concat( {{{column_first}}} , '-' , {{{column_second}}} )- Enter a name for the UDT in the Name field.
- (Optional) Enter a description in the Description field.
- Select SQL Expression in the Language field.
- Select String as the data type in the UDF Data Type field.
- Enter the following SQL expression in the Code field. Here we use the Concat function to join the two string columns.
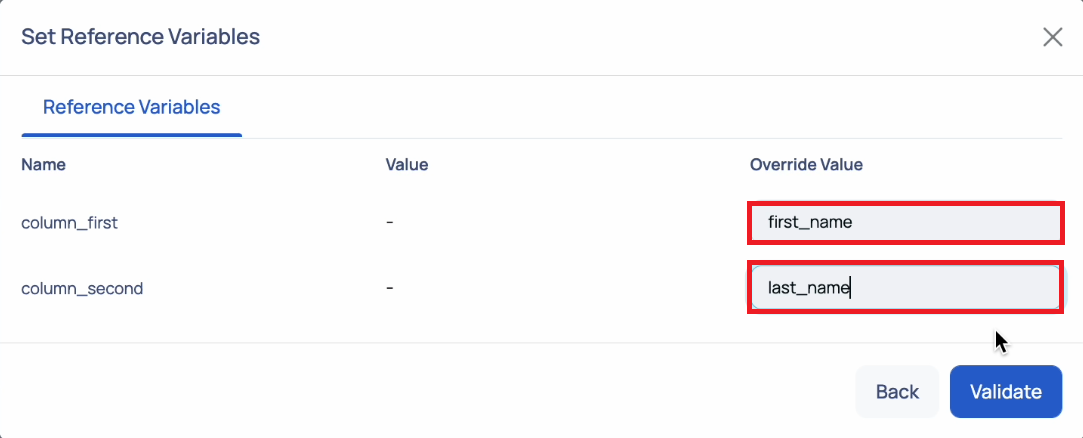
- Click Validate and select With Asset and select the asset.
- Enter the first and second column names in the Override Value field of the column_ first and column_second fields.
- Click Validate.
- Click Save to save the template.
Creating Validation UDT
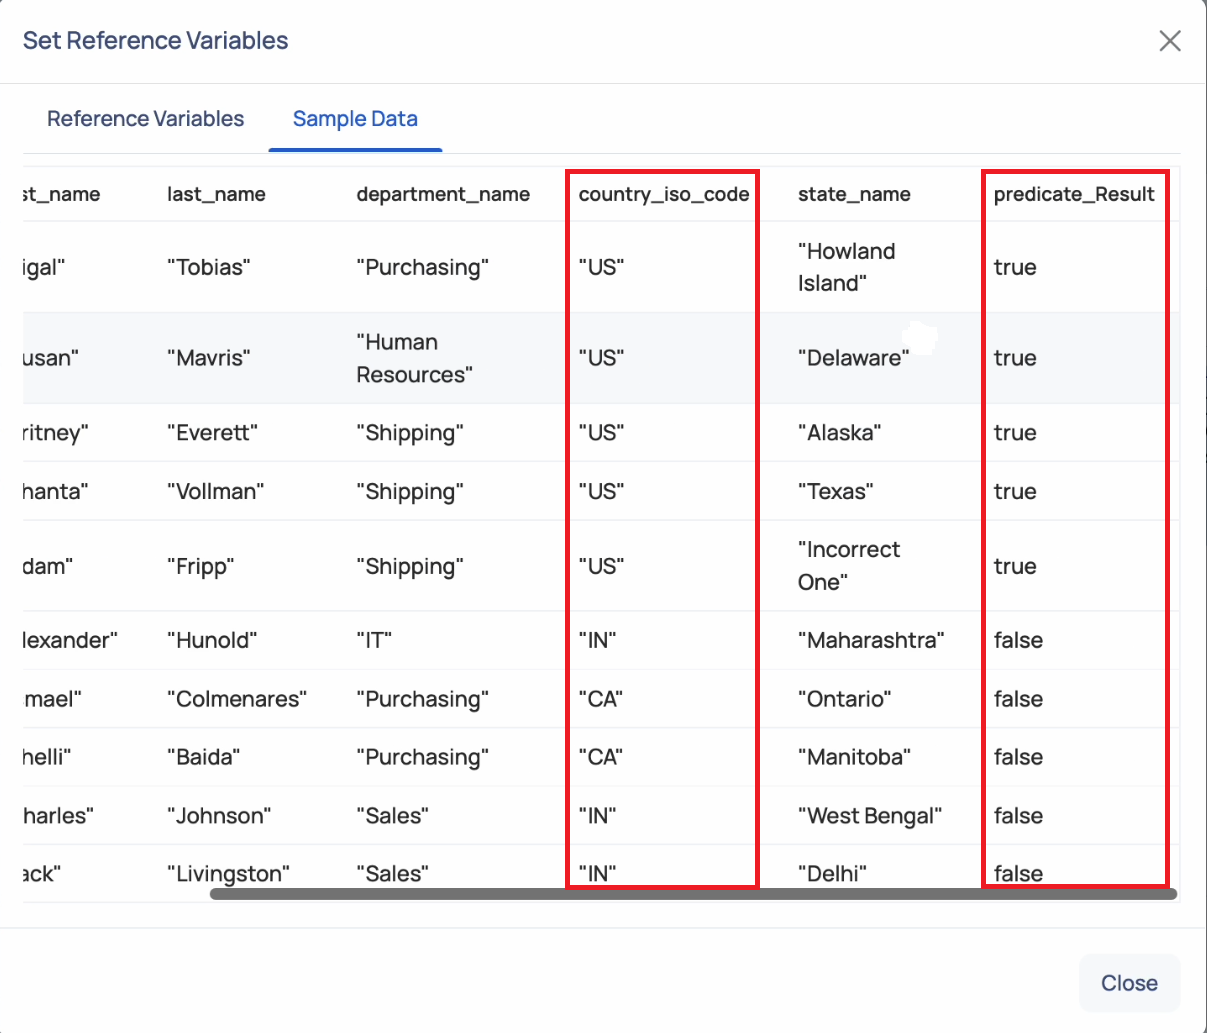
In this section, we create a Validation UDT which validates the values of the country_iso_code column. The sample validation code verifies only those values which are given as US. Other country values are considered to be invalid. Hence you receive a True value for US and False for rest of the values in the country_iso_code column.
- Click the Settings icon.
- Click User Defined Templates.
- Click Create New.
- Select Validation UDT.
- Click Continue.
- Enter a name for the UDT in the Name field.
- (Optional) Enter a description in the Description field.
- Select SQL Expression in the Language field.
- Enter the following SQL expression in the Code field.
CASE WHEN {{country_column}}} is null THEN true WHEN {{{country_column}}} == '' THEN true ELSE {{{country_column}}} == 'US' END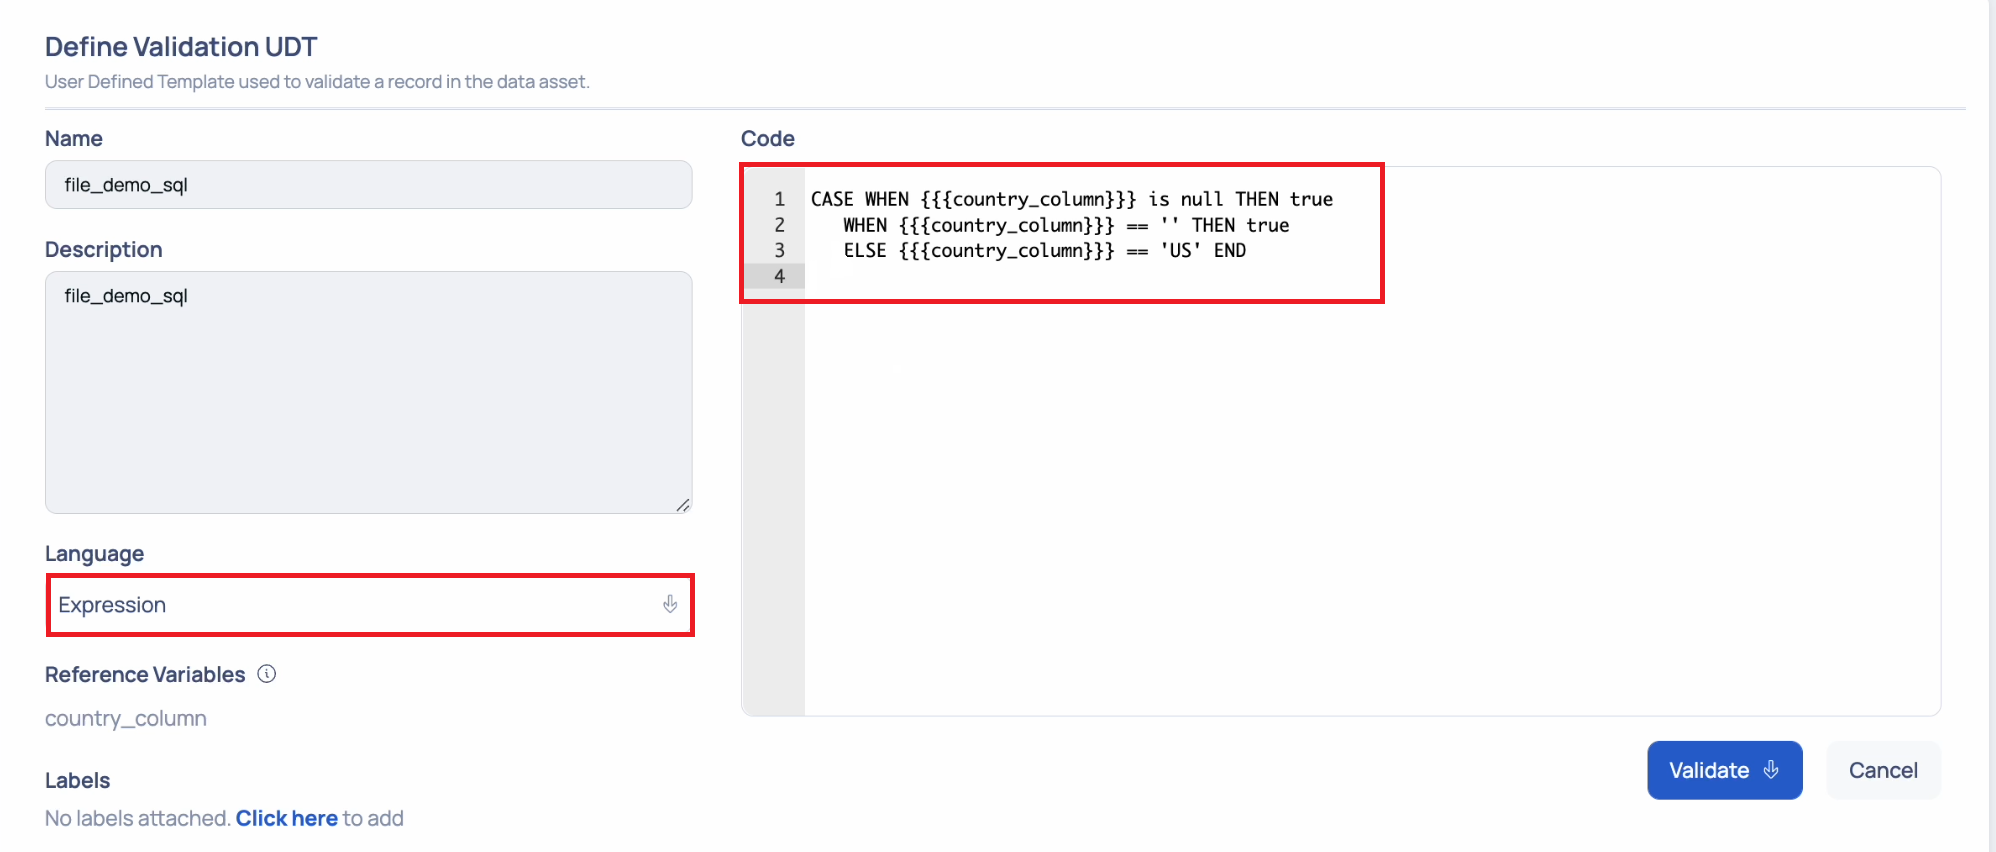
- Click Validate and select With Asset.
- Select the asset.
- Enter country_iso_code in the Override Value field.
- Click Validate.

You can view that all the column values with US, are returned as True. All other values are returned as False.
- Click Save to save the template.
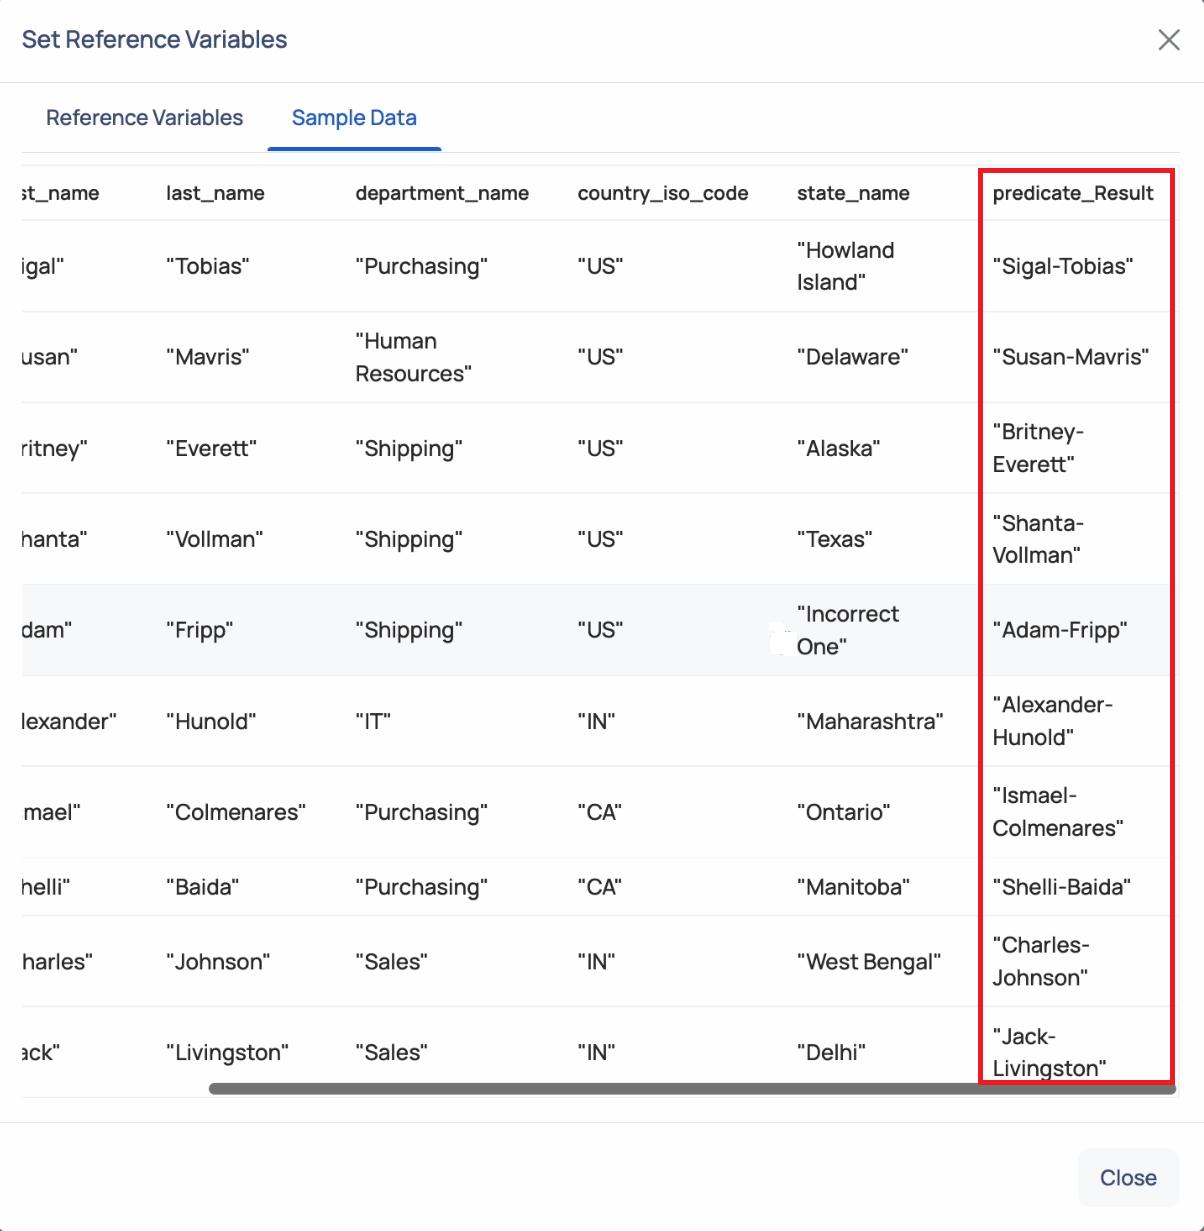
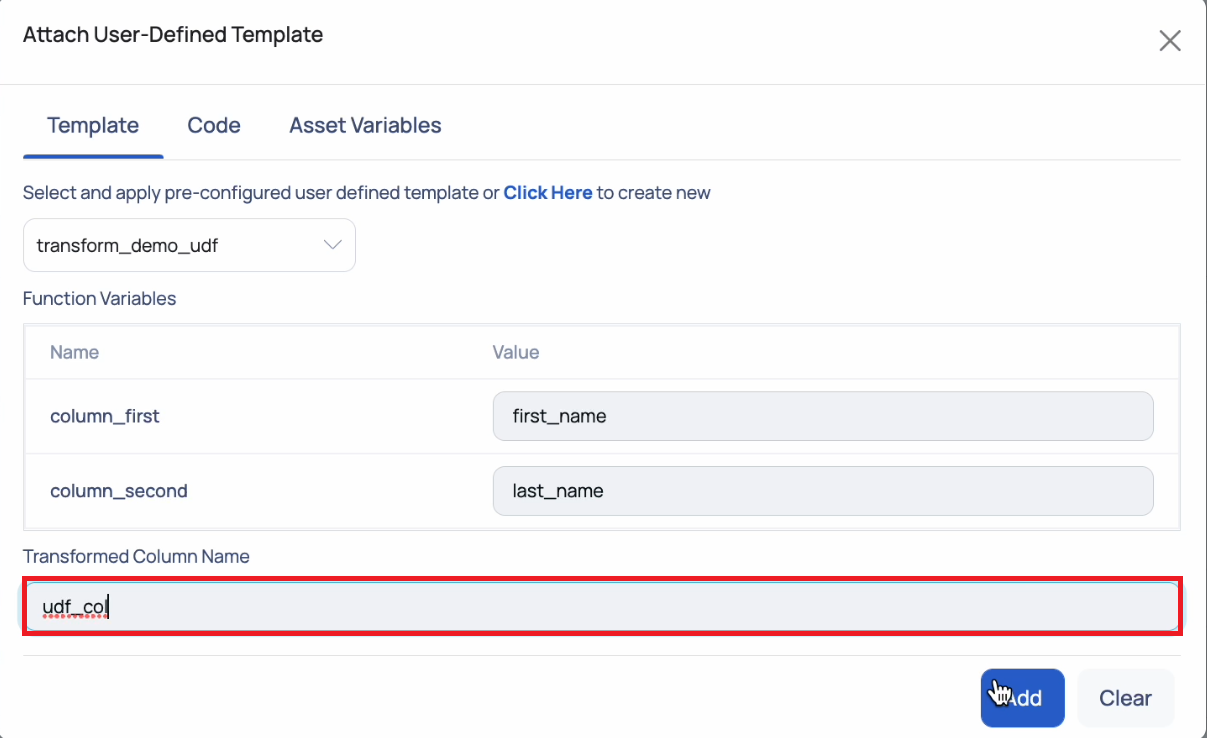
Creating Transform Column in Transform Section
Similarly, select and add the Transform UDT template. In the Transformed Column Name field, provide the name for the new column that is created from the first_name and last_ name columns.
Creating SQL Rule
Once you create the templates, you must use the templates in the SQL rule of a data quality policy.
- Click the Add New button and select Quality Policy.
- Select the asset for which the policy must be created.
- Navigate to the Rule Definitions section and select SQL Rule.
- Click Add Rule.
- Select the SQL Expression template created in the above sections, from the Template tab.
- For the Validation UDT, enter
country_iso_codein the Value field. - Click Validate.
- Save and execute the policy.