Kerberos Support (Service and Authentication Level)
ClickHouse supports Kerberos as an external authenticator for existing users configured in users.xml or local access control paths. These users must authenticate over HTTP using the GSS-SPNEGO mechanism.
Kerberos must be enabled at the system level via Ambari. Configuration changes are automatically managed through the Jinja template in Ambari → Advanced clickhouse-server-config → Clickhouse Server Template.
{% if security_enabled %}
<kerberos>
<realm>{{ realm_name }}</realm>
</kerberos>
{% endif %}
Kerberos Configuration Notes
Only one <kerberos> section is allowed. If multiple sections are defined, ClickHouse disables Kerberos authentication.
Do not configure both principal and realm sections simultaneously. Their coexistence disables the Kerberos authentication.
Kerberos can authenticate users defined locally in users.xml or local access control paths.
Currently, only HTTP interface requests are supported for Kerberos authentication using the GSS-SPNEGO mechanism.
A typical Kerberos principal follows this format: primary/instance@REALM. The /instance part is optional and may appear multiple times.
For authentication to succeed, the primary portion of the Kerberos principal must match the local ClickHouse username.
Enable Kerberos using SQL
When SQL-based access control is enabled in ClickHouse, Kerberos-authenticated users can be created using SQL commands.
To create a user with a specific realm:
CREATE USER my_user IDENTIFIED WITH kerberos REALM 'EXAMPLE.COM'
To create a user without restricting by realm:
CREATE USER my_user IDENTIFIED WITH kerberos
LDAP support (Service and Authentication Level)
ClickHouse supports LDAP authentication using two approaches:
LDAP as an External Authenticator: Authenticate existing users defined in users.xml or local access control files using LDAP credentials.
LDAP as an External User Directory: Allow authentication of users not defined locally, provided they exist on the LDAP server.
Steps to configure Public LDAP with ClickHouse
Test the LDAP Connection: Before configuring LDAP in ClickHouse, verify connectivity to the public LDAP server (or your enterprise LDAP service):
ldapsearch -x -b dc=example,dc=com -H ldap://ldap.forumsys.com
Configure LDAP in Ambari: Go to Ambari → Advanced clickhouse-server-config, and update the relevant section with your LDAP configuration parameters.
<ldap_servers>
<test_ldap_server>
<host>ldap.forumsys.com</host>
<port>389</port>
<bind_dn>uid={user_name},dc=example,dc=com</bind_dn>
<enable_tls>no</enable_tls>
<tls_require_cert>never</tls_require_cert>
</test_ldap_server>
</ldap_servers>
Configure LDAP User Role Mapping: To enable user role mapping, add the <ldap> section under the <user_directories> section in your ClickHouse configuration. This section determines how users are authenticated via LDAP and which roles they are assigned upon login.
In the following basic example, any user authenticated through LDAP will be granted the scientists_role (this role must be defined later in ClickHouse):
<user_directories>
<users_xml>
<path>users.xml</path>
</users_xml>
<local_directory>
<path>/var/lib/clickhouse/access/</path>
</local_directory>
<ldap>
<server>test_ldap_server</server>
<roles>
<scientists_role />
</roles>
<role_mapping>
<base_dn>dc=example,dc=com</base_dn>
<search_filter>(&(objectClass=groupOfUniqueNames)(uniqueMember={bind_dn}))</search_filter>
<attribute>cn</attribute>
</role_mapping>
</ldap>
</user_directories>
Make sure to replace ldap_server_name with the actual LDAP server identifier.
Save and restart affected ClickHouse components.
Configure ClickHouse Roles and Permissions: After configuring LDAP user role mapping, connect to the ClickHouse client and execute the following SQL statements to set up roles and privileges:
Create the role: Create a role in ClickHouse with the same name used in the role mapping section of the config.xml file:
CREATE ROLE scientists_role;
Grant privileges: Grant the necessary privileges to the role. The following example grants administrative privileges to users authenticated through LDAP:
GRANT ALL ON *.* TO scientists_role;
Log in and test the LDAP configuration.
[root@ck1 ~]# /usr/odp/3.3.6.1-1/clickhouse/bin/clickhouse client --user einstein --password password --port 9000 --secure
ClickHouse client version 25.5.4.1.
Connecting to localhost:9000 as user einstein.
Connected to ClickHouse server version 25.5.4.
Warnings:
* Linux transparent hugepages are set to "always". Check /sys/kernel/mm/transparent_hugepage/enabled
* Server was built in debug mode. It will work slowly.
clickhouse :) SHOW DATABASES
SHOW DATABASES
Query id: 13e3c20a-8c0e-4d47-85a2-d311fa523c41
┌─name───────────────┐
1. │ INFORMATION_SCHEMA │
2. │ db1 │
3. │ default │
4. │ information_schema │
5. │ system │
└────────────────────┘
5 rows in set. Elapsed: 0.002 sec.
For more information about LDAP, see LDAP Authentication.
SQL Driven Access Management
Ranger is not supported. Governance is managed through Access Control and Account Management. For more information, see ClickHouse Docs.
SSL Supported
Enable ClickHouse Service in Ambari
Ambari provides all the required options to enable the ClickHouse service. Use the example below to set up SSL using a self-signed CA for a 3-node cluster. Adjust the configuration based on your security policies and cluster requirements.
Example: Setting up Self-Signed CA-Based SSL for 3 Nodes
openssl genrsa -out marsnet_ca.key 2048
openssl req -x509 -subj "/CN=acceldata.ce CA" -nodes -key marsnet_ca.key -days 1095 -out marsnet_ca.crt
openssl req -newkey rsa:2048 -nodes -subj "/CN=ck1.acceldata.ce" -addext "subjectAltName = DNS:ck1.acceldata.ce,IP:10.100.11.31" -keyout chnode1.key -out chnode1.csr
openssl req -newkey rsa:2048 -nodes -subj "/CN=ck2.acceldata.ce" -addext "subjectAltName = DNS:ck1.acceldata.ce,IP:10.100.11.35" -keyout chnode2.key -out chnode2.csr
openssl req -newkey rsa:2048 -nodes -subj "/CN=ck3.acceldata.ce" -addext "subjectAltName = DNS:ck1.acceldata.ce,IP:10.100.11.36" -keyout chnode3.key -out chnode3.csr
#Create ext.cnf with this content for respective node
subjectAltName = DNS:ck1.acceldata.ce,IP:10.100.11.31
basicConstraints = CA:FALSE
keyUsage = digitalSignature, keyEncipherment
extendedKeyUsage = serverAuth, clientAuth
#Sign with -extfile
openssl x509 -req -in chnode1.csr -CA marsnet_ca.crt -CAkey marsnet_ca.key -CAcreateserial -out chnode1.crt -days 365 -extfile ext.cnf
#Repeat for each node (change the SAN in ext.cnf accordingly).
openssl x509 -in chnode1.crt -text -noout
openssl verify -CAfile marsnet_ca.crt chnode1.crt
#Create directory and copy crt key and ca config file for each node
mkdir -p /etc/click/certs
cp chnode1.crt /etc/click/certs/chnode.crt
cp chnode1.key /etc/click/certs/chnode.key
cp marsnet_ca.crt /etc/click/certs/
chown -R clickhouse:clickhouse /etc/click/certs/
chmod 755 /etc/click/certs/
chmod 0600 /etc/click/certs/*
#Import cert to local JDK17 truststore or custom truststore
/usr/lib/jvm/java-11-openjdk-17.0.25.0.9-2.el8.x86_64/bin/keytool -importcert -keystore /usr/lib/jvm/java-11-openjdk-17.0.25.0.9-2.el8.x86_64/lib/security/cacerts -storepass changeit -alias acceldata-ca -file /etc/click/certs/marsnet_ca.crt
#Only on the Web server host
cd /etc/click/certs/
openssl pkcs12 -export \
-in /etc/click/certs/chnode.crt \
-inkey /etc/click/certs/chnode.key \
-certfile /etc/click/certs/marsnet_ca.crt \
-out clickhouse-client-keystore.p12 \
-name clickhouse-client \
-passout pass:changeit
chown clickhouse:clickhouse clickhouse-client-keystore.p12
#And import the self-signed CA certificate into the system, refer to the following command:(Red Hat / CentOS / Rocky Linux) on each node for AWS connections trust verifications
cp /etc/click/certs/marsnet_ca.crt /etc/pki/ca-trust/source/anchors/
update-ca-trust extract
openssl verify -CAfile /etc/ssl/certs/ca-bundle.crt /etc/pki/ca-trust/source/anchors/marsnet_ca.crt
#Copy the content of /etc/click/certs/marsnet_ca.crt in your local workstation and follow the steps to add this cert as trusted cert to avoid DNS cert related issues while accessing WEB UI on browsers
Enable SSL for ClickHouse in Ambari
To enable SSL:
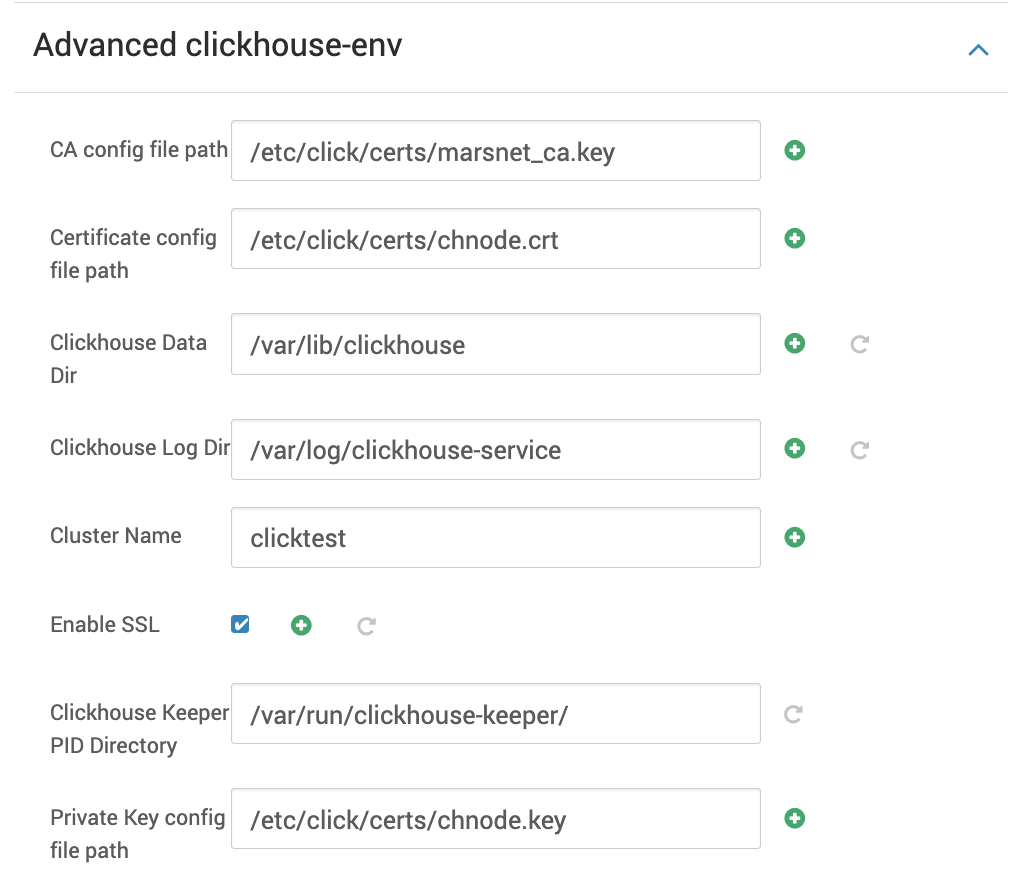
Go to Ambari → ClickHouse → Configs.
In the Advanced clickhouse-env section, check the Enable SSL option.
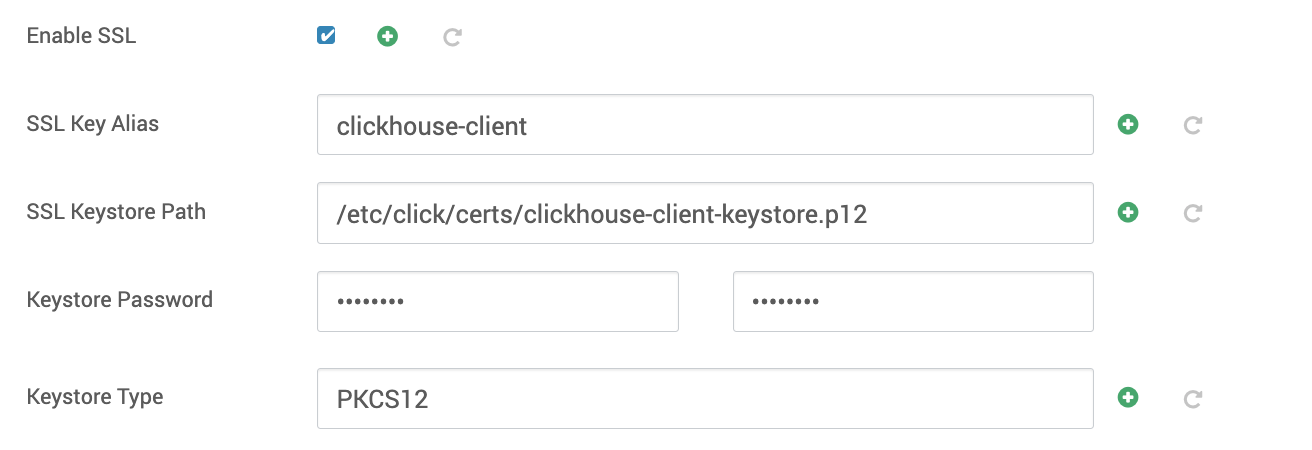
Fill out the following configuration fields as required for your setup.
In Ambari → ClickHouse → Configs, under Advanced clickhouse-application, check Enable SSL to secure the Web UI.
Save and restart all affected components options.
Validate SSL.
Check the connection through the client.
/usr/odp/3.3.6.4-1/clickhouse/bin/clickhouse client --host ck1.acceldata.ce \
--user default --port 9000 --secure -c /etc/clickhouse/conf/client/config.xml
clickhouse :) CREATE DATABASE db1 ON CLUSTER clicktest;
CREATE TABLE db1.cell_towers ON CLUSTER clicktest
(
radio Enum8('' = 0, 'CDMA' = 1, 'GSM' = 2, 'LTE' = 3, 'NR' = 4, 'UMTS' = 5),
mcc UInt16,
net UInt16,
area UInt16,
cell UInt64,
unit Int16,
lon Float64,
lat Float64,
range UInt32,
samples UInt32,
changeable UInt8,
created DateTime,
updated DateTime,
averageSignal UInt8
)
ENGINE = ReplicatedMergeTree ORDER BY (radio, mcc, net, created);
INSERT INTO db1.cell_towers SELECT * FROM s3('https://datasets-documentation.s3.amazonaws.com/cell_towers/cell_towers.csv.xz', 'CSVWithNames');
CREATE DATABASE db1 ON CLUSTER clicktest
Query id: ec09666c-b80e-42f6-9a64-9afc5cbb071b
┌─host─────────────┬─port─┬─status─┬─error─┬─num_hosts_remaining─┬─num_hosts_active─┐
1. │ ck3.acceldata.ce │ 9000 │ 0 │ │ 2 │ 0 │
2. │ ck2.acceldata.ce │ 9000 │ 0 │ │ 1 │ 0 │
3. │ ck1.acceldata.ce │ 9000 │ 0 │ │ 0 │ 0 │
└──────────────────┴──────┴────────┴───────┴─────────────────────┴──────────────────┘
3 rows in set. Elapsed: 0.078 sec.
CREATE TABLE db1.cell_towers ON CLUSTER clicktest
(
`radio` Enum8('' = 0, 'CDMA' = 1, 'GSM' = 2, 'LTE' = 3, 'NR' = 4, 'UMTS' = 5),
`mcc` UInt16,
`net` UInt16,
`area` UInt16,
`cell` UInt64,
`unit` Int16,
`lon` Float64,
`lat` Float64,
`range` UInt32,
`samples` UInt32,
`changeable` UInt8,
`created` DateTime,
`updated` DateTime,
`averageSignal` UInt8
)
ENGINE = ReplicatedMergeTree
ORDER BY (radio, mcc, net, created)
Query id: 42e37ebf-b699-4d16-9981-667f9dc567db
┌─host─────────────┬─port─┬─status─┬─error─┬─num_hosts_remaining─┬─num_hosts_active─┐
1. │ ck2.acceldata.ce │ 9000 │ 0 │ │ 2 │ 1 │
2. │ ck3.acceldata.ce │ 9000 │ 0 │ │ 1 │ 1 │
3. │ ck1.acceldata.ce │ 9000 │ 0 │ │ 0 │ 0 │
└──────────────────┴────��─┴────────┴───────┴─────────────────────┴──────────────────┘
3 rows in set. Elapsed: 0.120 sec.
INSERT INTO db1.cell_towers SELECT *
FROM s3('https://datasets-documentation.s3.amazonaws.com/cell_towers/cell_towers.csv.xz', 'CSVWithNames')
Query id: a3a73cc0-69f2-40b8-a957-c016e96d1b9a
Ok.
0 rows in set. Elapsed: 61.555 sec. Processed 43.28 million rows, 742.49 MB (703.05 thousand rows/s., 12.06 MB/s.)
Peak memory usage: 262.36 MiB.
Web UI
Knox Gateway Compatibility
Knox is currently unsupported. All endpoints such as /dashboard, /play, and the ClickHouse UI are protected by a login page that requires credentials of a permitted database user.
For more information about SQL-driven access management, see SQL Driven Access Management.