
The Ozone2 integration with ODP is available as an Ambari Mpack. Download the ozone2-mpack tar on your ambari-server node and install the mpack. For details about the link, see Mpacks Link.
This Mpack is designed to support Ozone2 service in HA and non-HA installations only on fresh installations.
Steps
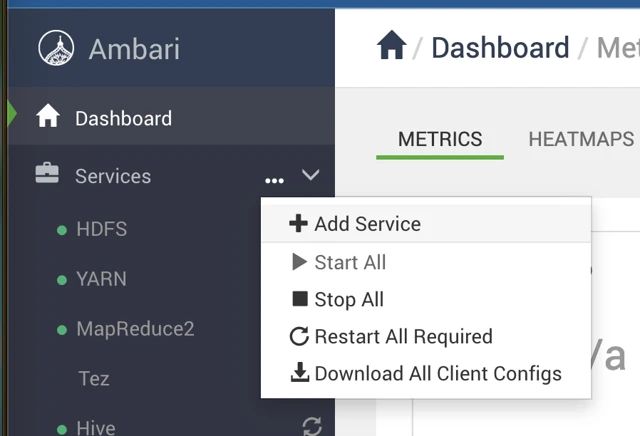
In the Ambari UI, go to Services > Add Service.
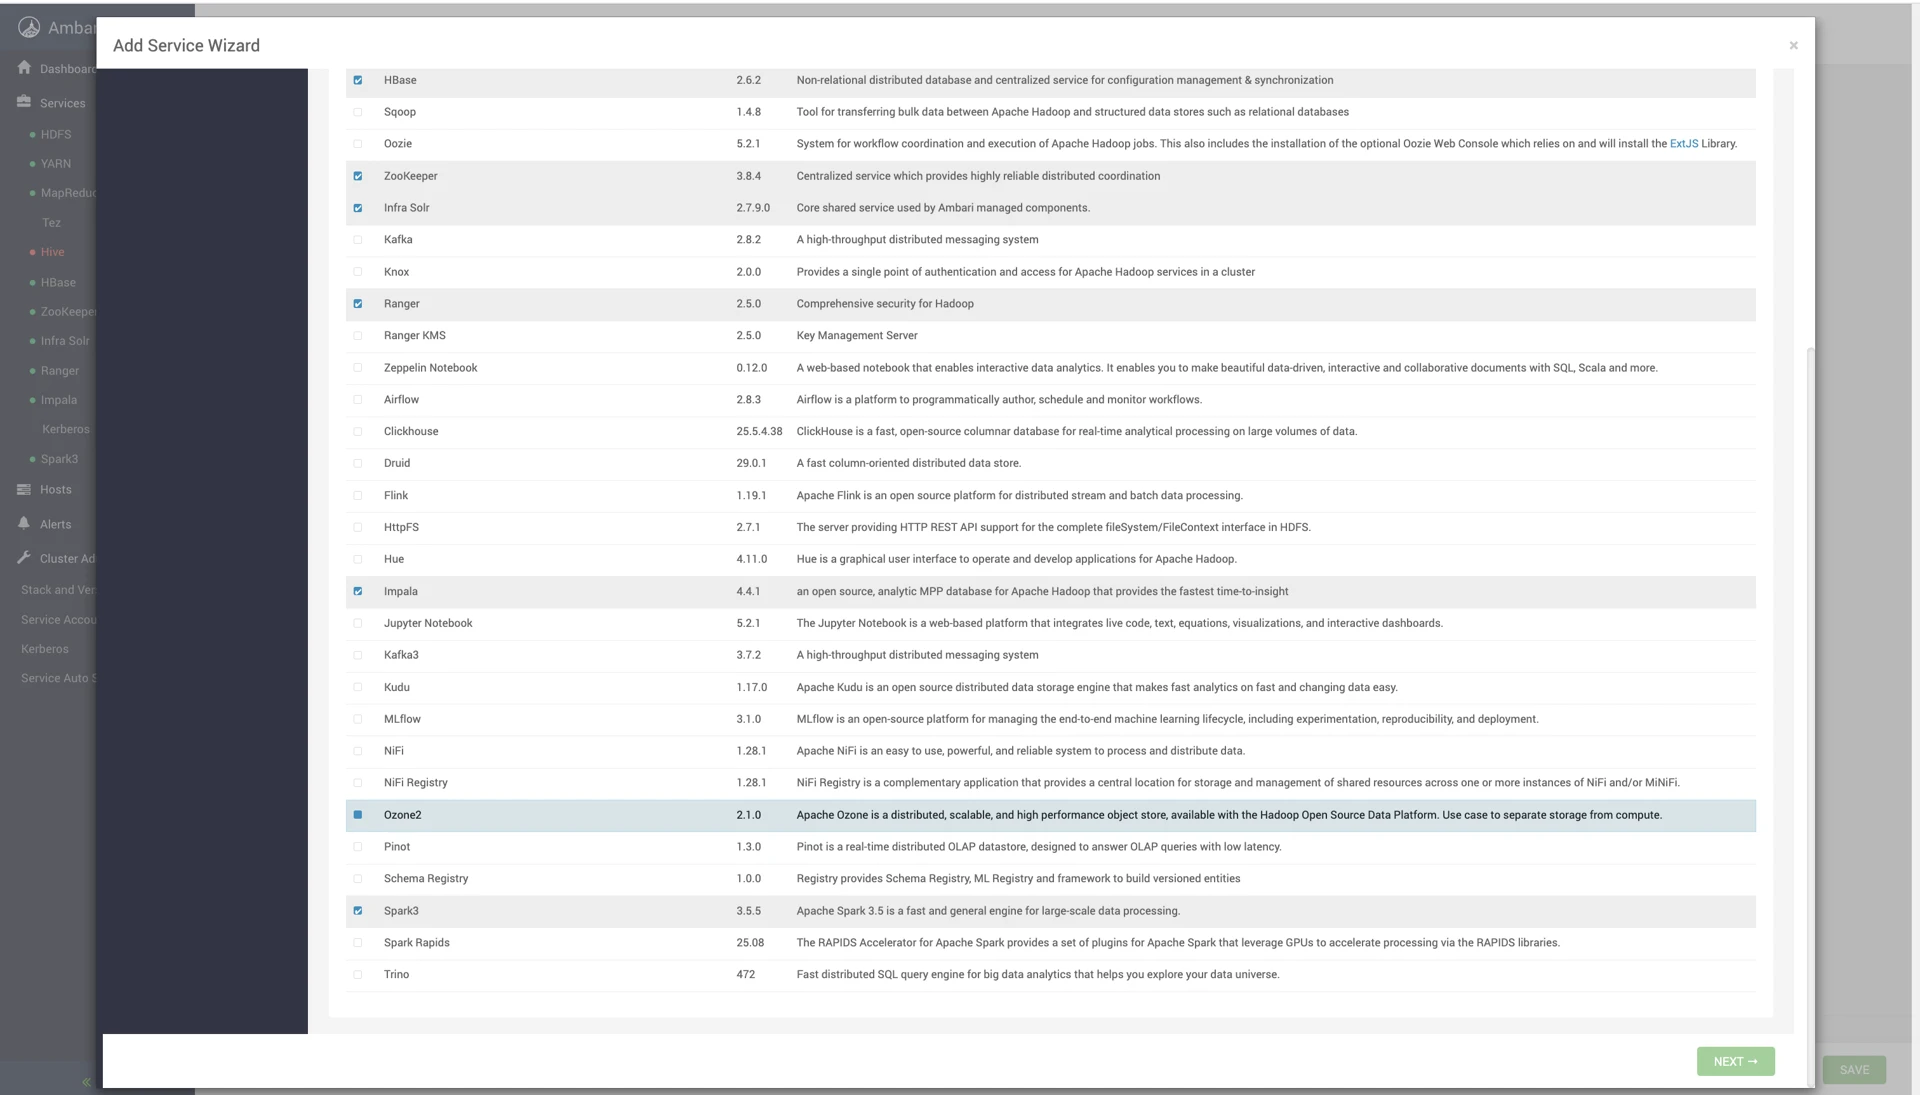
Go to Service Wizard and select Ozone2.
Click Next and configure Ozone2 component nodes and properties as per use case (Choose 3 nodes for OM, SCM, and Datanode to maintain HA).
For a secure cluster with Kerberos, ozone2 enables Kerberos authentication by default at installation time.
To enable SSL on Ozone2, configure properties as shown below.
You can see the following screen when the service is installed successfully, and click Ok.
SSL Enablement
Update the following properties as per your SSL configurations for the respective host and component.
Enable SSL on all components of ozone to implement fully functional SSL-enabled ozone.
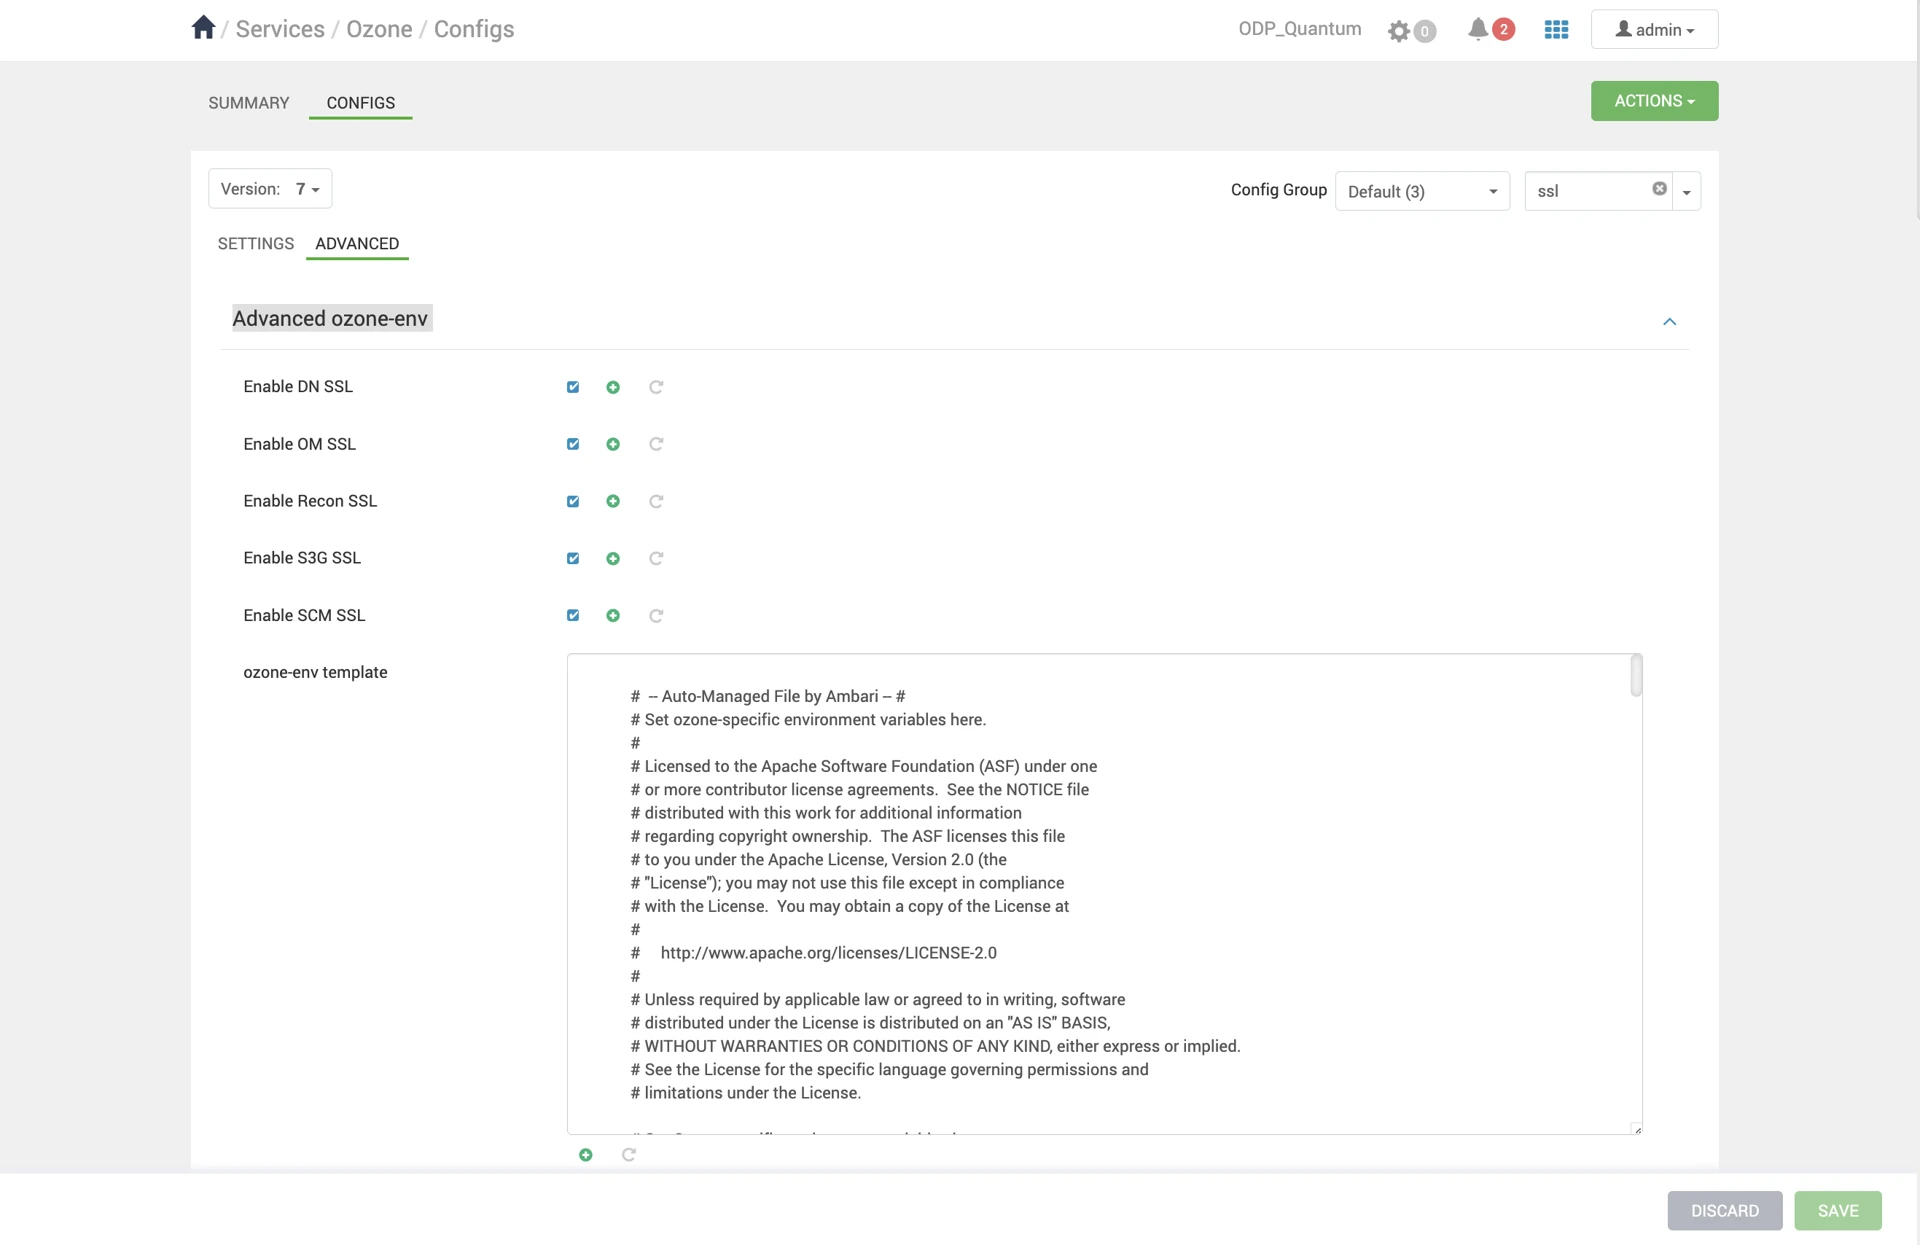
In the Ambari UI, go to Ozone > Configurations > Advanced ozone-env. Check the following properties.
In ozone-site, add the below configs.
Property | Value |
|---|---|
ozone.http.policy | HTTPS_ONLY |
ozone.https.client.keystore.resource | ssl-client.xml |
ozone.https.server.keystore.resource | ssl-server.xml |
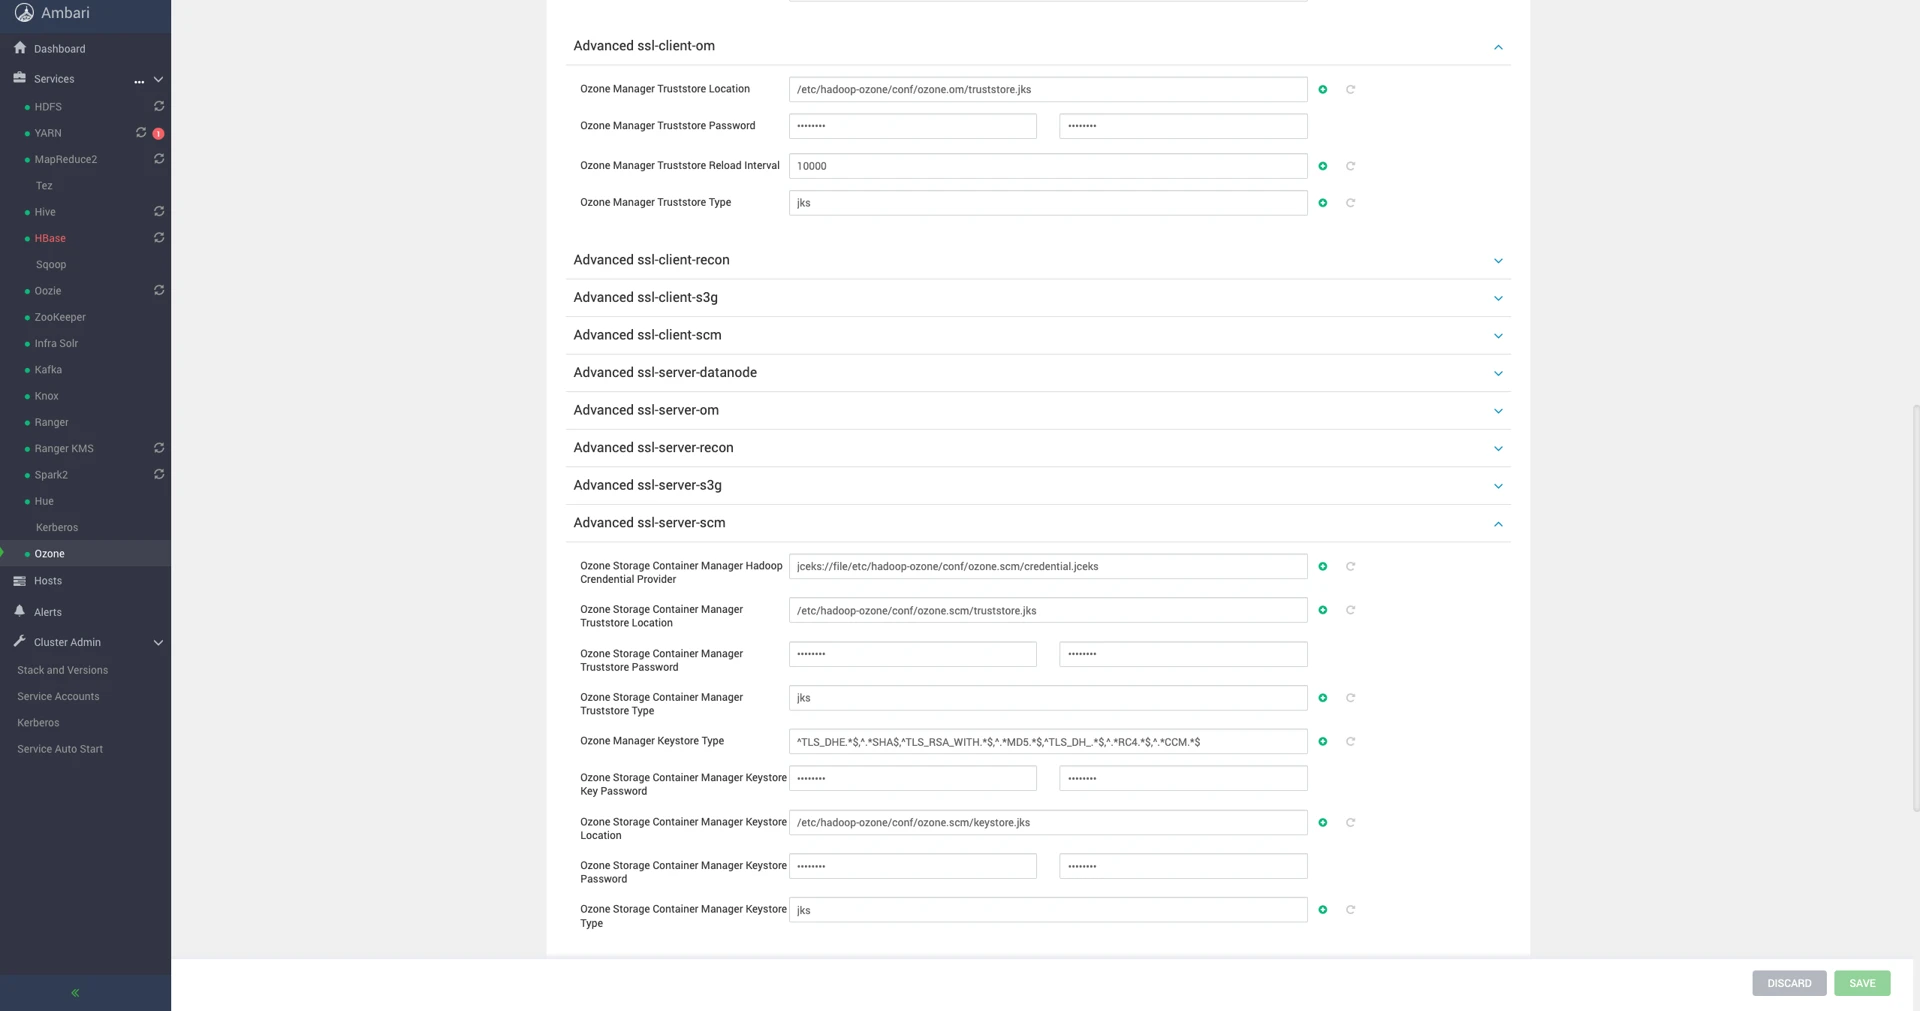
Then, configure the truststore and keystore settings in the following Ambari configuration sections:
Advanced
ozone-ssl-clientAdvanced
ssl-client-datanodeAdvanced
ssl-client-omAdvanced
ssl-client-reconAdvanced
ssl-client-s3gAdvanced
ssl-client-scmAdvanced
ssl-server-datanodeAdvanced
ssl-server-omAdvanced
ssl-server-reconAdvanced
ssl-server-s3gAdvanced
ssl-server-scm
Kerberos Configuration
The ozone service principal and keytab for service and spengo for UI will be configured with Ambari automation. If you have an SPNEGO-enabled Ozone cluster and want to disable it for all Ozone components, update the following properties as shown.
Property | Value |
|---|---|
ozone.security.http.kerberos.enabled | false |
ozone.http.filter.initializers |
This mpack supports Ozone with kerberos security only on fresh installation of ozone in a kerberized ODP cluster, considering development limitations.
Ranger Configuration
Enable or disable the Ranger authorization from Ambari UI > Ranger > Configs > Ozone Ranger Plugin and restart the service to implement changes.
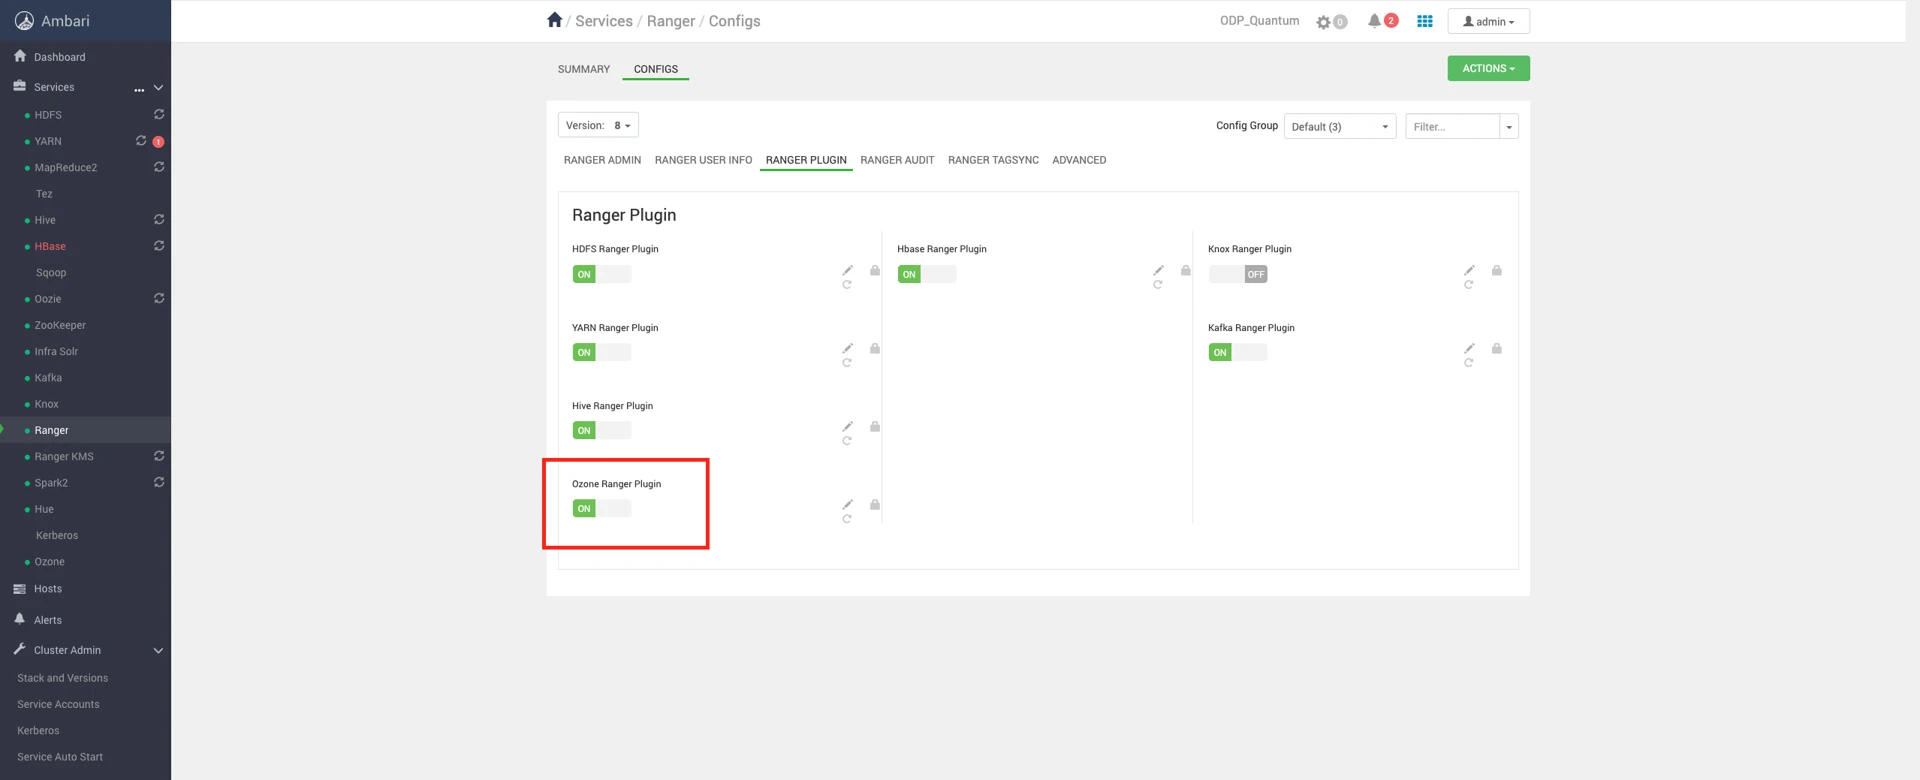
Before enabling the plugin, verify or add ozone-filesystem-hadoop3-1.4.0.3.2.3.0-1.jar to the given path.
Configure a Resource-based Service: Ozone
How to add the Ozone service.
Steps
On the Service Manager page, click the Add icon () next to Ozone. The Create Service page appears.
Enter the following information on the Create Service page:
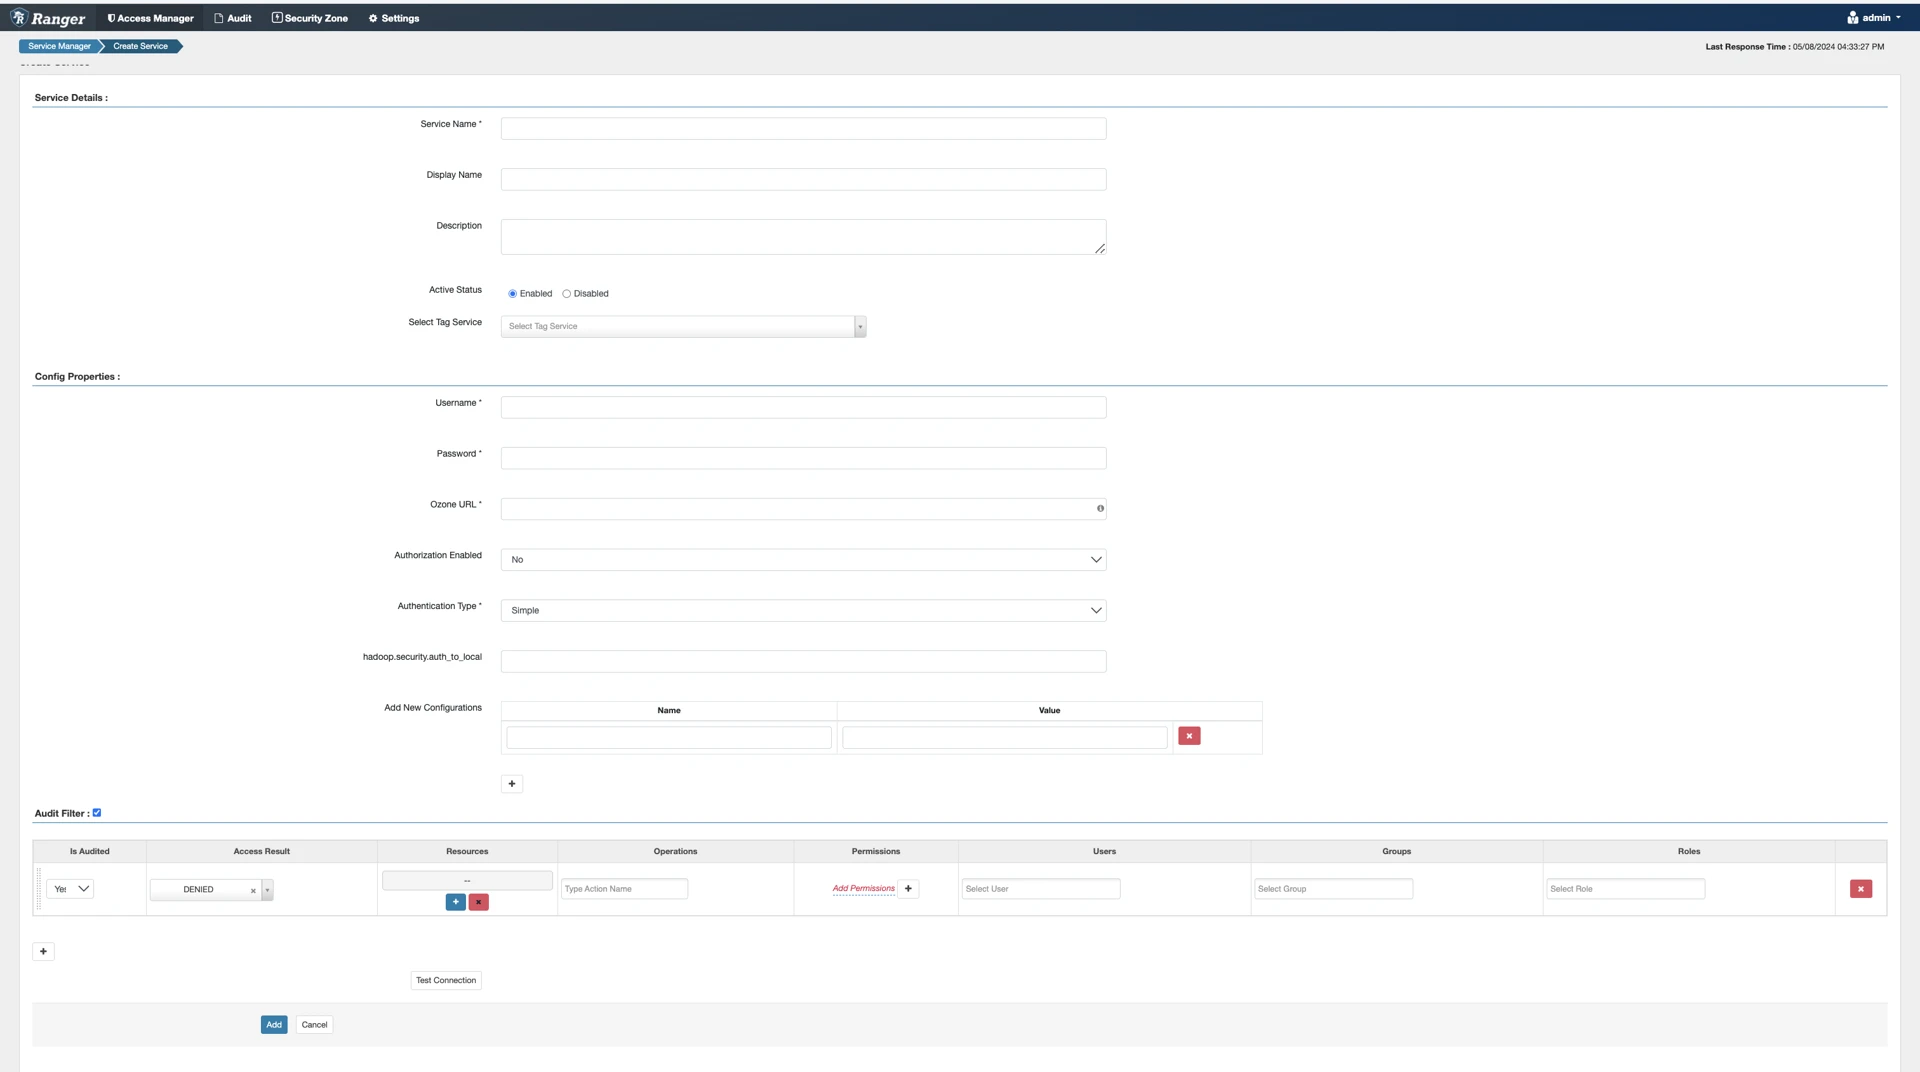
Service Details:
Field Name | Description |
|---|---|
Service Name | The name of the service is required when configuring agents. |
Description | A description of the service. |
Active Status | Enabled or Disabled. |
Select Tag Service | Select a tag-based service to apply the service and its tag-based policies to Ozone |
Configuration Properties:
Field Name | Description |
|---|---|
Username | The end system username that can be used for connection. |
Password | The password for the username entered above. |
Ozone URL | Ozone URL , <host><port> |
Authorization Enabled | Authorization involves restricting access to resources. If enabled, the user needs authorization credentials. |
Authentication Type | The type of authorization in use, as noted in the hadoop configuration file core-site.xml; either simple or Kerberos. (Required only if authorization is enabled). This field was formerly named hadoop.security.authorization. hadoop.security.auth_to_ local |
hadoop.security.auth_to_ local | Maps the login credential to a username with Hadoop; use the value noted in the hadoop configuration file, core site.xml |
Common Name For Certificate | The name of the certificate. This field is interchangeably named Common Name For Certificate and Ranger Plugin SSL CName in Create Service pages |
Add New Configurations | Add any other new configuration(s). |
Click Test Connection.
Click Add.
Configure a Resource-based Policy: Ozone
This section explains how to add a new policy to an existing Ozone service.
About this task:
Through configuration, Apache Ranger enables both Ranger policies and Ozone permissions to be checked for a user request.
When the Ozone Manager receives a user request, the Ranger plugin checks for policies set through the Ranger Service Manager.
If there are no policies, the Ranger plugin checks for permissions set in Ozone, as per Ozone ACL.
Acceldata recommends that permissions need to be created in the Ranger Service Manager and that restrictive permissions be applied at the Ozone level.
Steps:
In the Service Manager page, select an existing Ozone service. The list of policies page appears.
Click Add New Policy. The Create Policy page appears.
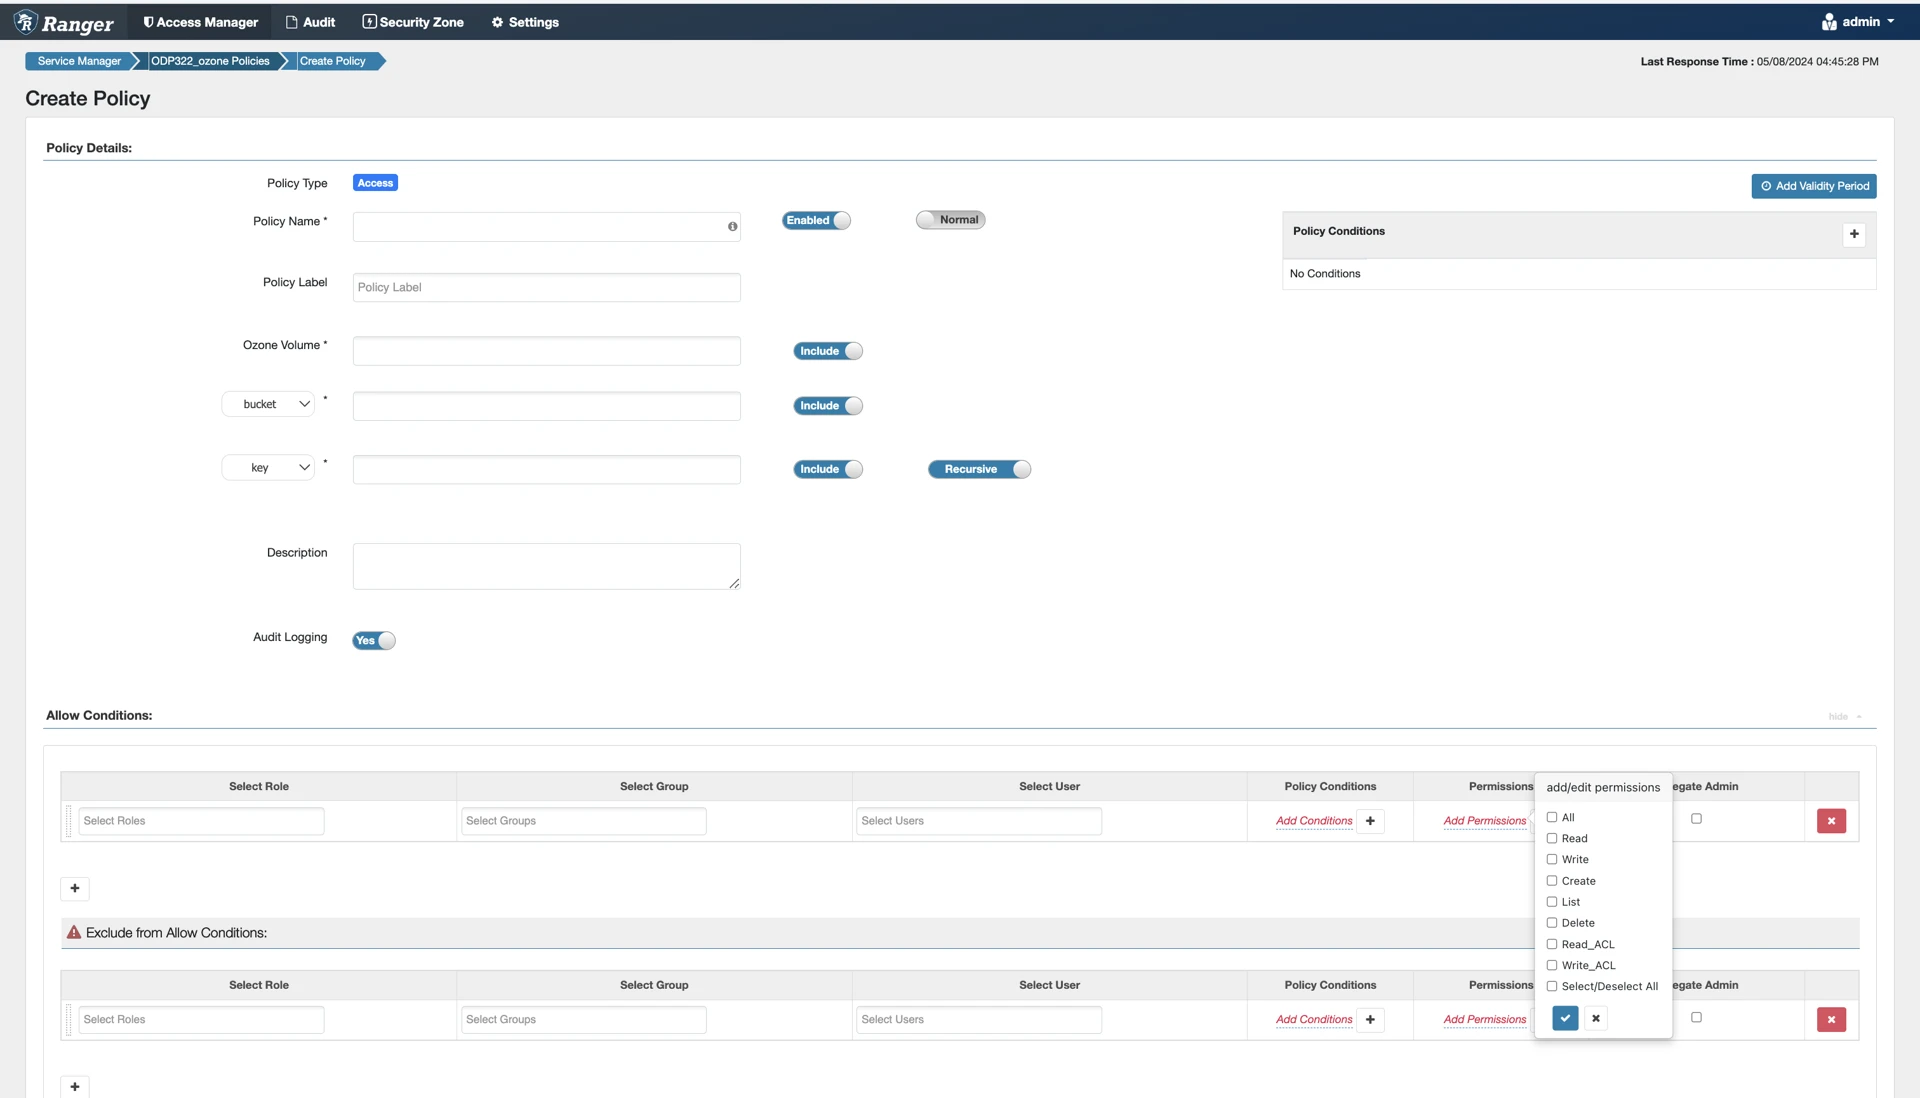
Complete the Create Policy page as follows:
Label | Description |
|---|---|
Policy Name | Enter an appropriate policy name. This name cannot be duplicated across the system. This field is mandatory. |
normal/override | Enables you to specify an override policy. When override is selected, the access permissions in the policy override the access permissions in existing policies. This feature can be used with Add Validity Period to create temporary access policies that override existing policies. |
Volume | Define the volume for the policy. Type in the applicable volume name. The autocomplete feature displays available volume based on the entered text. |
Bucket/none | Define the bucket for the policy. Type in the applicable bucket name. The autocomplete feature displays available buckets based on the entered text. Set bucket to none to provide volume level permissions. |
Key/none | Define the key for the policy. Type in the applicable key name. The autocomplete feature displays available keys based on the entered text.Set key to none to provide bucket level permissions. The default recursive setting specifies that the resource path is recursive; you can also specify a non-recursive path. |
Description | (Optional) Describe the purpose of the policy. |
Audit Logging | Specify whether this policy is audited. (De-select to disable auditing). [Ranger Audit is not supported in Ozone] |
Policy Label | Specify a label for this policy. You can search reports and filter policies based on these labels. |
Add Validity Period | Specify a start and end time for the policy. |
Allow Conditions
Label | Description |
|---|---|
Select Group | Specify the groups to which this policy applies.
|
Select User | Specify the users to whom this policy applies.
|
Permissions | Add or edit permissions: Read, Write, Create, Admin, Select/Deselect All. |
Delegate Admin | You can use Delegate Admin to assign administrator privileges to the users or groups specified in the policy. Administrators can edit or delete the policy, and can also create child policies based on the original policy. |
You can use the Plus (+) symbol to add additional conditions. Conditions are evaluated in the order listed in the policy. The condition at the top of the list is applied first, then the second, then the third, and so on.
Click Add.
The Ranger permissions corresponding to the Ozone operations are as follows:
Operation and Permission | Volume Permission | Bucket Permission | Key permission |
|---|---|---|---|
Create volume | CREATE | ||
List volume | LIST | ||
Get volume Info | READ | ||
Delete volume | DELETE | ||
Create bucket | READ | CREATE | |
List bucket | LIST, READ | ||
Get bucket info | READ | READ | |
Delete bucket | READ | DELETE | |
List key | READ | READ, LIST | |
Write key | READ | READ | CREATE, WRITE |
Read key | READ | READ | READ |