Set up Kafka Connect from Ambari
When installing Kafka, ensure to select the appropriate nodes for installing the Kafka broker and connect services.
Kafka Connect Setup with Kerberos, SSL, and Ranger
Since Kafka is already configured with SSL, Kerberos, and Ranger, the underlying topics maintain these settings during Kafka Connect operations. Below are the configurations for the Advanced kafka-connect-distributed section in Kafka's CONFIGS.
bootstrap.servers=<broker1-host>:6668,<broker2-host>:6668,<brokern-host>:6668
config.storage.replication.factor=3
config.storage.topic=connect-configs
group.id=connect-cluster
key.converter=org.apache.kafka.connect.json.JsonConverter
key.converter.schemas.enable=true
offset.flush.interval.ms=10000
offset.storage.replication.factor=3
offset.storage.topic=connect-offsets
plugin.path=/usr/odp/current/kafka-broker/libs/*
rest.port=8083
status.storage.replication.factor=3
status.storage.topic=connect-status
sun.security.krb5.debug=true
value.converter=org.apache.kafka.connect.json.JsonConverter
value.converter.schemas.enable=true
sasl.enabled.mechanisms=GSSAPI
sasl.kerberos.service.name=kafka
sasl.mechanism=GSSAPI
sasl.mechanism.inter.broker.protocol=GSSAPI
security.inter.broker.protocol=SASL_SSL
security.protocol=SASL_SSL
ssl.key.password=<password>
ssl.keystore.location=/opt/security/pki/keystore.jks
ssl.keystore.password=<password>
ssl.truststore.location=/opt/security/pki/truststore.jks
ssl.truststore.password=<password>
java.security.auth.login.config=/usr/odp/current/kafka-broker/config/kafka_jaas.conf
java.security.krb5.kdc=<KDC server hostname>
java.security.krb5.realm=<KDC server realm name>
javax.security.auth.useSubjectCredsOnly=true
consumer.bootstrap.servers=<broker1-host>:6668,<broker2-host>:6668,<brokern-host>:6668
consumer.security.protocol=SASL_SSL
consumer.ssl.truststore.location=/opt/security/pki/truststore.jks
consumer.ssl.truststore.password=<password>
producer.bootstrap.servers=<broker1-host>:6668,<broker2-host>:6668,<brokern-host>:6668
producer.security.protocol=SASL_SSL
producer.ssl.truststore.location=/opt/security/pki/truststore.jks
After configuring the above settings, restart the Kafka service (including broker and Connect). Once the restart is completed, it will start to operate in Kerberos and SSL mode.
Kafka Connector Use Cases
Acceldata ODP Kafka Connect offers support for the following connectors, which have been included in the this release:
Pubsub Connector
MongoDB Connector
JDBC Connector
S3 Connector
Amazon Simple Queue Service(SQS) Connector
Amazon Kinesis Firehose Connector
The following table describes the supported connector type and library versions:
Connector Name | Supported Type | Library Version |
|---|
Pubsub | Source & Sink | 1.2.0 |
MongoDB | Source & Sink | 1.6.1 |
JDBC | Source & Sink | 6.1.2 |
S3 | Sink Only | 2.6.0 |
Kinesis | Sink Only | 0.0.8 |
SQS | Sink only | 3.21.0 |
Pubsub Connector
Note The following steps provides a detailed procedure on setting up the Pubsub Sink Connector for Kafka Connect.
Configure the connector:
Prepare your configuration JSON for the Pubsub Sink Connector. Here's a basic example of what your JSON might look like:
{
"name": "<name of the kafka-sink-pubsub>",
"config": {
"connector.class": "com.google.pubsub.kafka.sink.CloudPubSubSinkConnector",
"tasks.max": "1",
"topics": "<Kafka-Topic-Name>",
"cps.project": "project-name",
"cps.topic": "Pubsub-topic-name"
}
}
Save the Configuration:
Save the above JSON configuration to a file, for instance connect-kafka-2-pubsub-demo.json. Before deploying the connector, review the configuration details in your JSON file to ensure they are correct and complete. You can display the contents of your configuration file with the following command:
cat config/connect-kafka-2-pubsub-demo.json
{
"name": "kafka-sink-pubsub",
"config": {
"connector.class": "com.google.pubsub.kafka.sink.CloudPubSubSinkConnector",
"tasks.max": "1",
"topics": "kafka-2-pubsub-1601-1801",
"cps.project": "acceldata-acm",
"cps.topic": "kafka-2-pubsub-1601-1501"
}
}
Deploy the Connector:
Use the following CURL command to submit your connector configuration to the Kafka Connect service:
curl -X POST -H "content-type: application/json" \
http://<kafka-connect-service-hostname>:8083/connectors \
--data @config/connect-kafka-2-pubsub-demo.json
Upon successful submission of the connector configuration, the sample response for the above POST call is as follows:
{
"name":"kafka-sink-pubsub",
"config":{
"connector.class":"com.google.pubsub.kafka.sink.CloudPubSubSinkConnector",
"tasks.max":"1",
"topics":"kafka-2-pubsub-1601-1501",
"cps.project":"acceldata-acm",
"cps.topic":"kafka-2-pubsub-1601-1501",
"name":"kafka-sink-pubsub"
},
"tasks":[
],
"type":"sink"
}
Verify Connector Deployment:
After submitting the configuration, check the status of the connector to ensure it is running:
curl http://<kafka-connect-service-hostname>:8083/connectors/kafka-sink-pubsub/status
Manage the Pubsub Topic:
If not already created, set up your Google Cloud Pubsub topic using the Google Cloud CLI:
gcloud pubsub topics create topic-name
Create a Pubsub Subscription:
Create a subscription to the topic for message consumption:
gcloud pubsub subscriptions create kafka-topic-subscription --topic=topic-name
List Available Connectors:
To see a list of all active connectors:
curl http://<kafka-connect-service-hostname>:8083/connectors
Fetch Connector Configuration:
To retrieve the specific configuration of a connector:
curl http://<kafka-connect-service-hostname>:8083/connectors/kafka-sink-pubsub
Troubleshooting
If you encounter any errors in the status response, address these issues before proceeding. Check the connector status and configuration for any discrepancies or required adjustments.
Sample Test Procedure for Kafka-Pubsub Connector
Prerequisites: Ensure that the cluster is Kerberos and SSL enabled.
Configure Kafka Producer
Before starting the Kafka producer, it's necessary to prepare the SSL configuration. Here is an example of the required producer configuration file:
File: client-ssl.properties
security.protocol = SASL_SSL
ssl.truststore.location = /opt/security/pki/truststore.jks
ssl.truststore.password = <password>
Display the file contents using:
cat client-ssl.properties
Start the Kafka Console Producer:
Use the following command to launch the Kafka Console Producer, which sends messages to the specified topic:
./bin/kafka-console-producer.sh \
--topic kafka-2-pubsub-1601-1801 \
--bootstrap-server basa1-cent7.acceldata.ce:6668 \
--producer.config client-ssl.properties
Send Data:
Enter messages directly into the producer console to send data.
> first message from apache kafka-1
> first message from apache kafka-2
# Continue to add as many records as required.
Start the Kafka Console Consumer:
To consume the messages sent by the producer, use the Kafka Console Consumer:
./bin/kafka-console-consumer.sh \
--topic kafka-2-pubsub-1601-1801 \
--bootstrap-server basa1-cent7.acceldata.ce:6668 \
--consumer.config client-ssl.properties \
--from-beginning
Verify Output:
The output in the consumer should match the messages sent:
first message from apache kafka-1
first message from apache kafka-2
# Displays as many records as added by the producer.
Check Pubsub Subscription:
To pull messages from the associated Pubsub subscription, execute:
gcloud pubsub subscriptions pull kafka-2-pubsub-1601-1501-sub --limit 10
Response:
# Outputs a table displaying data, message IDs, and other details.
┌───────────────────────────────────┬───────────────────┬──────────────┬────────────┬──────────────────┬────────────────────────────────────────────────────────────────────────────────────────────────────────────────────────────────────────────────────────────────────────────────────────────────────┐
│ DATA │ MESSAGE_ID │ ORDERING_KEY │ ATTRIBUTES │ DELIVERY_ATTEMPT │ ACK_ID │
├───────────────────────────────────┼───────────────────┼──────────────┼────────────┼──────────────────┼────────────────────────────────────────────────────────────────────────────────────────────────────────────────────────────────────────────────────────────────────────────────────────────────────┤
│ first message from apache kafka-1 │ 10276959045915816 │ │ │ │ RFAGFixdRkhRNxkIaFEOT14jPzUgKEUSAAgUBXx9cU9FdV5fGgdRDRlyfGkha1gWUwNFBXdVWxENem1cbaKdpIREX0B0algUBwtAWn5bXhIMbVRdcy-i4daM9_LMSEAvOaeJ-uNpe_3T_b1tZiA9XxJLLD5-NS5FQV5AEkw-G0RJUytDCypYEU4EISE-MD5FUw │
│ first message from apache kafka-2 │ 10276691542476072 │ │ │ │ RFAGFixdRkhRNxkIaFEOT14jPzUgKEUSAAgUBXx9cU9FdV5fGgdRDRlyfGkha1gWUwNFBXdVUxENem1cbaKdpIREX0B0algUBwRMUntbWR8Kblxbdy-i4daM9_LMSEAvOaeJ-uNpe_3T_b1tZiA9XxJLLD5-NS5FQV5AEkw-G0RJUytDCypYEU4EISE-MD5FUw │
└───────────────────────────────────┴───────────────────┴──────────────┴────────────┴──────────────────┴────────────────────────────────────────────────────────────────────────────────────────────────────────────────────────────────────────────────────────────────────────────────────────────────────┘
# Displays all the records sent by Kafka Sink Connector
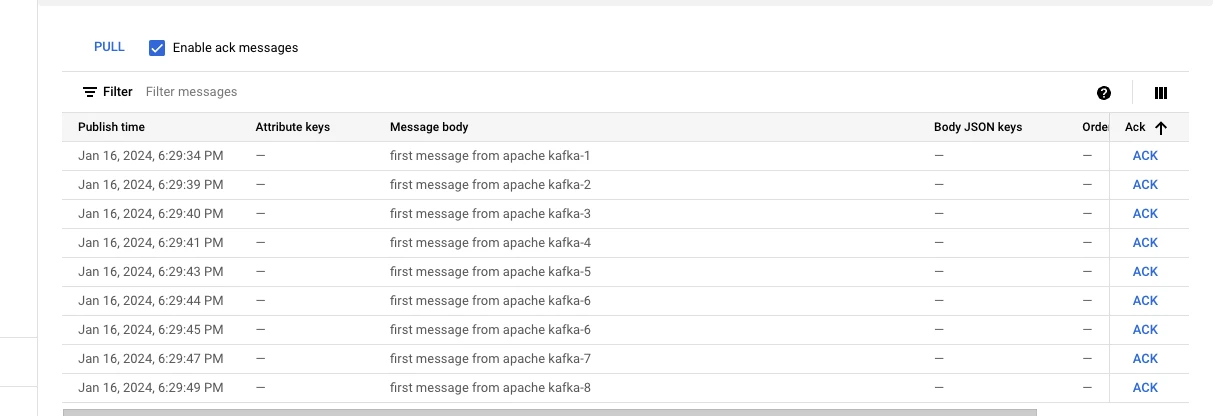
Pubsub UI
Note
The Pubsub connector also supports functioning as a source connector.
MongoDB Connector
Setting Up the MongoDB Source Connector for Kafka Connect.
Prerequisites: Ensure that MongoDB is configured on a 3-node cluster in distributed mode.
Configure MongoDB connector
Prepare your JSON configuration for the MongoDB Source Connector. This configuration will define how MongoDB connects to Kafka. Here's an example of what your JSON configuration might look like:
File: mongodb-2-kafka-01.json
{
"name": "mongodb-2-kafka-source-01",
"config": {
"connector.class": "com.mongodb.kafka.connect.MongoSourceConnector",
"connection.uri": "mongodb://<mongo-admin>:<password>@<mongodb-host>:27017/customers?authSource=admin&retryWrites=true&w=majority",
"database": "customers",
"collection": "students1",
"output.format.key": "json",
"output.format.value": "json",
"output.schema.infer.value": "true",
"poll.await.time.ms": "1000",
"offset.partition.name": "mongodb-2-kafka-source-aiven-01-part",
"errors.tolerance": "all",
"startup.mode": "copy_existing"
}
}
View the file content with:
cat config/mongodb-2-kafka-01.json
Deploy the MongoDB connector
Submit the above configuration to Kafka Connect using the following CURL command:
curl -X POST -H "Content-Type: application/json" \
--data @config/mongodb-2-kafka-01.json \
http://<kafka-connect-service-hostname>:8083/connectors
Upon successful submission of the connector configuration, the sample response for the above POST call is as follows:
{
"name":"mongodb-2-kafka-source-01",
"config":{
"connector.class":"com.mongodb.kafka.connect.MongoSourceConnector",
"connection.uri":"mongodb://mongo-admin:password@<mongodb-host>:27017/customers?authSource=admin&retryWrites=true&w=majority",
"database":"customers",
"collection":"students1",
"output.format.key":"json",
"output.format.value":"json",
"output.schema.infer.value":"true",
"poll.await.time.ms":"1000",
"offset.partition.name=":"mongodb-2-kafka-source-aiven-01-part",
"errors.tolerance":"all",
"startup.mode":"copy_existing",
"name":"mongodb-2-kafka-source-aiven-01"
},
"tasks":[
],
"type":"source"
}
Verify Connector Deployment
After submitting the configuration, check the status and details of the connector to ensure it is correctly configured and running:
curl http://<kafka-connect-service-hostname>:8083/connectors/mongodb-2-kafka-source-01
Response:
{
"name":"mongodb-2-kafka-source-01",
"config":{
"connector.class":"com.mongodb.kafka.connect.MongoSourceConnector",
"database":"customers",
"output.schema.infer.value":"true",
"offset.partition.name=":"mongodb-2-kafka-source-aiven-01-part",
"startup.mode":"copy_existing",
"output.format.value":"json",
"poll.await.time.ms":"1000",
"connection.uri":"mongodb://mongo-admin:password@<mongodb-hostname>:27017/customers?authSource=admin&retryWrites=true&w=majority",
"name":"mongodb-2-kafka-source-aiven-01",
"errors.tolerance":"all",
"collection":"students1",
"output.format.key":"json"
},
"tasks":[
{
"connector":"mongodb-2-kafka-source-01",
"task":0
}
],
"type":"source"
}
Interact with MongoDB
Log into MongoDB and insert data into the configured collection:
Logging into MongoDB:
mongo -u mongo-admin -p --authenticationDatabase admin <password>
replica01:PRIMARY>
Insert Data into MongoDB:
replica01:PRIMARY>
use customers
for (var i = 0; i <= 2; i++) {
db.students1.insert({ x: i })
}
db.students1.find()
Response:
{ "_id" : ObjectId("65b0029768710206599f5629"), "x" : 0 }
{ "_id" : ObjectId("65b0029768710206599f562a"), "x" : 1 }
{ "_id" : ObjectId("65b0029768710206599f562b"), "x" : 2 }
Consume Data from Kafka
Use the Kafka Console Consumer to retrieve the records sent from MongoDB to Kafka:
./bin/kafka-console-consumer.sh \
--topic customers.students1 \
--bootstrap-server <kafka-broker-host>:6667 \
--from-beginning
Expected Output: The consumer will display JSON-formatted records that reflect the inserted MongoDB data.
{"schema":{"type":"string","optional":false},"payload":"{\"_id\": {\"_id\": {\"$oid\":
\"65b0029768710206599f5629\"}, \"copyingData\": true}, \"operationType\": \"insert\", \"documentKey\": {\"_id\": {\"$oid\": \"65b0029768710206599f5629\"}}, \"fullDocument\": {\"_id\":
{\"$oid\": \"65b0029768710206599f5629\"}, \"x\": 0.0}, \"ns\": {\"db\": \"customers\", \"coll\": \"students1\"}}"}
{"schema":{"type":"string","optional":false},"payload":"{\"_id\": {\"_id\": {\"$oid\": \"65b0029768710206599f562a\"}, \"copyingData\": true}, \"operationType\": \"insert\", \"documentKey\": {\"_id\": {\"$oid\": \"65b0029768710206599f562a\"}}, \"fullDocument\": {\"_id\": {\"$oid\": \"65b0029768710206599f562a\"}, \"x\": 1.0}, \"ns\": {\"db\": \"customers\", \"coll\": \"students1\"}}"}
{"schema":{"type":"string","optional":false},"payload":"{\"_id\": {\"_id\": {\"$oid\": \"65b0029768710206599f562b\"}, \"copyingData\": true}, \"operationType\": \"insert\", \"documentKey\": {\"_id\": {\"$oid\": \"65b0029768710206599f562b\"}}, \"fullDocument\": {\"_id\": {\"$oid\": \"65b0029768710206599f562b\"}, \"x\": 2.0}, \"ns\": {\"db\": \"customers\", \"coll\": \"students1\"}}"}
Note
The MongoDB connector also supports functioning as a sink connector, allowing Kafka data to be written back into MongoDB.
JDBC Connector
Setting Up the JDBC Sink Connector for Kafka Connect
Prerequisite: Before starting with the JDBC Connector, ensure that the appropriate JDBC driver (e.g., <MYSQL/POSTGRES/ORACLE>-connector-java.jar) is copied into the kafka/libs directory.
Configure the JDBC Sink Connector
Prepare your JSON configuration for the JDBC Sink Connector. This configuration will specify how data is published from Kafka to your database. Here's an example of what your JSON configuration might look like for MySQL:
File: jdbc-kafka-2-mysql-sink-test1801.json
{
"name": "jdbc-sink-kafka-2-mysql-1830-19",
"config": {
"connector.class": "io.aiven.connect.jdbc.JdbcSinkConnector",
"tasks.max": "1",
"topics": "orders2",
"connection.url": "jdbc:mysql://kconnect1.acceldata.ce:3306/kafka_test",
"connection.user": "kafka_test",
"connection.password": "<password>",
"key.converter": "org.apache.kafka.connect.storage.StringConverter",
"value.converter": "org.apache.kafka.connect.json.JsonConverter",
"key.converter.schemas.enable": true,
"value.converter.schemas.enable": true,
"auto.create": true,
"schemas.enable": false
}
}
View the file content using:
cat config/jdbc-kafka-2-mysql-sink-test1801.json
Deploy the JDBC Sink Connector
Submit the above configuration to Kafka Connect using the following CURL command:
curl -X POST -H "Content-Type: application/json" \
--data @config/jdbc-kafka-2-mysql-sink-test1801.json \
http://<kafka-connect-service-hostname>:8083/connectors
Verify Connector Deployment
Check the status of the connector to ensure it is correctly configured and running:
curl http://<kafka-connect-service-hostname>:8083/connectors/jdbc-sink-kafka-2-mysql-1830-19/status
Sample Response:
["jdbc-mysql-2-kafka-connect-incremental","jdbc-sink-kafka-2-mysql-1830-19"]
Data Ingestion from Kafka to MySQL
Ensure the MySQL table orders2 is created and ready to receive data:
Verify table existence:
MariaDB [kafka_test]> SHOW TABLES IN kafka_test;
+----------------------+
| Tables_in_kafka_test |
+----------------------+
| |
+----------------------+
No Tables.
Start the Kafka Producer for the orders2 topic:
./bin/kafka-console-producer.sh --topic orders2 --broker-list <kafka-broker-host>:6667
Ingest structured data:
{"schema":{"type":"struct","fields":[{"type":"int64","optional":false,"field":"id"},{"type":"string","optional":false,"field":"product"},{"type":"int32","optional":false,"field":"quantity"},{"type":"int32","optional":false,"field":"price"}]},"payload":{"id":1,"product":"Iphone","quantity":10,"price":1400}}
Verify data within MySQL:
MariaDB [kafka_test]> SHOW TABLES IN kafka_test;
+----------------------+
| Tables_in_kafka_test |
+----------------------+
| orders2 |
+----------------------+
SELECT * FROM orders2;
+----+---------+----------+-------+
| id | product | quantity | price |
+----+---------+----------+-------+
| 1 | Iphone | 10 | 1400 |
Insert a few more records from the Kafka producer:
./bin/kafka-console-producer.sh --topic orders2 --broker-list localhost:9092
{"schema":{"type":"struct","fields":[{"type":"int64","optional":false,"field":"id"},{"type":"string","optional":false,"field":"product"},{"type":"int32","optional":false,"field":"quantity"},{"type":"int32","optional":false,"field":"price"}]},"payload":{"id":2,"product":"Ipods","quantity":20,"price":1600}}
{"schema":{"type":"struct","fields":[{"type":"int64","optional":false,"field":"id"},{"type":"string","optional":false,"field":"product"},{"type":"int32","optional":false,"field":"quantity"},{"type":"int32","optional":false,"field":"price"}]},"payload":{"id":3,"product":"Ipods","quantity":30,"price":3000}}
Verify data within MySQL:
Expected Result in MySQL:
+----+---------+----------+-------+
| id | product | quantity | price |
+----+---------+----------+-------+
| 1 | Iphone | 10 | 1400 |
| 2 | Ipods | 20 | 1600 |
| 3 | Ipods | 30 | 3000 |
+----+---------+----------+-------+
3 rows in set (0.000 sec)
Note
The JDBC connector also supports functioning as a source connector, which can be utilized to bring data from databases into Kafka.
S3 Connector
Setting up the S3 Sink Connector for Kafka Connect.
The following provides clear steps for setting up and testing the S3 Sink Connector, ensuring users can successfully integrate their Kafka streams into Amazon S3 for data storage and processing tasks.
Configure the S3 Sink Connector
Prepare your JSON configuration for the S3 Sink Connector. This configuration will specify how data is published from Kafka to your S3 bucket. Here's an example of what your JSON configuration might look like:
File: s3-sink-1902-03.json
{
"name": "s3-sink-kafka-2-mysql-1830-19",
"config": {
"aws_access_key_id": "ACCESS_KEY_ID",
"aws_secret_access_key": "SECRET_KEY",
"aws_s3_bucket": "ad-odp/Release/Daily/kafka-connect/",
"aws_s3_prefix": "basa-prefix",
"aws_s3_region": "us-west-1",
"connector.class": "io.aiven.kafka.connect.s3.AivenKafkaConnectS3SinkConnector",
"key.converter": "org.apache.kafka.connect.converters.ByteArrayConverter",
"value.converter": "org.apache.kafka.connect.converters.ByteArrayConverter",
"output_compression": "gzip",
"output_fields": "value,key,timestamp",
"tasks.max": 1,
"topics": "s3-d1902-01",
"schemas.enable": false
}
}
View the file content using:
cat conf/s3-sink-1902-03.json
Deploy the S3 Sink Connector
Submit the above configuration to Kafka Connect using the following CURL command:
curl -X POST -H "content-type: application/json" \
--data @conf/s3-sink-1902-03.json \
http://<kafka-connect-service-hostname>:8083/connectors
Sample Response:
{
"name": "jdbc-sink-kafka-2-mysql-1830-19",
"config": {
"aws_access_key_id": "<aws access key id>",
"aws_secret_access_key": "<aws secret access key>",
"aws_s3_bucket": "ad-odp/Release/Daily/kafka-connect/",
"aws_s3_prefix": "basa-prefix",
"aws_s3_region": "us-west-1",
"connector.class": "io.aiven.kafka.connect.s3.AivenKafkaConnectS3SinkConnector",
"key.converter": "org.apache.kafka.connect.converters.ByteArrayConverter",
"output_compression": "gzip",
"output_fields": "value,key,timestamp",
"tasks.max": "1",
"topics": "s3-d1902-01",
"value.converter": "org.apache.kafka.connect.converters.ByteArrayConverter",
"name": "jdbc-sink-kafka-2-mysql-1830-19"
},
"tasks": [],
"type": "sink"
}
Verify Connector Deployment
Check the status of the connector to ensure it is correctly configured and running:
curl http://<kafka-connect-service-hostname>:8083/connectors/s3-sink-kafka-2-mysql-1830-19/status
Sample Response:
{
"name": "jdbc-sink-kafka-2-mysql-1830-19",
"connector": {
"state": "RUNNING",
"worker_id": "10.90.9.81:8083"
},
"tasks": [
{
"id": 0,
"state": "RUNNING",
"worker_id": "10.90.9.81:8083"
}
],
"type": "sink"
}
Publish Data to the S3 Bucket
Start the Kafka producer to send data to the topic configured for the S3 connector:
./bin/kafka-console-producer.sh \
--broker-list node1.acceldata.ce:6667,node2.acceldata.ce:6667,node3.acceldata.ce:6667,node4.acceldata.ce:6667 \
--topic s3-d1902-01
Input sample records into the producer console:
>io.aiven.kafka.connect.s3.AivenKafkaConnectS3SinkConnector1
>io.aiven.kafka.connect.s3.AivenKafkaConnectS3SinkConnector2
>io.aiven.kafka.connect.s3.AivenKafkaConnectS3SinkConnector3
#... Continue inputting texts as required
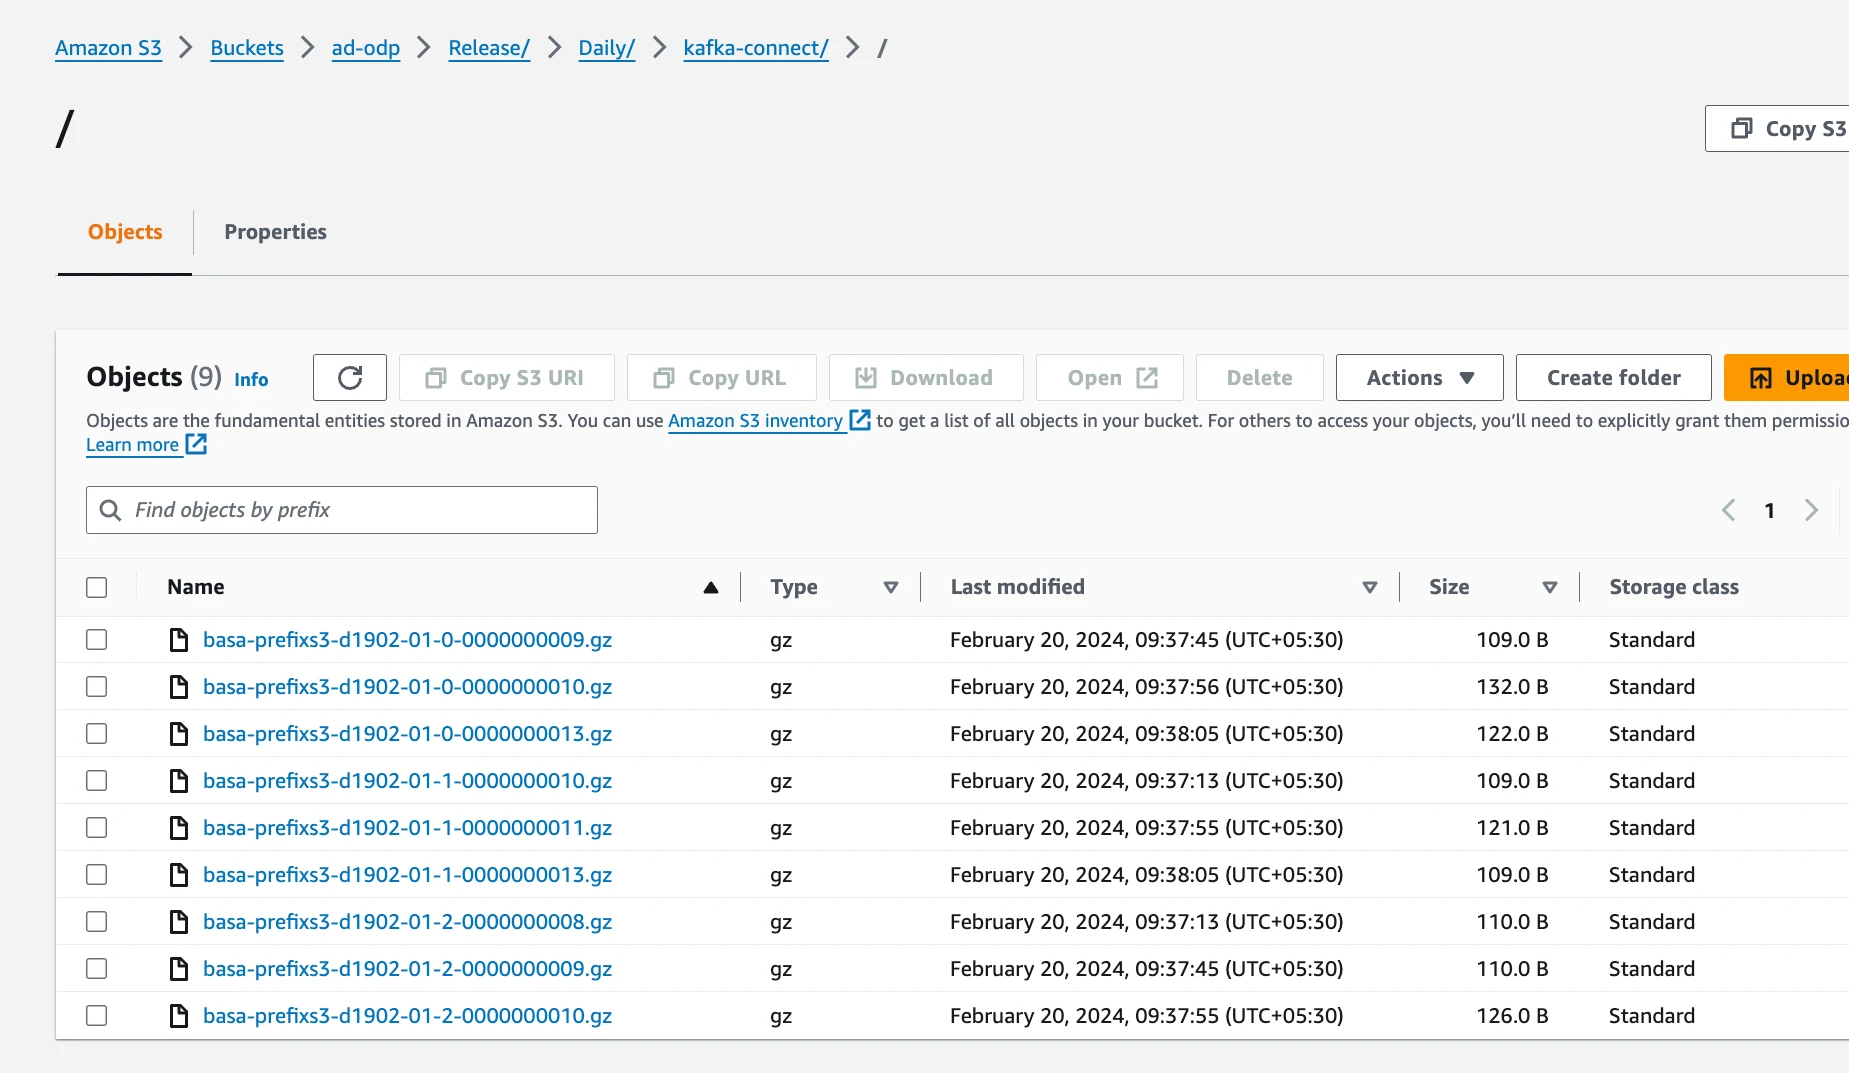
Verify Data Presence in S3 Bucket
Check the S3 bucket to confirm that the files have been successfully uploaded:
aws s3 ls s3://ad-odp/Release/Daily/kafka-connect/
You should see files like:
2024-02-20 05:07:45 109 basa-prefixs3-d1902-01-0-0000000009.gz
2024-02-20 05:07:56 132 basa-prefixs3-d1902-01-0-0000000010.gz
2024-02-20 05:08:05 122 basa-prefixs3-d1902-01-0-0000000013.gz
Note
Since the data is compressed (gzip) and converted to byte arrays, it cannot be directly read from the S3 files.
Also, the S3 connector does not support functioning as a source connector.
Warning
This is only for JSON/String convertor. Avro is not supported.
Amazon SQS Sink Connector
Camel SQS Sink connector
The camel-aws-sqs-sink-kafka-connector is a Kafka Connect sink connector that forwards records from configured Kafka topics to Amazon Simple Queue Service (SQS). In a typical setup, producers write events to Kafka, Connect runs this Camel-based sink, which turns each consumed record into SQS API traffic so downstream systems can pick up the same payload from a queue (by queue name or full ARN).
For example the below example show the payload to submit the job to SQS .
Submit the job
curl -X POST http://ocr2350-0.ocr2350.basapuram.svc.cluster.local:8083/connectors \
-H "Content-Type: application/json" \
-d '{
"name": "camel-sqs-sink-connector1",
"config": {
"connector.class": "org.apache.camel.kafkaconnector.awssqssink.CamelAwssqssinkSinkConnector",
"topics": "kafka3-sqs-topic-01",
"tasks.max": "1",
"camel.kamelet.aws-sqs-sink.queueNameOrArn": "arn:aws:sqs:eu-north-1:xxxxxxxxx:ocr-2350-test",
"camel.kamelet.aws-sqs-sink.region": "eu-north-1",
"camel.kamelet.aws-sqs-sink.autoCreateQueue": "true",
"camel.kamelet.aws-sqs-sink.accessKey": "AKIASZxxxxxx",
"camel.kamelet.aws-sqs-sink.secretKey": "G6dpdI9rExxxxxxxXX/xxxxxxyyyyy",
"camel.kamelet.aws-sqs-sink.useDefaultCredentialsProvider": "false",
"key.converter": "org.apache.kafka.connect.storage.StringConverter",
"value.converter": "org.apache.kafka.connect.storage.StringConverter"
}
}'
Here “ocr2350-0.ocr2350.basapuram.svc.cluster.local” is the connector hostname and 8083 is the connector listening port.
Verify the Submitted Job Status
[root@ocr2350-0 kafka3]# curl http://ocr2350-0.ocr2350.basapuram.svc.cluster.local:8083/connectors/camel-sqs-sink-connector1/status | jq
% Total % Received % Xferd Average Speed Time Time Time Current
Dload Upload Total Spent Left Speed
100 249 100 249 0 0 243k 0 --:--:-- --:--:-- --:--:-- 243k
{
"name": "camel-sqs-sink-connector1",
"connector": {
"state": "RUNNING",
"worker_id": "ocr2350-0.ocr2350.basapuram.svc.cluster.local:8083"
},
"tasks": [
{
"id": 0,
"state": "RUNNING",
"worker_id": "ocr2350-0.ocr2350.basapuram.svc.cluster.local:8083"
}
],
"type": "sink"
}
Produce Messages from Kafka
export KAFKA_OPTS="-Djava.security.auth.login.config=/usr/odp/current/kafka3-broker/conf/kafka3_client_jaas.conf"
./bin/kafka-console-producer.sh --topic kafka3-sqs-topic-01 --bootstrap-server ocr2350-0.ocr2350.basapuram.svc.cluster.local:6669 --producer.config client-ssl.properties
Sample Messages
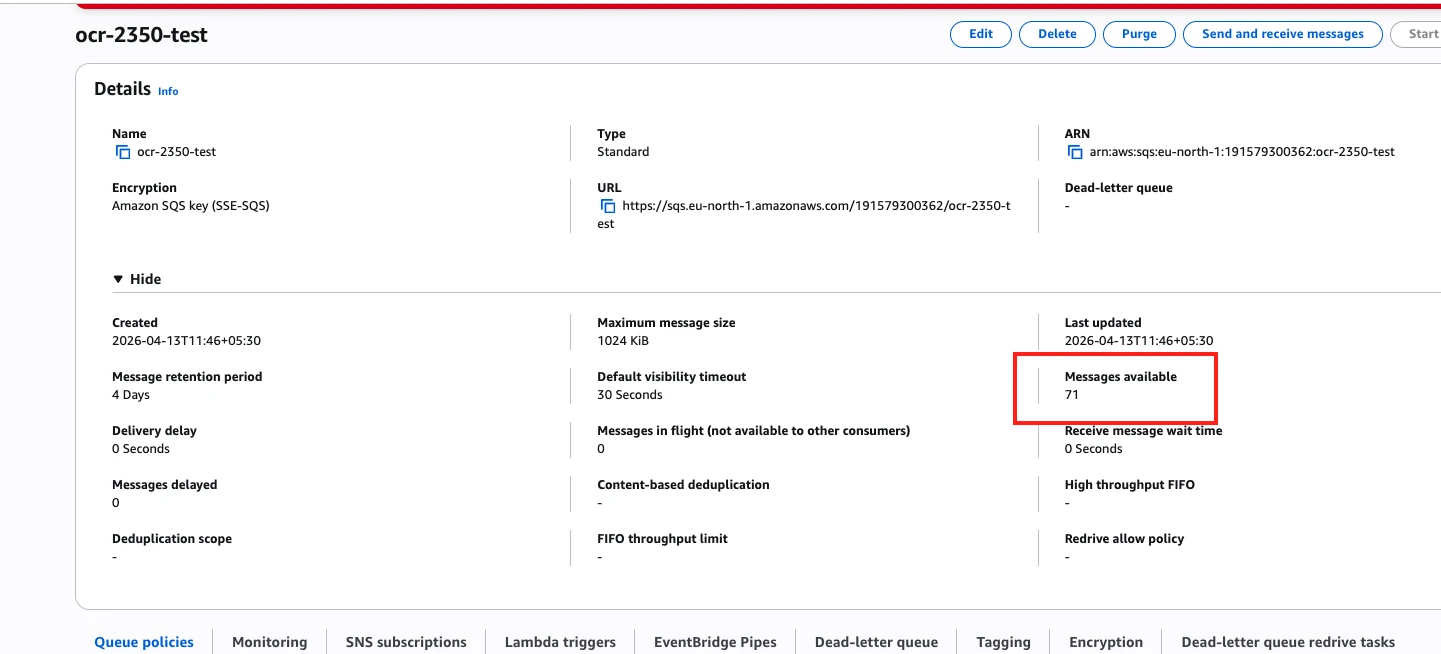
Verify from AWS SQS UI
Send Few More Messages
Amazon Kinesis Firehose Connector
Setting up the Amazon Kinesis Firehose Sink Connector for Kafka Connect.
The following provides the required steps for setting up and testing the Amazon Kinesis Firehose Sink Connector, ensuring users can successfully integrate their Kafka streams into Amazon S3 for data storage and processing tasks via Kinesis Firehose.
Configure the Kinesis Firehose Sink Connector
Prepare your JSON configuration for the Kinesis Firehose Sink Connector. This configuration will specify how data is published from Kafka to Amazon Kinesis Firehose, which then stores the data in Amazon S3. Here's an example of what your JSON configuration might look like:
File: kafka-2-kinesis-sink-test-2901-02.json
{
"name": "kafka-2-kineis-sink-test-08",
"config": {
"connector.class": "com.amazon.kinesis.kafka.FirehoseSinkConnector",
"tasks.max": 1,
"topics": "kafka-2-kinesis-firehose-sink-topic-08",
"deliveryStream": "basa-PUT-S3-dp",
"region": "ap-south-1",
"batch": true,
"batchSize": 500,
"batchSizeInBytes": 3670016,
"schemas.enable": false
}
}
View the file content using:
cat config/kafka-2-kinesis-sink-test-2901-02.json
Deploy the Kinesis Firehose Sink Connector
Submit the above configuration to Kafka Connect using the following CURL command:
curl -X POST -H "content-type: application/json" \
--data @config/kafka-2-kinesis-sink-test-2901-02.json \
http://<kafka-connect-service-hostname>:8083/connectors
Verify Connector Deployment
Check the status of the connector to ensure it is correctly configured and running:
curl http://<kafka-connect-service-hostname>:8083/connectors/kafka-2-kineis-sink-test-08/status
Sample response:
{
"name":"kafka-2-kineis-sink-test-08",
"connector":{
"state":"RUNNING",
"worker_id":"10.90.6.86:8083"
},
"tasks":[
{
"id":0,
"state":"RUNNING",
"worker_id":"10.90.6.86:8083"
}
],
"type":"sink"
}
List All Active Connectors
To see a list of all active connectors in your Kafka Connect cluster, use the following CURL command:
curl http://<kafka-connect-service-hostname>:8083/connectors
View Connector Properties
To review the detailed configuration and properties of the Kinesis Firehose Sink Connector, you can fetch this information by running:
curl http://<kafka-connect-service-hostname>:8083/connectors/kafka-2-kineis-sink-test-08
Publish Data to Kinesis Firehose
Start the Kafka console producer to send data to the topic configured for the Kinesis Firehose connector:
./bin/kafka-console-producer.sh \
--broker-list <kafka-broker-hosts> \
--topic kafka-2-kinesis-firehose-sink-topic-08
Input sample records into the producer console:
{"schema":{"type":"string","optional":false},"payload":"kafka to hdfs sink connector producing messages line1"}
{"schema":{"type":"string","optional":false},"payload":"kafka to hdfs sink connector producing messages line2"}
{"schema":{"type":"string","optional":false},"payload":"kafka to hdfs sink connector producing messages line3"}
#... Continue inputting texts as required
Verify Data in Amazon S3
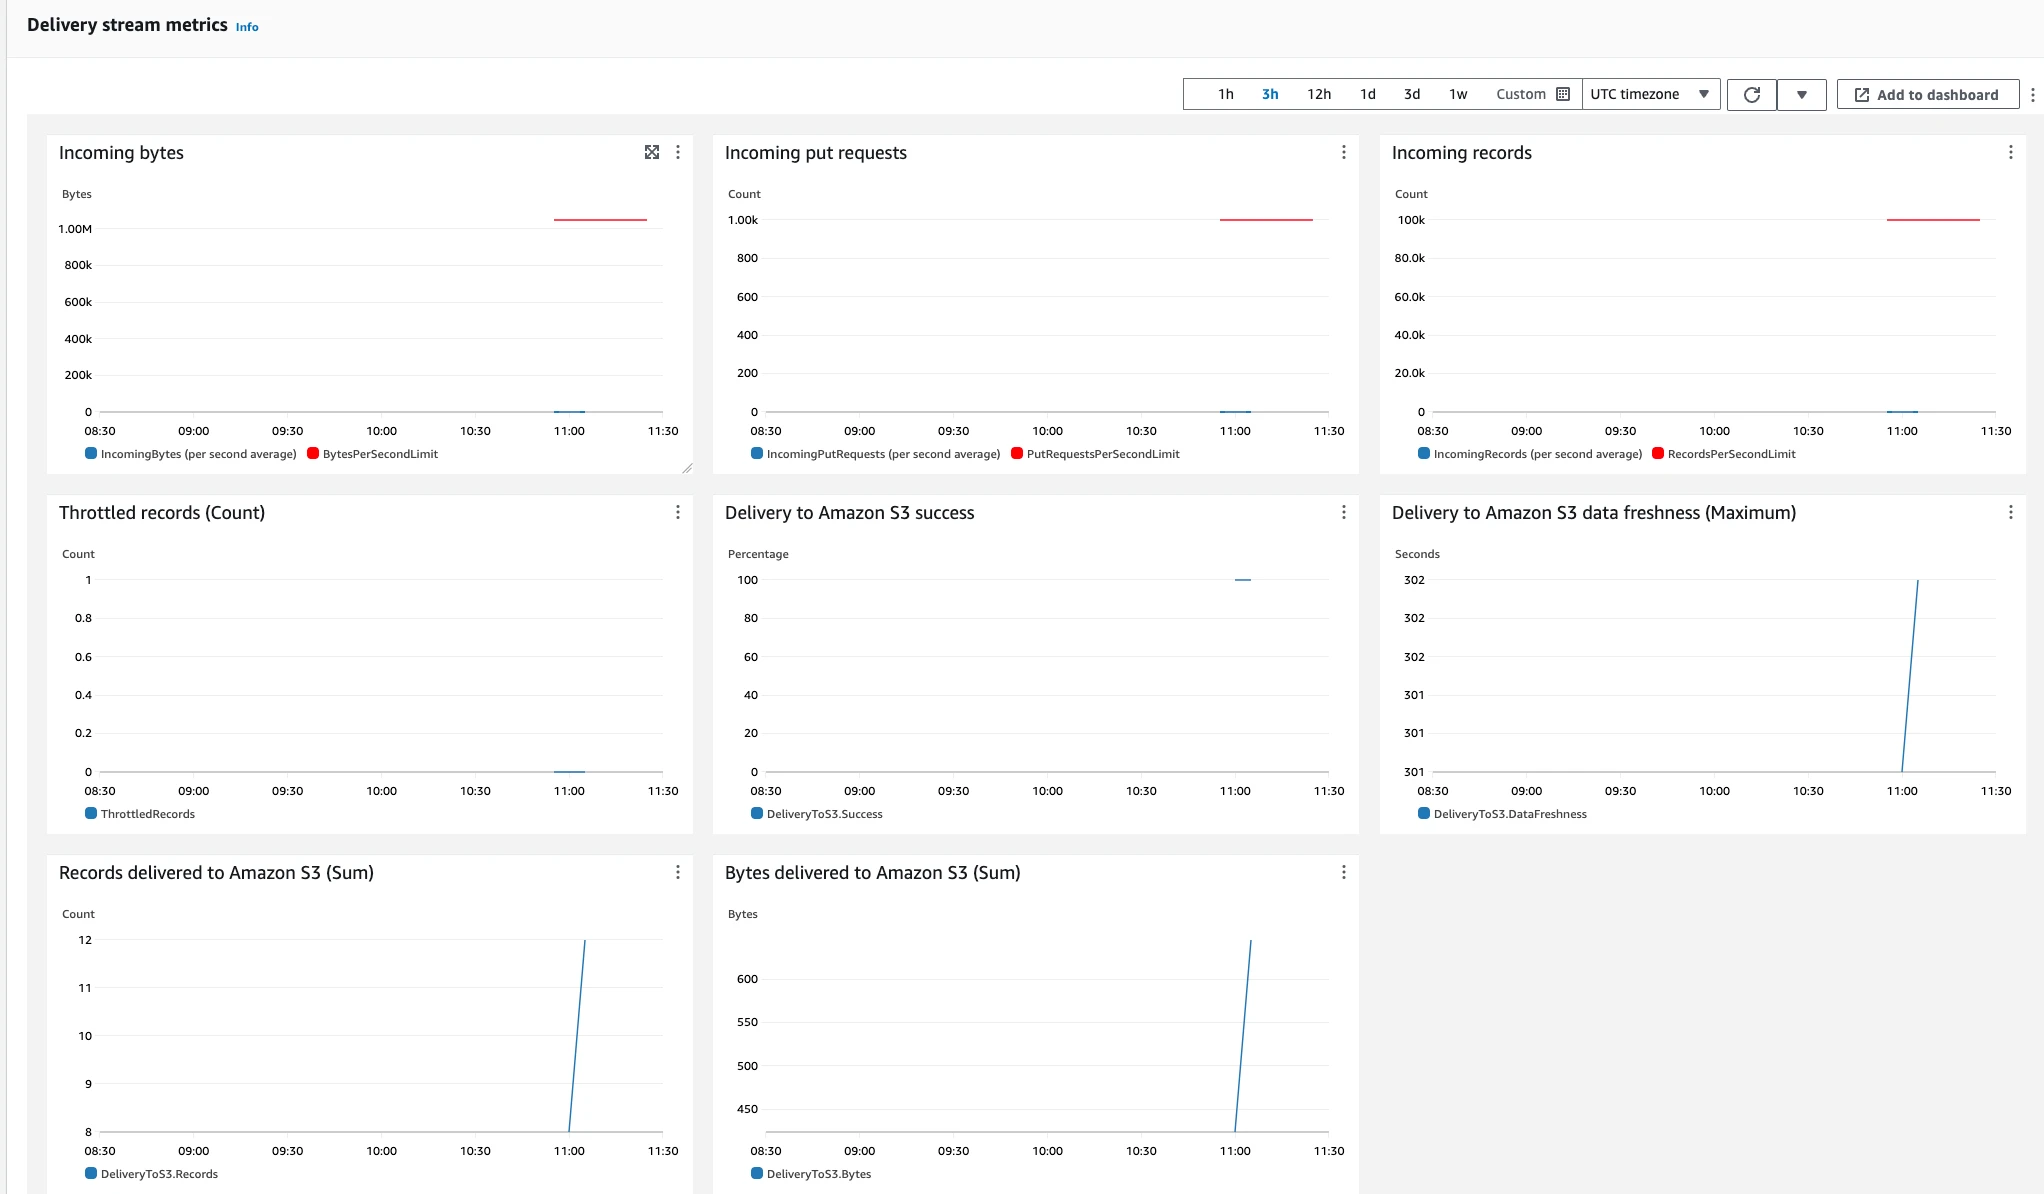
Monitor the Kinesis Firehose dashboard to observe incoming bytes and their delivery to S3. Verify the data has been stored in S3 by accessing the corresponding S3 bucket:
aws s3 ls s3://<your-bucket-path>/
Download and view the data to confirm the integrity and correctness of the records:
aws s3 cp s3://<your-file-path> - | zcat
The following code block displays the sample data saved in these files. To view and verify the data, you must download the file.
kafka to hdfs sink connector producing messages line1
kafka to hdfs sink connector producing messages line2
kafka to hdfs sink connector producing messages line3
#... The output contains the list of added records
Note
The Kinesis Firehose connector does not support functioning as a source connector.