Control Plane Installation
On selecting the control plane installation, only the control plane will be installed.

The following settings and configuration parameters are displayed for control plane installation:
- Torch Installation Versions
- Torch Control Plane Multitenancy Configurations
- Control Plane Settings (Single Tenant) and Control Plane Settings (Multi Tenant)
- Database Configuration
- SMTP Configuration
- Notification Configuration
- Airgap Registry Settings
The following section explains the configuration parameters along with the required inputs:
Torch Installation Versions
This tab displays the current Acceldata Torch version that is to be installed. This is a read-only configuration for reference. It also displays the Spark Major Version.

Torch Control Plane Multitenancy Configurations
There are two working modes of Torch control plane, namely:
- Single Tenant
- Multi Tenant

The Control Plane Settings vary depending on the tenancy.
Single Tenant
The following section describes the Control Plane Settings for a Single Tenant:
Control Plane Settings
Provide the following domain configurations for control plane:
- Base Domain: FQDN(Fully Qualified Domain Name) for the control plane
- Auth Server URL: This server will be internally used for authentication (read-only)
- Admin Server URL: This URL will be used for user management

Multi Tenant
The following section describes the Control Plane Settings for a Multi Tenant:
Control Plane Settings
Provide the following domain configurations for control plane:
- Base Domain: FQDN for the control plane.
- Auth Server URL: This server will be internally used for authentication(read-only)
- *_Admin Server URL: *_This URL will be used for user management.

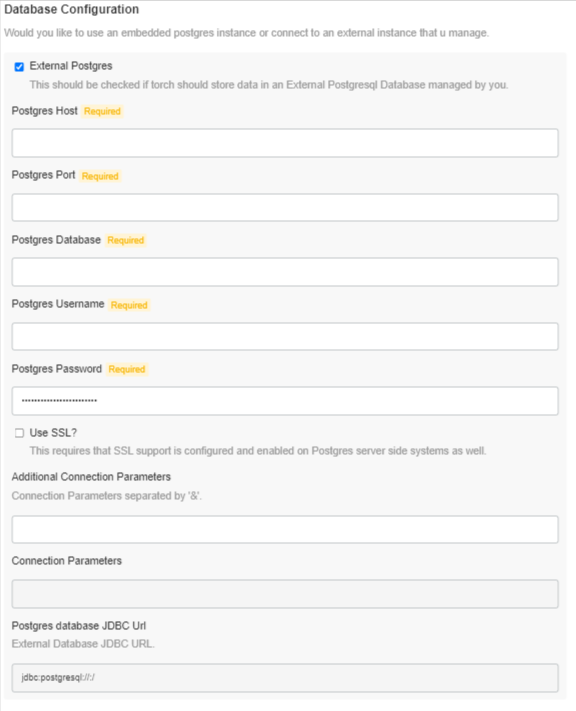
Database Configuration
Torch collects and stores metadata information. This data is stored in a Postgres database. This Postgres database is provided along with the Torch application. The user can either choose to use this embedded Postgres instance or connect to an external instance, managed by the user itself. Check the External Postgres box, if you choose to store data in an external Postgres database. Inputs required:
- Postgres Host: The hostname or IP address of the server
- Postgres Port: Port number of the server
- Postgres Database: Name of the Postgres database
- Postgres Username: Username for the database
- Postgres Password: The database user’s password.
Once you enter all the required inputs, the Postgres Database JDBC URL is generated.
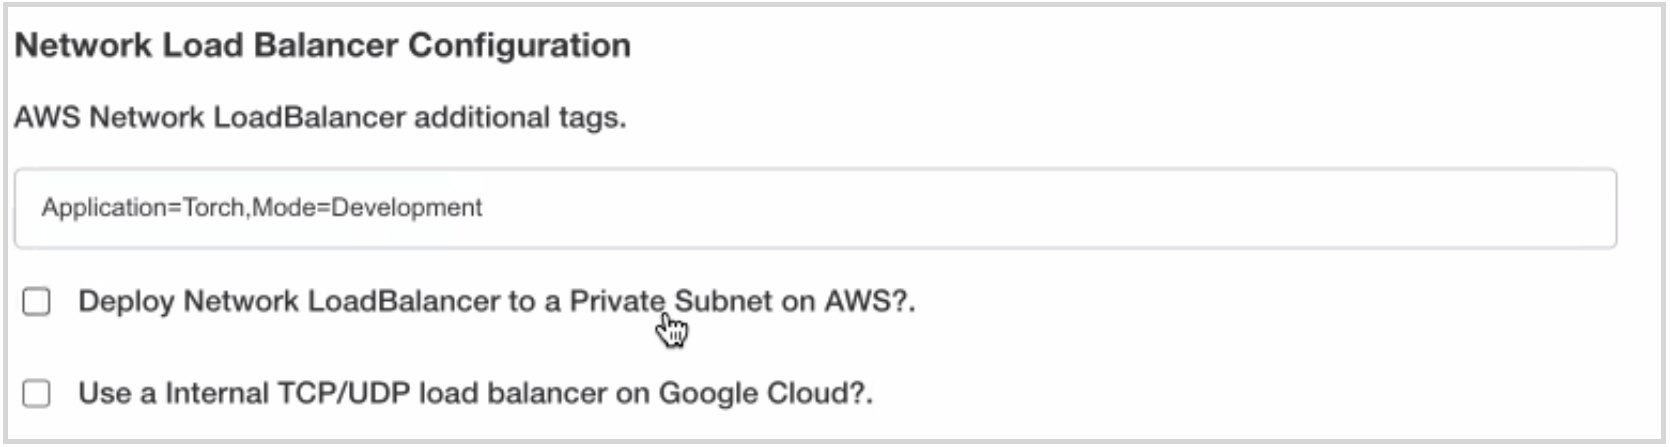
Network Load Balancer Configuration
Torch deployment requires you to configure the network load balancer. In order to deploy the network load balancer, the following options are provided:
- AWS Network Load Balancer additional tags: This is specific to Amazon Elastic Kubernetes Service (EKS) which is a managed service that can be used to run Kubernetes on AWS without needing to install, operate, and maintain your own Kubernetes control plane or nodes. The input box provided is for you to add additional tags to your load balancer. For example, if you have a specific tag to track all the resources used in the Torch application, that tag can be entered in the provided input box.
- Deploy Network Load Balancer to a Private Subnet on AWS? : Click the checkbox to deploy the network load balancer to a private subnet on AWS. If this checkbox is not selected then the network load balancer is deployed to a public subnet.
- Use a Internal TCP/UDP load balancer on Google Cloud? : Click the checkbox to deploy the internal TCP/UDP load balancer on Google Cloud Platform.
Pre-requisites
Following are the pre-requisites for deploying the network load balancer on a EKS cluster:
- Tag all public and private subnets that your cluster uses for load balancer resources with the following key-value pair:
Key: kubernetes.io/cluster/cluster-name
Value:
shared
Replace cluster-name with your Amazon EKS cluster's name. The shared value allows more than one cluster to use the subnet.
- To allow Kubernetes to use your private subnets for internal load balancers, tag all private subnets in your VPC with the following key-value pair:
Key:
kubernetes.io/role/internal-elbValue:1 - To allow Kubernetes to use only tagged subnets for external load balancers, tag all public subnets in your VPC with the following key-value pair:
Key:
kubernetes.io/role/elbValue:1
SMTP Configuration
Torch uses an SMTP server to send notifications and verification emails. Inputs Required:
- SMTP Server host to connect: SMTP server FQDN
- SMTP Port: Port number on which SMTP server is running
- Authentication Username: If authentication is enabled, Server authentication username.
- Authentication Password: If authentication is enabled, Server authentication password.
- From email address: Email that will be used by an SMTP server to send notifications. Should be a valid email address.
- *_To email address: *_Email to which replies will be sent

Notification Configuration
Acceldata Torch allows the user to configure notification channels to receive notifications regarding policy executions and policy results. Check the Enable Notifications? box, to enable Torch support for notifications. On enabling, Torch would send emails or Slack messages for multiple events occurring in the system.Input required:
- IP address: IP(Host) address of Torch UI.
Check the Enable Email Channel checkbox if you want Torch to send out Email notifications.

Airgap Registry Settings

Click the Save Config button.