Explanation (Core Concepts)
What is an xStore Cluster?
An xStore Cluster is the catalog plane for your xDP platform — a single place to register, organize, and serve all your data sources as governed catalogs. Powered by Apache Gravitino, an xStore exposes metalakes, catalogs, schemas, and tables, and publishes an Iceberg REST endpoint that external engines (Spark, Trino, and other xCompute clusters) use to read your tables.
xStore runs entirely inside your own Kubernetes infrastructure. Acceldata manages the cluster's lifecycle and configuration through the xDP platform, but your catalog metadata never leaves your network.
This guide is written for the Platform Administrator who provisions and operates xStore clusters; data engineers and analysts then consume the catalogs it serves.
Important: xCentral is a prerequisite. A running xCentral governance cluster must exist for your tenant before you create an xStore — the xStore links to it for policy enforcement and identity. The screenshots in this guide show an xStore (xstore-demo-doc-cluster) governed by the demo-doc-xcentral xCentral.
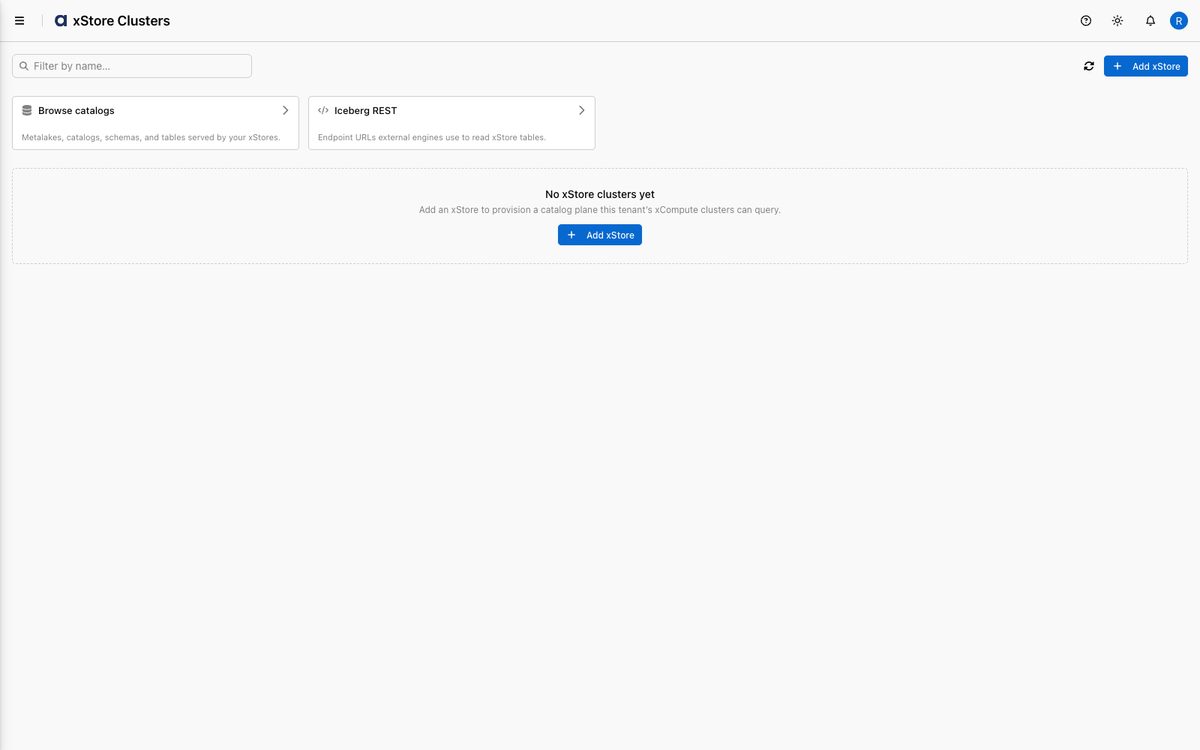
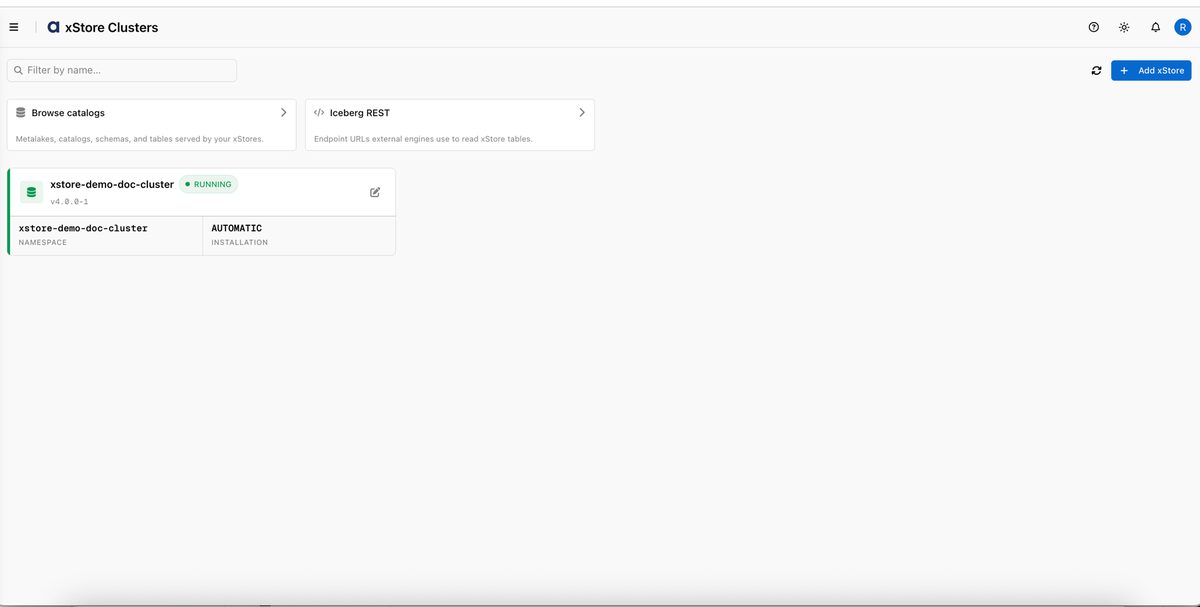
When no xStore exists yet, the xStore Clusters page shows an empty state that prompts you to add your first one. The page also surfaces two shortcuts — Browse catalogs (metalakes, catalogs, schemas, and tables served by your xStores) and Iceberg REST (the endpoint URLs external engines use to read xStore tables).
Key Concepts
Apache Gravitino catalog plane: xStore is built on Gravitino. It serves catalogs/schemas/tables and an Iceberg REST endpoint that compute engines query.
xCentral prerequisite: xCentral must be deployed and running before you create an xStore. The xStore links to it for governance and identity.
PostgreSQL (Internal or External): xStore persists catalog, schema, and table metadata in PostgreSQL. Choose Internal (auto-deployed) for quick setup, or External (your existing instance) for production. xStore runs three services, each backed by its own database (
xstore,xstore-iceberg,xstore-hms-metastore).S3-Compatible Object Storage (Internal or External): xStore stores files, assets, and large objects in S3-compatible storage. As with PostgreSQL, it can be auto-deployed (Internal) or connect to an existing service (External), with three per-service buckets (
xstore,xstore-iceberg,xstore-hms-metastore).xCentral Connection — Internal vs External: Determines how this xStore reaches xCentral. Internal is used when xCentral is on the same Kubernetes cluster (internal service DNS); External when it is on a different cluster (external URL endpoint).
xObserve Integration (optional): Optionally deploy xObserve observability sidecars (actions-agent, node monitor, log collector) plus the Iceberg connector, which stream metrics, logs, and catalog-change events to the xObserve stack on the linked xCentral. This requires xObserve to be installed on that xCentral first.
Form and YAML editing: Before installing, review and tune the deployment configuration in either a structured Form editor or a raw YAML editor.
Capabilities
From an xStore cluster's detail page you can:
Browse catalog — open the catalog this xStore serves (metalakes, catalogs, schemas, tables).
Monitor status & health — see live status, last report time, reporting interval, and incident summary.
Review deployment — installation mode, data-plane version, registry, internal URL, and description.
Manage linked xCompute clusters — attach xCompute clusters so they can query this xStore's catalogs.
Tutorial (Getting Started)
This tutorial walks you through deploying your first xStore cluster, xstore-demo-doc-cluster, using internal PostgreSQL and internal object storage.
Prerequisites
Before you begin, ensure you have:
A running xCentral instance for your tenant (xStore links to it for governance).
A Kubernetes cluster (version 1.19 or higher) with cluster-admin privileges and
kubectlconfigured to reach it.Administrative permissions on the xDP platform.
For production: an external PostgreSQL (with the three service databases pre-created) and an external S3-compatible object store (with the three service buckets pre-created). For a quick start, xStore can deploy both internally.
Step 1 — Prerequisites
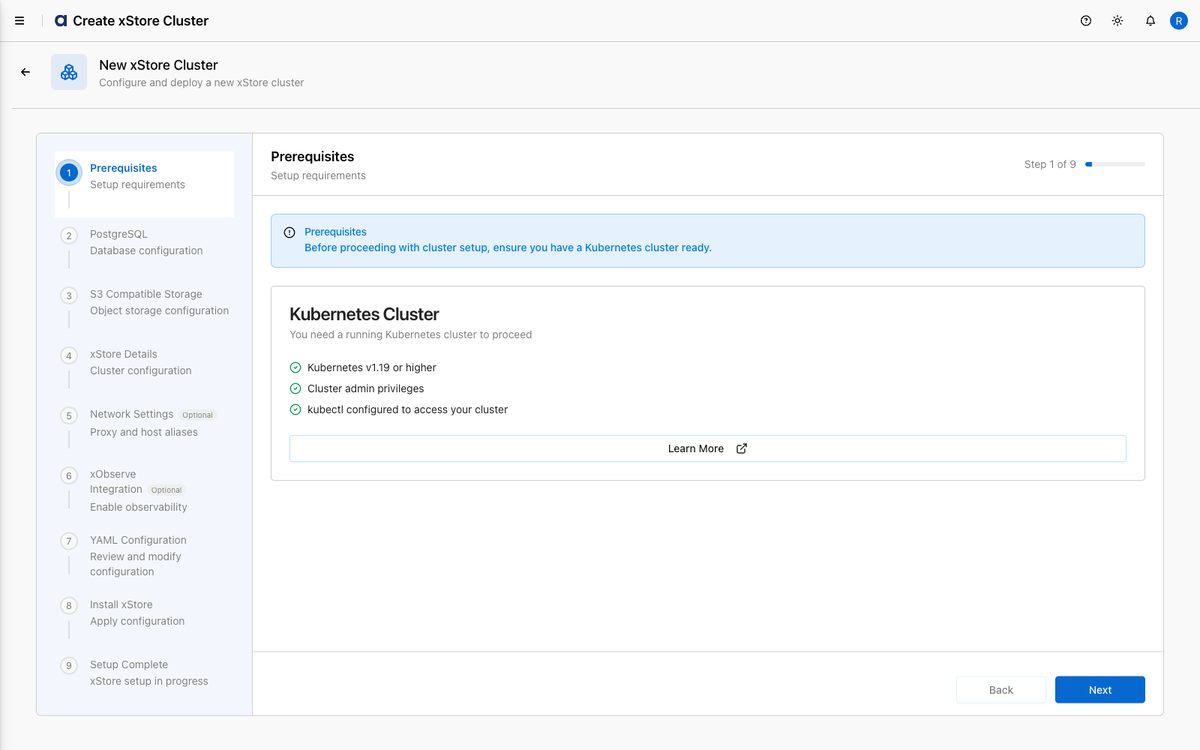
Open xStore Clusters from the left sidebar (xDP → Infrastructure → xStore Clusters) and click Add xStore. The 9-step creation wizard opens.
The Prerequisites screen confirms what's required: a running Kubernetes cluster (v1.19+), cluster-admin privileges, and
kubectlconfigured to reach it.Click Next.
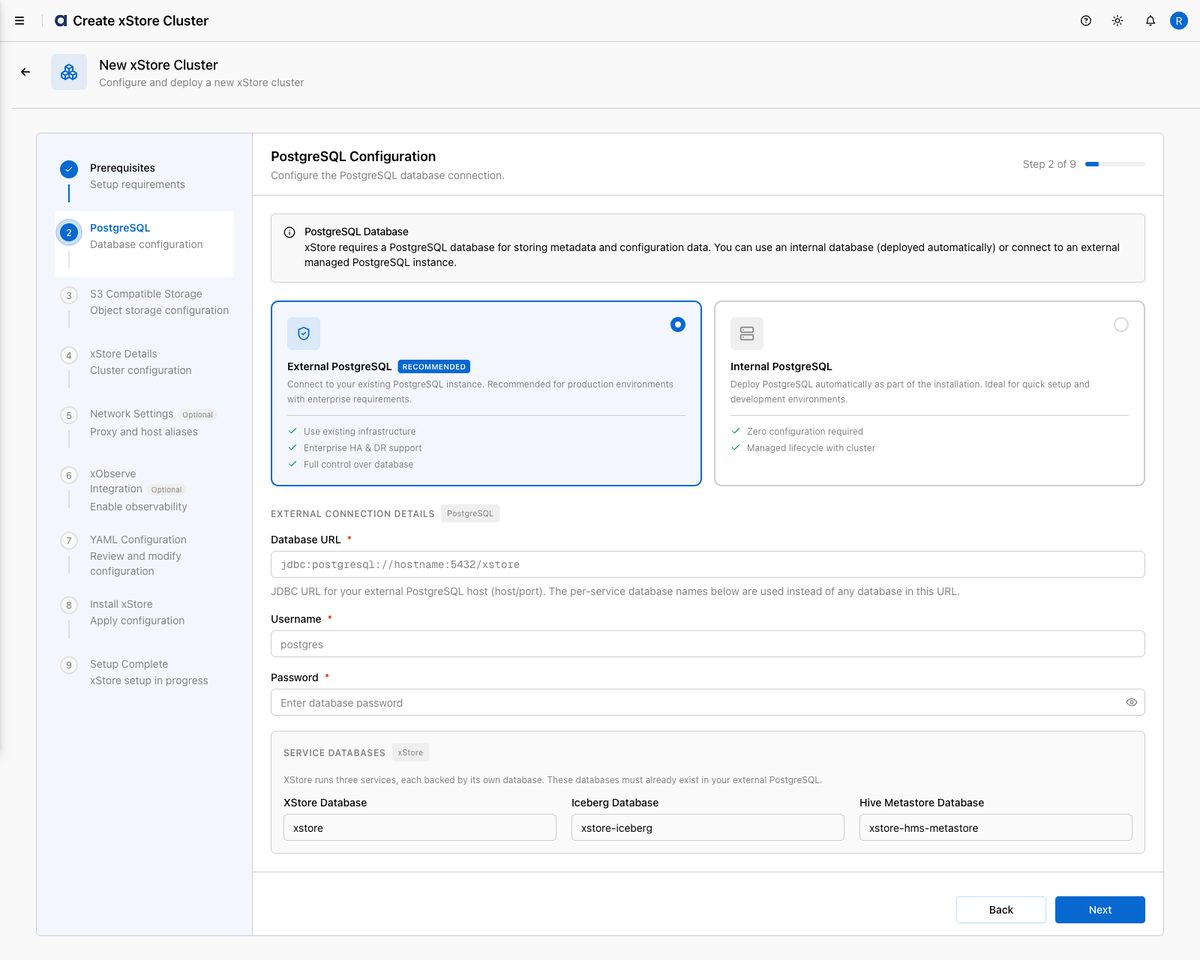
Step 2 — Configure PostgreSQL
Choose your PostgreSQL deployment option from the two cards:
External PostgreSQL (recommended for production): connect to your existing instance. Provide the JDBC Database URL (host/port), Username, and Password. The three Service Databases —
xstore,xstore-iceberg, andxstore-hms-metastore— must already exist in your external PostgreSQL.
Internal PostgreSQL (recommended for quick setup): xDP deploys a dedicated PostgreSQL instance automatically as part of the installation. No connection details are required. This tutorial uses Internal.
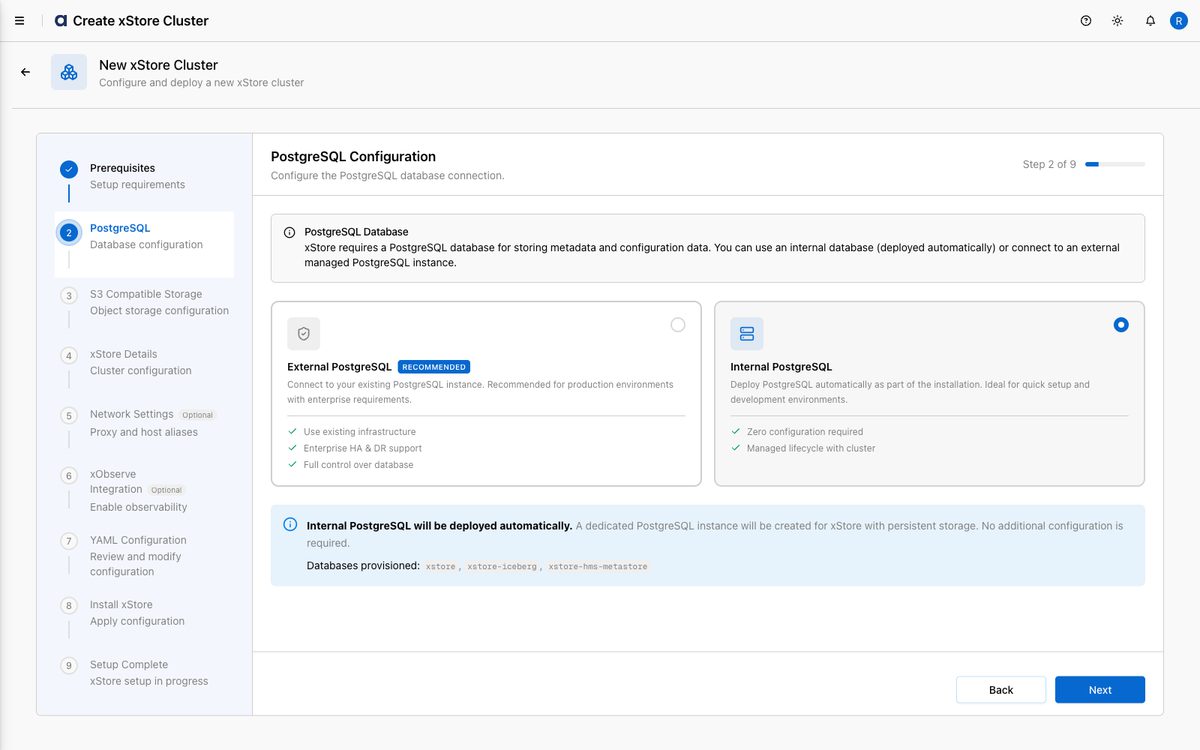
Click Next.
Step 3 — Configure S3-Compatible Object Storage
Choose your object storage option:
External S3 Compatible Storage (recommended for production): connect to your existing S3-compatible storage or Amazon S3. Provide the S3 Endpoint, Access Key, Secret Key, fallback Bucket Name, and Region. As with PostgreSQL, three per-service buckets (
xstore,xstore-iceberg,xstore-hms-metastore) must already exist.

Internal S3 Compatible Storage: xDP deploys S3-compatible object storage automatically alongside xStore. Ideal for development and testing. This tutorial uses Internal.
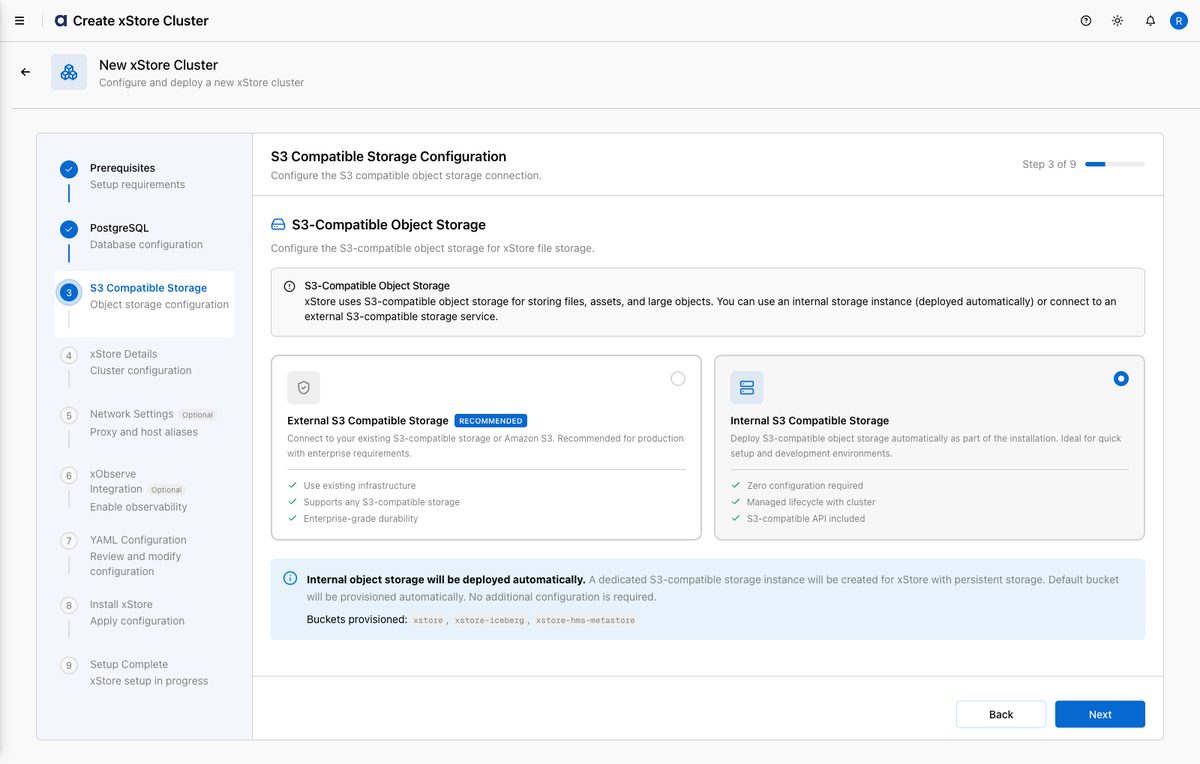
Click Next.
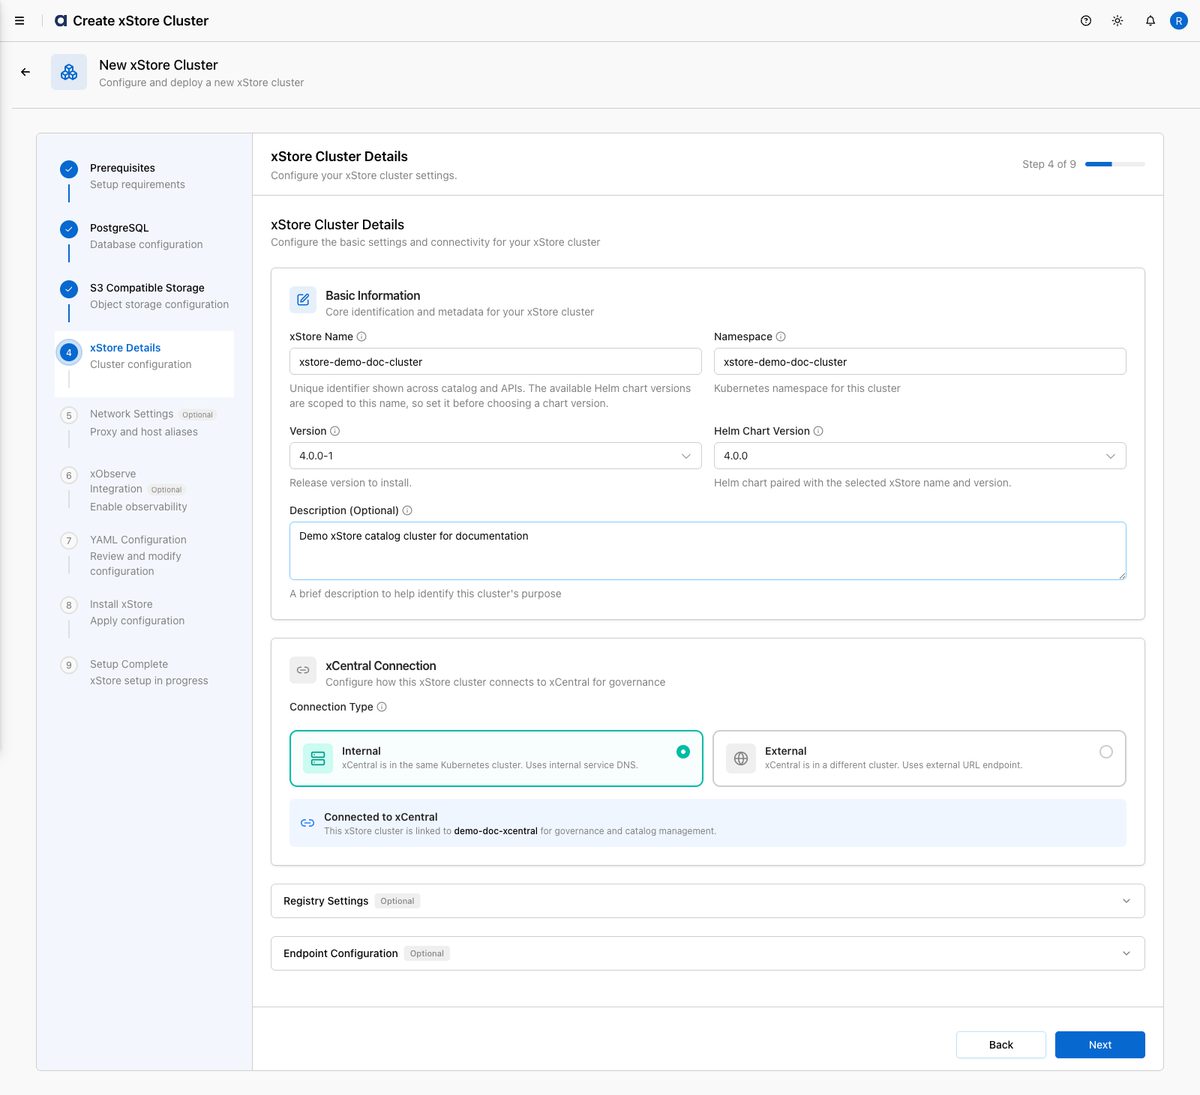
Step 4 — xStore Cluster Details
Fill in the cluster identity and connectivity:
xStore Name: A unique identifier shown across the catalog and APIs (e.g.
xstore-demo-doc-cluster). Set this first — the available Helm Chart Version options are scoped to the name.Namespace: The Kubernetes namespace where services are deployed.
Version: The xStore release to install (e.g.
4.0.0-1).Helm Chart Version: Auto-selected once a name and version are chosen.
Description (Optional): A short description of the cluster's purpose.
xCentral Connection → Connection Type: Internal (xCentral on the same cluster, internal service DNS) or External (different cluster, external URL endpoint). The panel confirms which xCentral governs this xStore — here, demo-doc-xcentral.
Registry Settings / Endpoint Configuration (optional): expand to configure a private container registry or a custom endpoint.
Click Next. A toast confirms "xStore '…' is being created."
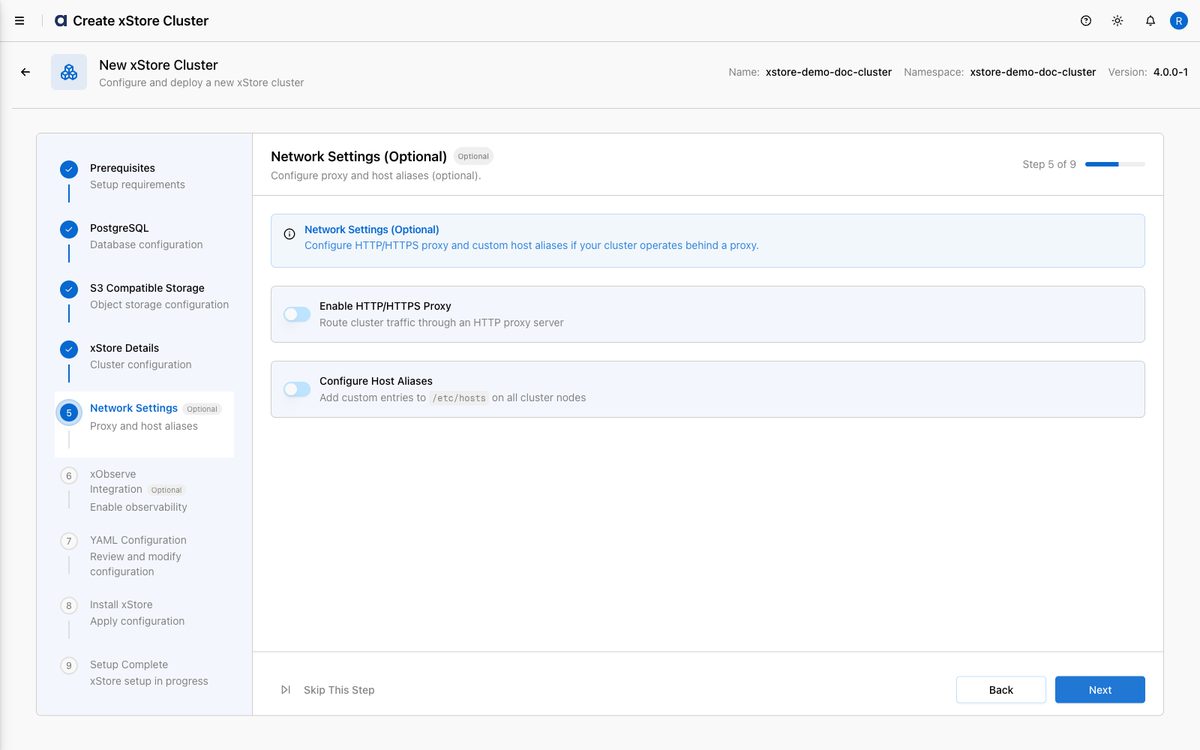
Step 5 — Network Settings (Optional)
Configure proxy or host-alias settings if your Kubernetes cluster requires them:
Enable HTTP/HTTPS Proxy: route cluster traffic through an HTTP proxy server.
Configure Host Aliases: add custom
/etc/hostsentries on all cluster nodes — useful for on-premise services not in DNS.
Click Next, or Skip This Step if not needed.
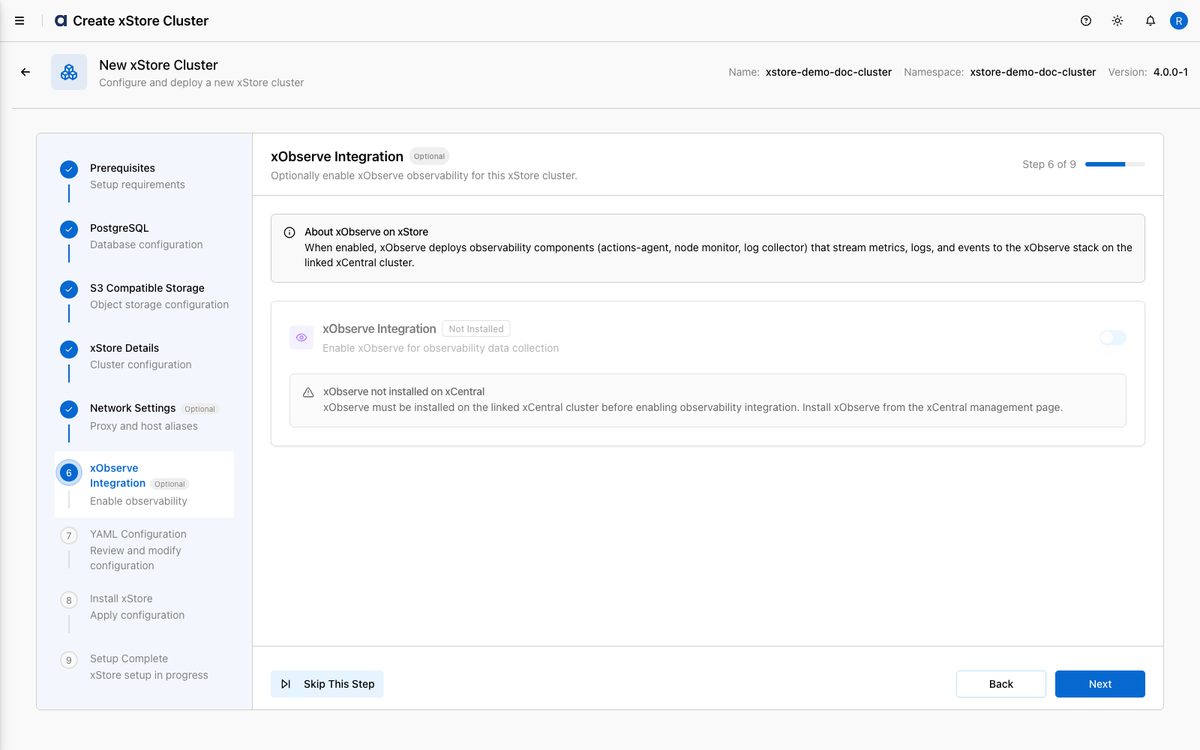
Step 6 — xObserve Integration (Optional)
Optionally enable xObserve observability for this xStore. When enabled, xObserve deploys observability components — actions-agent, node monitor, and log collector — plus an Iceberg connector that stream metrics, logs, and catalog-change events to the xObserve stack on the linked xCentral cluster.
Note: The toggle is disabled until xObserve is installed on the linked xCentral. Install xObserve from the xCentral management page first, then return here to enable it. For this tutorial xObserve is not installed, so the step is skipped.
Click Next (or Skip This Step).
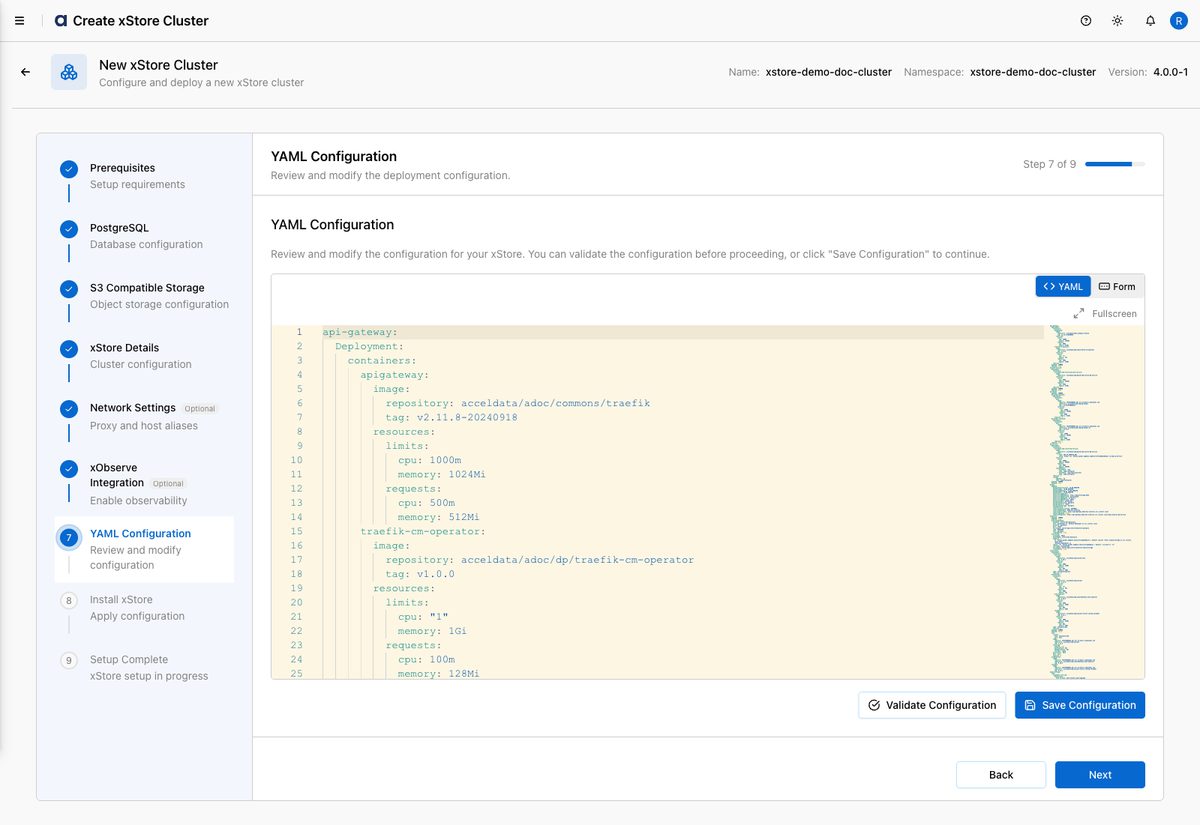
Step 7 — YAML Configuration
The configuration editor loads with all deployment settings for the xStore cluster. It supports two modes:
YAML mode: a full-control raw editor.
Form mode: a structured editor where boolean values display as toggles and arrays can be added or removed.
Review the deployment configuration (image repositories, resource limits, PostgreSQL and object-storage settings, xCentral connection). Optionally click Validate Configuration to check for errors, then click Save Configuration to continue.
Step 8 — Install xStore Cluster
The Install xStore Cluster screen shows the two commands needed to deploy xStore onto your Kubernetes cluster:
Download the Kubernetes manifest — run the
curlcommand (or click Download Manifest) to fetchmanifest.yamlfrom xDP.Apply the manifest to your Kubernetes cluster — run the
kubectlcommand to create the namespace (if needed) and apply the manifest.
Run both commands against your cluster, tick "I have downloaded the manifest and applied it to my Kubernetes cluster.", then click Next.
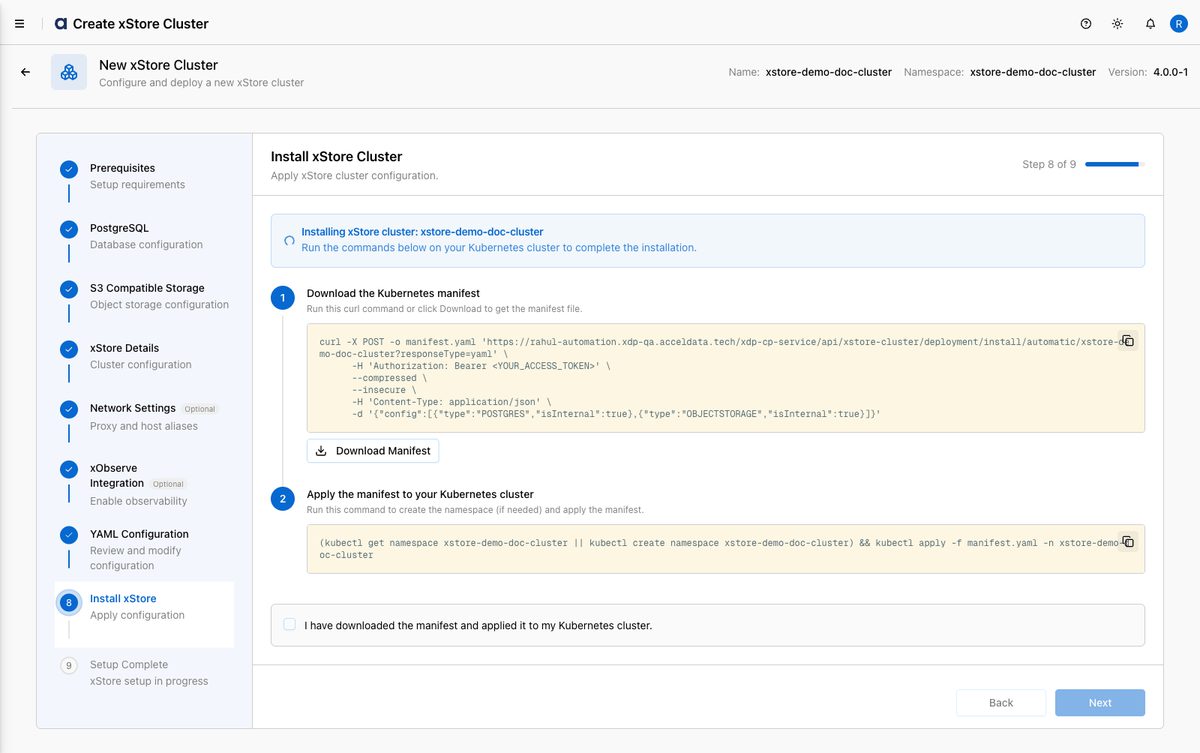
Note: The screenshot above masks the Authorization: Bearer access token. In the live UI the command contains your real, short-lived token — treat it as a secret and never paste it into tickets, chats, or screenshots.
Step 9 — Setup Complete
The xStore Registration screen polls for cluster health. The Installation Status shows Waiting to register xStore while it checks — this typically takes a few minutes — and a Registration in Progress banner confirms the process is running. Once the cluster is healthy and registers with xDP, click Finish Setup.
You are returned to the xStore Clusters list, where the new cluster appears with a RUNNING badge, its version, namespace, and installation mode.
How-to Guides
View xStore cluster details
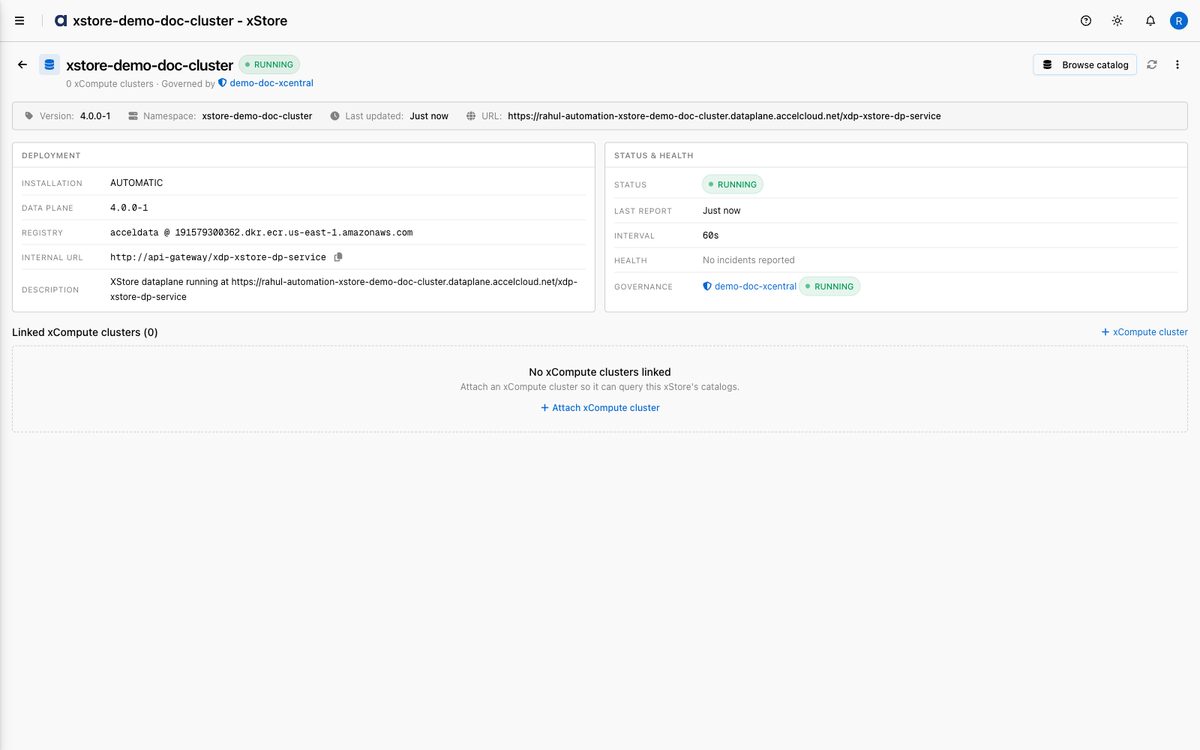
From xStore Clusters, click the cluster card to open its detail view.
The header shows the cluster name, a live RUNNING status, the linked xCompute count, and the governing xCentral (Governed by demo-doc-xcentral), plus Browse catalog, Refresh xStore, and More actions controls.
A summary bar shows Version, Namespace, Last updated, and the dataplane URL. Two cards detail the cluster:
Deployment — Installation mode, Data plane version, Registry, Internal URL, and Description.
Status & health — Status, Last report, reporting Interval, Health (incident summary), and the Governance link to the xCentral.
Browse the catalog this xStore serves
Open the cluster detail view and click Browse catalog (or use Browse catalogs on the xStore Clusters list).
Explore the metalakes, catalogs, schemas, and tables served by this xStore. External engines read these tables via the Iceberg REST endpoint shown on the list page.
Edit an xStore cluster's configuration
From xStore Clusters, find the cluster and click the Edit (pencil) icon.
In the wizard, navigate to the YAML Configuration step and make your changes in Form or YAML mode (for example, PostgreSQL credentials, object-storage endpoints, or resource limits).
Click Save Configuration, then go to the Install step.
Copy and run the updated install commands. The cluster reconciles automatically and returns to RUNNING once complete.
Enable xObserve on an existing xStore
Ensure xObserve is installed on the linked xCentral (install it from the xCentral management page).
Edit the xStore and open the xObserve Integration step; the toggle becomes available once xObserve is detected on the xCentral.
Enable the toggle, save the configuration, and re-run the install commands. xObserve sidecars and the Iceberg connector are deployed.
Link an xCompute cluster to this xStore
Open the xStore detail view and find Linked xCompute clusters.
Click Attach xCompute cluster and follow the xCompute creation/link flow.
Once linked, the xCompute cluster can query this xStore's catalogs.
Delete an xStore cluster
From the cluster detail view, open More actions and choose Delete (or use the delete control on the cluster card).
Confirm the deletion.
Warning: Deleting an xStore removes it from the xDP platform. The underlying cluster resources are not automatically removed — clean up the xStore namespace afterward. Detach any linked xCompute clusters first.
Reference
Creation wizard steps
Step | Name | Required | What it configures |
|---|---|---|---|
1 | Prerequisites | — | Informational: Kubernetes v1.19+, cluster-admin, |
2 | PostgreSQL | Yes | Internal (auto-deployed) or external PostgreSQL + three service databases. |
3 | S3 Compatible Storage | Yes | Internal (auto-deployed) or external object storage + three service buckets. |
4 | xStore Details | Yes | Name, namespace, version, helm chart version, description, xCentral connection, registry, endpoint. |
5 | Network Settings | Optional | HTTP/HTTPS proxy and host aliases. |
6 | xObserve Integration | Optional | Enable xObserve sidecars + Iceberg connector (requires xObserve on the linked xCentral). |
7 | YAML Configuration | Yes | Review/edit the rendered deployment config (Form or YAML mode). |
8 | Install xStore | Yes | Download + apply the Kubernetes manifest via |
9 | Setup Complete | — | Polls for registration; Finish Setup when healthy. |
Service databases and buckets
xStore runs three services, each backed by its own database and bucket. For External PostgreSQL/storage these must already exist; for Internal they are provisioned automatically.
Service | Default database | Default bucket |
|---|---|---|
XStore |
|
|
Iceberg |
|
|
Hive Metastore |
|
|
xCentral connection type
Type | Use when | How xStore connects |
|---|---|---|
Internal | xCentral runs on the same Kubernetes cluster | Internal service DNS |
External | xCentral runs on a different Kubernetes cluster | Externally reachable endpoint URL |
Cluster detail view fields
Section | Field | Description |
|---|---|---|
Header | Status | Lifecycle status — |
Header | Governed by | The xCentral cluster enforcing governance on this xStore. |
Summary bar | Version | Deployed xStore release (e.g. |
Summary bar | Namespace | Kubernetes namespace hosting xStore. |
Summary bar | Last updated | Time of the most recent change. |
Summary bar | URL | Externally reachable dataplane service URL. |
Deployment | Installation | Install mode — |
Deployment | Data plane | Dataplane version. |
Deployment | Registry | Container image registry the deployment pulls from. |
Deployment | Internal URL | In-cluster service URL (e.g. |
Deployment | Description | Free-text description of the instance. |
Status & health | Status | Current runtime status. |
Status & health | Last report | Time of the cluster's most recent health report. |
Status & health | Interval | Health-reporting interval (e.g. |
Status & health | Health | Incident summary (e.g. No incidents reported). |
Status & health | Governance | Link to the linked xCentral and its status. |
xStore cluster statuses
Status | Meaning |
|---|---|
RUNNING | All services healthy and registered with the control plane. |
PENDING | Services starting up or awaiting registration. |
UNHEALTHY | One or more services reporting errors. |
STOPPED | xStore has been paused or unregistered. |
UNKNOWN | Health-check data not yet received. |
Best Practices
Tip: Create xCentral first, then xStore, then attach xCompute — build the platform from the governance layer up.
Stand up xCentral before xStore. xStore links to xCentral for governance and identity; create and verify xCentral first.
Use external PostgreSQL and object storage for production. Dedicated external services simplify backup, sizing, and recovery, and keep catalog performance consistent. Pre-create the three service databases and buckets before running the wizard.
Verify external services are reachable. Before starting the wizard, confirm PostgreSQL and the object-storage endpoint are accessible from the environment where xStore will be deployed.
Install xObserve on xCentral before enabling it on xStore. The xObserve Integration toggle stays disabled until xObserve is present on the linked xCentral.
Protect the install token. The
Authorization: Bearertoken in the install command is a short-lived secret — never paste it into tickets, chats, or screenshots.
What's Next
Attach an xCompute cluster so Spark, Trino, or notebooks can query this xStore's catalogs.
Browse catalogs to register and explore data sources served by your xStore.
Point external engines at the Iceberg REST endpoint to read xStore tables from outside xDP.