Compute | Chargeback & Budget
In today's budget driven environment, it is extremely essential for organizations to monitor and track the costs spent on various departments or the organization. The chargeback feature in ADOC allows you to track, measure, and attribute infrastructure costs across business units and data platforms. The Chargeback feature also allows you to efficiently allocate funds (based on previous expenditures) to various business units of your organization.
The following tabs are present in the Chargeback and Budget page:
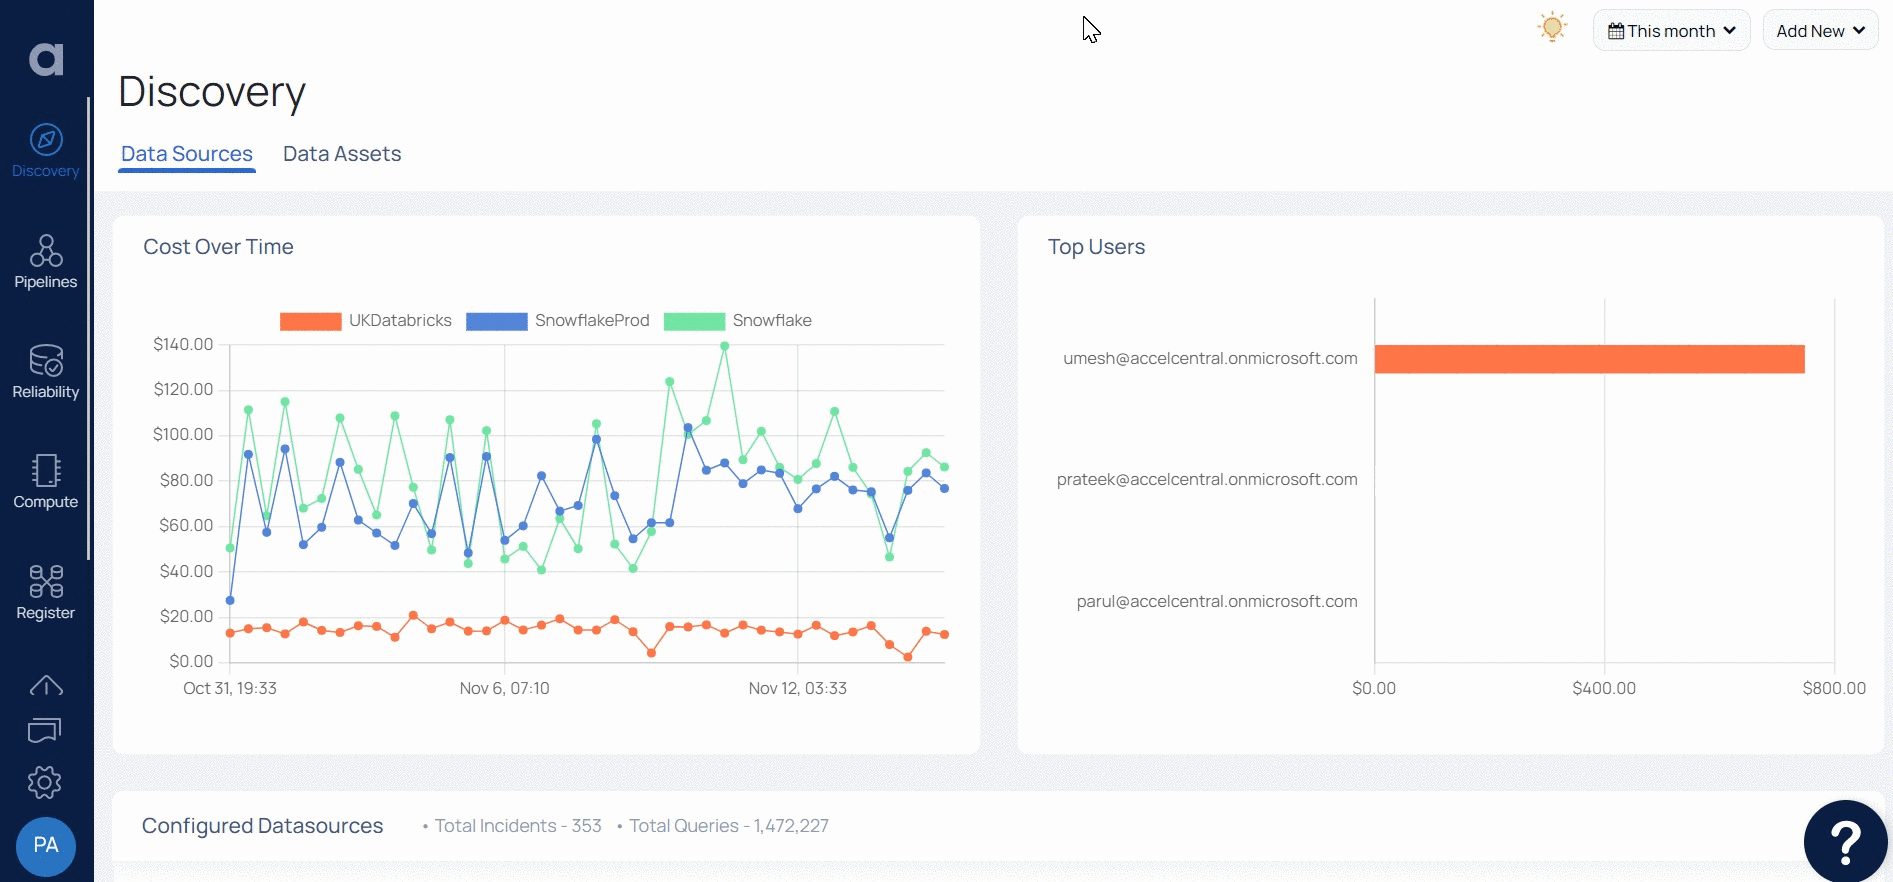
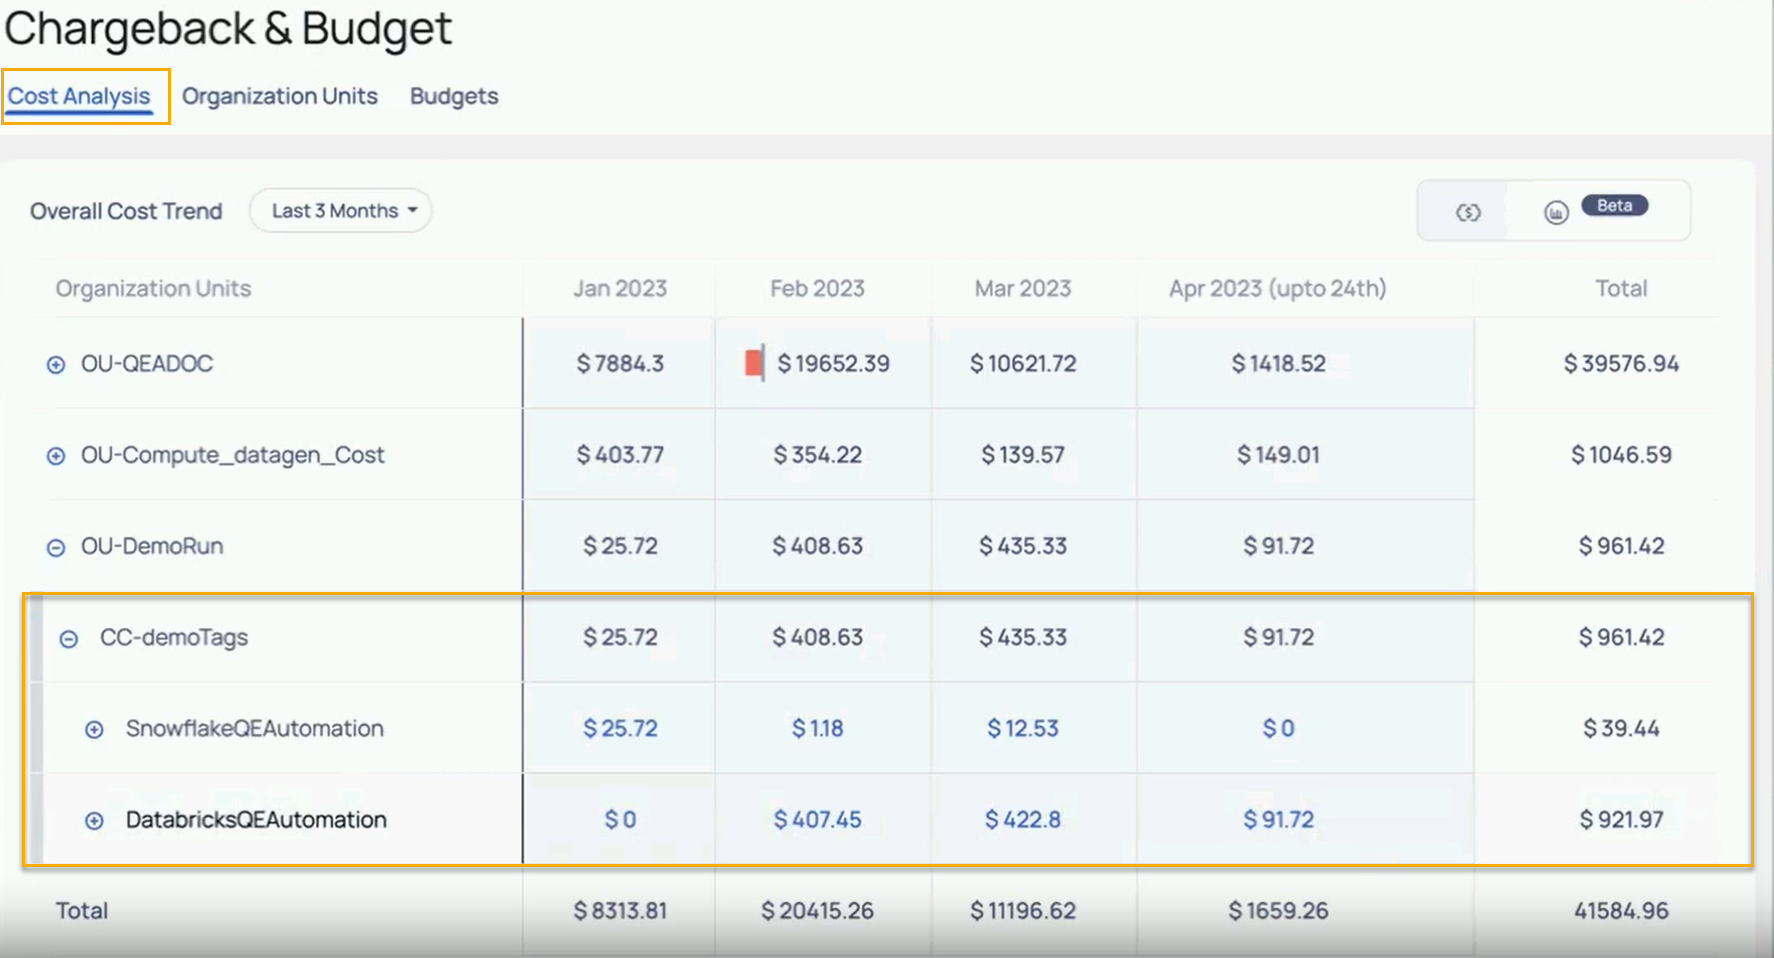
Cost Analysis
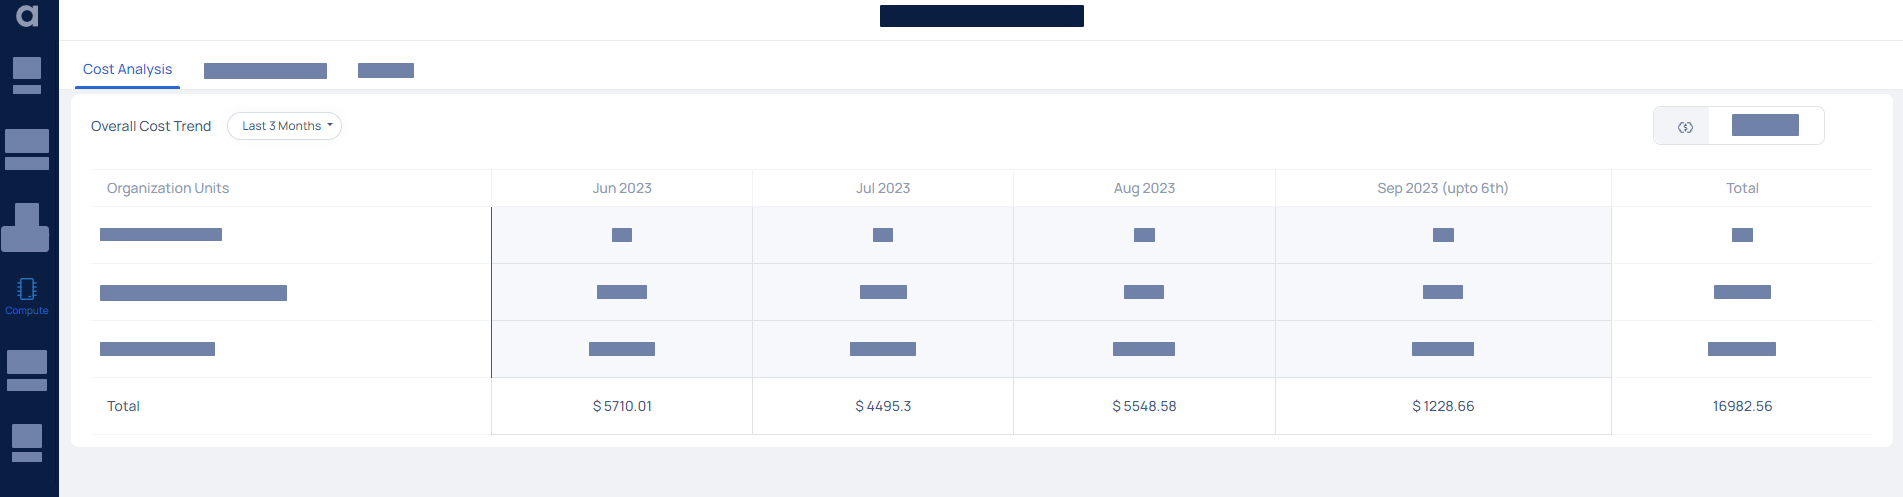
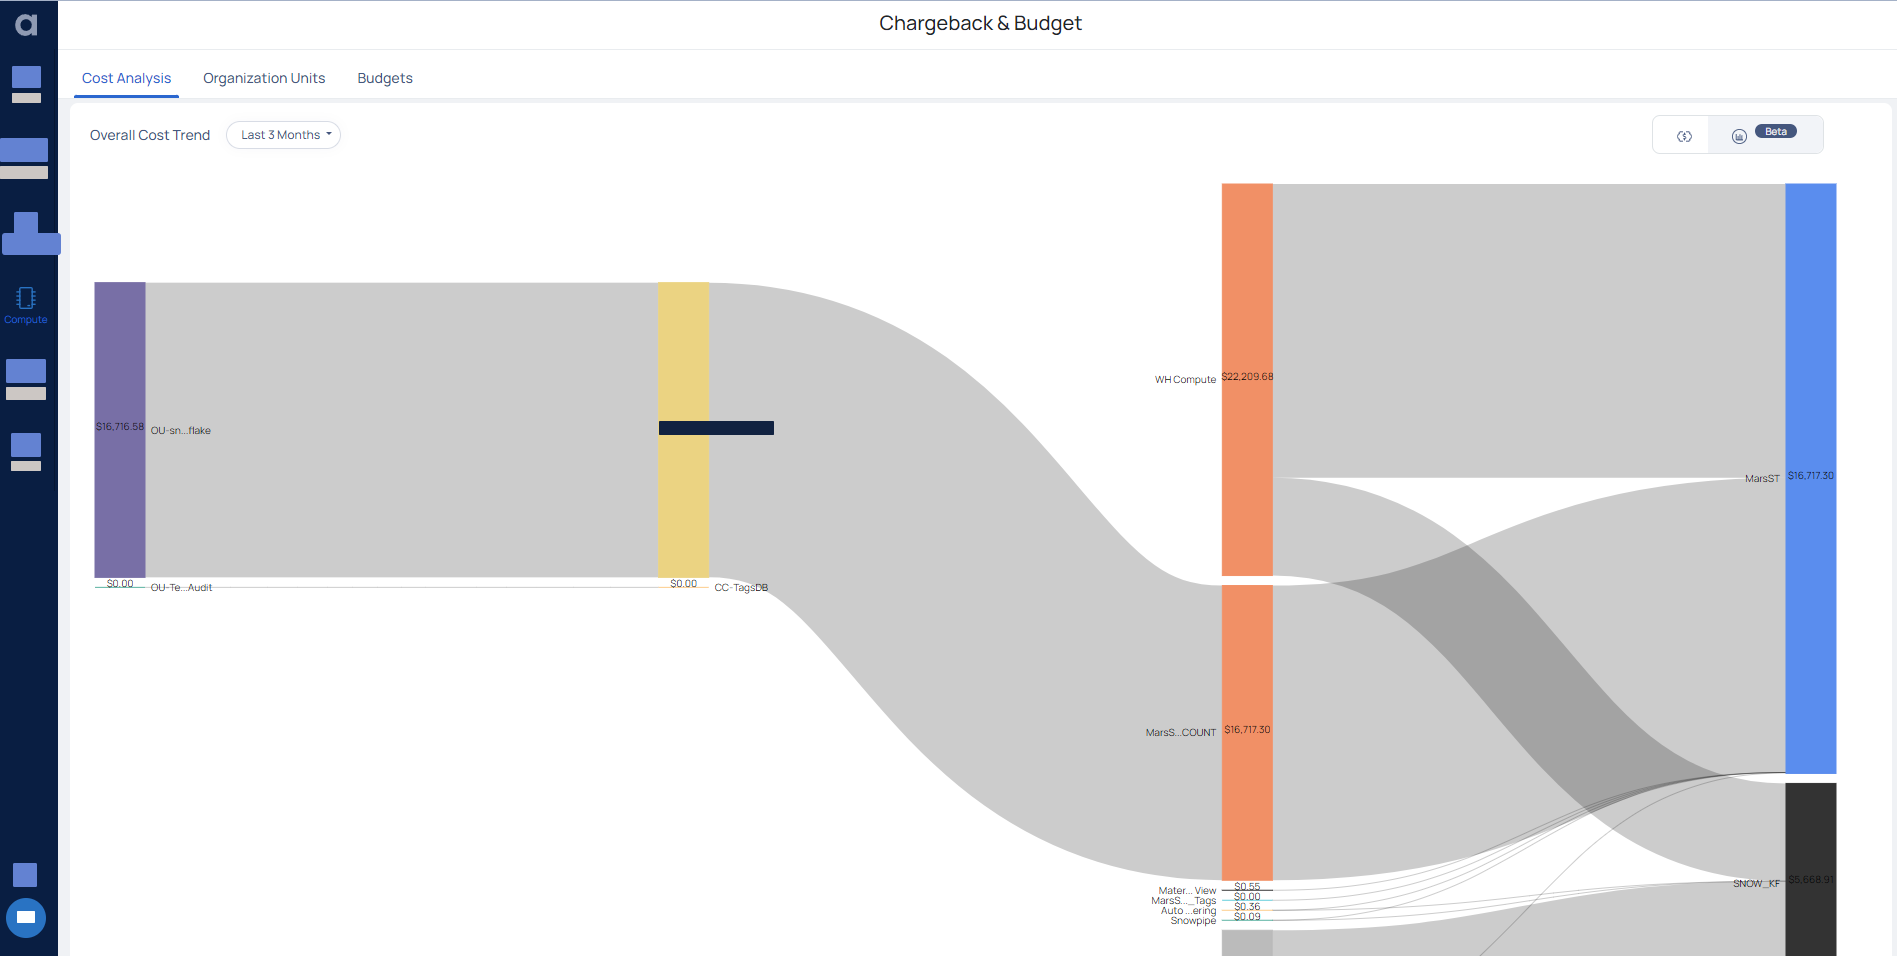
The Cost Analysis function of ADOC displays the overall cost trends for the selected time period. This function allows users to easily identify cost trends and patterns, helping them make informed decisions regarding budgeting and resource allocation. Additionally, the "Cost Analysis" function offers customizable filters and visualizations to further analyze cost data and gain deeper insights into spending patterns.
| Field | Description |
|---|---|
| Organization Units | The field exhibits the designation of the units for which the price is exhibited. |
| Data Period | The Overall Cost Trend section displays the period selected, such as the Last 3 months or Last 6 months. The period is shown in months, accompanied by the corresponding cost details in dollars. |
| Displays the cost in the tabular format. | |
| Displays the cost in graphical format. |
Organization Unit
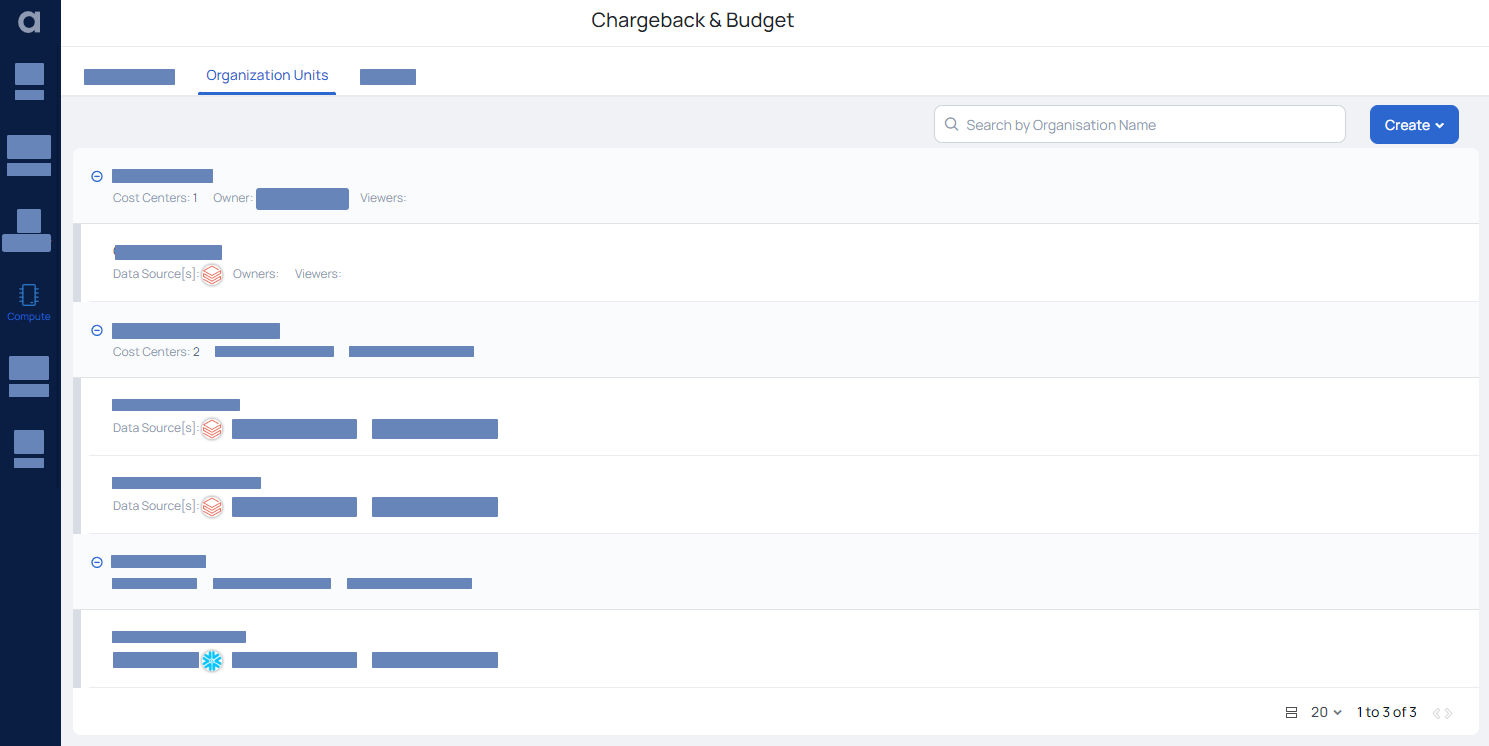
An OU is a division of a company. OU can be any department, such as engineering, sales, or marketing. You can utilize OUs to define hierarchies between departments in your organization. OUs incur a variety of expenses in order to complete their tasks. For example, an Engineering OU may incur license charges such as data platform costs (AWS, GCP, Snowflake, and so on), database licensing costs (Oracle DB, MS SQL, and so on).
How to create a Cost Centre?
- Login to ADOC.
- Click Compute > Chargeback > Organization Units
- Click Create and select Cost Centre.
- Enter the Cost Centre, Owner, Viewer, Org unit, fields
- Click Next
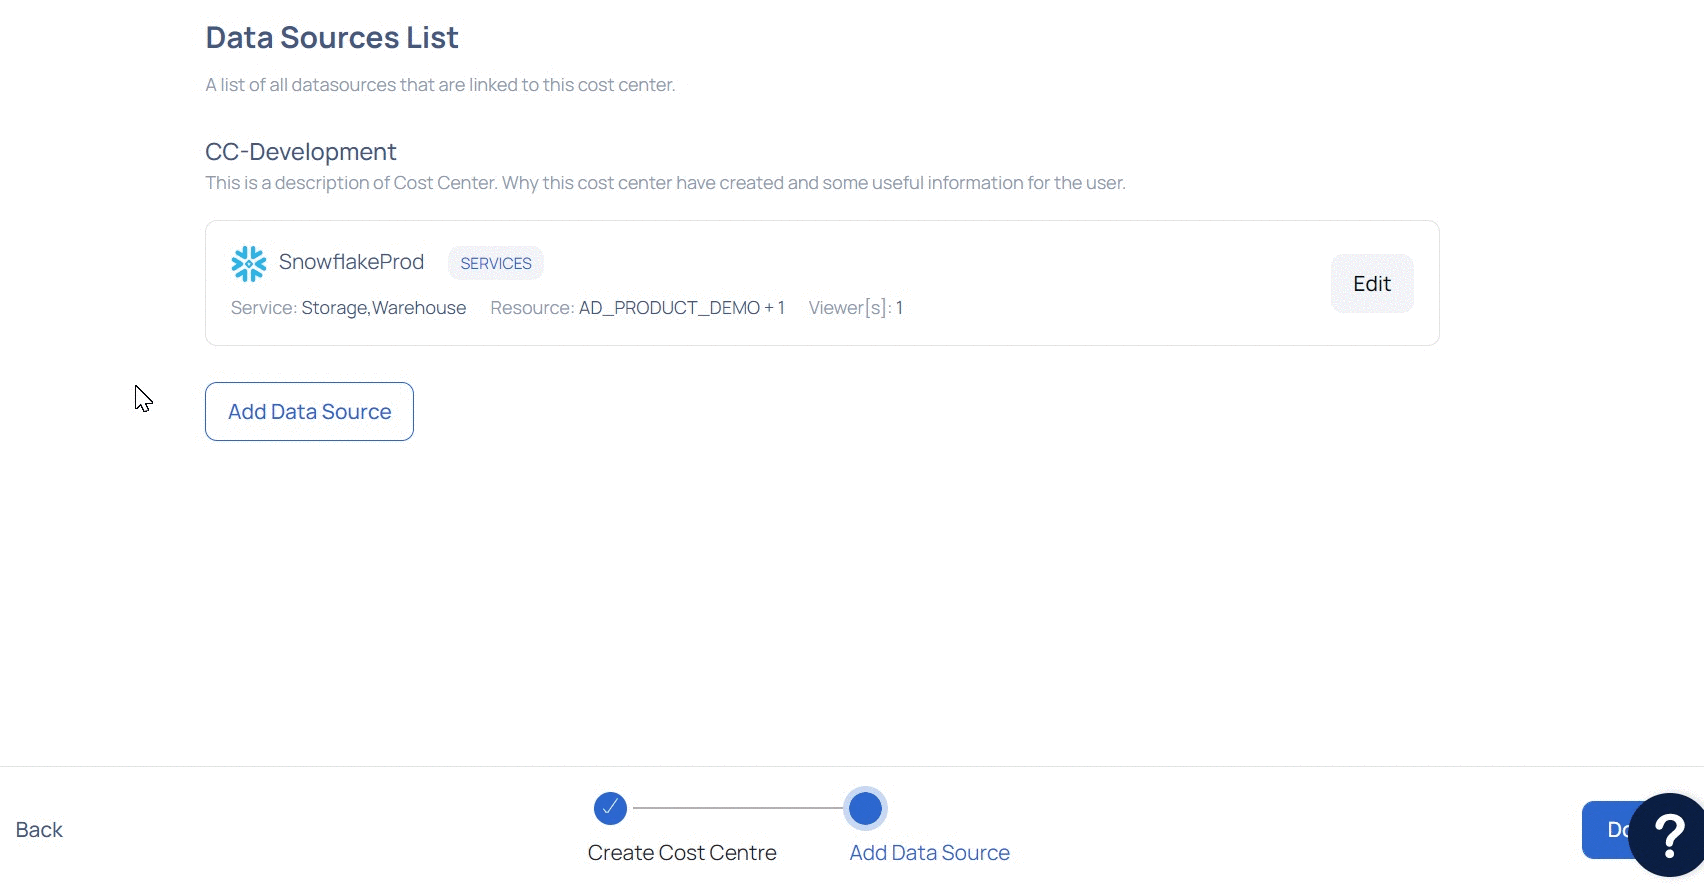
- The Data Source details page for the CC is displayed.
Enter the following Data Source details:
Data Source: Select your Data Source. ADOC supports multiple Data Sources to which you can link your CC.
Data Source Name: Select the name of your data source. This is applicable if you have multiple instances for the same data source.
Select Account: Select on of the following Scope.
- Entire Account: If you select this option, the entire data source account is dedicated to the CC.
- Services/Resources: If you select this option, only a limited set of resources or services from the data source are a part of the CC. You must also select which resources or services of this Data Source must be a part of this CC. The expenditure caused by the selected resources or services are billed only under this CC. In the image below (after step 9), two warehouses are added to the CC. The cost of these warehouses is billed only to this CC.
- Tags Pair: If you select this option, you must select the tags which must be a part of this CC. he expenditure caused by the selected tags are billed only under this CC.
Click Create.
You can see the newly created Cost Center on the Data Sources List page. This page displays list of Data Sources linked to the Cost Center.
To add more cost centers of various data sources, click Add Data Source.
From version 2.7.0 onwards you can now add Tag Pairs and add multiple key values.
Using Snowflake or Databricks Tag Pairs, create a chargeback-based cost center. You can now track costs by selecting the tag keys - tag values combinations.
In this example, let's try to add tags for Snowflake and Databricks and see how we can view them for more targeted analysis.
Tags Pair: If you choose this option, you must also choose the tag key-value pairs that must be part of this cost center. The expenses associated with the selected tags are billed only under this Cost center.
Snowflake
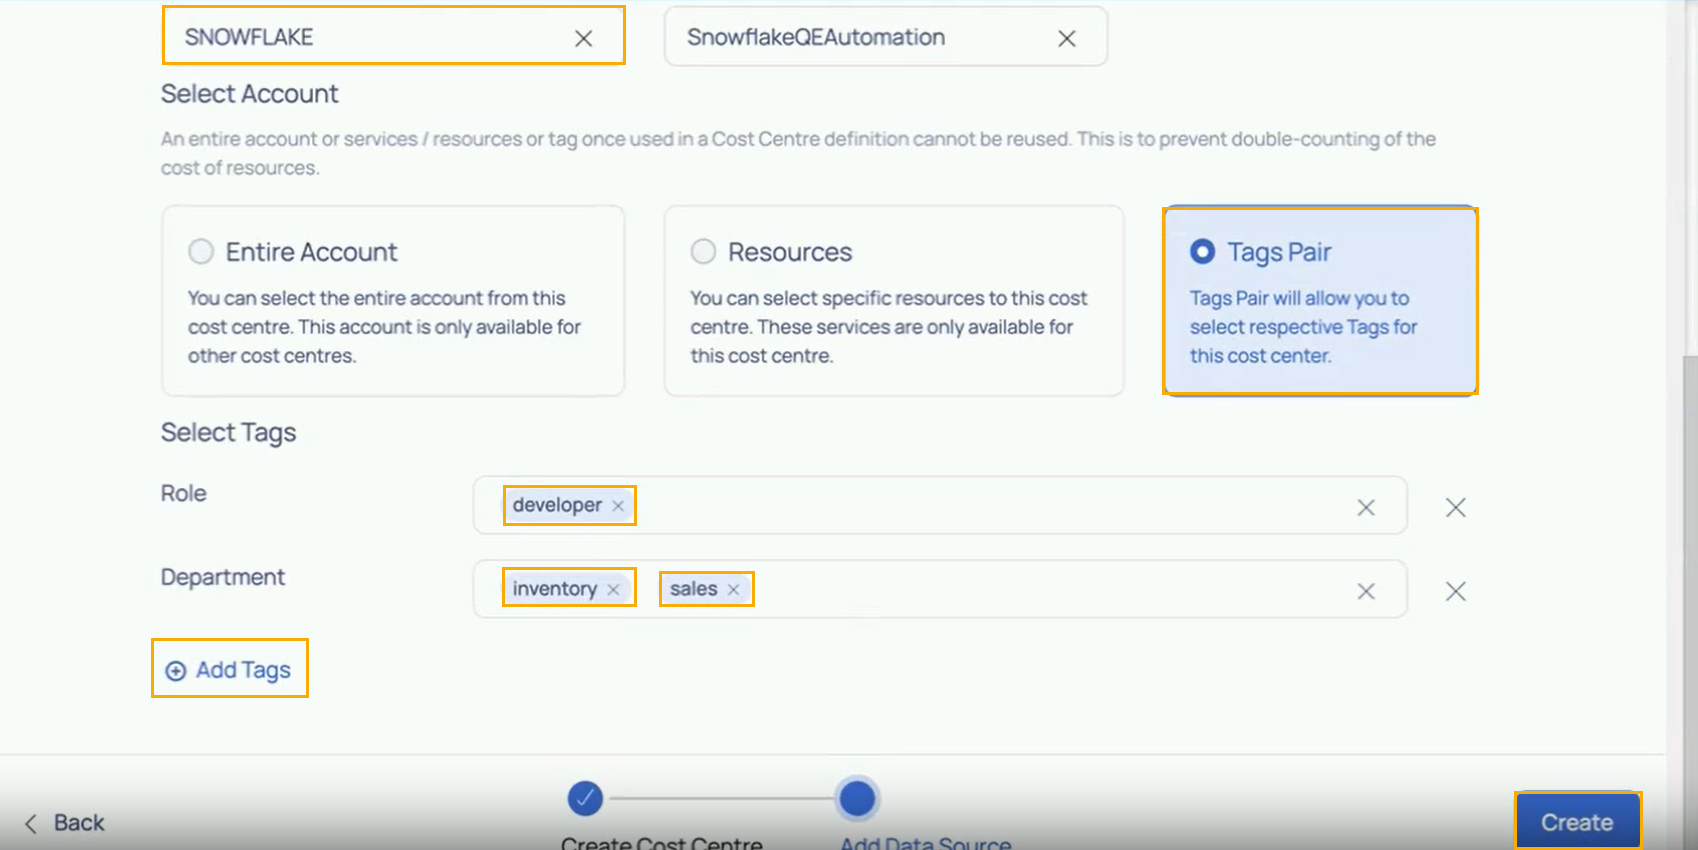
Add Tags: To add multiple key values SnowFlake
Databricks
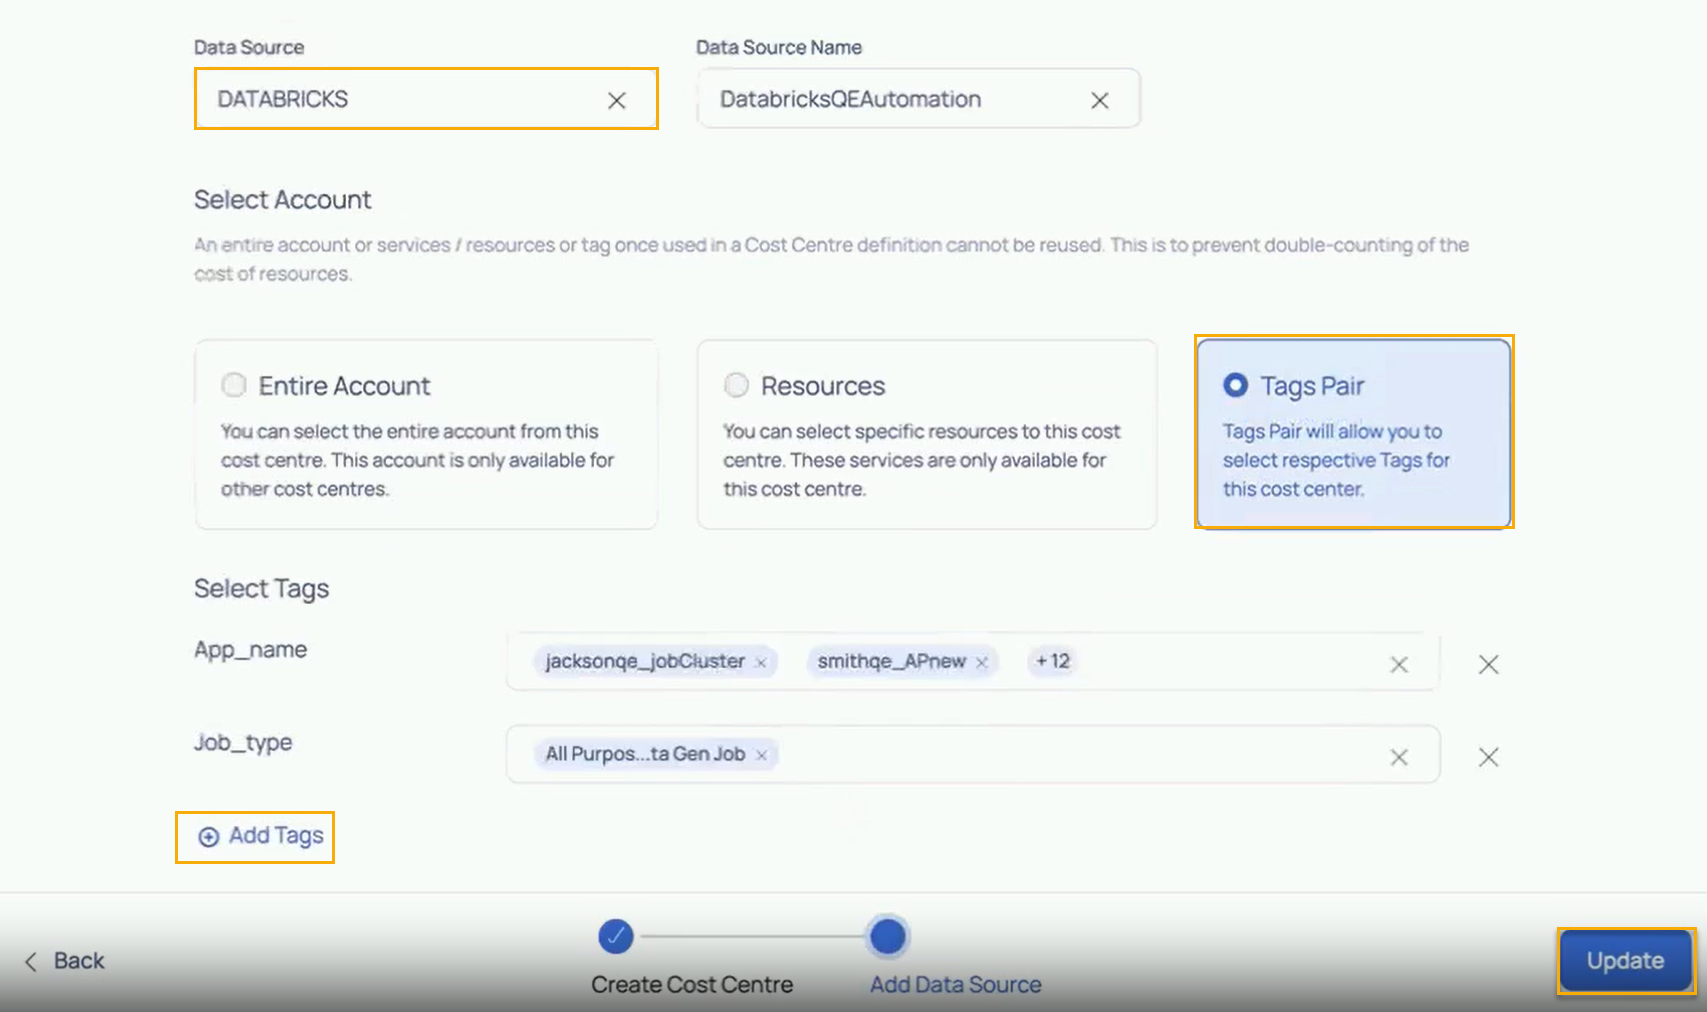
Add Tags: To add multiple key values Databricks
Now go to the Listing page Cost Analysis tab and you will see the sum total of all the costs that was added based on the tags applied.
Cost -Based on tags selected
This feature increases cost monitoring flexibility and control by allowing for more targeted analysis and optimization of spending across specific resources or departments within the account. Furthermore, it can aid in the identification of areas where cost-cutting measures can be implemented to improve overall efficiency and profitability.
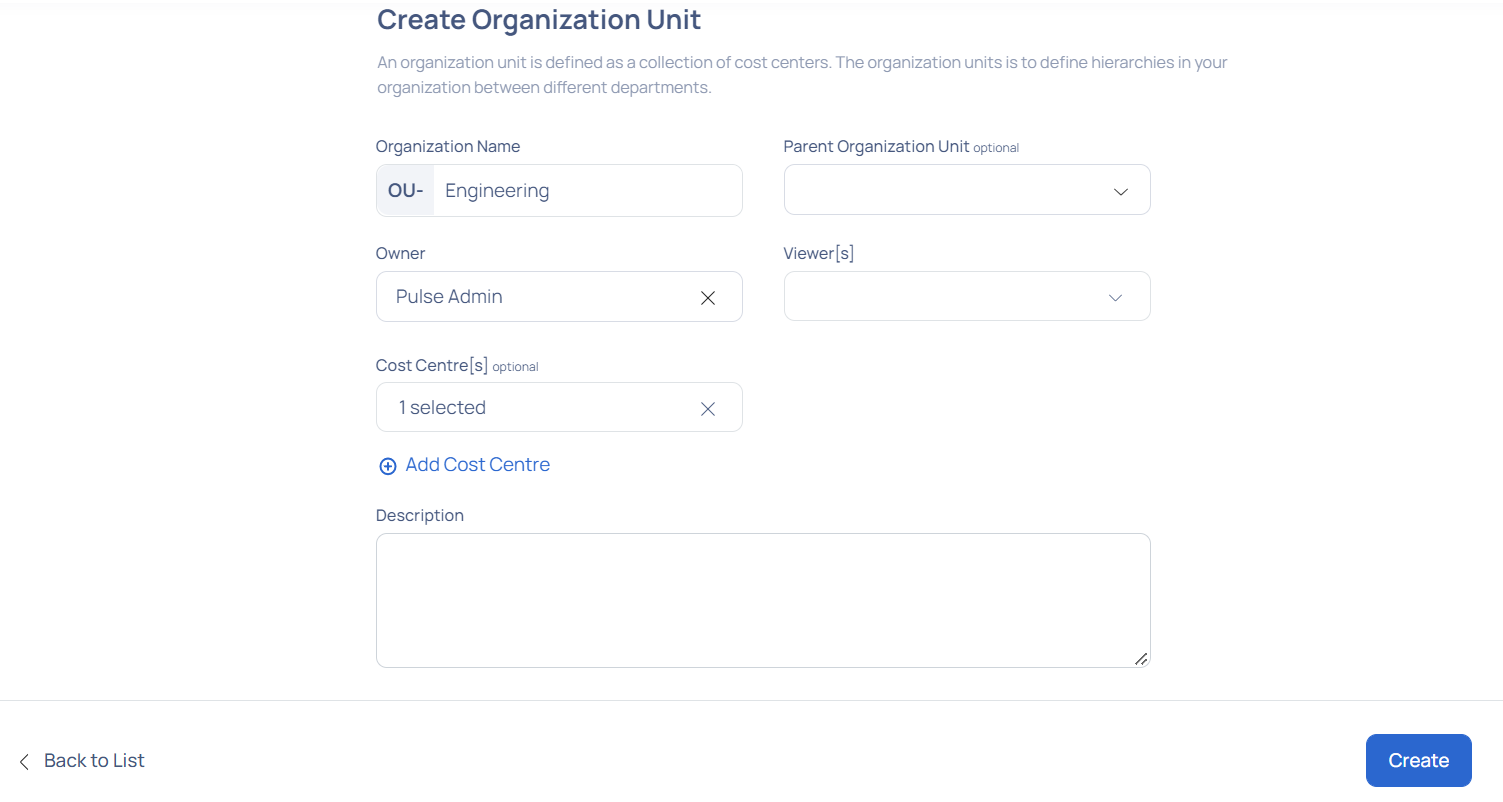
How to create a Organization Unit?
Login to ADOC.
Click Compute > Chargeback > Organization Units
Click Create and select Organization Units.
Enter the data in the following fields:
- Organization Name: Enter a name for your OU. OU is automatically prefixed to all OU names.
- Parent Organization Unit: Select a parent OU for the current OU, to make this a child OU of another OU. This field is optional.
- Owner: Select an owner for the OU.
- Viewer: Select the viewers for the OU.
- Cost Centre[s]: Select the cost centres that you want to include under this OU. This field is optional and you can create OU without selecting any CC. To create a new CC, click Add Cost Centre.
- Description: Add an optional description to your OU.
Click Create.
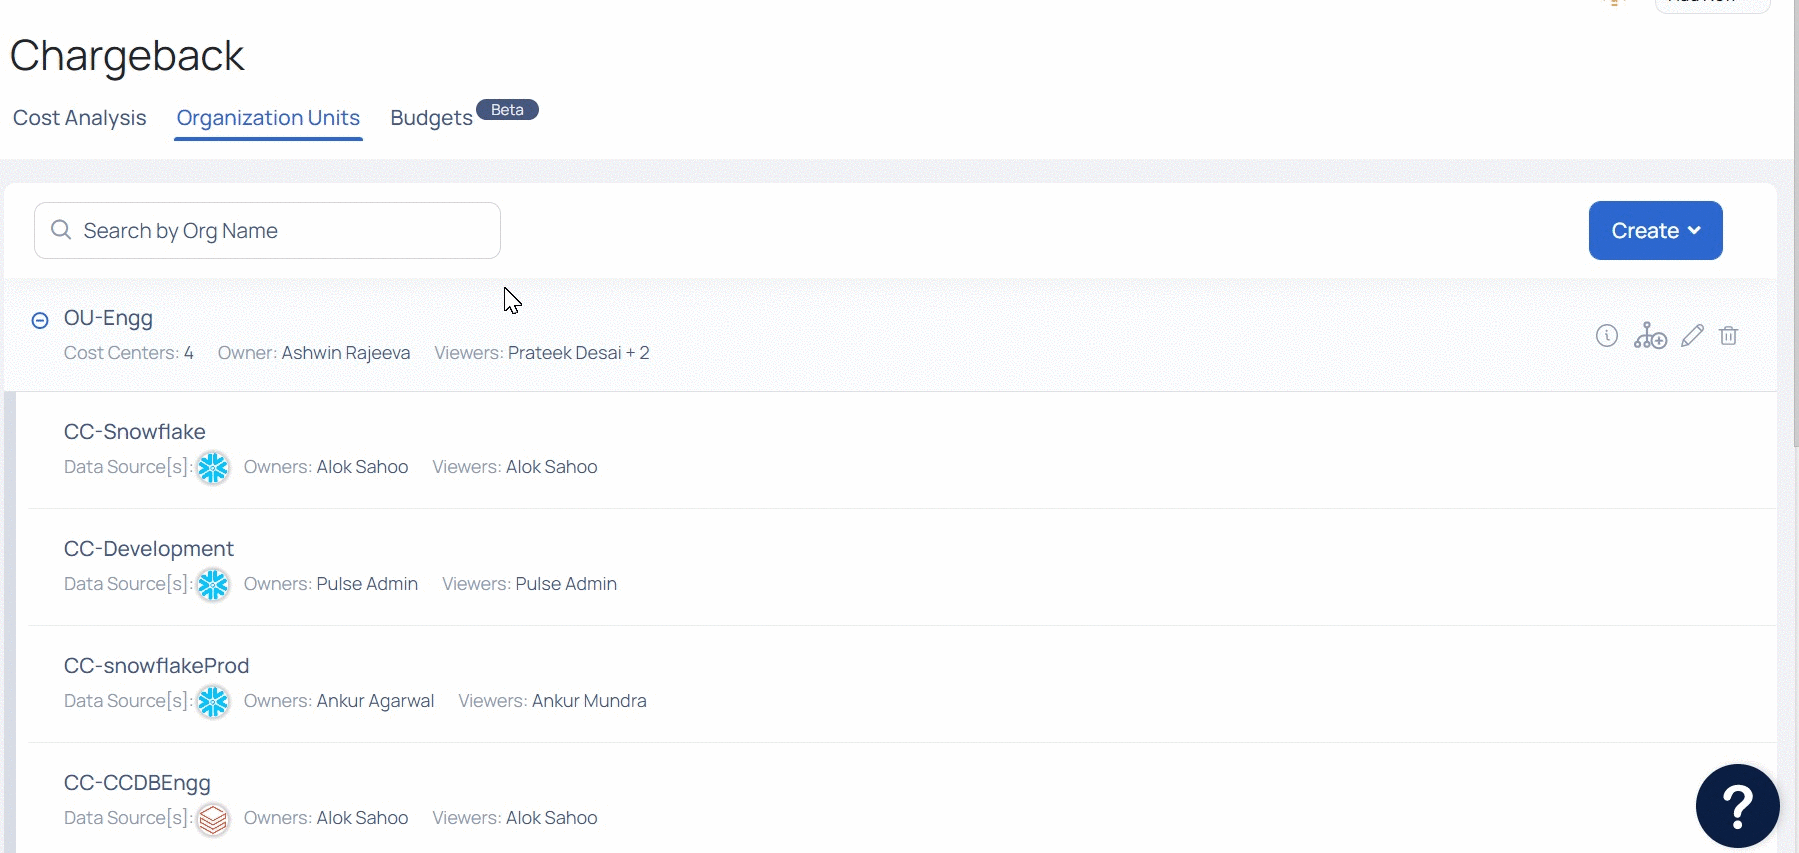
How to edit Organization Unit and Cost Centre?
When you establish an OU or CC, it appears on the page. Under their parent OUs, CCs and sub OUs are listed. To view an OU's child OUs and CCs, click the + button next to it.
To add child OUs, click the Add a child organization Unit for an OU button. You can edit an OU, child OU, or CC by clicking the edit icon. You can delete the OU, child OU, or CC by clicking the Delete button.
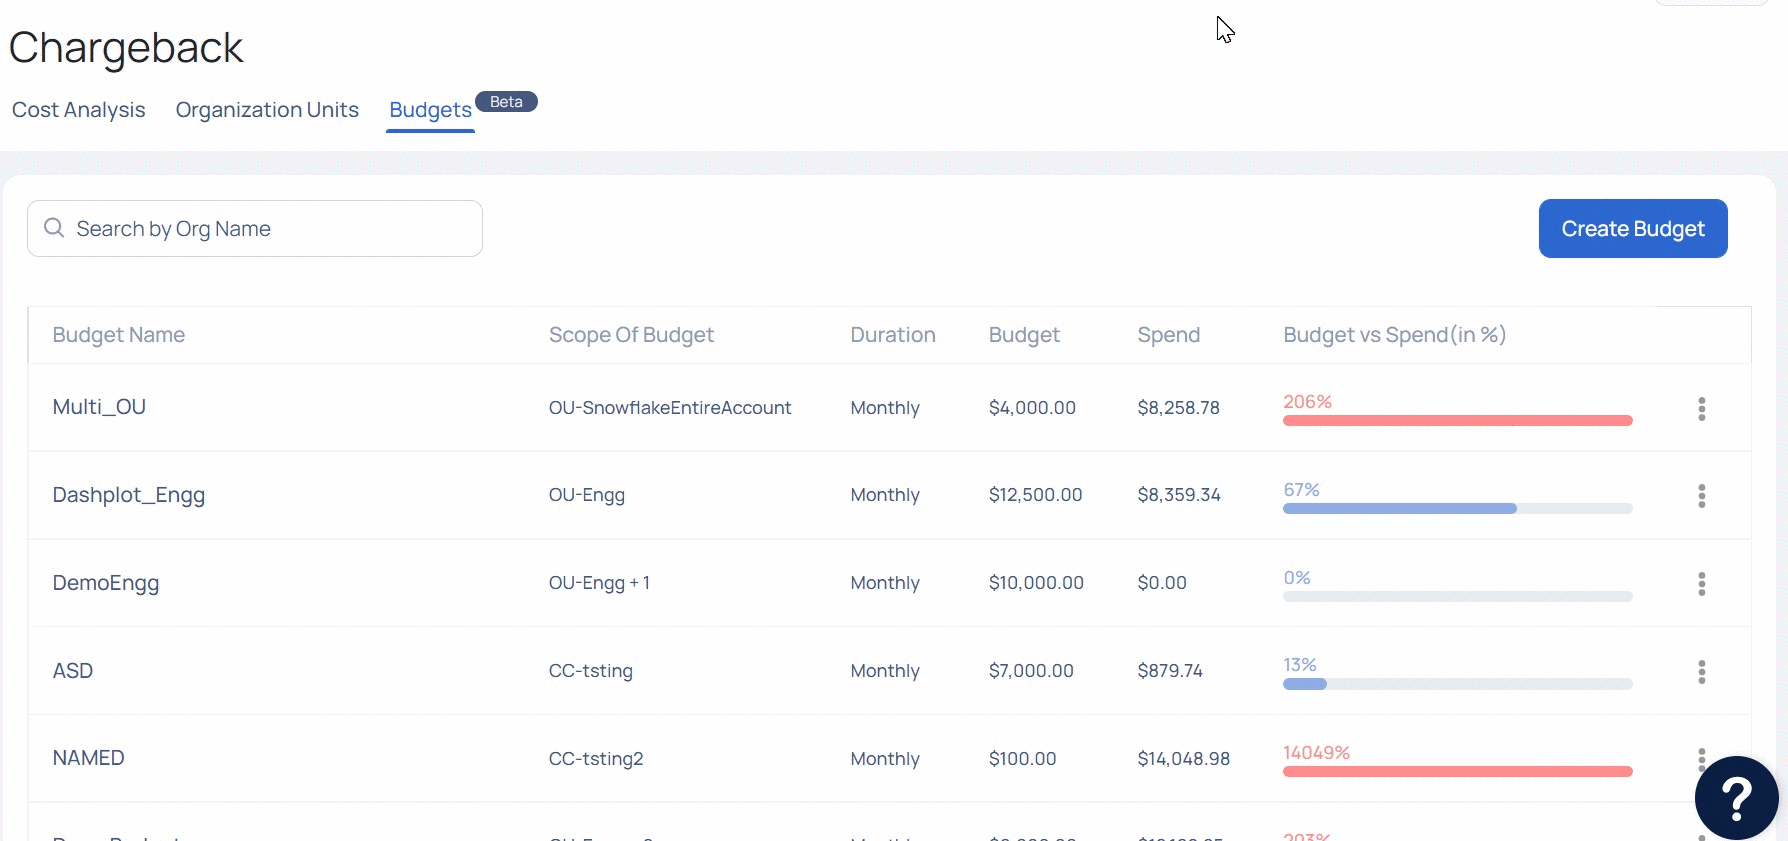
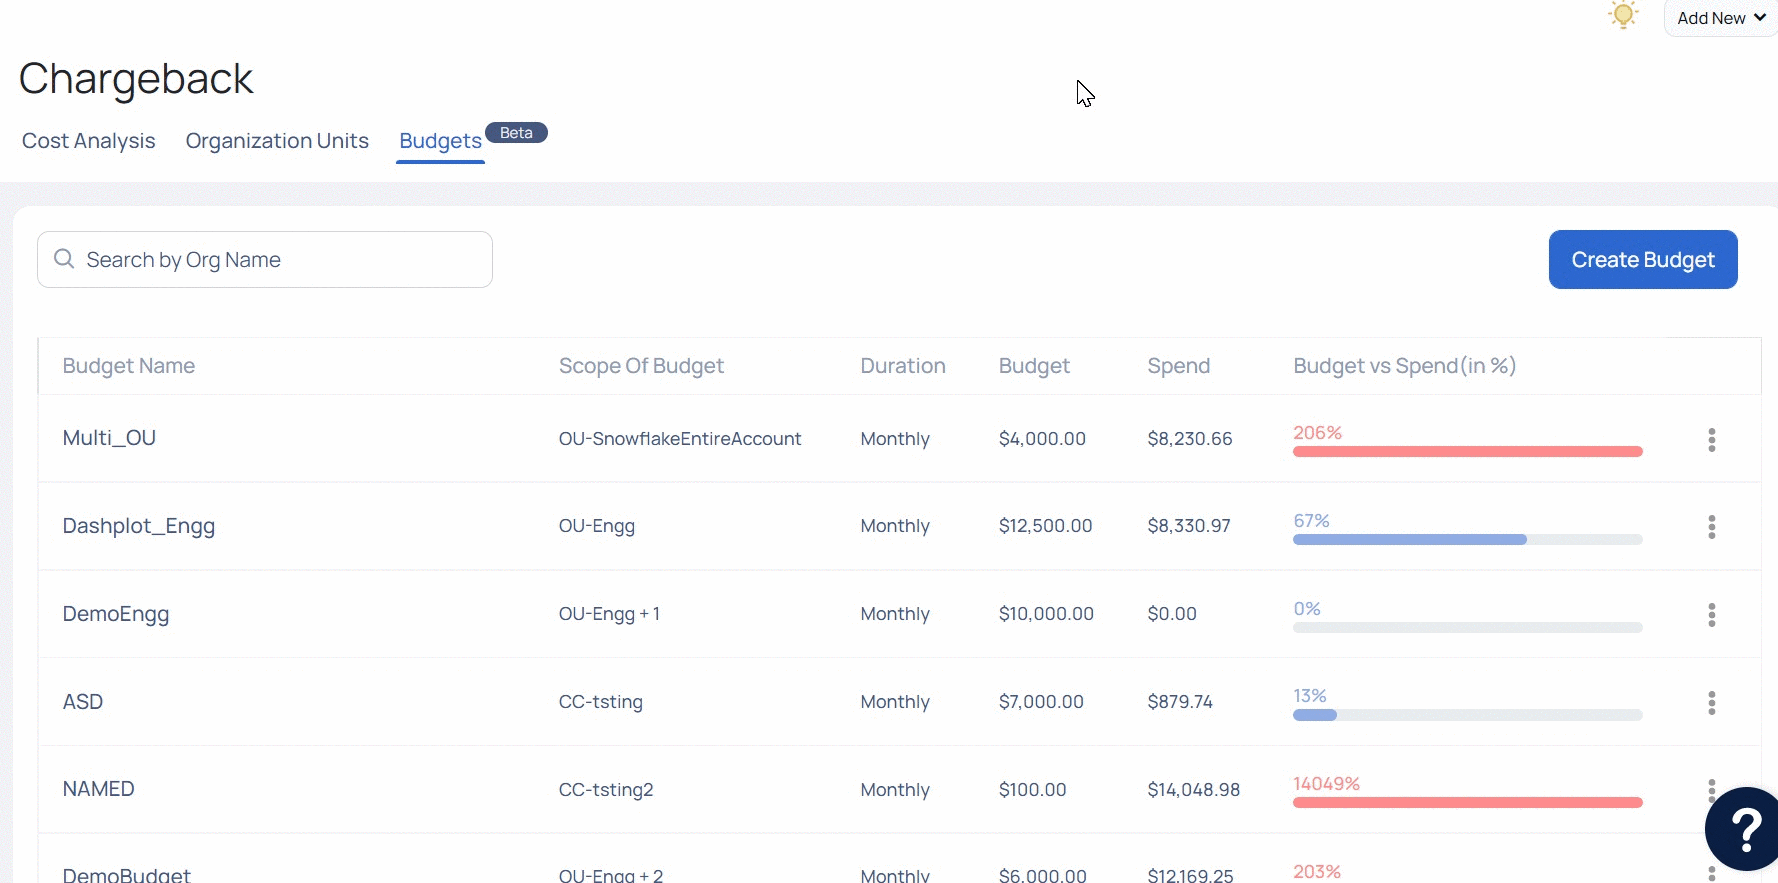
Budgets
Chargeback's Budgeting tool allows you to create budgets based on your organization's needs. Once you've established a budget, you may track your spending and see how close you are to meeting it. ADOC also allows you to set notifications for when your expenses approach your budget limit.
You can use this option to establish numerous budgets for each department in your organization, as well as multiple budgets for each quarter.
| Column | Description |
|---|---|
| Budget Name | The name of the budget. |
| Scope of Budget | The scope of the budget. This can be organization unit or Cost Center. |
| Duration | The total duration of the budget. |
| Budget | The actual amount of the budget. |
| Spend | The total expenditure incurred. |
| Budget vs Spend | The percentile difference between actual budget and actual spend. |
| Ellipsis menu | You can use this menu to edit or delete a budget. |
How do I create a budget?
You can create multiple budgets on Organization Units and Cost Centers.
- Click Create Budget.
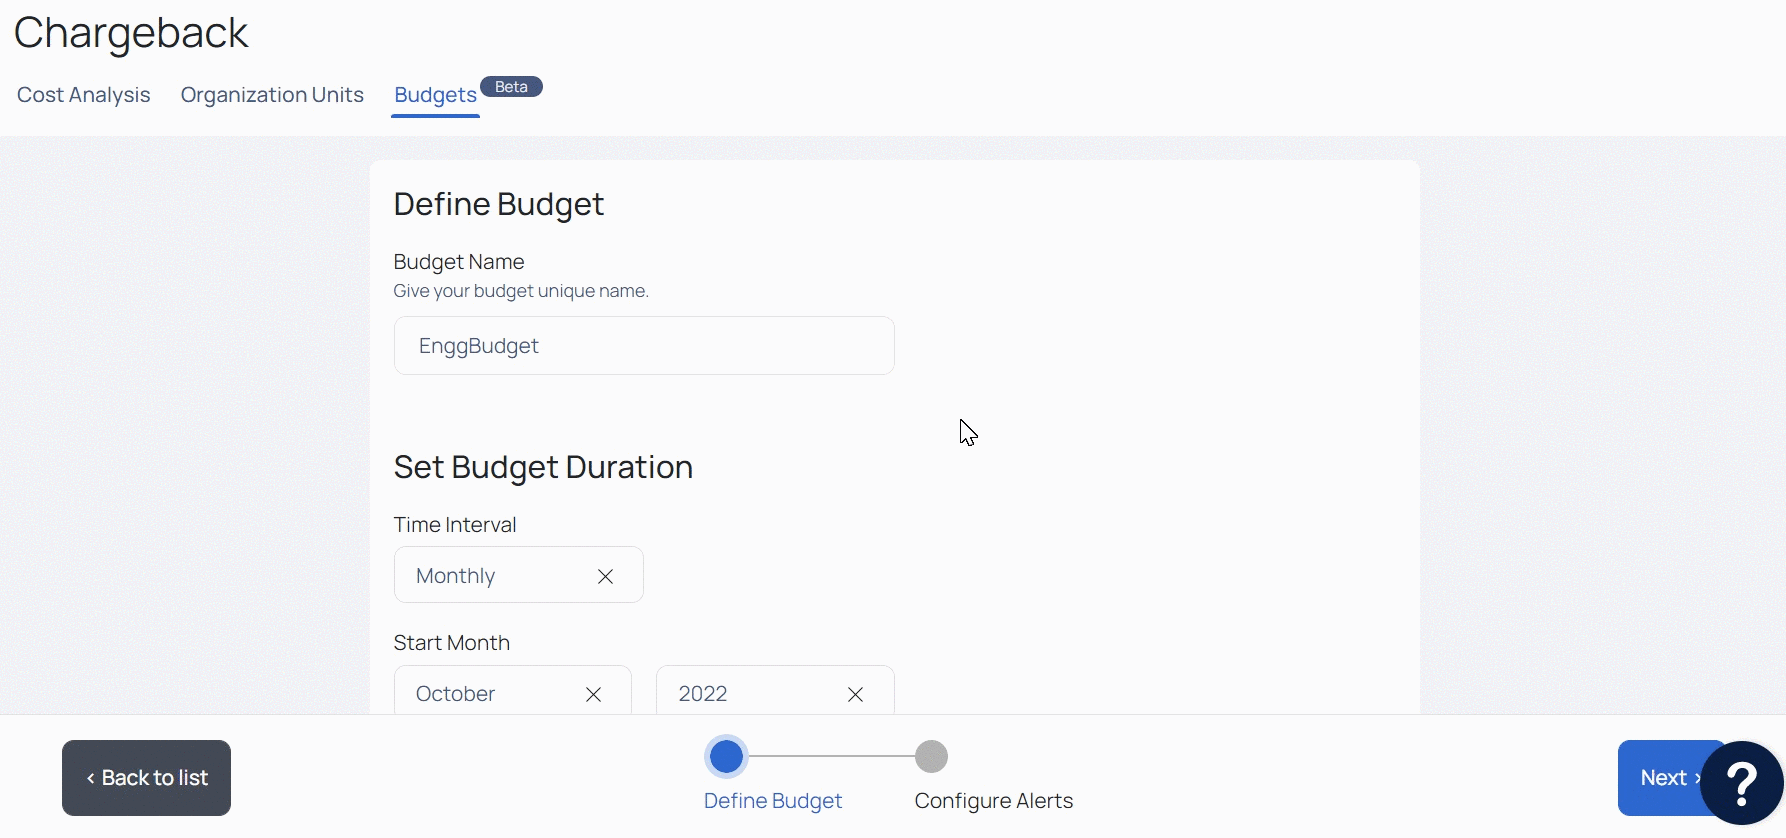
- Enter a name for the budget in the Budget Name field.
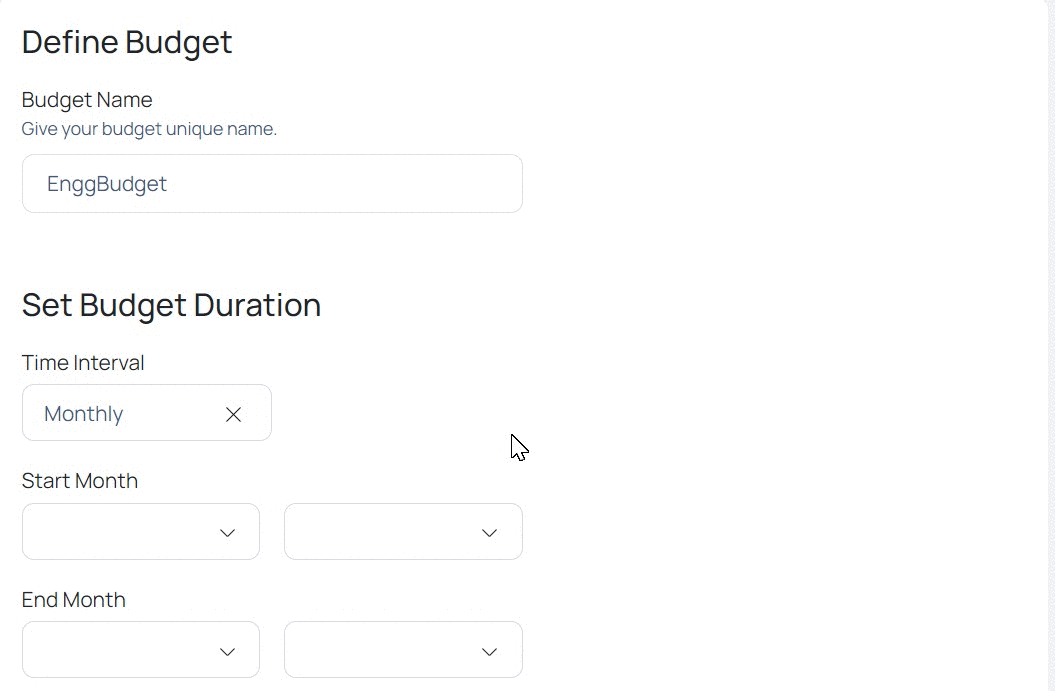
1. Set a Budget Duration?
In the Budget Duration section, you must set the start and end date of the budget. If you want to continue a Budget for indefinite time period, do not set the end date for the budget. You must also set the time interval of the budget. Time interval can be either Monthly, Quarterly, or Yearly.
If you set $100000 as your budget and set the time interval to be Monthly, ADOC considers $100000 as the total budget amount for each month, starting from budget start date to budget end date.
To configure budget duration:
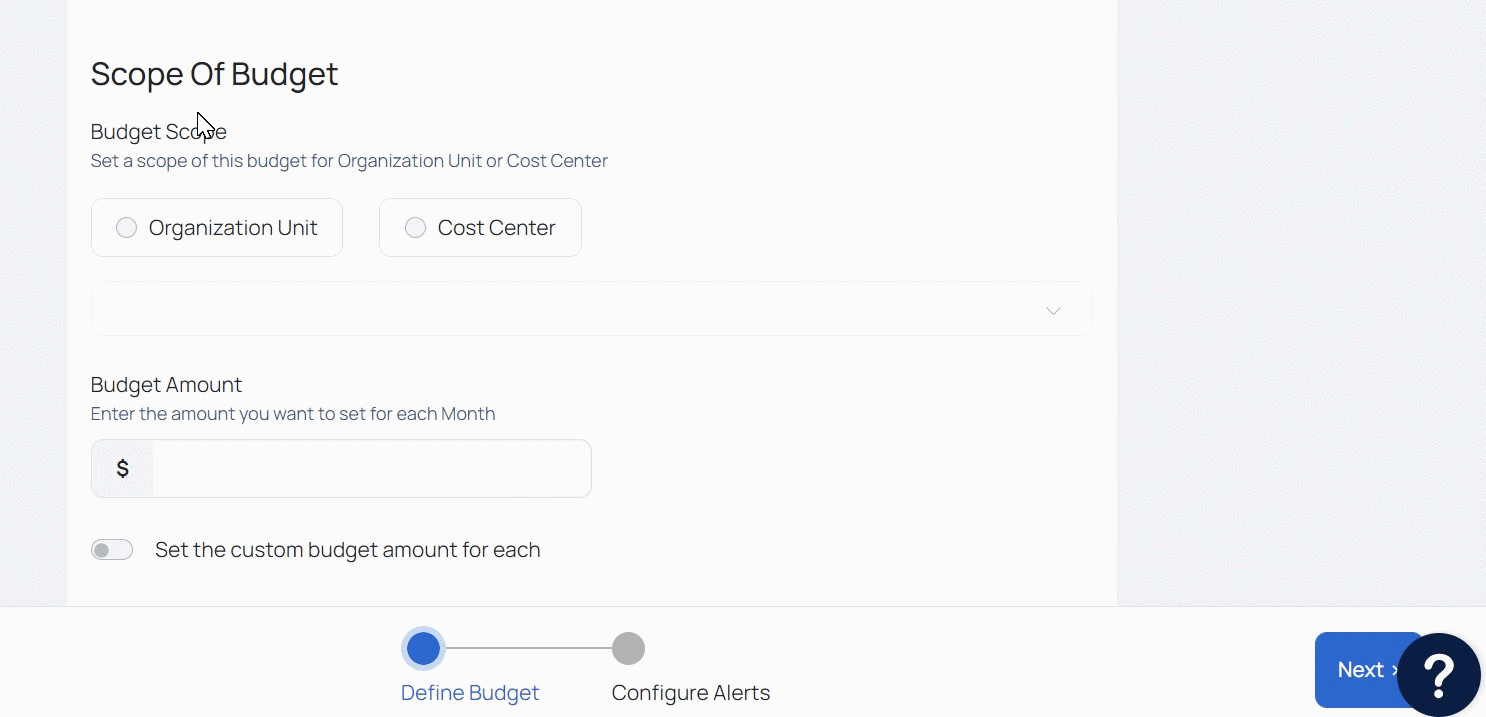
2. Set Budget Scope and Amount
In this section, you can set the scope of the budget. The scope defines if the Budget is created for an Organization Unit or a Cost Center. You can set the scope of the budget either to an Organization Unit or a Cost Center and not both. However, when you set the scope of the budget to Organization Unit, the budget is also applicable to all the Cost Centers that are part of the Organization Unit. You can set the scope for multiple Organization Units/Cost Centers. You can also divide the budget among various Organization Units/Cost Centers.
To configure the Budget Scope:
- Select either Organization Unit or Cost Center in the Budget Scope field.
- Select the Organization Unit(s)/Cost Center(s) which must be part of the budget.
- Enter the total budget amount in the Budget Amount field.
In the following image, two Organization units are selected and the total budget amount is $10000.
The $10000 is applicable to both the Organization Units selected. However, if you want to distribute this budget amount among both the Organization units, you can do so by using the Set the custom budget amount for each Organization Unit toggle button. When you enable this toggle button, you can divide the total budget amount among the Organization Units/Cost Centers for which the budget is created.
In the following image, the total budget of $10000 is equally distributed among both the Organization units.

3. Set Threshold and Configure Notifications
The Threshold settings allow you to define thresholds at two levels;
Warning : You can set the warning threshold when your expenditures are very close to your total budget.
Critical. You can set the critical threshold when you are almost about to exhaust your set budget.
For example, if your budget is $10,000, you can establish a critical threshold of $8000 (80% of the money used). When your expenditure hits $9000 (90% of the budget), you can set the Critical threshold. Both the Warning and Critical thresholds must have percentile values entered. ADOC generates the amount automatically based on the percentage value entered.
From Version 2.7.0 onwards you can now set a trigger based on Forecast and Actual threshhold. If your expected spend based on current consumption exceeds a given budget benchmark, you can now receive a notification and have time to act on it.

You can set the alert notifications by selecting the Notification Channels. When your budget reaches either the Warning or Critical stage, all the members who are part of the selected notifications channels are notified about the event. An incident is also generated in the Alert Management page.
Click Submit once all the configurations are completed. You can see the Budget now appears on the list of Budgets.
When the budget hits its predetermined levels, an alert is generated.
How do I make changes to my budget?
update delete
You cannot change the budget's name, time interval, start date, or start year.
You cannot modify the scope from Organization Unit to Cost Center or vice versa.
You can, however, add or subtract Organization Units/Cost Centers from the budget.
You can, however, add or subtract Organization Units/Cost Centers from the budget.