Managing Workflows
Use this guide to create, edit, pause, resume, and delete workflows in xDP.
Create a Workflow
Navigate to Workflows from the left menu.
Click + Create Workflow (or Create Your First Workflow if none exist).
In the Workflow Configuration panel on the right, enter a Workflow Name and optional Description.
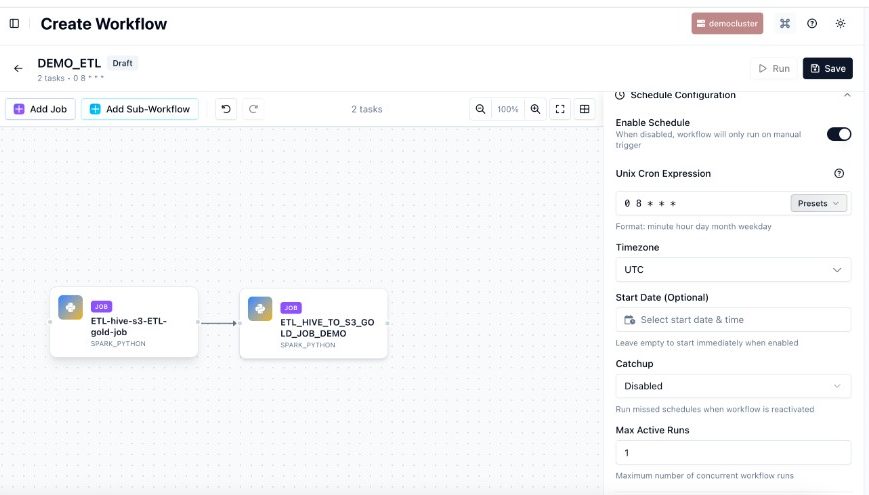
To run on a schedule, expand Schedule Configuration, toggle Enable Schedule, and enter a Unix Cron Expression (e.g.,
0 8 * * *for daily at 8:00 AM UTC). Set the Timezone and optional Start Date.Click + Add Job in the toolbar to add a task node to the canvas. In the right panel, use Select Job from Cluster to choose an existing Spark job.
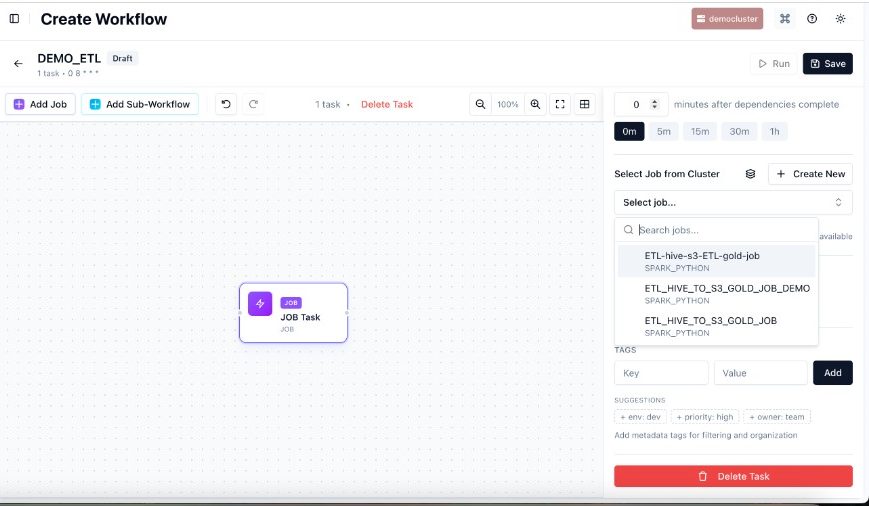
Repeat for additional tasks. Draw dependency edges by dragging from the output handle (right side) of one task to the input handle (left side) of the next.
Click Save. The workflow appears in the list with Active status.
Tip: Enable Catchup only if you need the scheduler to backfill missed runs after downtime. For most pipelines, leave it disabled.
Edit a Workflow
On the Workflows list, click the Edit (pencil) icon in the Actions column for the workflow.
The workflow canvas opens. Add, remove, or reconnect tasks as needed. Click a task node to change its job selection or settings.
To update the schedule, click the canvas background to open the Schedule Configuration panel and change the cron expression.
Click Save to apply changes.
Tip: To replace the Spark job on a task, click the task node, clear the current job using the × in the selection field, then search for and select the new job.
Pause and Resume a Schedule
Pausing stops automatic scheduled runs without deleting the workflow. You can still trigger it manually while paused.
To pause: In the Actions column, click the Pause icon (||). The status changes from Active to Paused.
To resume: Click the Resume icon (▶) next to the paused workflow. The status returns to Active.
Alternative — disable via editor: Open the workflow editor, click the canvas background, toggle Enable Schedule off, then click Save. Use this for longer-term or permanent deactivation.
Delete a Workflow
Warning: Deletion is permanent. The workflow configuration and schedule are removed and cannot be recovered. Workflows referenced as sub-workflows in other workflows cannot be deleted.
On the Workflows list, click the Delete (trash) icon in the Actions column.
Confirm the deletion in the dialog.
Tip: If you might need the workflow again, pause it first rather than deleting it immediately.
Best Practices
Pause before editing structural changes (adding/removing tasks) to avoid triggering runs with a partially updated DAG.
Use consistent naming such as
<team>_<source>_<purpose>for discoverability.Keep Max Active Runs at 1 for resource-intensive pipelines to avoid overlap with the next scheduled run.
Check sub-workflow dependencies before deleting — workflows used as sub-workflows in other workflows are blocked from deletion.