This page provides instructions for setting up "Hive/Impala ODBC and JDBC on Windows or Linux using the Simba OEM ODBC Drivers.
Download Links
For details about downloading the driver links, contact Acceldata Support.
Download Simba Drivers
For details about Hive and Impala Simba Drivers, contact Acceldata Support.
Set up the Hive and Impala ODBC on Windows
This page provides instructions for setting up Hive and Impala ODBC on Windows using the Simba OEM ODBC Drivers.

Windows HIVE/Impala ODBC
You can reach out to the Acceldata Support. team by submitting a support ticket to obtain the HIVE and Impala ODBC Driver.
Download Links
Impala Documentation:
- OEM ODBC Driver Installation Instructions
- Simba Apache Impala ODBC Data Connector
Installation Steps
Follow the below steps to install the Simba OEM ODBC Driver for Hive on Windows.
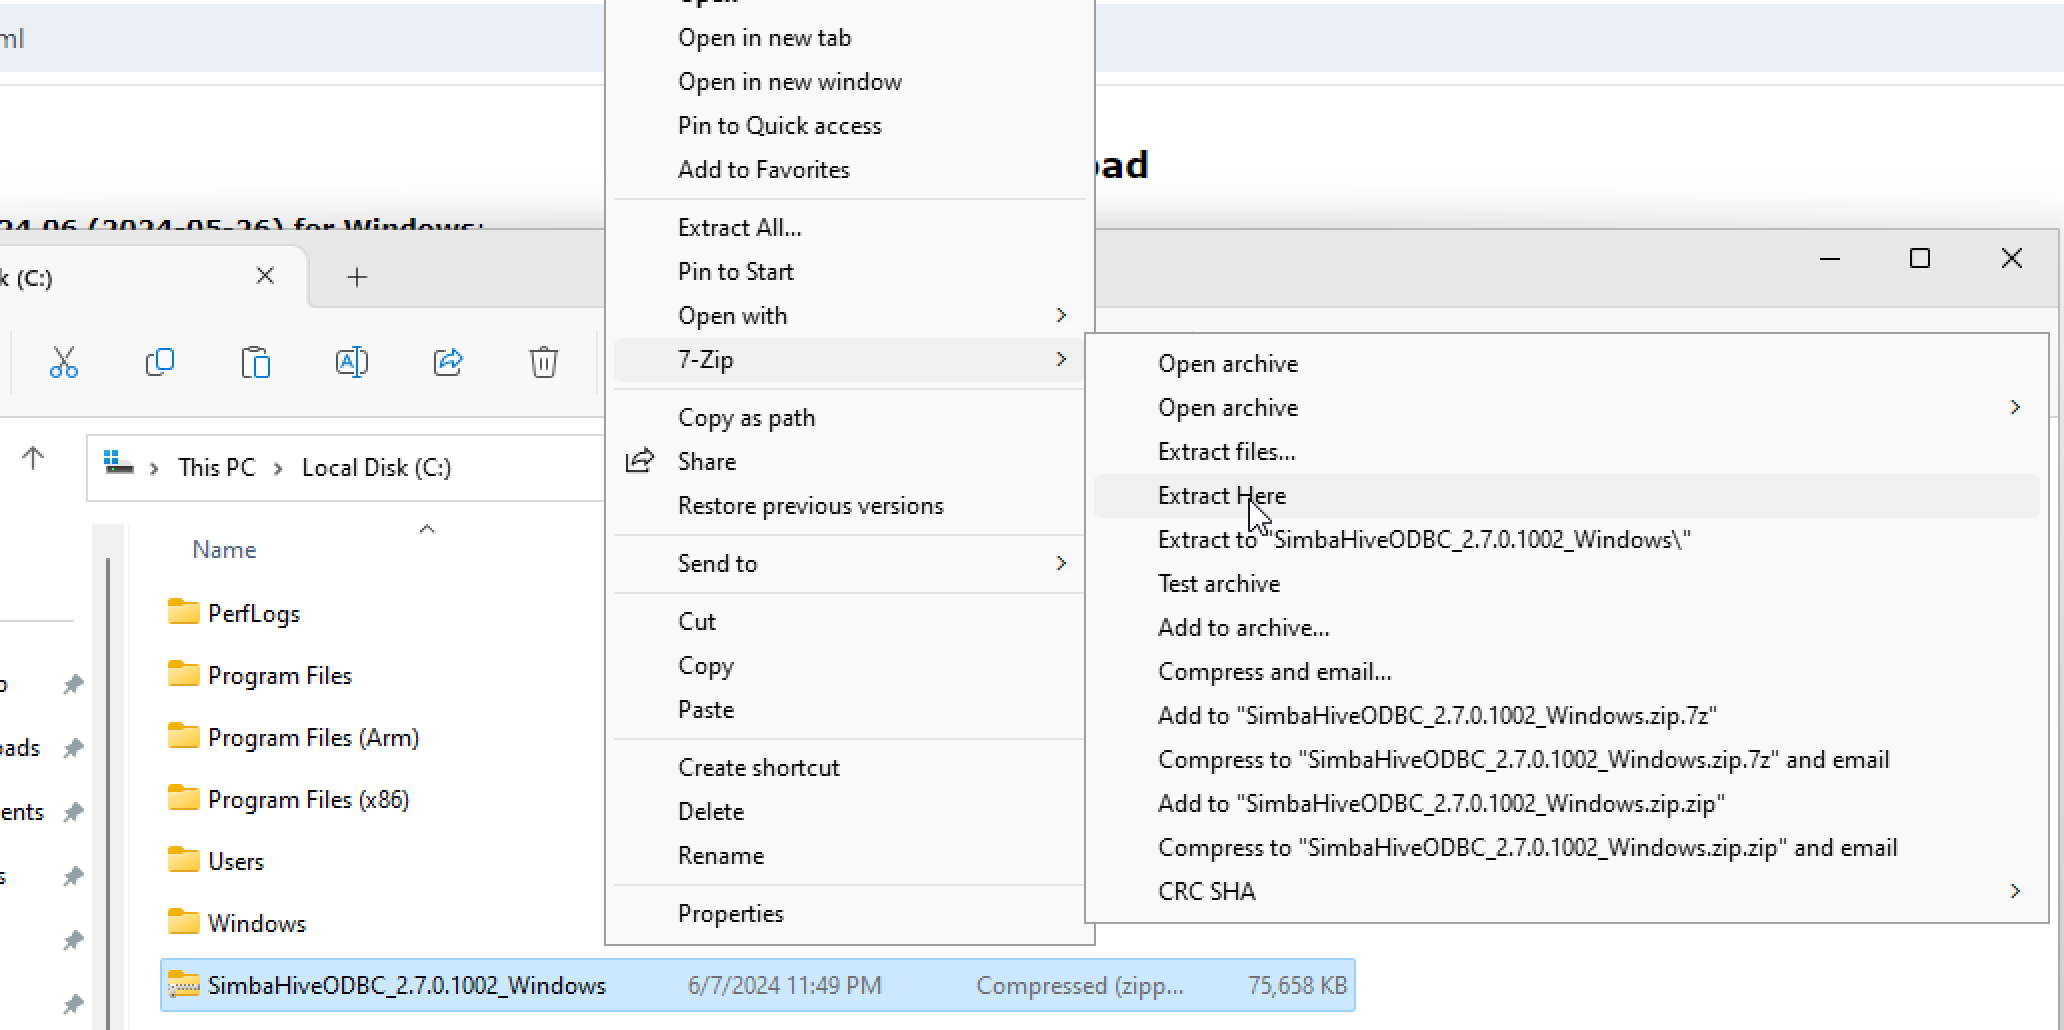
Unzip the Installation Package: Unzip the
SimbaHiveODBC_2.7.0.1002_Windows.zipfile to a convenient location.Create the Installation Directory: Create a dedicated directory for driver installation. For simultaneous 32-bit and 64-bit versions, maintain separate directories.
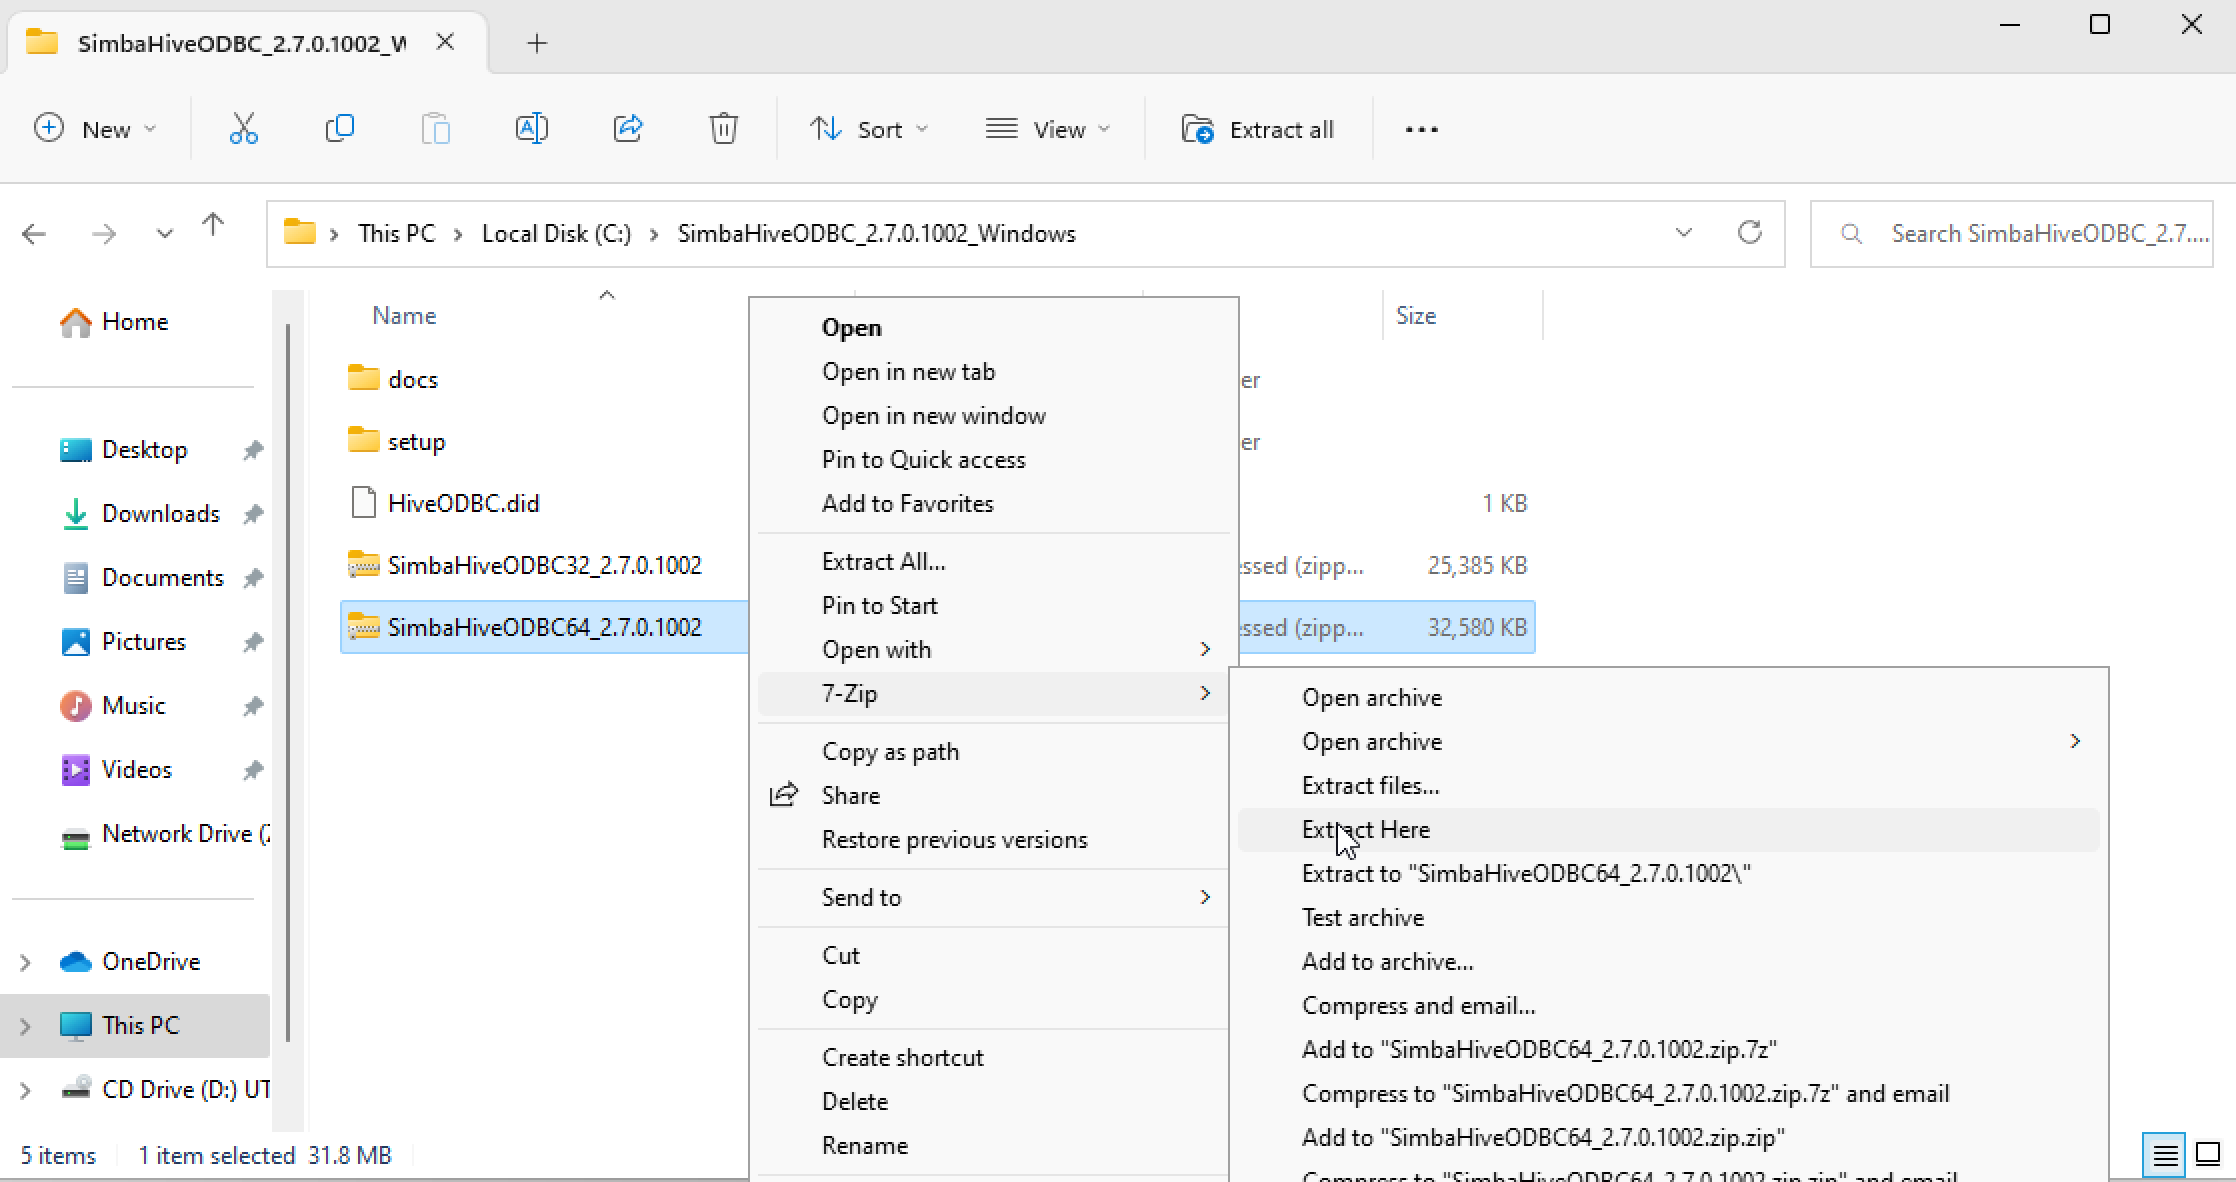
Copy the Driver Files:
- Extract the inner ZIP file corresponding to the desired version (32-bit or 64-bit).
- Copy all files and folders from the extracted location to the installation directory.
- Copy the
[DataSource]ODBC.didfile to the\libsubfolder in the installation directory.
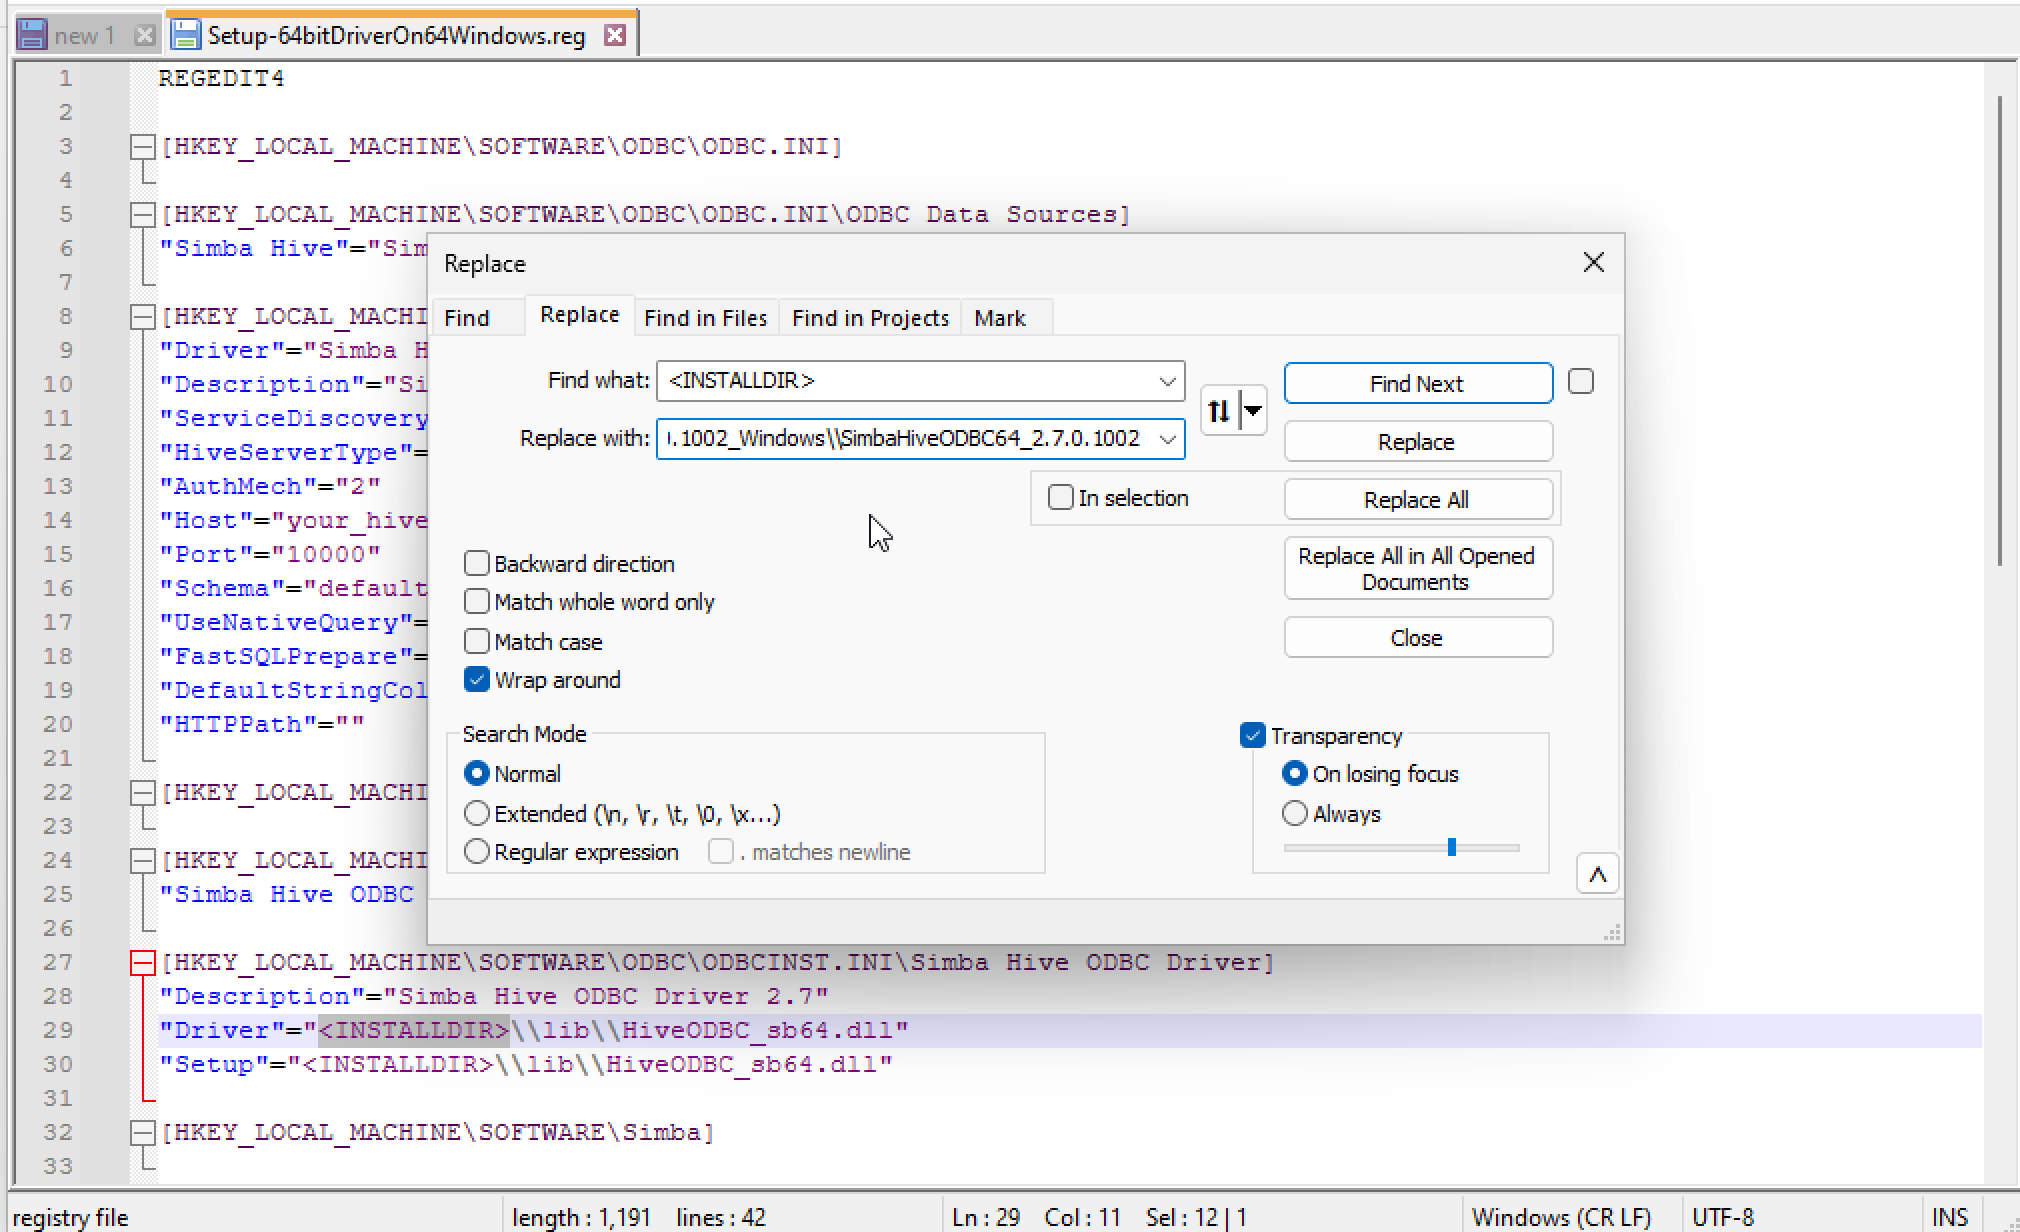
Modify the Registry File:
Navigate to the
\setupsubfolder in the extracted location.Identify the appropriate
.regfile for your installation.Open the
.regfile in a text editor and make the following changes:- Update branding information to match the ZIP file name.
- Replace
<INSTALLDIR>with the actual installation directory path. - Set
SwapFilePathto a writable directory for temporary files.- Backslash Escaping:
- Original Path:
C:\Program Files\Magnitude - Escaped Path:
C:\\Program Files\\Magnitude
- Original Path:
- Backslash Escaping:
Save the changes.
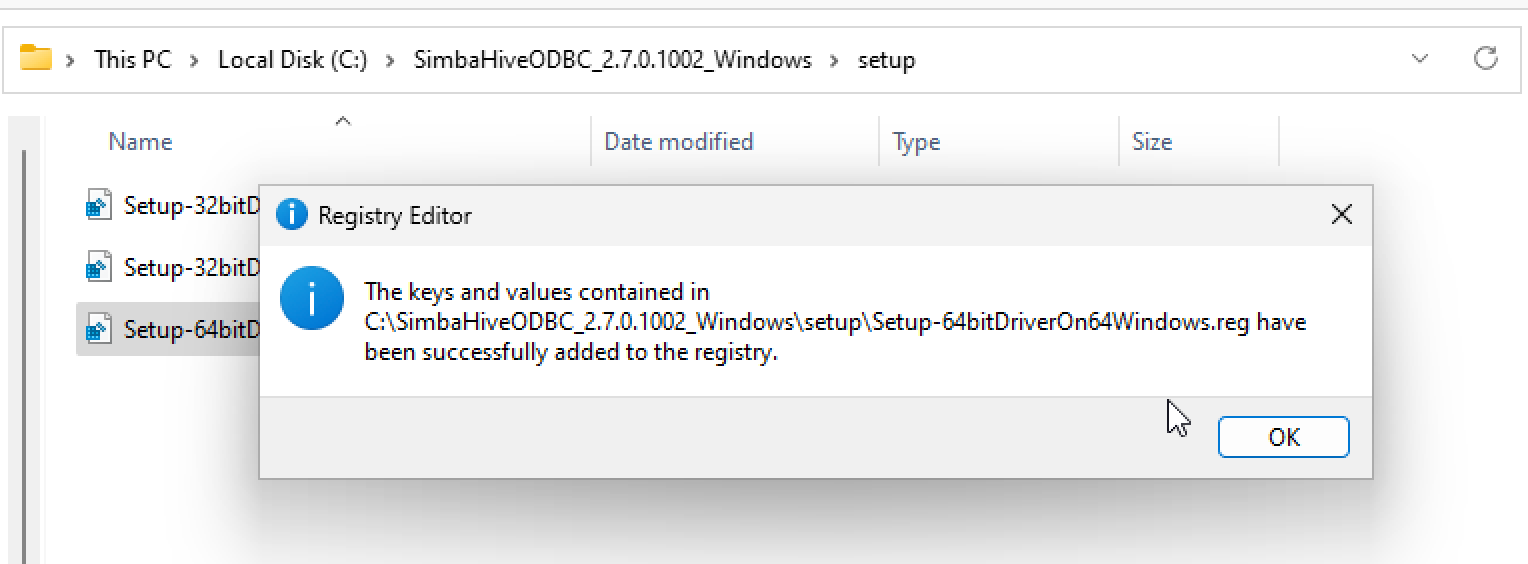
Run the Registry File: Double-click the modified
.regfile to create necessary registry keys.
| File or Folder Name | Description |
|---|---|
\docs | Contains the Simba-branded driver documentation including release history and connection properties. |
\setup | Contains the Windows registry files necessary for the driver. |
[DataSource]ODBC.did | The Vendor-branded .did file determines driver and vendor names. Must be copied to \lib. |
Simba[DataSource]ODBC32_[Version].zip or Simba[DataSource]ODBC64_[Version].zip | The Inner ZIP files contain driver components. Extract corresponding to driver bitness. |
\ErrorMessages | Contains error messages produced by the driver. Copy to the installation directory. |
\lib | Contains necessary driver binary files. Copy to the installation directory. |
third-party-licenses.txt | Contains licenses for third-party software used by the driver. Copy to the installation directory. |
[DriverSpecificFolder] | Placeholder for additional driver components. Copy to installation directory if present. |
Registry Entries
The \setup folder contains the Windows registry files for each combination of driver bitness and machine bitness:
Setup-32bitDriverOn32Windows.regSetup-32bitDriverOn64Windows.regSetup-64bitDriverOn64Windows.reg
Run the appropriate .reg file to add registry entries under HKEY_LOCAL_MACHINE\SOFTWARE or HKEY_LOCAL_MACHINE\SOFTWARE\Wow6432Node depending on machine architecture.
Hive ODBC Setup
- Unzip the
SimbaHiveODBC_2.7.0.1002_Windows.zipfile to a convenient location.
- Create a dedicated directory for the driver installation. If installing both 32-bit and 64-bit versions, use the separate directories.
- Default Path: C:\Program Files\Simba
- Custom Path: D:\Simba\Custom
- Unzip the one more file shown below, which contains libraries.
- Depending on whether you are using a 32-bit or 64-bit version of Windows, select and modify the appropriate file below:
- Setup-32bitDriverOn32Windows.reg
- Setup-32bitDriverOn64Windows.reg
- Setup-64bitDriverOn64Windows.reg
- From step 4, save and execute the modified .reg file.
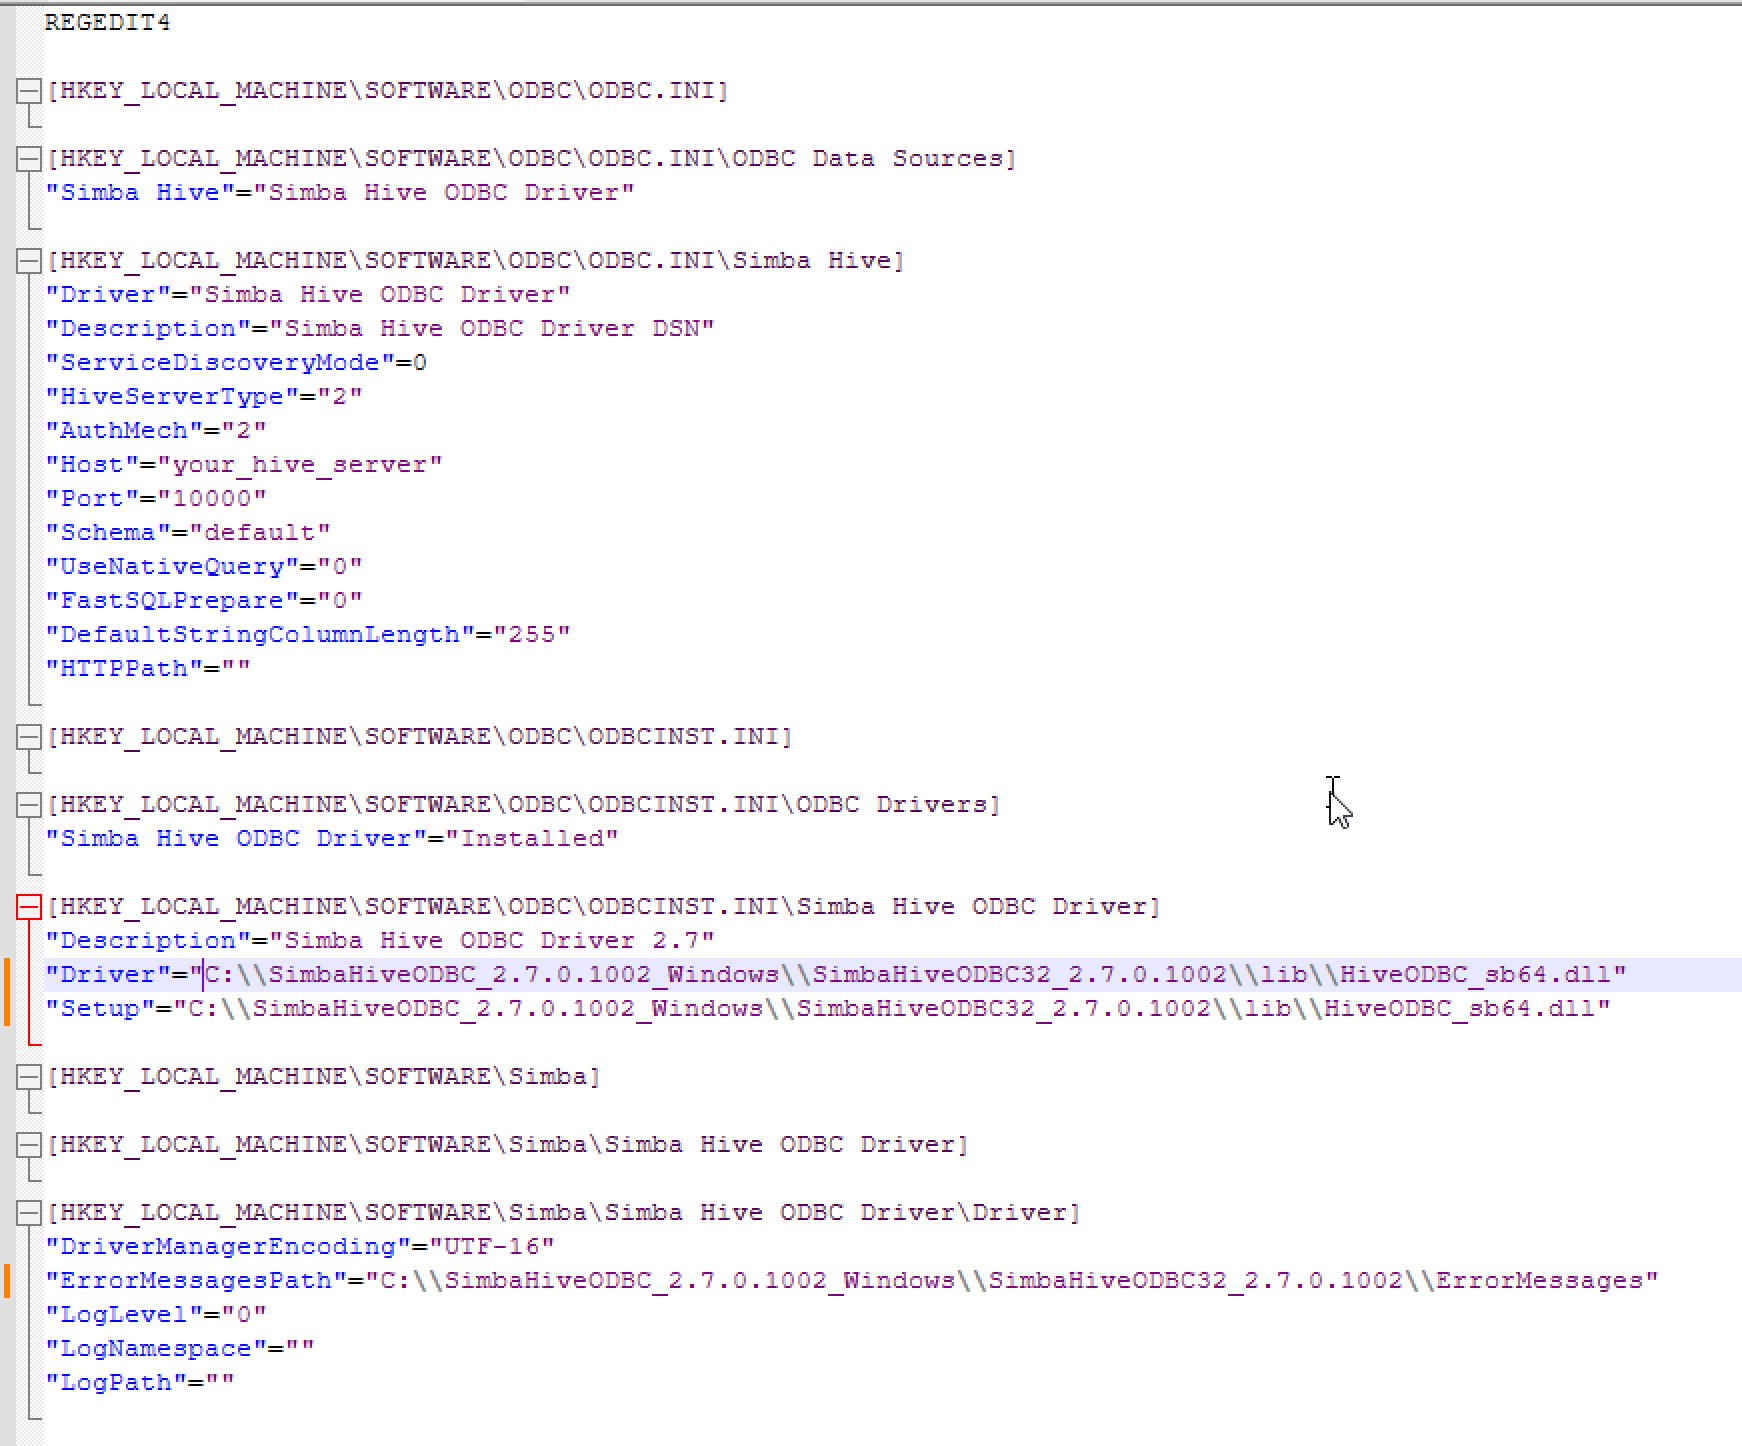
The sample registration file:
Installing the Simba Apache Impala ODBC Connector On Windows
- Depending on your client application's bitness, double-click to run either Simba Impala 2.8 32-bit.msi or Simba Impala 2.8 64-bit.msi.
- Click Next.
- If you agree to the terms of the License Agreement, select the checkbox and click Next.
- To change the installation location, click Change, browse to your desired folder, and click OK. To accept the default installation location, simply click Next.
- Click Install.
- Once the installation is complete, click Finish.
- If you have received a license file via email, copy it into the \lib subfolder of the installation directory you selected earlier. Ensure that you have the Administrator privileges when modifying the contents of this folder.
Creating a Data Source Name (DSN) on Windows
After installing the Simba Apache Impala ODBC Connector, you need to create a Data Source Name (DSN). A DSN is a data structure that stores connection information, allowing the connector to connect to Impala. Alternatively, you can specify connection settings in a connection string or as connector-wide settings. The connection string settings take precedence over DSN settings, while DSN settings take precedence over connector-wide settings.
Follow these instructions to create a DSN. For details on using connection strings, see Using a Connection String on page 69. For information on connector-wide settings, refer to Setting Connector-Wide Configuration Options on Windows on page 29.
Follow the steps to create a Data Source Name (DSN) on Windows:
From the Start menu, open ODBC Data Sources.
- Note: Ensure you select the ODBC Data Source Administrator that matches the bitness of the client application you will use to connect to Impala.
In the ODBC Data Source Administrator, click the Drivers tab and scroll down to confirm that the Simba Apache Impala ODBC Connector appears in the list of installed ODBC connectors.
Choose one of the following options:
- To create a DSN for the current user only, click the User DSN tab.
- To create a DSN that all users can access, click the System DSN tab.
- Note: It is recommended to create a System DSN instead of a User DSN, as some applications may use a different user account and may not recognize User DSNs created under another account.
Click Add.
In the Create New Data Source dialog, select Simba Apache Impala ODBC Connector and click Finish. This will open the Simba Apache Impala ODBC Connector DSN Setup dialog.
In the Data Source Name field, enter a name for your DSN.
Optionally, provide a description for the DSN in the Description field.
In the Host field, enter the IP address or hostname of the Impala server.
In the Port field, specify the TCP port number that the Impala server uses to listen for client connections.
- Note: The default port number for Impala is 21050.
In the Database field, type the name of the database schema to use when a schema is not explicitly specified in a query.
- Note: You can query other schemas by explicitly specifying the schema in the query. To view your databases, use the command
show databasesat the Impala command prompt.
- Note: You can query other schemas by explicitly specifying the schema in the query. To view your databases, use the command
In the Authentication section, configure authentication as required. For more details, see Configuring Authentication on Windows on page 12.
- Note: By default, Impala is configured to use the No Authentication mechanism with the Simba Apache Impala ODBC Connector.
If operations against Impala should be performed on behalf of a different user than the authenticated user, enter the delegated user’s name in the Delegation UID field.
From the Transport Mode drop-down list, select the Thrift transport protocol to use.
- Note: For information on supported Thrift transport protocols by your Impala server, see Authentication Options on page 67.
To configure a connection through a proxy server, click Proxy Options. For more information, see Configuring a Proxy Connection on Windows on page 19.
If the Transport Mode is set to HTTP, you can configure HTTP options such as custom headers by clicking HTTP Options. For more details, see Configuring HTTP Options on Windows on page 20.
To set up client-server verification over SSL, click SSL Options. For more information, see Configuring SSL Verification on Windows on page 21.
To configure advanced connector options, click Advanced Options. For more details, see Configuring Advanced Options on Windows on page 22.
To set server-side properties, click Advanced Options and then select Server Side Properties. For more information, see Configuring Server-Side Properties on Windows on page 24.
To adjust logging behavior for the connector, click Logging Options. For more information, see Configuring Logging Options on Windows on page 25.
To test the connection, click Test. Review the results and then click OK.
- Note: If the connection fails, verify that the settings in the Simba Impala ODBC Connector DSN Setup dialog are correct, and contact your Impala server administrator if necessary.
To save your settings and close the Simba Impala ODBC Connector DSN Setup dialog, click OK.
To exit the ODBC Data Source Administrator, click OK.
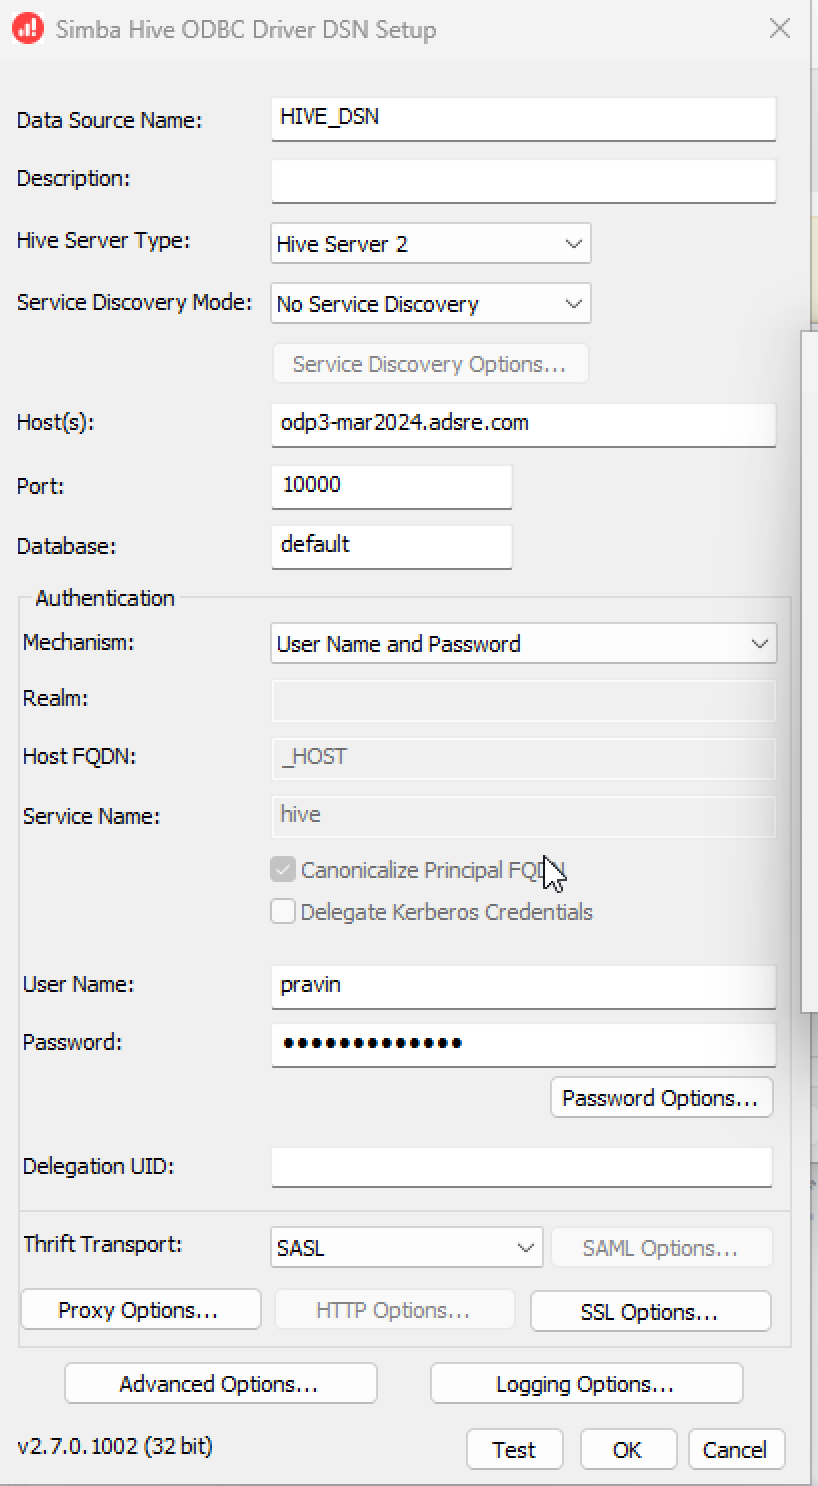
Add DSN
ODP-3.2.3.0-2
HIVE: LDAP enabled
Transport Mode: binary (port 10000)
Kerberos enabled
Set up the Hive and Impala ODBC on Linux
The ODP ODBC Hive and Impala Setup Documentation
Welcome to the ODP ODBC Hive Setup Documentation. This page provides comprehensive instructions for setting up ODP's ODBC drivers to connect to Apache Hive on both Windows and Linux environments. Follow these steps meticulously to ensure a smooth and successful setup.
Prerequisites
Before you begin, ensure you have the following prerequisites installed:
ODBC Driver Managers: Choose one of the following:
- iODBC 3.52.9 or later
- unixODBC 2.2.14 or later
libsasl Libraries:
- cyrus-sasl-2.1.22-7 or later
- cyrus-sasl-gssapi-2.1.22-7 or later
Installation Steps
- Download the ODBC Drivers: You can reach out to Acceldata Support to access the ODP ODBC drivers.
- Extract the Downloaded Files: Unzip the downloaded archive to a suitable directory.
- Install the Drivers: Follow the instructions in the downloaded files to install the drivers on Windows and Linux nodes.
Configuration Steps
- Install unixODBC:
xxxxxxxxxxyum install unixODBC -y- Extract the Downloaded Tar File:
xxxxxxxxxxtar --directory=/opt -zxvf SimbaHiveODBC-2.7.0.1002-Linux.tar.gz- Set the Environment Variables:
xxxxxxxxxxexport LD_LIBRARY_PATH=$LD_LIBRARY_PATH:/usr/local/lib- Set the ODBC Environment Variables:
xxxxxxxxxxexport ODBCINI=/opt/SimbaHiveODBC-2.7.0.1002-Linux/setup/odbc.iniexport ODBCSYSINI=/opt/SimbaHiveODBC-2.7.0.1002-Linux/setupexport SIMBAHIVEINI=/opt/SimbaHiveODBC-2.7.0.1002-Linux/setup/simba.hiveodbc.ini- Modify the
odbc.iniFile: Edit theodbc.inifile with the following configurations.
xxxxxxxxxxODBC][ODBC Data Sources]ODP=Simba Hive 64-bit=Simba Hive ODBC Driver 64-bit [ODP]Description=Simba Hive 64-bit=Simba Hive ODBC Driver 64-bitDriver=/opt/SimbaHiveODBC-2.7.0.1002-Linux/SimbaHiveODBC64-2.7.0.1002/lib/libhiveodbc_sb64.soHOST=[HOST]PORT=10000ServiceDiscoveryMode=0HiveServerType=2AuthMech=2ThriftTransport=1UID=KrbHostFQDN=_HOSTKrbServiceName=hiveKrbRealm=SSL=0Testing the Connection
Use the following commands to test the connection using the unixODBC driver manager:
xxxxxxxxxxisql [DataSourceName]or
xxxxxxxxxxiusql [DataSourceName]Replace [DataSourceName] with the DSN you have configured in the odbc.ini file.
Troubleshooting
[S1000][unixODBC][Simba][ODBC] (10001) General error: [Simba][DriverSupport] (1070) Cannot access file /opt/SimbaHiveODBC-2.7.0.1002-Linux/SimbaHiveODBC64-2.7.0.1002/lib/HiveODBC.did. The driver cannot function properly without the file.[IM005][unixODBC][Driver Manager]Driver's SQLAllocHandle on SQL_HANDLE_DBC failed[ISQL]ERROR: Could not SQLConnectSolution:
Copy the HiveODBC.did file to the specified location.
xxxxxxxxxxcp /opt/SimbaHiveODBC-2.7.0.1002-Linux/HiveODBC.did /opt/SimbaHiveODBC-2.7.0.1002-Linux/SimbaHiveODBC64-2.7.0.1002/lib/Conclusion
By following these detailed steps, you can successfully set up ODP's ODBC drivers connection to ODP Hive and Impala.