
Kafka MirrorMaker 3 refers to MirrorMaker 2 on Kafka 3, since Kafka 3 supports the MirrorMaker 2 architecture.
Kafka MirrorMaker 3 utility is integrated with ODP Ambari, facilitating the replication of Kafka topics between ODP clusters, allowing data transfer from source to destination and vice versa. Before configuring the Kafka MirrorMaker3 service via Ambari, ensure the health of the Kafka service, confirming its ability to add and fetch data from topics.
Below are the steps to enable Kerberos, SSL, and Ranger authorization for seamless access to Kafka Service topics.
Enable Kafka Kerberos
Enabling Kerberos for the entire ODP Cluster also includes enabling Kafka. Refer to the documentation below for instructions on enabling Kerberos on an ODP cluster.
Enable Kafka SSL
Gather the CA-signed truststore and keystore certificates along with their details to enable SSL for the Kafka service. If CA certificates are not accessible, generate self-signed certificates by following the instructions below.
Replicate the provided script on all nodes where Kafka services are running, execute it, and then copy the $(hostname).crt file to all other nodes reciprocally. Finally, import the certificate to the truststore on each node.
With the above-generated certificates (or CA certificates), you must have details regarding the following:
Configure Kerberos, SSL, and Ranger to Kafka
Once Kerberos and SSL details are obtained as described in the preceding sections, proceed to configure them for the Kafka service.
Following that, all remaining configurations are set to default. Kafka is now enabled with Ranger, Kerberos, and SSL.
Kafka MirrorMaker3 Setup with Kerberos and SSL
Note that the configured settings for the source and destination clusters need to be added for the mirrorMaker3 service. For instance, if the Kafka source cluster is Kerberos and SSL enabled, and the destination is a plain cluster (without Kerberos and SSL), ensure these settings are appropriately specified.
To navigate to Kafka MirrorMaker3 configurations in the Ambari UI, perform the following:
Log in to the Ambari UI.
Navigate to the Services list in the main menu and click on Kafka from the list of services to open the Kafka service page.
In the Kafka Service page, click on the Configs tab.
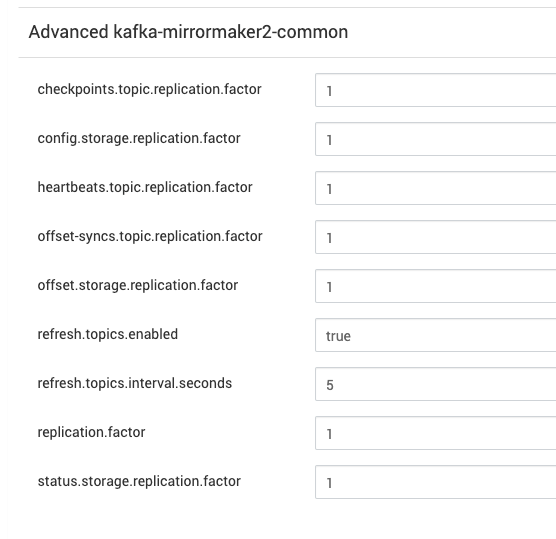
Navigate to the Advanced section and look for the subsection titled Advanced kafka3-mirrormaker2-common.
Modify and save configurations.
Considering this is a test cluster, a replication factor of 1 has been added. However, if the Kafka clusters consist of 3 or more nodes, it is imperative to set the replication factor to a minimum of 3.
MirrorMaker3 Source Cluster Configuration
To navigate to the Kafka MirrorMaker3 configurations in the Ambari UI, perform the following:
Log in to the Ambari UI.
Navigate to the Services list in the main menu and click on Kafka from the list of services to open the Kafka service page.
In the Kafka Service page, click on the Configs tab.
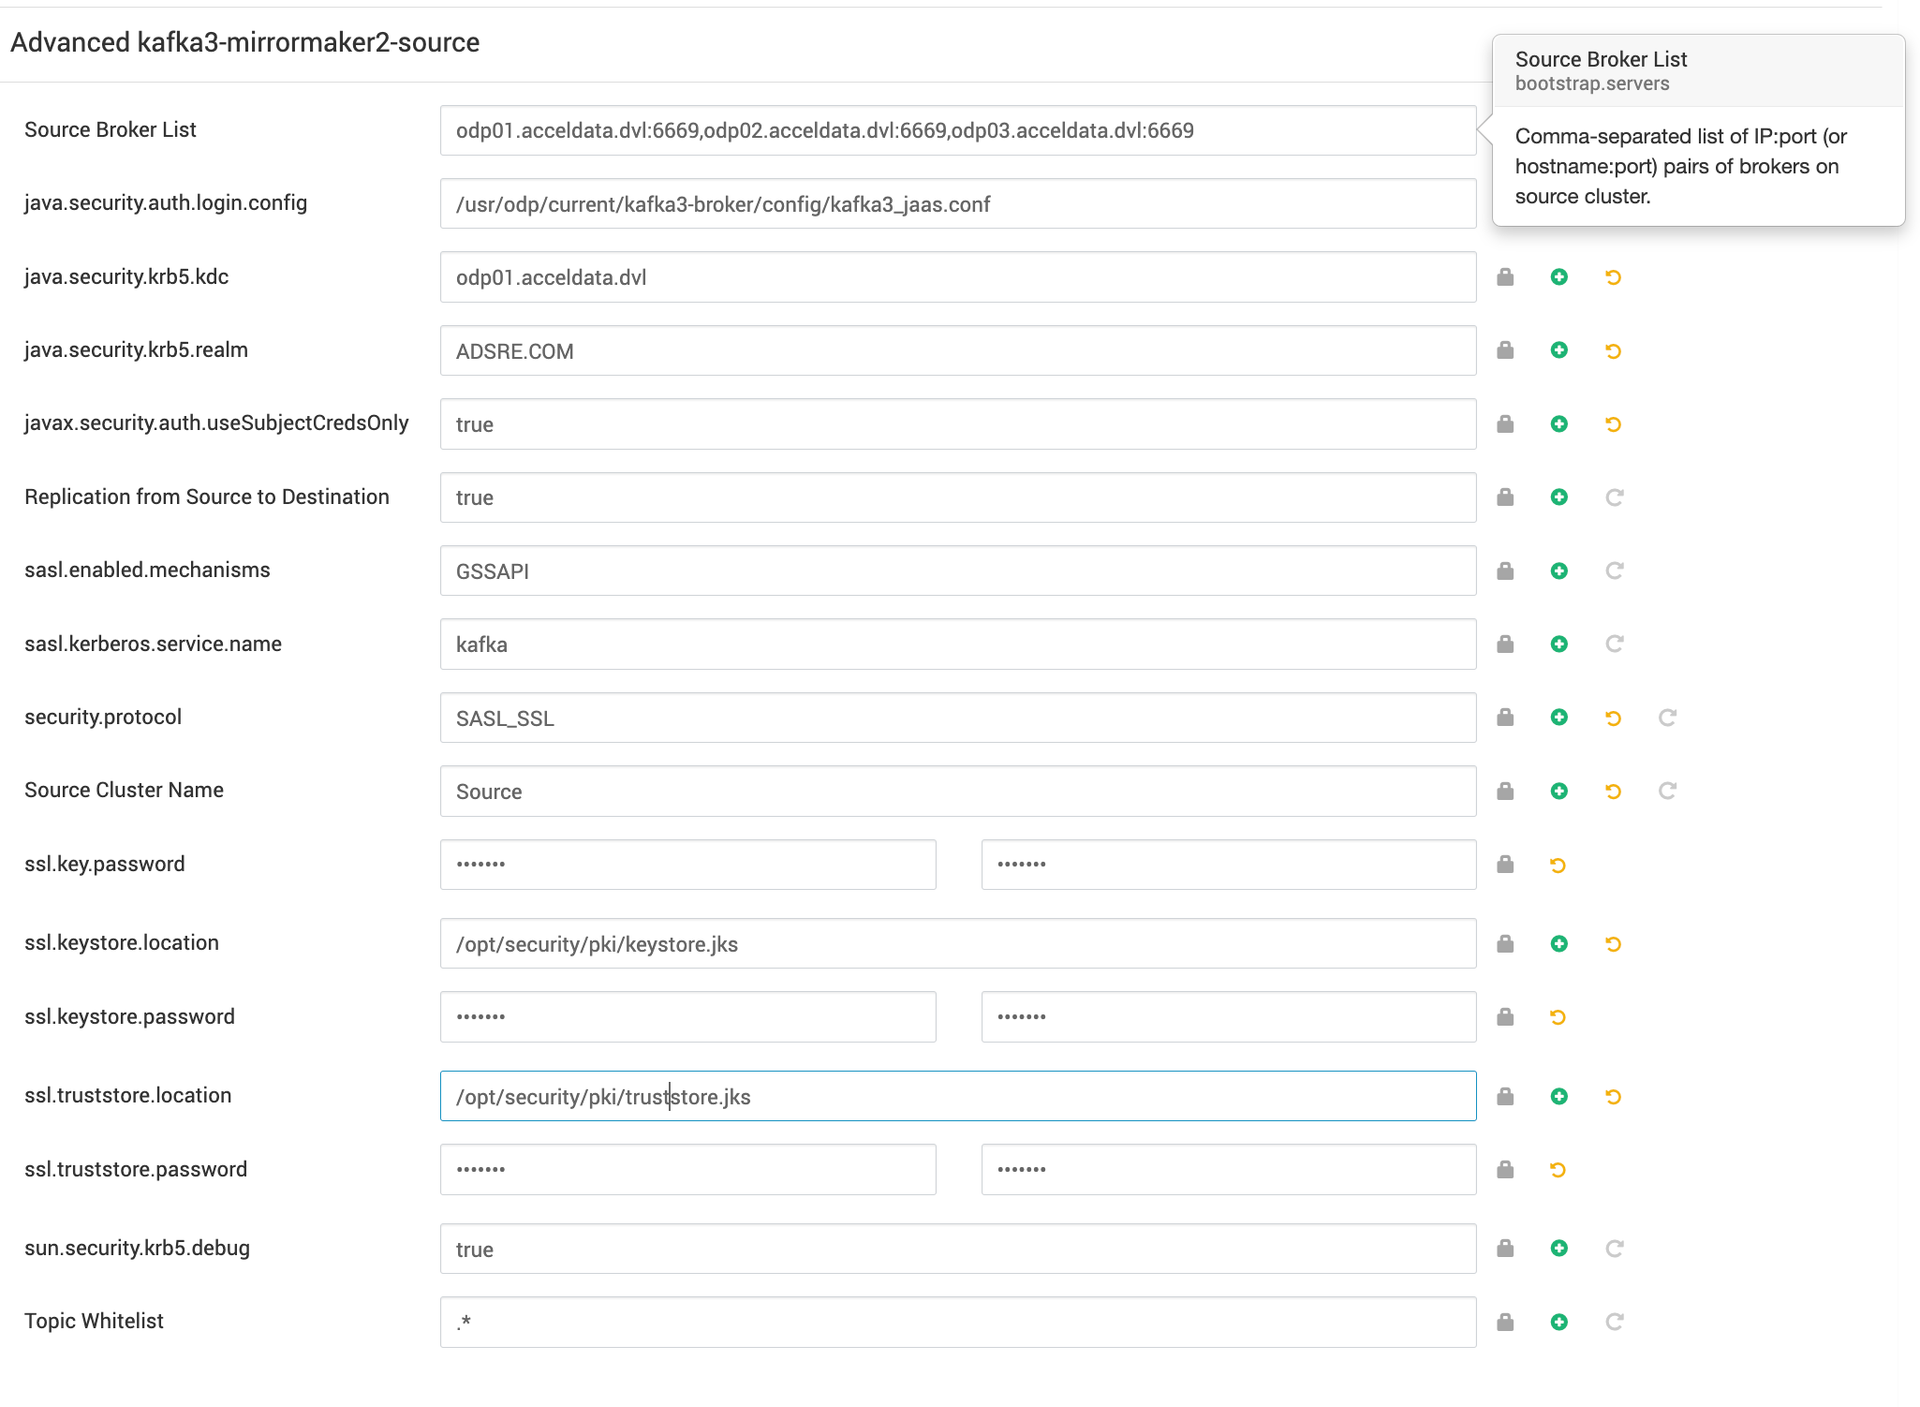
Navigate to the Advanced section and look for the subsection titled Advanced kafka3-mirrormaker2-source.
Modify and save configurations.
In this scenario, the Source cluster is configured with Kerberos and SSL. Ensure the respective values are added accordingly.
Example configuration:
Sample Configuration:
MirrorMaker3 Source Destination Configuration
To navigate to Kafka MirrorMaker3 configurations in the Ambari UI, perform the following:
Log in to the Ambari UI.
Navigate to the Services list in the main menu and click on Kafka from the list of services to open the Kafka service page.
In the Kafka Service page, click on the Configs tab.
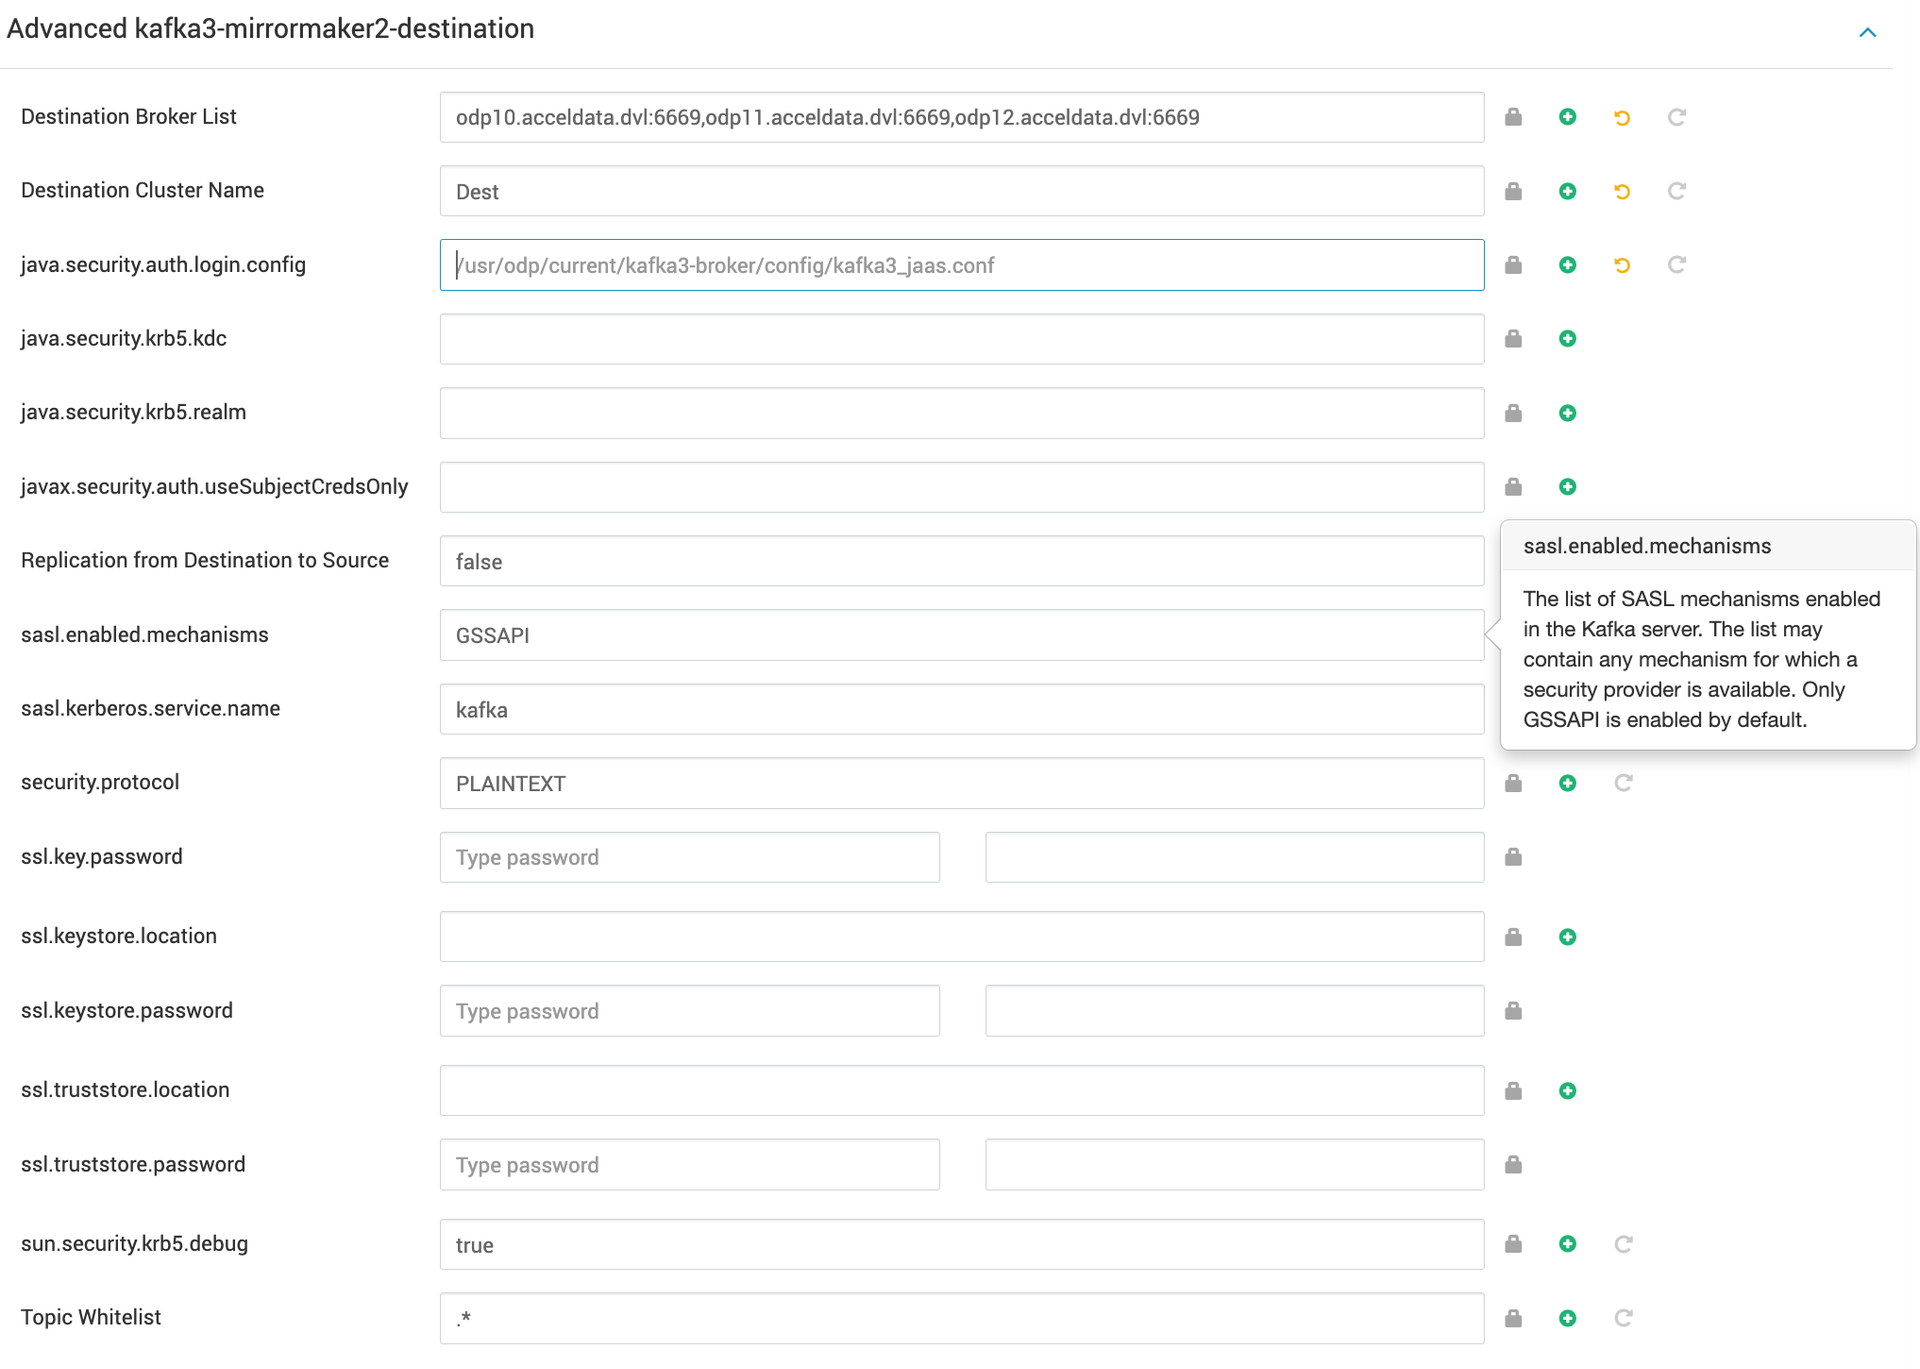
Navigate to the Advanced section and look for the subsection titled Advanced kafka3-mirrormaker2-destination.
Modify and save configurations.
In this context, the destination Kafka cluster is configured as a Plain cluster without Kerberos or SSL.
Sample Destination Configuration:
Once you have configured the source and destination cluster details, save and restart the Kafka service.
MirrorMaker3 Use Case Testing
The following topics have been replicated from the source cluster to the destination cluster, each appended with .Dest.
In the destination cluster, you can see the following default topics, each appended with the name of the source cluster.
Replicating a Topic from Source to Destination Cluster
Produce Data on the Source Cluster
Start by producing data for your topic using the Kafka console producer. Connect to your source cluster and specify the topic and security configurations.
Add Sample Data
Verify from the Destination Cluster
Check that the topic has been replicated to the destination cluster. Use the Kafka topics command to list topics and verify the presence of your source topic.
Expected Output
Consume Data from the Replicated Cluster
Use the Kafka console consumer to view the data from the replicated topic to confirm the successful replication.
Expected Output
Manage Multiple Topics
Add numerous topics from the source cluster and verify their presence in the destination cluster. The topics should appear in the destination cluster’s topic list with a prefix that includes the source cluster's name. This ensures that you can distinguish between locally created topics and replicated ones.