To enable Solr auditing for the supported components in the ODP stack, the following properties must be validated in Ranger.
- Ensure Ranger is enabled for all components. The Ranger service must be created in the Ranger UI, the service test connection and policies are working.
- In the Ambari UI, navigate to
Ranger>Configs>RANGER AUDIT,:- Enable
Audit to Solr. - Verify the following properties.
- Enable
ranger.audit.solr.zookeepers = <ZK1:2181,ZK2:2181,ZK3:2181/infra-solr>ranger.audit.solr.username=ranger_solrranger.audit.solr.password=<password>- Save and restart all required services.
Refer to the following documentation pages to enable Solr auditing for the individual components.
HDFS
- In the Ambari UI, navigate to
HDFS>Configs>Advanced ranger-hdfs-audit, and enableAudit to Solr. - In
Advanced ranger-hdfs-audit, verify the following properties.
xasecure.audit.is.enabled=truexasexure.audit.destination.solr=true (or check Audit to Solr)xasecure.audit.destination.solr.batch.filespool.dir=/var/log/hadoop/hdfs/audit/solr/spoolxasecure.audit.destination.solr.zookeepers=<ZK1:2181,ZK2:2181,ZK3:2181/infra-solr>YARN
- In the Ambari UI, navigate to
YARN>Configs>Advanced ranger-yarn-audit, and enableAudit to Solr. - In
Advanced ranger-yarn-audit, verify the following properties.
xasecure.audit.destination.solr.batch.filespool.dir=/var/log/hadoop/yarn/audit/solr/spoolxasexure.audit.destination.solr=true (or check Audit to Solr)xasecure.audit.destination.solr.zookeepers=<ZK1:2181,ZK2:2181,ZK3:2181/infra-solr>xasecure.audit.is.enabled=trueHive
- In the Ambari UI, navigate to
Hive>Configs>Advanced ranger-hive-audit, and enableAudit to Solr. - In
Advanced ranger-hive-audit, verify the following properties.
xasecure.audit.destination.solr.batch.filespool.dir=/var/log/hive/audit/solr/spoolxasexure.audit.destination.solr=true (or check Audit to Solr)xasecure.audit.destination.solr.zookeepers=<ZK1:2181,ZK2:2181,ZK3:2181/infra-solr>xasecure.audit.is.enabled=trueImpala
Impala — Audit to HDFS is enabled with Hive by default; no additional settings are required.
HBase
- In the Ambari UI, navigate to
HBase>Configs>Advanced ranger-hbase-audit, and enableAudit to Solr. - In
Advanced ranger-hbase-audit, verify the following properties.
xasecure.audit.destination.solr.batch.filespool.dir=/var/log/hbase/audit/solr/spoolxasexure.audit.destination.solr=true (or check Audit to Solr)xasecure.audit.destination.solr.zookeepers=<ZK1:2181,ZK2:2181,ZK3:2181/infra-solr>xasecure.audit.is.enabled=trueKafka
- In the Ambari UI, navigate to
Kafkain the left pane >Configs>Advanced ranger-kafka-audit, and enableAudit to Solr. - In
Advanced ranger-kafka-audit, verify the following properties.
xasecure.audit.destination.solr.batch.filespool.dir=/var/log/hbase/audit/solr/spoolxasexure.audit.destination.solr=true (or check Audit to Solr)xasecure.audit.destination.solr.zookeepers=<ZK1:2181,ZK2:2181,ZK3:2181/infra-solr>xasecure.audit.is.enabled=trueKafka3
- In the Ambari UI, navigate to
Kafka 3in the left pane >Configs>Advanced ranger-kafka3-audit, and enableAudit to Solr. - In
Advanced ranger-kafka3-audit, verify the following properties.
xasecure.audit.destination.solr.batch.filespool.dir=/var/log/kafka3/audit/solr/spoolxasexure.audit.destination.solr=true (or check Audit to Solr)xasecure.audit.destination.solr.zookeepers=<ZK1:2181,ZK2:2181,ZK3:2181/infra-solr>xasecure.audit.is.enabled=trueOzone
- In the Ambari UI, navigate toOzone in the left pane > Configs > Advanced ranger-ozone-audit, and enable Audit to Solr.
- In
Advanced ranger-ozone-audit, verify the following properties.
xasecure.audit.destination.solr.batch.filespool.dir=/var/log/hadoop-ozone/audit/hdfs/spool xasexure.audit.destination.solr=true (or check Audit to Solr)xasecure.audit.destination.solr.zookeepers=<ZK1:2181,ZK2:2181,ZK3:2181/infra-solr>xasecure.audit.is.enabled=trueRangerKMS
- In the Ambari UI, navigate to
RangerKMSin the left pane >Configs>Advanced ranger-kms-audit, and enableAudit to Solr. - In
Advanced ranger-kms-audit, verify the following properties.
xasecure.audit.destination.solr.batch.filespool.dir=/var/log/ranger/kms/audit/solr/spoolxasexure.audit.destination.solr=true (or check Audit to Solr)xasecure.audit.destination.solr.zookeepers=<ZK1:2181,ZK2:2181,ZK3:2181/infra-solr>xasecure.audit.destination.solr.urls={{ranger_audit_solr_urls}}xasecure.audit.is.enabled=trueKudu
Before enabling Ranger HDFS audit for Kudu, ensure the required Ranger policies are in place as outlined in the documentation: Security. On this page, see Ranger.
- In the Ambari UI, navigate to Kudu in the left pane >
Configs>Advanced ranger-kudu-audit, and enableAudit to Solr. - In
Advanced ranger-kudu-audit, verify the following properties.
xasecure.audit.destination.solr.batch.filespool.dir=/var/log/kudu/audit/solr/spoolxasexure.audit.destination.solr=true (or check Audit to Solr)xasecure.audit.destination.solr.zookeepers=<ZK1:2181,ZK2:2181,ZK3:2181/infra-solr>xasecure.audit.is.enabled=trueSchema Registry
Before enabling Ranger HDFS audit for Schema Registry, ensure the required Ranger policies are in place as outlined in the documentation: Installation. On this page, see Ranger Configuration.
- In the Ambari UI, navigate to
Schema Registry>Configs>Advanced ranger-schema-registry-audit, and enableAudit to Solr. - In
Advanced ranger-schema-registry-audit, verify the following properties.
xasecure.audit.destination.solr.batch.filespool.dir=/var/log/registry/audit/solr/spoolxasexure.audit.destination.solr=true (or check Audit to Solr)xasecure.audit.destination.solr.zookeepers=<ZK1:2181,ZK2:2181,ZK3:2181/infra-solr>xasecure.audit.is.enabled=trueAdditional Steps for Kerberos enabled Environment
- Create the JAAS configuration file.
Path:
/etc/registry/conf/schema-registry_jaas.conf
SchemaRegistry { com.sun.security.auth.module.Krb5LoginModule required useKeyTab=true keyTab="/etc/security/keytabs/registry.service.keytab" storeKey=true useTicketCache=false principal="registry/<hostname>@<realm>";};- Update the
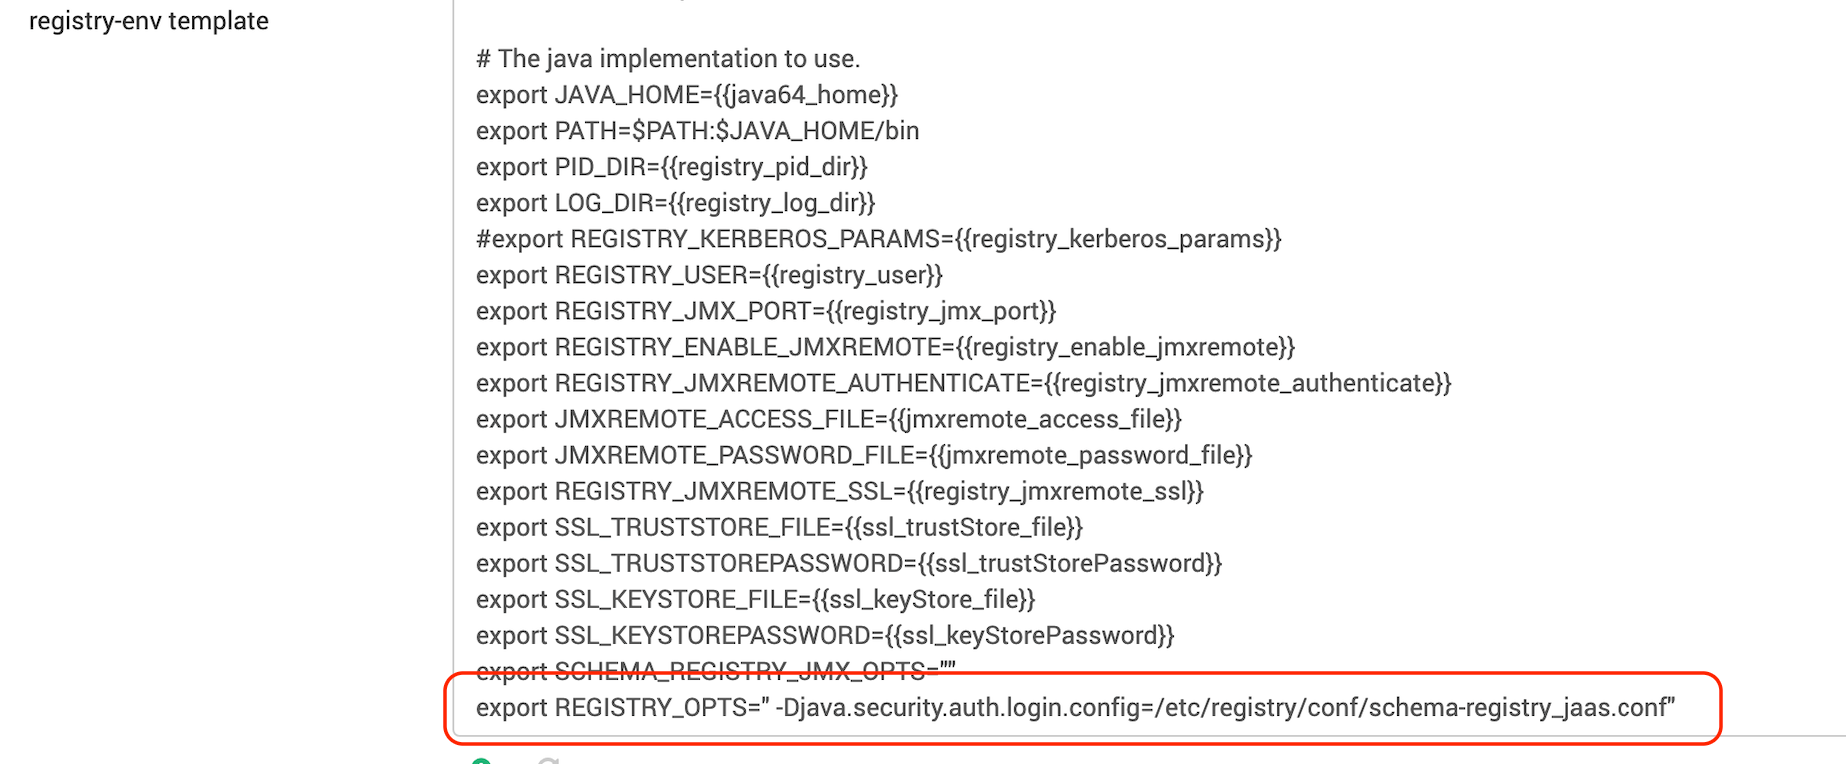
registry-envtemplate. Append the following line to export the JAAS config.
export REGISTRY_OPTS=" -Djava.security.auth.login.config=/etc/registry/conf/schema-registry_jaas.conf"
- In Schema Registry, under Custom ranger-schema-registry-audit, verify the following properties.
xasecure.audit.destination.solr.force.use.inmemory.jaas.config=truexasecure.audit.jaas.Client.loginModuleControlFlag=required xasecure.audit.jaas.Client.loginModuleName=com.sun.security.auth.module.Krb5LoginModulexasecure.audit.jaas.Client.option.keyTab=/etc/security/keytabs/registry.service.keytabxasecure.audit.jaas.Client.option.principal=registry/_HOST@<realm>xasecure.audit.jaas.Client.option.serviceName=solrxasecure.audit.jaas.Client.option.storeKey=falsexasecure.audit.jaas.Client.option.useKeyTab=trueKnox
- In the Ambari UI, navigate to
Knoxin the left pane >Configs>Advanced ranger-knox-audit, and enableAudit to Solr. - In
Advanced ranger-knox-audit, verify the following properties.
xasecure.audit.destination.solr.batch.filespool.dir=/var/log/knox/audit/solr/spoolxasexure.audit.destination.solr=true (or check Audit to Solr)xasecure.audit.destination.solr.zookeepers=<ZK1:2181,ZK2:2181,ZK3:2181/infra-solr>xasecure.audit.is.enabled=true- Also, verify that the file
/usr/odp/current/knox-server/conf/knox-gateway-jaas.confexists, as it is required for authenticating with Infra Solr for audit logging. It must contain the following configuration.
# cat /usr/odp/current/knox-server/conf/knox-gateway-jaas.confcom.sun.security.jgss.initiate {com.sun.security.auth.module.Krb5LoginModule requiredrenewTGT=falsedoNotPrompt=trueuseKeyTab=truekeyTab="/etc/security/keytabs/knox.service.keytab"principal="knox/<hostname>@<realm>"storeKey=trueuseTicketCache=false;};Client {com.sun.security.auth.module.Krb5LoginModule requiredrenewTGT=falsedoNotPrompt=trueuseKeyTab=truekeyTab="/etc/security/keytabs/knox.service.keytab"principal="knox/<hostname>@<realm>"storeKey=trueuseTicketCache=false;NiFi
Before enabling Solr audit for NiFi, ensure the required Ranger policies are in place as outlined in the documentation: NiFi Installation and SSL Enablement. On this page, see Ranger Configuration.
- In the Ambari UI, navigate to
NiFi>Configs>Advanced ranger-nifi-audit, and enableAudit to Solr. - Verify the following properties under
Advanced ranger-nifi-audit.
xasexure.audit.destination.solr=true (or check Audit to Solr)xasecure.audit.destination.solr.batch.filespool.dir= /var/log/nifi/audit/solr/spool/xasecure.audit.destination.solr.zookeepers=<ZK1:2181,ZK2:2181,ZK3:2181/infra-solr>xasecure.audit.jaas.Client.option.serviceName= solrNiFi Registry
Before enabling Solr audit for NiF-Registry, ensure the required Ranger policies are in place as outlined in the documentation: Installing NiFi Registry. On this page, see see Ranger Configuration.
- Add
nifiregistryto the Ranger audit service users in Advanced infra-solr-security-json:
Ranger audit service users = {default_ranger_audit_users},nifiregistry- Save and restart both Ambari Infra and NiFi Registry.
- In the Ambari UI, navigate to NiFi Registry >
Configs>Advanced ranger-nifi-registry-audit, and enableAudit to Solr. - Verify the following properties under
Advanced ranger-nifi-registry-audit.
xasexure.audit.destination.solr=true (or check Audit to Solr)xasecure.audit.destination.solr.batch.filespool.dir= /var/log/nifi/audit/solr/spool/xasecure.audit.destination.solr.zookeepers=<ZK1:2181,ZK2:2181,ZK3:2181/infra-solr>xasecure.audit.jaas.Client.option.serviceName= solr