
Kafka 4 is a distributed event streaming platform for real-time data feeds, with improved scalability, performance, resilience, and operational simplicity. Kafka 4 completes the transition to KRaft-based metadata management, removing the dependency on ZooKeeper and providing a more streamlined architecture for managing Kafka clusters.
Kafka 4.3.0 is a major upgrade from the previous Kafka 3.7.2 release. The most significant architectural change is the complete removal of ZooKeeper, which makes KRaft mandatory, along with Java 17 as the server-side baseline. The release also includes improvements in consumer groups, operations, observability, security, and overall KRaft stability. Kafka 4.3.0 includes 25 KIPs and over 600 commits since Kafka 4.2.0.
Note: The source material for this section referenced the previous release as "kafka4.7.2." Based on the version numbering used elsewhere in this documentation set (Kafka 3.7.2 → Kafka 4.3.0), this appears to be a typo for Kafka 3.7.2. Confirm the correct prior version before publishing.
Key concepts
Kafka 4 includes several core components that enable distributed, real-time event streaming:
Producer: Sends messages to Kafka topics by writing records to specific partitions. Producers support batching and compression to improve throughput and reduce network overhead.
Consumer: Reads records from Kafka topics and supports different consumption models, including at-least-once and exactly-once processing semantics. Kafka 4.3.0 also introduces improvements to consumer group coordination and rebalance behavior.
Broker: Stores topic partitions and replicates data across the cluster to provide fault tolerance and high availability. Kafka 4.3.0 introduces improvements to broker resource management, partition placement, and storage monitoring.
Controller: Manages cluster metadata, partition leadership, broker membership, and other cluster-level operations. Kafka 4 uses KRaft for controller and metadata management instead of ZooKeeper.
KRaft mode: The architecture Kafka 4 uses to manage cluster metadata with its own Raft-based consensus mechanism. This removes the need for ZooKeeper, simplifies cluster architecture, and provides a more scalable and operationally efficient metadata management model.
Kafka Streams: A stream-processing library for building applications that process Kafka data in real time. Kafka 4.3.0 adds improvements to state-store management, processing exception handling, and state cleanup.
Kafka Connect: A framework for integrating Kafka with external systems. Kafka 4.3 introduces the
ConnectPlugininterface to improve the discoverability and management of configurable Connect components.
Java requirements
Kafka 4.3.0 requires newer Java versions for server-side components:
Component | Required Java version |
|---|---|
Kafka Brokers, Kafka Connect, Kafka Tools | Java 17 or newer |
Kafka Clients, Kafka Streams | Java 11 or newer |
Kafka 4.3.0 fully supports Java 17. Java 11 remains supported for a subset of modules, such as clients and streams.
KRaft mode
Kafka 4 uses KRaft (Kafka Raft Metadata mode) for cluster metadata management. KRaft replaces ZooKeeper and allows Kafka to manage metadata directly using its internal controller quorum.
KRaft provides:
ZooKeeper-free Kafka deployments.
Simplified cluster architecture and administration.
Improved metadata scalability.
Integrated controller and broker management.
Raft-based metadata replication and fault tolerance.
Kafka 4 also provides additional KRaft configuration options for controlling controller fetch and snapshot sizes and for improving cluster management operations.
Kafka 4.3.0 release highlights
Kafka 4.3.0 includes the following improvements across the Kafka ecosystem:
Follower fetch from tiered offset: Introduces
follower.fetch.last.tiered.offset.enableto control how followers bootstrap from tiered storage.Cordon brokers and log directories: Introduces
cordoned.log.dirs, which lets administrators prevent new partitions from being placed on selected log directories during scaling or decommissioning operations.Consumer group improvements: Adds new coordinator configuration and assignment improvements to optimize consumer group management.
Partition storage monitoring: Adds metrics that show the percentage of maximum retention currently used by topic partitions.
OAuth client assertion support: Adds support for OAuth client assertions with the
client_credentialsgrant type.Kafka Streams improvements: Adds state-store memory metrics, state cleanup configuration, and additional processing capabilities.
Kafka Connect improvements: Introduces the
ConnectPlugininterface to improve the discoverability of configurable Kafka Connect components.MirrorMaker 2 improvements: Adds support for updated metric naming through the
metric.names.formatsconfiguration.
Install Kafka 4 using Ambari
Complete the following steps to install the Kafka 4 Mpack in Ambari.
Step 1: Install the Mpack
Download the Kafka 4 Mpack from the Mpacks link.
Upload the Kafka 4 Mpack
.tar.gzfile to the Ambari server.Run the following command to install the Mpack:
ambari-server install-mpack --mpack=kafka4_mpack_tar.gz --verboseThe command displays the following output:
INFO: Management pack kafka4-4.3.0.tar.gz successfully installed! Please restart ambari-server. INFO: Loading properties from /etc/ambari-server/conf/ambari.properties Ambari Server 'install-mpack' completed successfully.Restart the Ambari server:
ambari-server restart
Step 2: Add the Kafka4 service
Sign in to the Ambari UI and go to Add kafka4 service.
Select the hosts for the Kafka4 brokers.
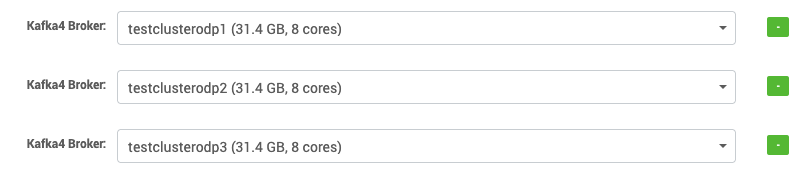
In Kraft mode, you can select hosts as controller, broker, or both, depending on the size of the cluster and the use case.
Broker role
A broker — sometimes called a node or server — is responsible for orchestrating the storage and transmission of messages within the Kafka cluster.
Controller role
A controller coordinates the cluster by managing and tracking its metadata. Controllers form a metadata quorum, where each controller serves either as the active controller or as a hot standby for the active controller.
While Kafka nodes can serve as both brokers and controllers, it's sometimes preferable to separate these functions, especially in complex deployments. In simpler setups, combining the broker and controller roles can improve efficiency.
To maintain high availability, a majority of controllers must be operational. For example, with 3 controllers, the cluster can tolerate 1 failure; with 5 controllers, it can tolerate up to 2 failures.
Step 3: Configure the controller and broker lists
Under Advanced kraft-broker-controller, specify a comma-separated list of node.id@hostname values for the nodes you want to select as controllers and brokers, in kraft-controller-list and kraft-broker-list respectively.
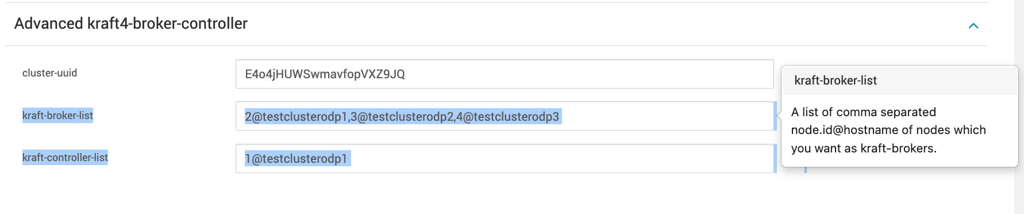
Example: three Kafka brokers and one controller.
Note
Assign
node.idto the controller list first. For example, forcontroller1,node.idmust be set to1, and so on. Each node ID must be unique across all servers in a cluster. No two servers can share the same node ID, regardless of theirprocess.rolesvalues. Even if a node serves as both controller and broker, it still requires a distinctnode.idin the controller and broker lists.
Step 4: Set log directories
Set log directories (log.dirs) under Advanced kraft4-broker and Advanced kraft4-controller to store KRaft broker and KRaft controller log data. By default, /kraft4-broker-logs and /kraft4-controller-logs are used as the log directories for the broker and controller.
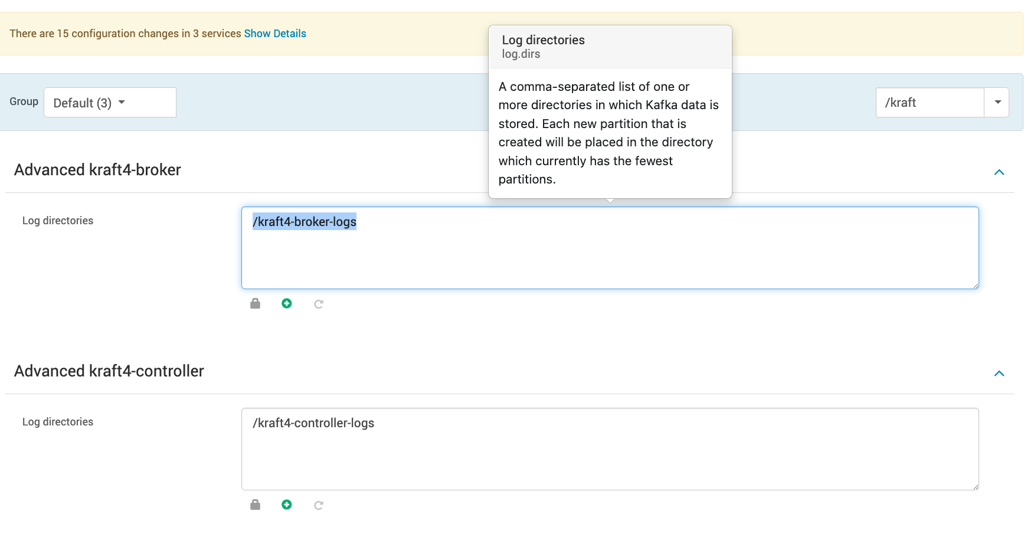
Step 5: Configure operational log and PID directories
Under Advanced kraft4-broker-env and Advanced kraft4-controller-env, configure the Kraft-broker log directory and Kraft-controller log directory to store Kafka4 KRaft operational logs. You can also specify the Kafka PID directory for the broker and controller, which is used to store process ID (PID) files for the KRaft broker and KRaft controller.
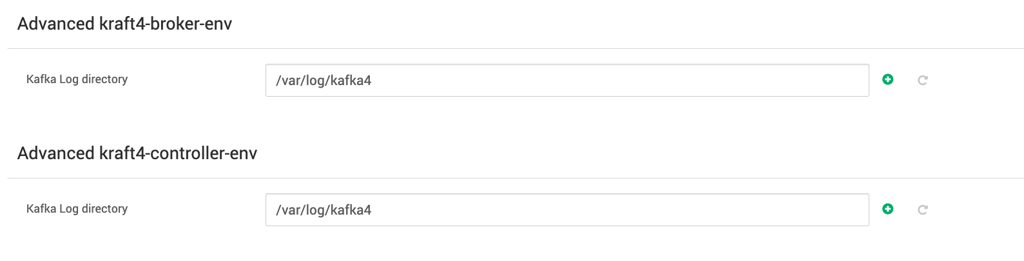
Step 6: Configure listener ports
Specify the port on which you want the KRaft brokers and KRaft controllers to listen, under Advanced kraft-broker and Advanced kraft-controller respectively.


Step 7: Review remaining configuration
You can modify the remaining configurations depending on your use case, under Advanced kraft-controller, Advanced kraft-broker, Advanced kraft-controller-env, and Advanced kraft-broker-env.
Step 8: Configure KDC credentials and deploy
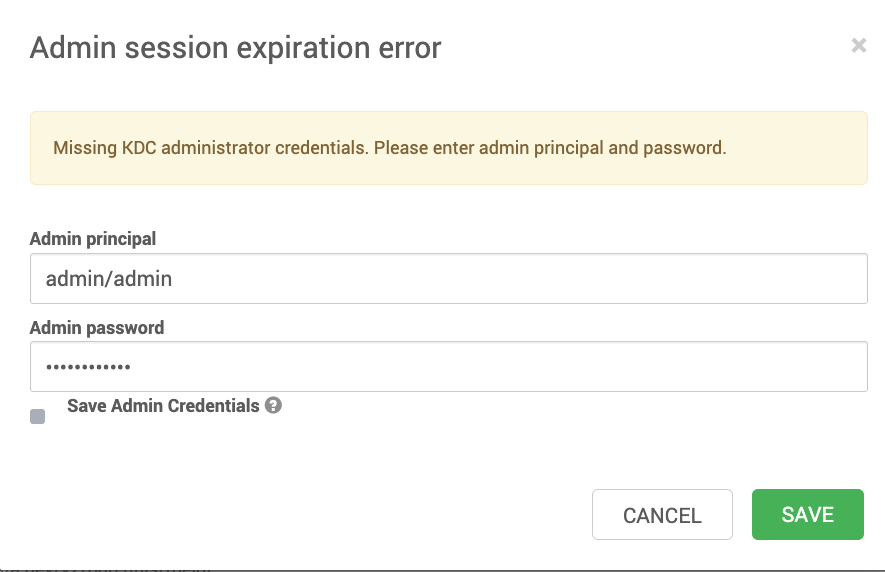
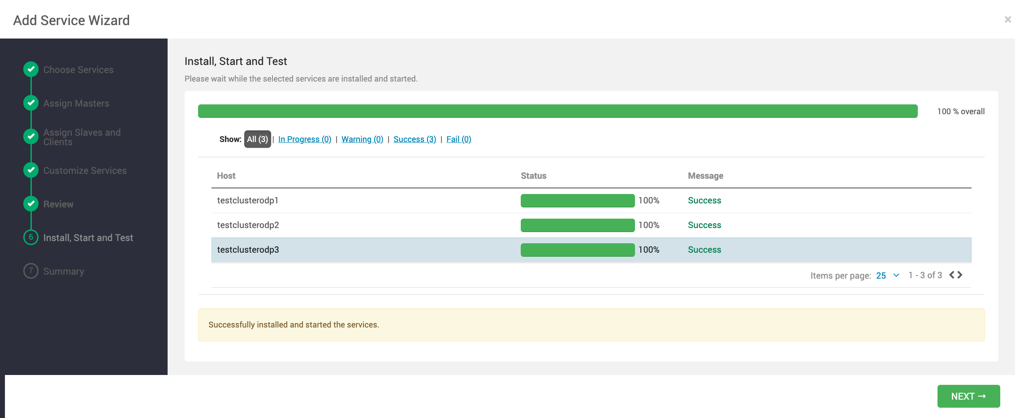
Configure your KDC administrator credentials, then deploy and start Kafka4.
Step 9: Use current KRaft settings
When you use KRaft instead of ZooKeeper, use current, non-deprecated configuration settings. The following table describes the settings to use.
Feature | Allowed with ZooKeeper | Required with KRaft |
|---|---|---|
Clients and services |
|
|
Schema Registry |
|
|
Administrative tools |
|
|
Retrieve Kafka cluster ID |
| From the command line, use |
Create a topic to store your events
Before you can write your first events, create a topic using Kafka's default broker port, configured as 7001:
To view the details of the newly created topic:
Write events into the topic
Run the console producer:
Enter a few events:
Stop the producer with Ctrl-C.
Read the events
Open another terminal and run the console consumer:
You should see:
You can continue adding events from the producer terminal. They appear immediately in the consumer terminal.
Note
You must provide a client configuration file for Kerberos or SSL authentication. The file typically takes one of the following forms.
Kerberos enabled (
client-kerb.prop):security.protocol=SASL_PLAINTEXTSSL enabled (
client-ssl.prop):security.protocol = SSL ssl.truststore.location = /opt/security/pki/truststore.jks ssl.truststore.password = WelcomeKerberos and SSL enabled (
client-kerb-ssl.prop):security.protocol = SASL_SSL ssl.truststore.location = /opt/security/pki/truststore.jks ssl.truststore.password = WelcomeBefore you perform any Kafka operation, export the required
KAFKA_OPTS:export KAFKA_OPTS="-Djava.security.auth.login.config=/usr/odp/current/kafka4-broker/config/kafka4_jaas.conf -Djava.security.krb5.conf=/etc/krb5.conf"Run the command as the
kafkauser. If Ranger is enabled, alternatively grant the required permissions to the user from the Ranger UI before you perform the operation.
Security
Enable Ranger for Kafka 4
Complete the following steps to enable and configure Ranger authorization for Kafka 4.
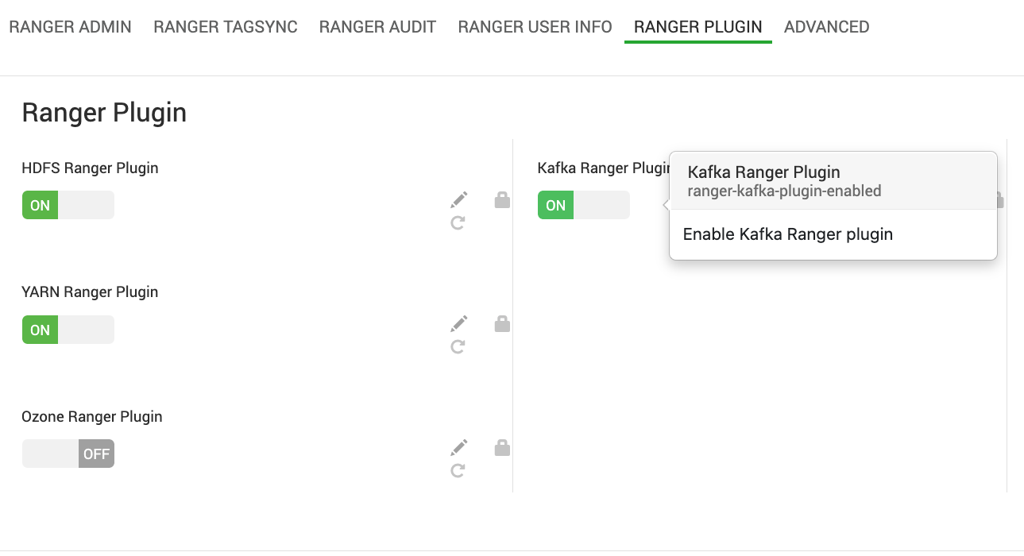
Step 1: Enable the Ranger plugin
In Ambari, go to Ranger > Ranger Plugin, and set the Ranger plugin enablement property to true.
Step 2: Configure advanced Ranger Kafka 4 properties
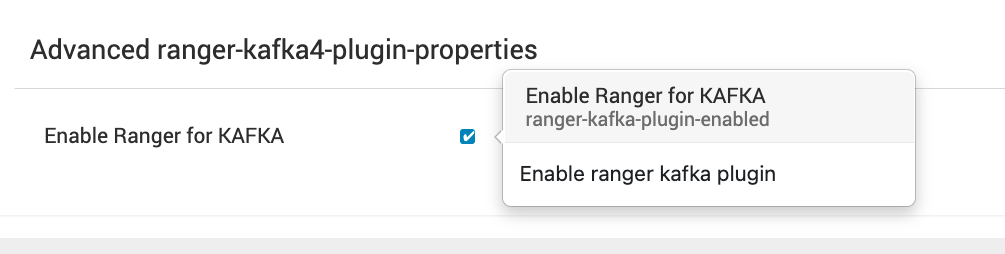
Go to Kafka 4 > Configs > Advanced ranger-kafka4-plugin-properties, and set the corresponding Ranger plugin property to:
Save the configuration and restart the required Kafka 4 services if prompted.
Step 3: Verify the Ranger connection
Open the Ranger Admin UI and go to the Kafka 4 service or policy. Select Test Connection to verify that the Kafka 4 Ranger plugin communicates successfully with Ranger.
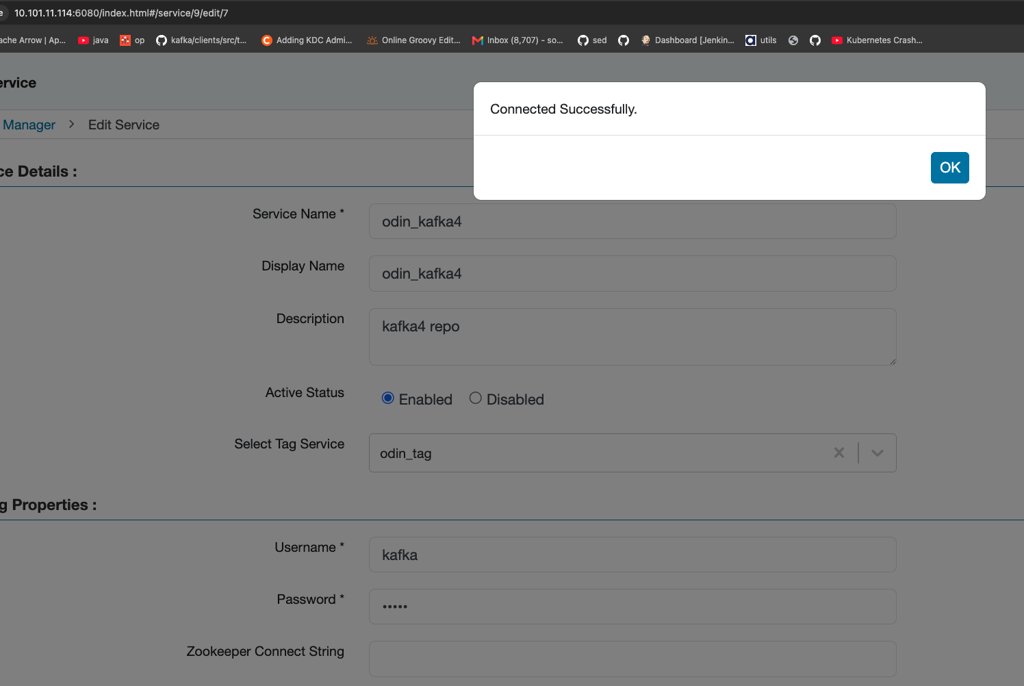
Step 4: Configure Kafka 4 policies
Once the connection is verified, go to Ranger UI > Kafka 4 Policies. From this page, you can create and manage authorization policies and assign privileges to users and groups, including:
Consume: Read messages from topics.
Publish: Write messages to topics.
Create: Create topics.
Delete: Delete topics.
Describe: View topic and cluster metadata.
Configure: Modify resource configurations.
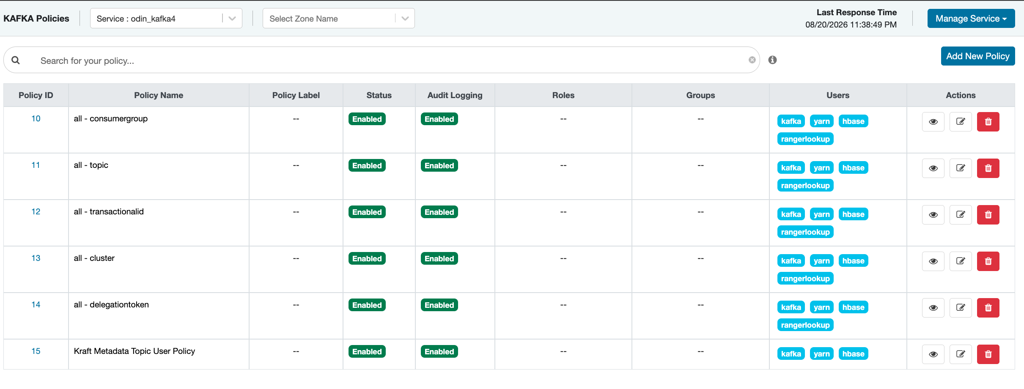
This allows administrators to control user- and group-level access to Kafka 4 resources through Ranger.
Note If the Ranger-Kafka plugin is enabled, use the
rangerlookupkeytab and principal. You can edit these configurations through the Ranger UI, under Service Manager > Edit Service > Config Properties.

Enable SSL for Kafka 4
Update the following properties according to your SSL configuration, defined under Advanced kraft4-broker and Advanced kraft4-Controller:
security.inter.broker.protocol=SASL_SSL ssl.client.auth=none ssl.key.password=Welcome ssl.keystore.location=/opt/security/pki/keystore.jks ssl.keystore.password=Welcome ssl.truststore.location=/opt/security/pki/truststore.jks ssl.truststore.password=Welcome listener.security.protocol.map=CONTROLLER:SASL_SSL,PLAINTEXT:PLAINTEXT,SSL:SSL,SASL_PLAINTEXT:SASL_PLAINTEXT,SASL_SSL:SASL_SSL
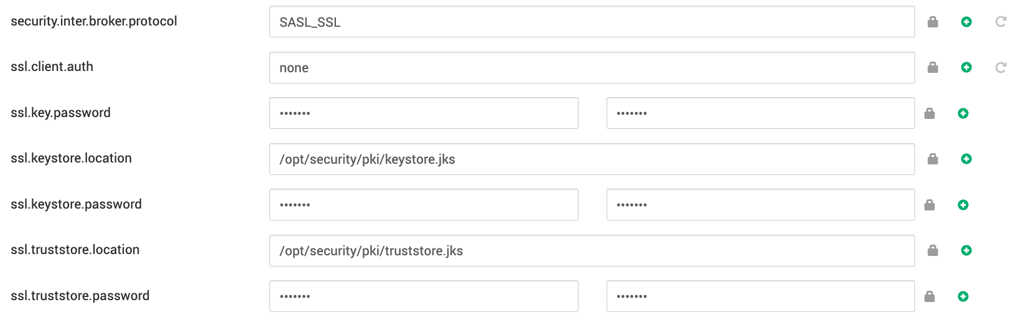

Add the following properties in the Ranger UI for Kafka, based on your configuration:
Name
Value
default-policy.1.resource.topic__cluster_metadatasetup.additional.default.policiestruebootstrap.serverstestclusterodp1:7001,testclusterodp2:...kafka.keytab/etc/security/keytabs/rangerlookup.ser...kafka.principalrangerlookup/testclusterodp1@ADSRE...default-policy.1.policyItem.1.accessTypepublish,consume,configure,describe,c...security.protocolSASL_SSLdefault-policy.1.nameKraft Metadata Topic User Policytag.download.auth.userskafkapolicy.download.auth.userskafkasasl.mechanismGSSAPIdefault-policy.1.policyItem.1.userskafkassl.truststore.passwordWelcomessl.truststore.location/opt/security/pki/truststore.jks