Managing High Availability
Ambari web provides a wizard-driven user experience that enables you to configure high availability of the components that support services across the stack. High availability is assured through establishing active and standby components. If an active component becomes unavailable, the standby component is available. After configuring high availability for a service, Ambari enables you to manage and disable (rollback) the high availability of components in that service.
Ambari web provides a wizard-driven user experience that enables you to configure high availability of the components that support services across the stack. High availability is assured through establishing active and standby components. If the active component fails or becomes unavailable, the standby component is available. After configuring high availability for a service, Ambari enables you to manage and disable (rollback) the high availability of components in that service.
Configuring NameNode High Availability
Enable NameNode High Availability
To ensure that another NameNode in your cluster is always available if the active NameNode host fails, you should enable and configure NameNode high availability on your cluster using Ambari Web.
About this task
The Enable HA wizard describes the set of automated and manual steps you must take to set up NameNode high availability. HDFS and ZooKeeper must stop and start when enabling NameNode HA. Maintenance Mode will prevent those start and stop operations from occurring. If the HDFS or ZooKeeper services are in Maintenance Mode,H the NameNode HA wizard will not complete successfully.
Before you begin
- Verify that you have at least three hosts in your cluster and are running at least three Apache ZooKeeper servers.
- Verify that the Hadoop Distributed File System (HDFS) and ZooKeeper services are not in Maintenance Mode.
Procedure
- In Ambari Web, browse to Services > HDFS > Summary.
- Click Actions, then click Enable NameNode HA. The Enable NameNode HA wizard launches.
- On Get Started, type in a Nameservice ID and click Next.
You use this Nameservice ID instead of the NameNode FQDN after HA is set up.

If you are using Hive, you must manually change the Hive Metastore FS root to point to the Nameservice URI instead of the NameNode URI, as follows:
a. Find the current FS root on the Hive host.
xxxxxxxxxxhive --config /etc/hive/conf/conf.server --service metatool -listFSRoot utput should look like: Listing FS Roots... hdfs://[NAMENODE_HOST]/apps/hive/warehouse.b. Change the FS root.
xxxxxxxxxx$ hive --config /etc/hive/conf/conf.server --service metatool -updateLocation [NEW_LOCATION] [OLD_LOCATION]For example, if your Nameservice ID is mycluster, you input:
$ hive --config /etc/hive/conf/conf.server --service metatool -updateLocation hdfs://mycluster/apps/hive/ warehouse hdfs://c6401.ambari.apache.org/apps/hive/warehouseThe output looks similar to:
Successfully updated the following locations... Updated X records in SDS table
c. Adjust the ZooKeeper Failover Controller retries setting for your environment.
i. Browse to **Services** > **HDFS** > **Configs** > **Advanced core-site**.
d. Set
xxxxxxxxxxha.failover-controller.active-standby-elector.zk.op.retries=120.- On Select Hosts, select a host for the additional NameNode and the JournalNodes, and then click Next.
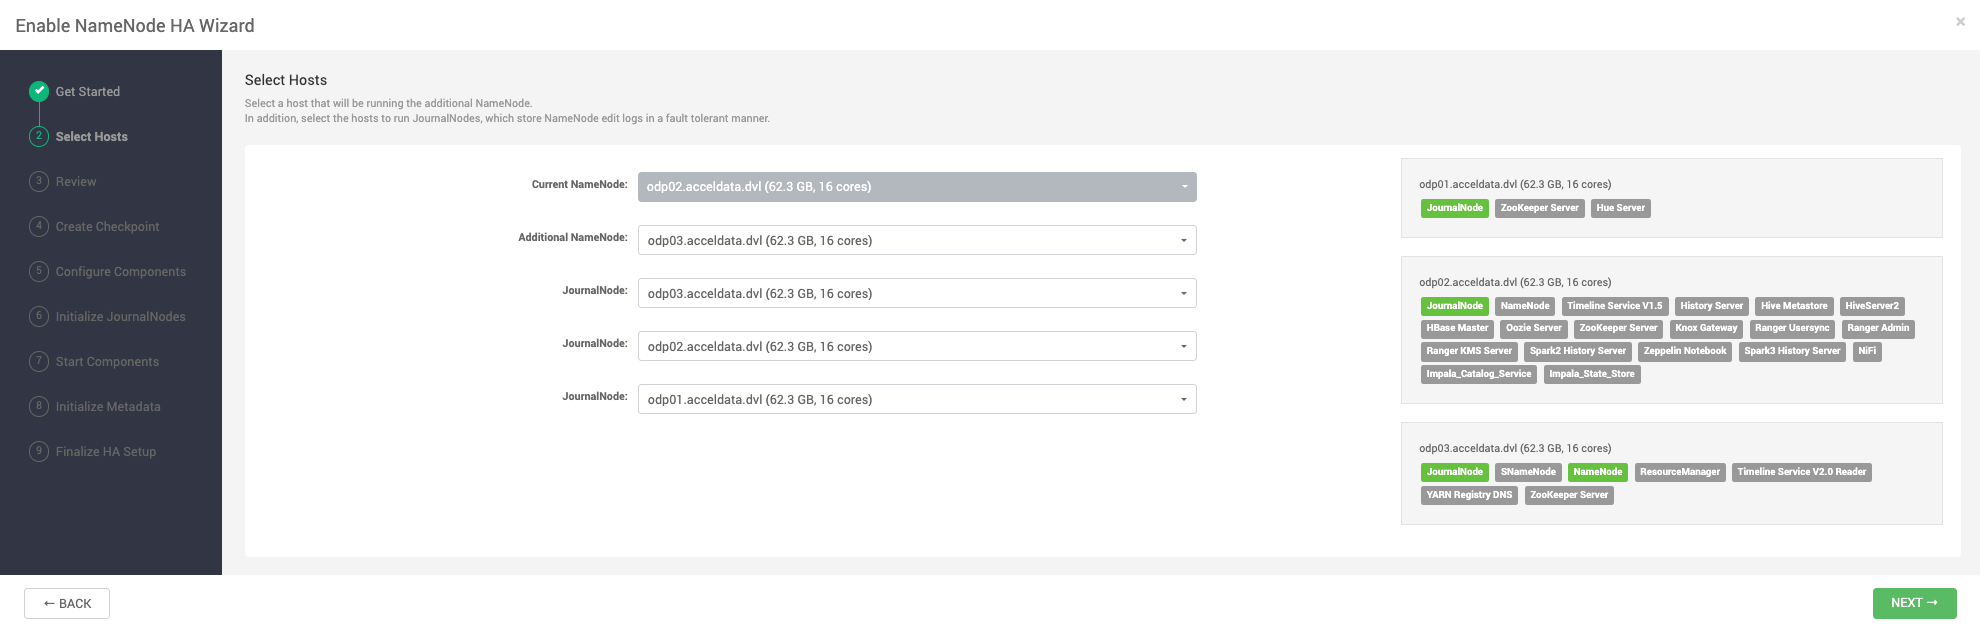
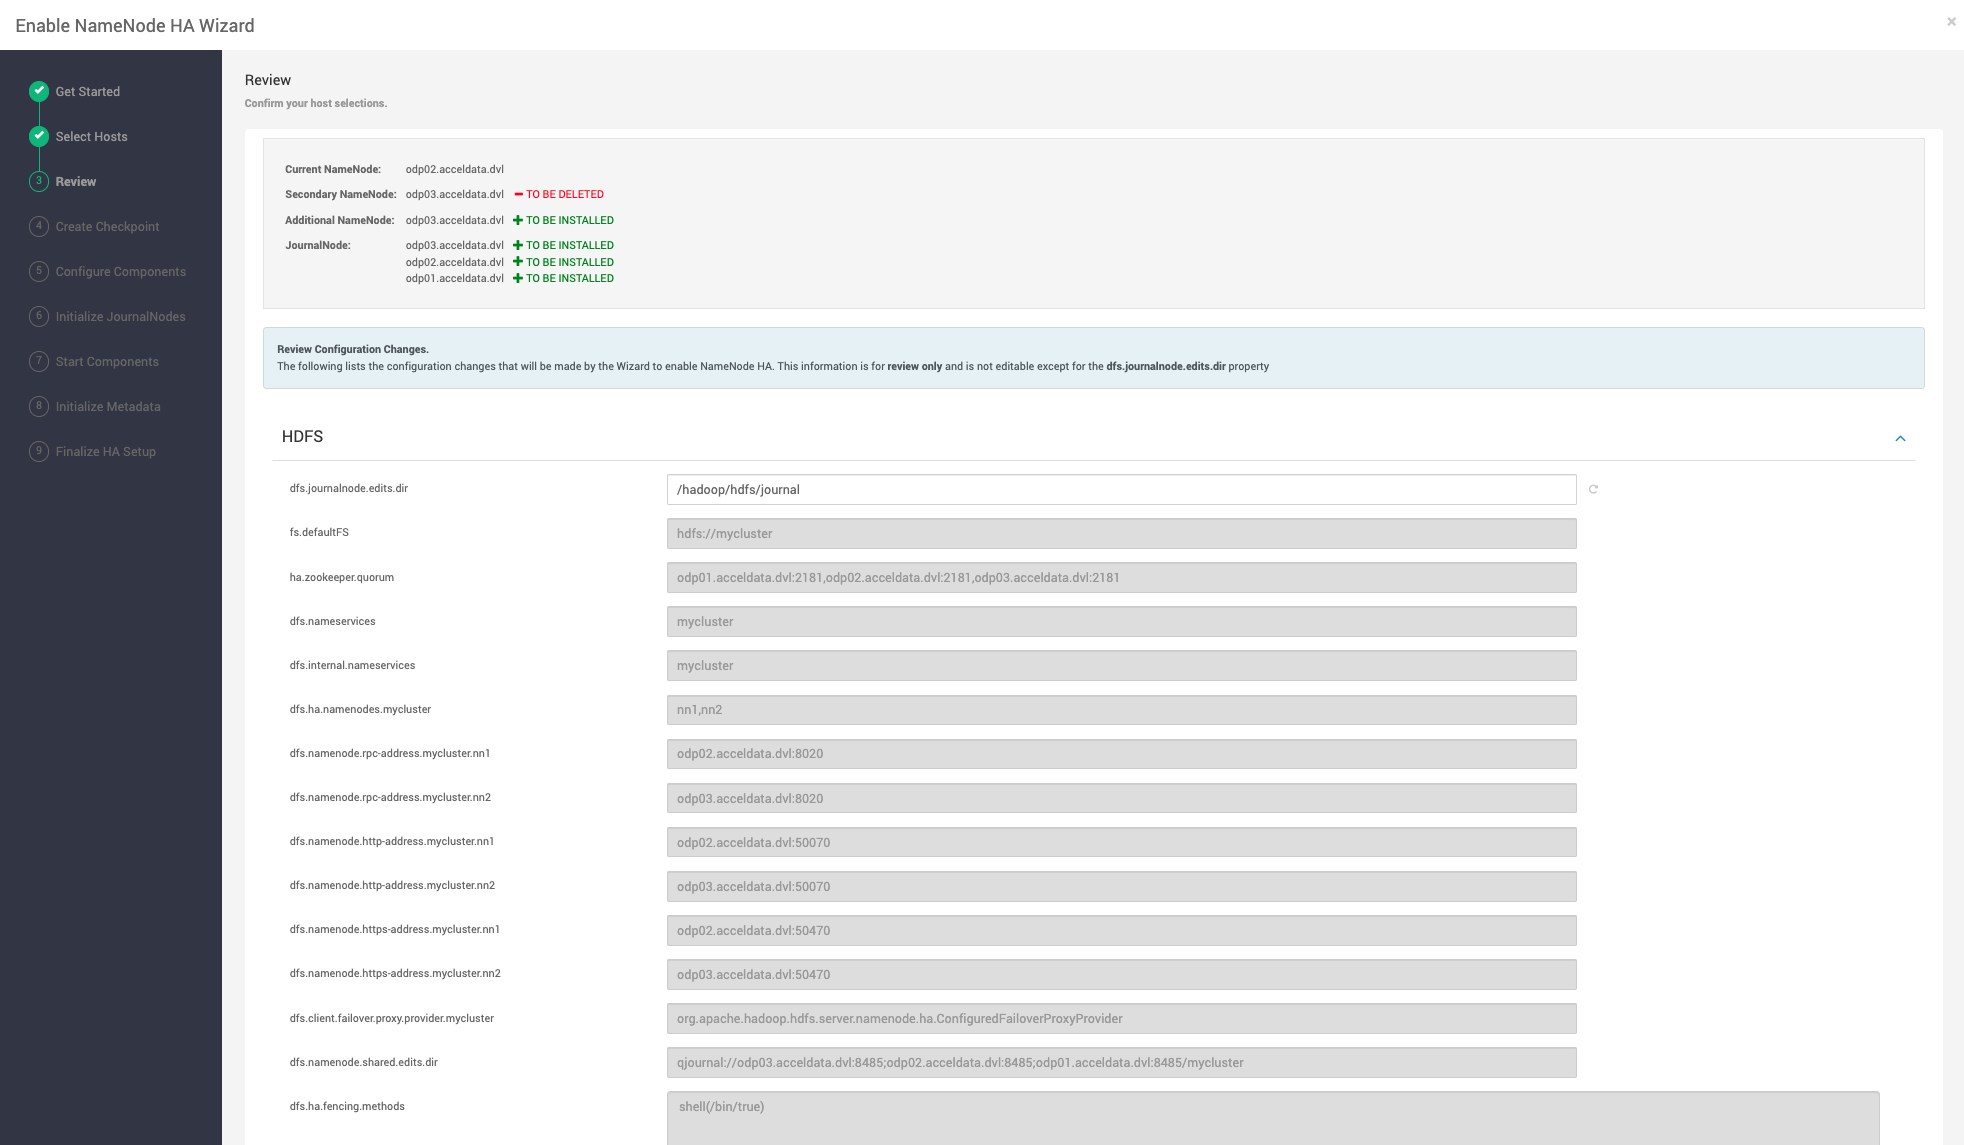
- On Review, confirm your host selections and click Next:
- Follow the directions on the Manual Steps Required: Create Checkpoint on NameNode page.
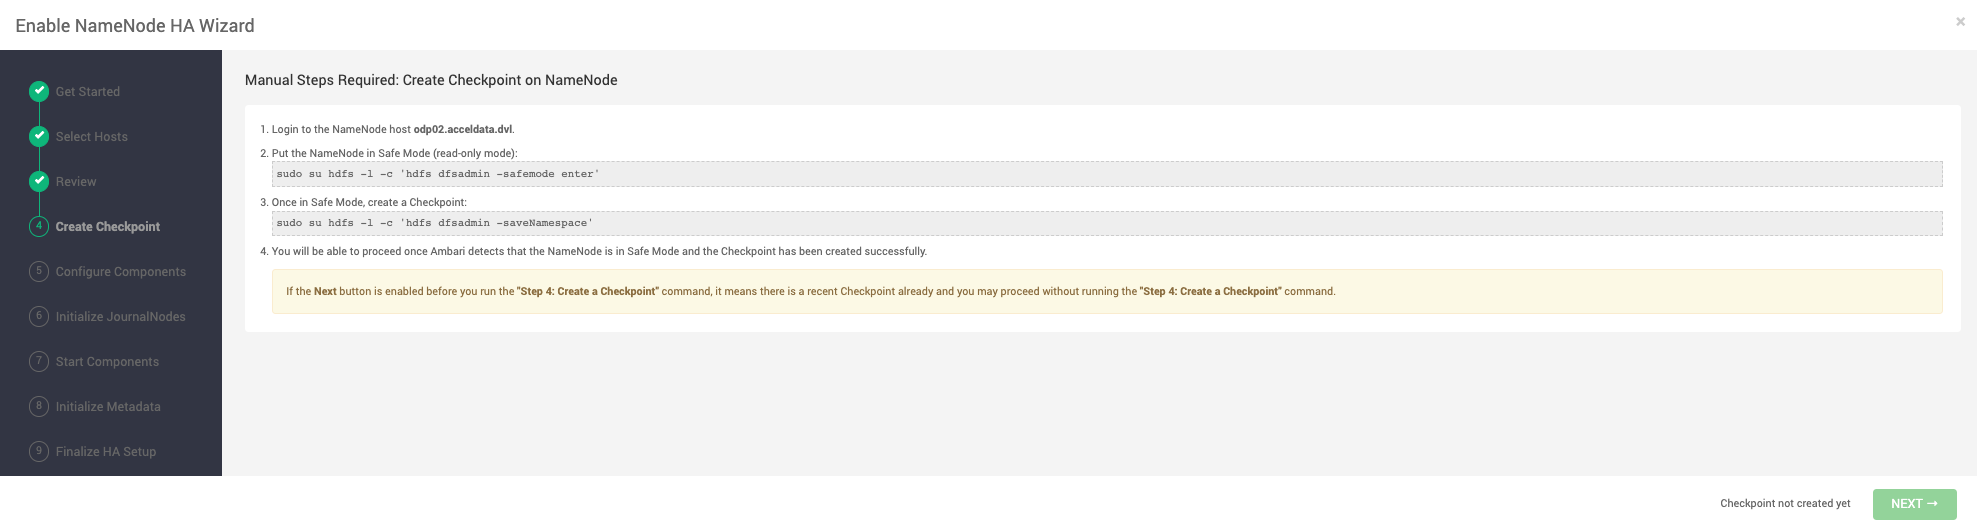
You must log in to your current NameNode host and run the commands to put your NameNode into safe mode and create a checkpoint.
When Ambari detects success and the message on the bottom of the window changes to Checkpoint created, click Next.
- On Configure Components, monitor the configuration progress bars.
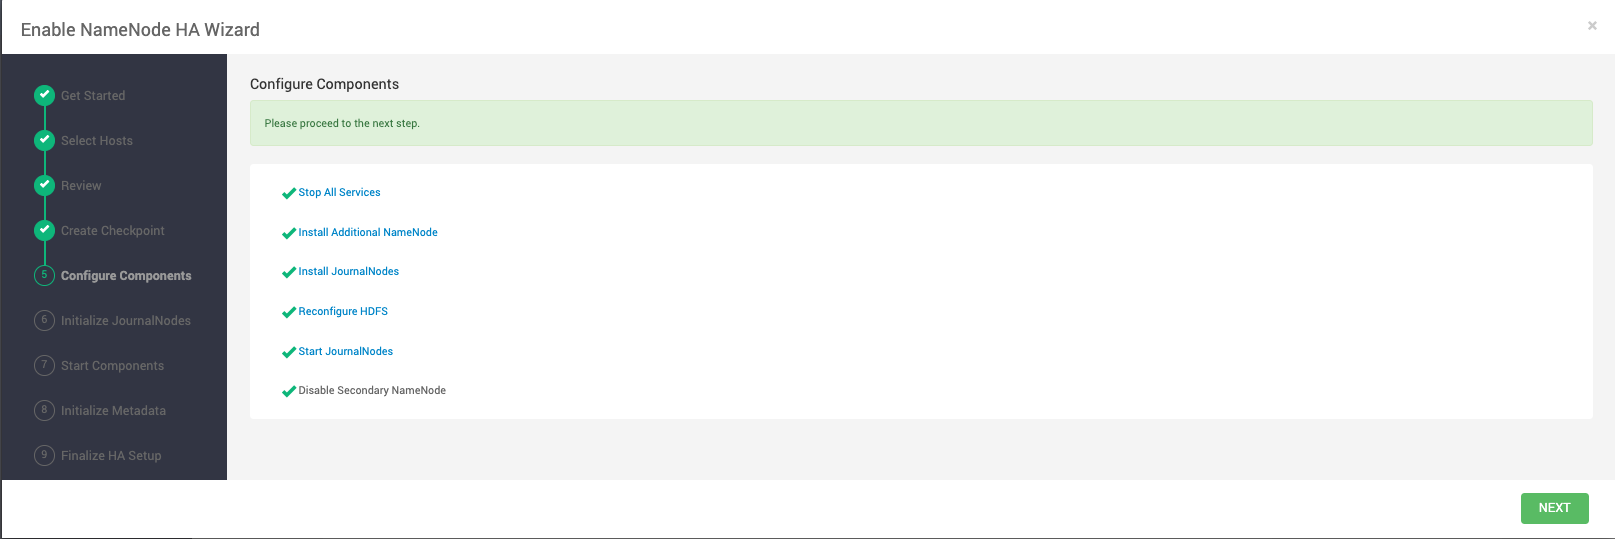
When all components have been configured successfully, click Next
- Follow the instructions on Manual Steps Required: Initialize JournalNodes.
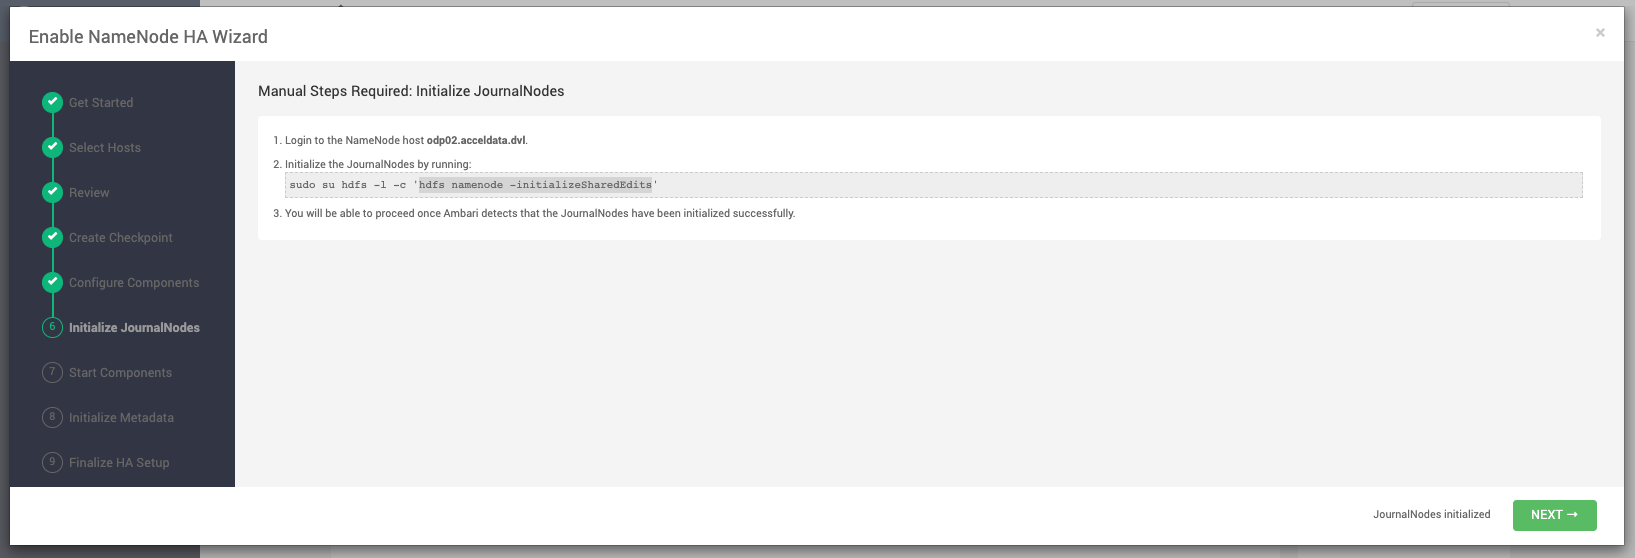
You must log in to your current NameNode host to run the command to initialize the JournalNodes. When JournalNodes initiate successfully, click Next.
- On Start Components, monitor the progress bars as the ZooKeeper servers and NameNode start.
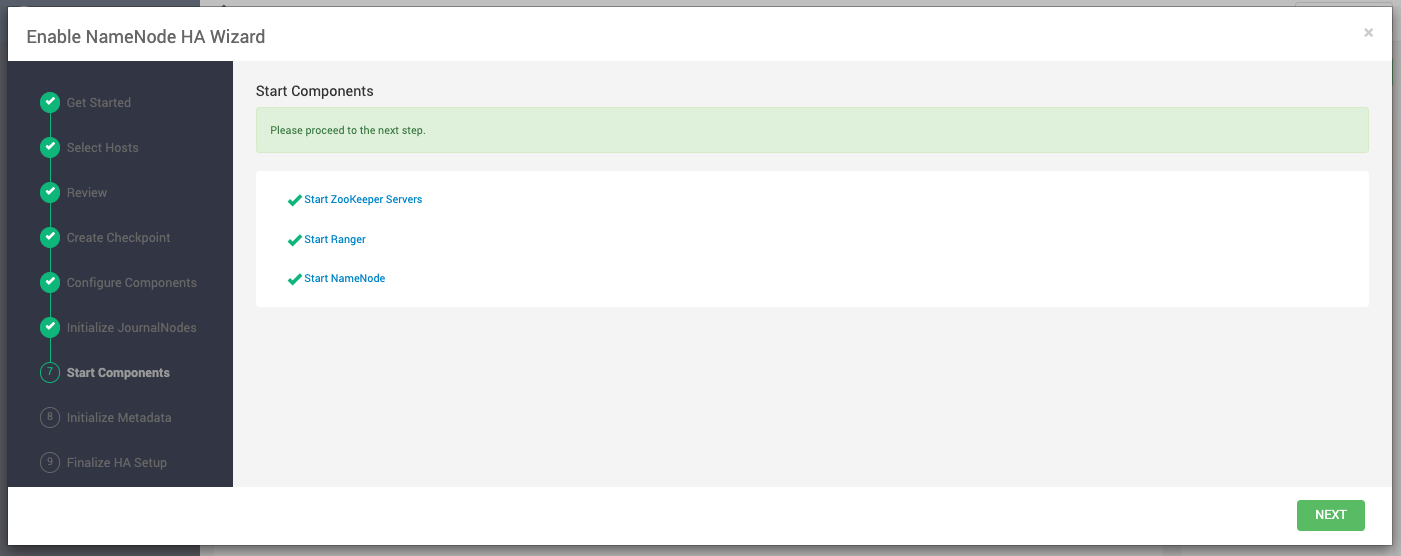
When ZooKeeper servers and NameNode have started, click Next.
In a cluster with Ranger enabled, and with Hive configured to use MySQL, Ranger will fail to start if MySQL is stopped. To work around this issue, start the Hive MySQL database and then retry starting components.
- On Manual Steps Required: Initialize NameNode HA Metadata, complete all steps, using the instructions on the page.
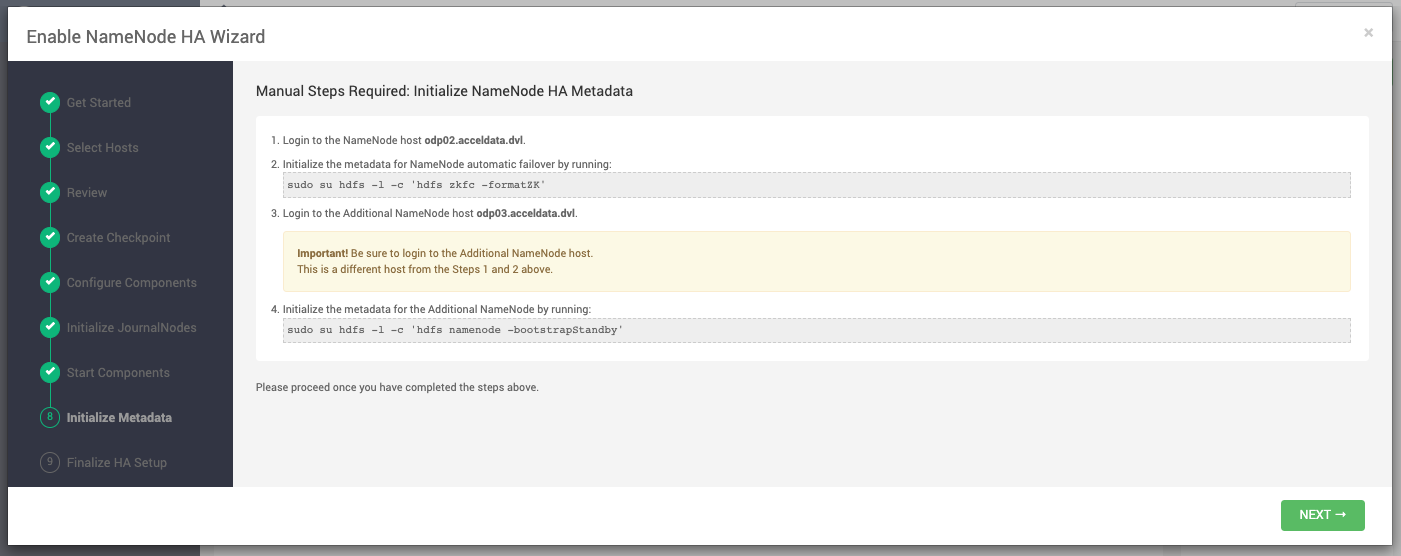
For this step, you must log in to both the current NameNode and the additional NameNode. Make sure you are logged in to the correct host for each command. Click OK to confirm, after you complete each command. When you have completed the four steps required to intialize metadata, click Next.
- On Finalize HA Setup, monitor the progress bars, the wizard completes HA setup.

When the wizard completes HA setup, click Done to finish the wizard.
After Ambari Web reloads, you may see some alert notifications. Wait a few minutes until all the services restart.
- Restart any components using Ambari Web, if necessary.
What to do next
Review and confirm all recommended configuration changes.
Rolling Back NameNode High Availability
To disable (roll back) NameNode high availability, perform these tasks (depending on your installation):
Stop HBase
Procedure
- In Ambari Web, click the HBase service.
- Click Service Actions > Stop.
- Wait until HBase has stopped completely before continuing.
What to do next
Checkpoint the active NameNode.
Checkpoint the Active NameNode
About this task
If HDFS is used after you enable NameNode HA, but you want to revert to a non-HA state, you must checkpoint the HDFS state before proceeding with the rollback. If the Enable NameNode HA wizard failed and you need to revert, you can omit this step and proceed to stop all services. Checkpointing the HDFS state requires different syntax, depending on whether Kerberos security is enabled on the cluster or not:
Procedure
- If Kerberos security has not been enabled on the cluster, use the following command on the active NameNode host and as the HDFS service user, to save the namespace:
xxxxxxxxxxsudo su -l [HDFS_USER] -c 'hdfs dfsadmin -safemode enter' sudo su -l [HDFS_USER] -c 'hdfs dfsadmin - saveNamespace'- If Kerberos security has been enabled on the cluster, use the following commands to save the namespace:
sudo su -l [HDFS_USER] -c 'kinit -kt /etc/security/keytabs/nn.service.keytab nn/[HOSTNAME]@[REALM];hdfs dfsadmin -safemode enter' sudo su -l [HDFS_USER] -c 'kinit -kt /etc/security/keytabs/nn.service.keytab nn/ [HOSTNAME]@[REALM];hdfs dfsadmin -saveNamespace'In this example, [HDFS_USER] is the HDFS service user (for example, hdfs), [HOSTNAME] is the Active NameNode hostname, and [REALM] is your Kerberos realm.
What to do next
Stop all services
Stop all Services
About this task
In Ambari Web > Services you can stop all listed services simultaneously.
Procedure
- In the Services section, click Stop All.
All listed services stop.
What to do next
Prepare the Ambari server host for NameNode rollback.
Prepare the Ambari Server Host for NameNode Rollback
To prepare for the NameNode rollback task:
Procedure
- Log in to the Ambari server host.
- Set the following environment variables:
| Environment Variables | Description |
|---|---|
| export AMBARI_USER=AMBARI_USERNAME | Substitute the value of the administrative user for Ambari Web. The default value is admin. |
| export AMBARI_PW=AMBARI_PASSWORD | Substitute the value of the administrative password for Ambari Web. The default value is admin. |
| export AMBARI_PORT=AMBARI_PORT | Substitute the Ambari Web port. The default value is 8080. |
| export AMBARI_PROTO=AMBARI_PROTOCOL | Substitute the value of the protocol for connecting to Ambari Web. Options are http or https. The default value is http. |
| export CLUSTER_NAME=CLUSTER_NAME | Substitute the name of your cluster, which you set during installation: for example, mycluster. |
| export NAMENODE_HOSTNAME=NN_HOSTNAME | Substitute the FQDN of the host for the non-HA NameNode: for example, nn01.mycompany.com. |
| export ADDITIONAL_NAMENODE_HOSTNAME=ANN_HOSTNAME | Substitute the FQDN of the host for the additional NameNode in your HA setup. |
| export SECONDARY_NAMENODE_HOSTNAME=SNN_HOSTNAME | Substitute the FQDN of the host for the standby NameNode for the non-HA setup. |
| export JOURNALNODE1_HOSTNAME=JOUR1_HOSTNAME | Substitute the FQDN of the host for the first Journal Node. |
| export JOURNALNODE2_HOSTNAME=JOUR2_HOSTNAME | Substitute the FQDN of the host for the second Journal Node. |
| export JOURNALNODE3_HOSTNAME=JOUR3_HOSTNAME | Substitute the FQDN of the host for the third Journal Node. |
- Double check that these environment variables are set correctly.
What to do next
Restore the HBase configuration.
Restore the HBase Configuration
About this task
If you have installed HBase, you might need to restore a configuration to its pre-HA state:
Procedure
- From the Ambari server host, determine whether your current HBase configuration must be restored: /var/lib/ambari-server/resources/scripts/configs.py -u [AMBARI
Use the environment variables that you set up when preparing the Ambari server host for rollback for the variable names.
- If hbase.rootdir is set to the NameService ID you set up using the Enable NameNode HA wizard, you must revert hbase-site to non-HA values. For example, in "hbase.rootdir":"hdfs://[name-service-id]:8020/apps/ hbase/data", the hbase.rootdir property points to the NameService ID and the value must be rolled back.
- If hbase.rootdir points instead to a specific NameNode host, it does not need to be rolled back. For example, in "hbase.rootdir":"hdfs://[nn01.mycompany.com]:8020/apps/hbase/data", the hbase.rootdir property points to a specific NameNode host and not a NameService ID. This does not need to be rolled back; you can proceed to delete ZooKeeper failover controllers.
- If you must roll back the hbase.rootdir value, on the Ambari Server host, use the config.sh script to make the necessary change: /var/lib/ambari-server/resources/scripts/configs.py -u [AMBARI_USER] -p[AMBARI_PW] - port [AMBARI_PORT] set localhost [CLUSTER_NAME] hbase-site hbase.rootdir hdfs:// [NAMENODE_HOSTNAME]:8020/apps/hbase/data
Use the environment variables that you set up when preparing the Ambari server host for rollback for the variable names.
- On the Ambari server host, verify that the hbase.rootdir property has been restored properly: /var/lib/ambari-server/resources/scripts/configs.py -u [AMBARI_USER] -p [AMBARI_PW] -port [AMBARI_PORT] get localhost [CLUSTER_NAME] hbase-site
The hbase.rootdir property should now be the same as the NameNode hostname, not the NameService ID.
What to do next
Delete the ZooKeeper failover controllers.
Delete ZooKeeper Failover Controllers
Before you begin
If the following command on the Ambari server host returns an empty items array then you must delete ZooKeeper (ZK) Failover Controllers:
curl -u [AMBARI_USER]:[AMBARI_PW] -H "X-Requested-By: ambari" -i [AMBARI_PROTO]://localhost: [AMBARI_PORT]/api/v1/clusters/[CLUSTER_NAME]/host_components?HostRoles/component_name=ZKFCProcedure
- On the Ambari Server host, issue the following DELETE commands:
curl -u [AMBARI_USER]:[AMBARI_PW] -H "X-Requested-By: ambari" -i -X DELETE [AMBARI_PROTO]:// localhost:[AMBARI_PORT]/api/v1/clusters/[CLUSTER_NAME]/hosts/[NAMENODE_HOSTNAME]/ host_components/ZKFC curl -u [AMBARI_USER]:[AMBARI_PW] -H "X-Requested-By: ambari" -i -X DELETE [AMBARI_PROTO]://localhost:[AMBARI_PORT]/api/v1/clusters/[CLUSTER_NAME]/hosts/ [ADDITIONAL_NAMENODE_HOSTNAME]/host_components/ZKFC- Verify that the controllers are gone:
curl -u [AMBARI_USER]:[AMBARI_PW] -H "X-Requested-By: ambari" -i [AMBARI_PROTO]://localhost: [AMBARI_PORT]/api/v1/clusters/[CLUSTER_NAME]/host_components?HostRoles/component_name=ZKFCThis command should return an empty items array.
What to do next
Modify HDFS configurations.
Modify HDFS Configurations
You may need to modify your hdfs-site configuration and/or your core-site configuration.
Before you begin
Check whether you need to modify your hdfs-site configuration, by executing the following command on the Ambari Server host:
/var/lib/ambari-server/resources/scripts/configs.py --user=[ambari_user] --password=[ambari_password] --port=[port] --action=get --host=localhost --cluster=[CLUSTERNAME] --config-type=hdfs-siteIf you see any of the following properties, you must delete them from your configuration.
- dfs.nameservices
- dfs.client.failover.proxy.provider.[NAMESERVICE_ID]
- dfs.ha.namenodes.[NAMESERVICE_ID]
- dfs.ha.fencing.methods
- dfs.ha.automatic-failover.enabled
- dfs.namenode.http-address.[NAMESERVICE_ID].nn1
- dfs.namenode.http-address.[NAMESERVICE_ID].nn2
- dfs.namenode.rpc-address.[NAMESERVICE_ID].nn1
- dfs.namenode.rpc-address.[NAMESERVICE_ID].nn2
- dfs.namenode.shared.edits.dir
- dfs.journalnode.edits.dir
- dfs.journalnode.http-address
- dfs.journalnode.kerberos.internal.spnego.principal
- dfs.journalnode.kerberos.principal
- dfs.journalnode.keytab.file
Where [NAMESERVICE_ID] is the NameService ID you created when you ran the Enable NameNode HA wizard.
Procedure
- On the Ambari Server host, execute the following for each property you found:
/var/lib/ambari-server/resources/scripts/configs.py --user=[ambari_user] --password=[ambari_password] --port=[port] --action=delete --host=localhost --cluster=[CLUSTERNAME] --config-type=hdfs-site [property]Replace [PROPERTY_NAME] with the name of each of the properties to be deleted.
- Verify that all of the properties have been deleted:
/var/lib/ambari-server/resources/scripts/configs.py --user=[ambari_user] --password=[ambari_password] --port=[port] --action=get --host=localhost --cluster=[CLUSTERNAME] --config-type=hdfs-siteNone of the properties listed above should be present.
- Determine whether you must modify your core-site configuration:
/var/lib/ambari-server/resources/scripts/configs.py --user=[ambari_user] --password=[ambari_password] --port=[port] --action=get --host=localhost --cluster=[CLUSTERNAME] --config-type=core-site4. If you see the property ha.zookeeper.quorum, delete it:
/var/lib/ambari-server/resources/scripts/configs.py --user=[ambari_user] --password=[ambari_password] --port=[port] --action=delete --host=localhost --cluster=[CLUSTERNAME] --config-type=core-site [property]- If the property fs.defaultFS is set to the NameService ID, revert it to its non-HA value:
"fs.defaultFS":"hdfs://[name-service-id]" The property fs.defaultFS needs to be modified as it points to a NameService ID "fs.defaultFS":"hdfs://[nn01.mycompany.com]"You need not change the property fs.defaultFS, because it points to a specific NameNode, not to a NameService ID.
- Revert the property fs.defaultFS to the NameNode host value:
/var/lib/ambari-server/resources/scripts/configs.py --user=[ambari_user] --password=[ambari_password] --port=[port] --action=set --host=localhost --cluster=[CLUSTERNAME] --config-type=core-site [property] fs.defaultFS hdfs://[NAMENODE_HOSTNAME]7. Verify that the core-site properties are now properly set:
/var/lib/ambari-server/resources/scripts/configs.py --user=[ambari_user] --password=[ambari_password] --port=[port] --action=get --host=localhost --cluster=[CLUSTERNAME] --config-type=core-siteThe property fs.defaultFS should be the NameNode host and the property ha.zookeeper.quorum should not appear.
What to do next
Re-create the standby NameNode
Re-create the Standby NameNode
You may need to recreate your standby NameNode.
Before you begin
Check whether you need to recreate the standby NameNode, on the Ambari Server host:
curl -u [AMBARI_USER]:[AMBARI_PW] -H "X-Requested-By: ambari" -i -X GET [AMBARI_PROTO]://localhost:[AMBARI_PORT]/api/v1/clusters/[CLUSTER_NAME]/host_components?HostRoles/component_name=SECONDARY_NAMENODEIf this returns an empty items array, you must recreate your standby NameNode. Otherwise you can proceed to re- enable your standby NameNode.
Procedure
- On the Ambari Server host, run the following command:
curl -u [AMBARI_USER]:[AMBARI_PW] -H "X-Requested-By: ambari" -i -X POST -d '{"host_components" : [{"HostRoles":{"component_name":"SECONDARY_NAMENODE"}}] }' [AMBARI_PROTO]:// localhost:[AMBARI_PORT]/api/v1/clusters/[CLUSTER_NAME]/hosts?Hosts/ host_name=[SECONDARY_NAMENODE_HOSTNAME]2. Verify that the standby NameNode now exists. On the Ambari Server host, run the following command:
curl -u [AMBARI_USER]:[AMBARI_PW] -H "X-Requested-By: ambari" -i -X GET [AMBARI_PROTO]:// localhost:[AMBARI_PORT]/api/v1/clusters/[CLUSTER_NAME]/host_components?HostRoles/ component_name=SECONDARY_NAMENODEThis should return a non-empty items array containing the standby NameNode.
What to do next
Re-enable the standby NameNode.
Re-enable the Standby NameNode
To re-enable the standby NameNode:
Procedure
- Run the following commands on the Ambari Server host:
curl -u [AMBARI_USER]:[AMBARI_PW] -H "X-Requested-By: ambari" -i -X PUT -d '{"RequestInfo":{"context":"Enable Secondary NameNode"},"Body":{"HostRoles": {"state":"INSTALLED"}}}'[AMBARI_PROTO]://localhost:[AMBARI_PORT]/api/v1/clusters/[CLUSTER_NAME]/hosts/[SECONDARY_NAMENODE_HOSTNAME}/host_components/SECONDARY_NAMENODE- Analyze the output.
- If this returns 200, proceed to delete all JournalNodes.
- If this input returns the value 202, wait a few minutes and then run the following command:
curl -u [AMBARIUSER]:[AMBARI PW] -H "X-Requested-By: ambari" -i -X GET "[AMBARI_PROTO]://localhost:[AMBARI_PORT]/api/v1/clusters/[CLUSTER_NAME]/host_components?HostRoles/component_name=SECONDARY_NAMENODE&fields=HostRoles/state"- Wait for the response "state" : "INSTALLED" before proceeding.
What to do next
Delete all JournalNodes.
Delete all JournalNodes
You may need to delete any JournalNodes.
Before you begin
Check to see if you need to delete JournalNodes, on the Ambari Server host:
curl -u [AMBARI_USER]:[AMBARI_PW] -H "X-Requested-By: ambari" -i -X GET [AMBARI_PROTO]://localhost:[AMBARI_PORT]/api/v1/clusters/[CLUSTER_NAME]/host_components?HostRoles/component_name=JOURNALNODEIf this returns an empty items array, you can go on to delete the additional NameNode. Otherwise you must delete the JournalNodes.
Procedure
- On the Ambari Server host, run the following command:
curl -u [AMBARI_USER]:[AMBARI_PW] -H "X-Requested-By: ambari" -i -X DELETE [AMBARI_PROTO]://localhost:[AMBARI_PORT]/api/v1/clusters/[CLUSTER_NAME]/hosts/[JOURNALNODE1_HOSTNAME]/host_components/JOURNALNODE curl -u [AMBARI_USER]:[AMBARI_PW] -H "X-Requested-By: ambari" -i -X DELETE [AMBARI_PROTO]://localhost:[AMBARI_PORT]/api/v1/clusters/[CLUSTER_NAME]/hosts/[JOURNALNODE2_HOSTNAME]/host_components/JOURNALNODE curl -u [AMBARI_USER]:[AMBARI_PW] -H "X-Requested-By: ambari" -i -X DELETE [AMBARI_PROTO]://localhost:[AMBARI_PORT]/api/v1/clusters/[CLUSTER_NAME]/hosts/[JOURNALNODE3_HOSTNAME]/host_components/JOURNALNODE- Verify that all the JournalNodes have been deleted. On the Ambari Server host:
curl -u [AMBARI_USER]:[AMBARI_PW] -H "X-Requested-By: ambari" -i -X GET [AMBARI_PROTO]://localhost:[AMBARI_PORT]/api/v1/clusters/[CLUSTER_NAME]/host_components?HostRoles/component_name=JOURNALNODEThis should return an empty items array.
What to do next
Delete all additional NameNodes.
Delete the Additional NameNode
You may need to delete your additional NameNode.
Before you begin
Check to see if you need to delete your Additional NameNode, on the Ambari Server host:
curl -u [AMBARI_USER]:[AMBARI_PW] -H "X-Requested-By: ambari" -i -X GET [AMBARI_PROTO]://localhost:[AMBARI_PORT]/api/v1/clusters/[CLUSTER_NAME]/host_components?HostRoles/component_name=NAMENODEIf the items array contains two NameNodes, the Additional NameNode must be deleted.
Procedure
- On the Ambari Server host, run the following command:
curl -u [AMBARI_USER]:[AMBARI_PW] -H "X-Requested-By: ambari" -i -X DELETE [AMBARI_PROTO]://localhost:[AMBARI_PORT]/api/v1/clusters/[CLUSTER_NAME]/hosts/[ADDITIONAL_NAMENODE_HOSTNAME]/host_components/NAMENODE2. Verify that the Additional NameNode has been deleted:
curl -u [AMBARI_USER]:[AMBARI_PW] -H "X-Requested-By: ambari" -i -X GET [AMBARI_PROTO]://localhost:[AMBARI_PORT]/api/v1/clusters/[CLUSTER_NAME]/host_components?HostRoles/component_name=NAMENODEThis should return an items array that shows only one NameNode.
What to do next
Verify HDFS components.
Verify the HDFS components
Procedure
- Browse to Ambari Web UI > Services > HDFS.
- Check the Summary panel and ensure that the first three lines look like this:
- NameNode
- SNameNode
- DataNodes
You should not see a line for JournalNodes.
What to do next
Start HDFS service.
Start HDFS
Before you begin
Before starting HDFS, verify that you have the correct components.
Procedure
- In Ambari Web, click Service Actions, then click Start.
- If the progress bar does not show that the service has completely started and has passed the service checks, repeat Step1.
- To start all of the other services, click Actions > Start All in the Services navigation panel.
Configuring ResourceManager High Availability
You can configure high availability for ResourceManager by using the Enable ResourceManager HA wizard. Enable ResourceManager high availability
To access the wizard and enable ResourceManager high availability:
Configuring Resource Manager High Availability
About this task
On an ODP environment, you can configure high availability for ResourceManager by using the Enable ResourceManager HA wizard.
Before you begin
You must have at least three:
- hosts in your cluster
- Apache ZooKeeper servers running
Procedure
- In Ambari Web, browse to Services > YARN > Summary.
- Select Service Actions and choose Enable ResourceManager HA. The Enable ResourceManager HA wizard launches, describing a set of automated and manual steps that you must take to set up ResourceManager high availability.
- On Get Started, read the overview of enabling ResourceManager HA.

Click Next to proceed.
- On Select Host, accept the default selection or choose an available host.
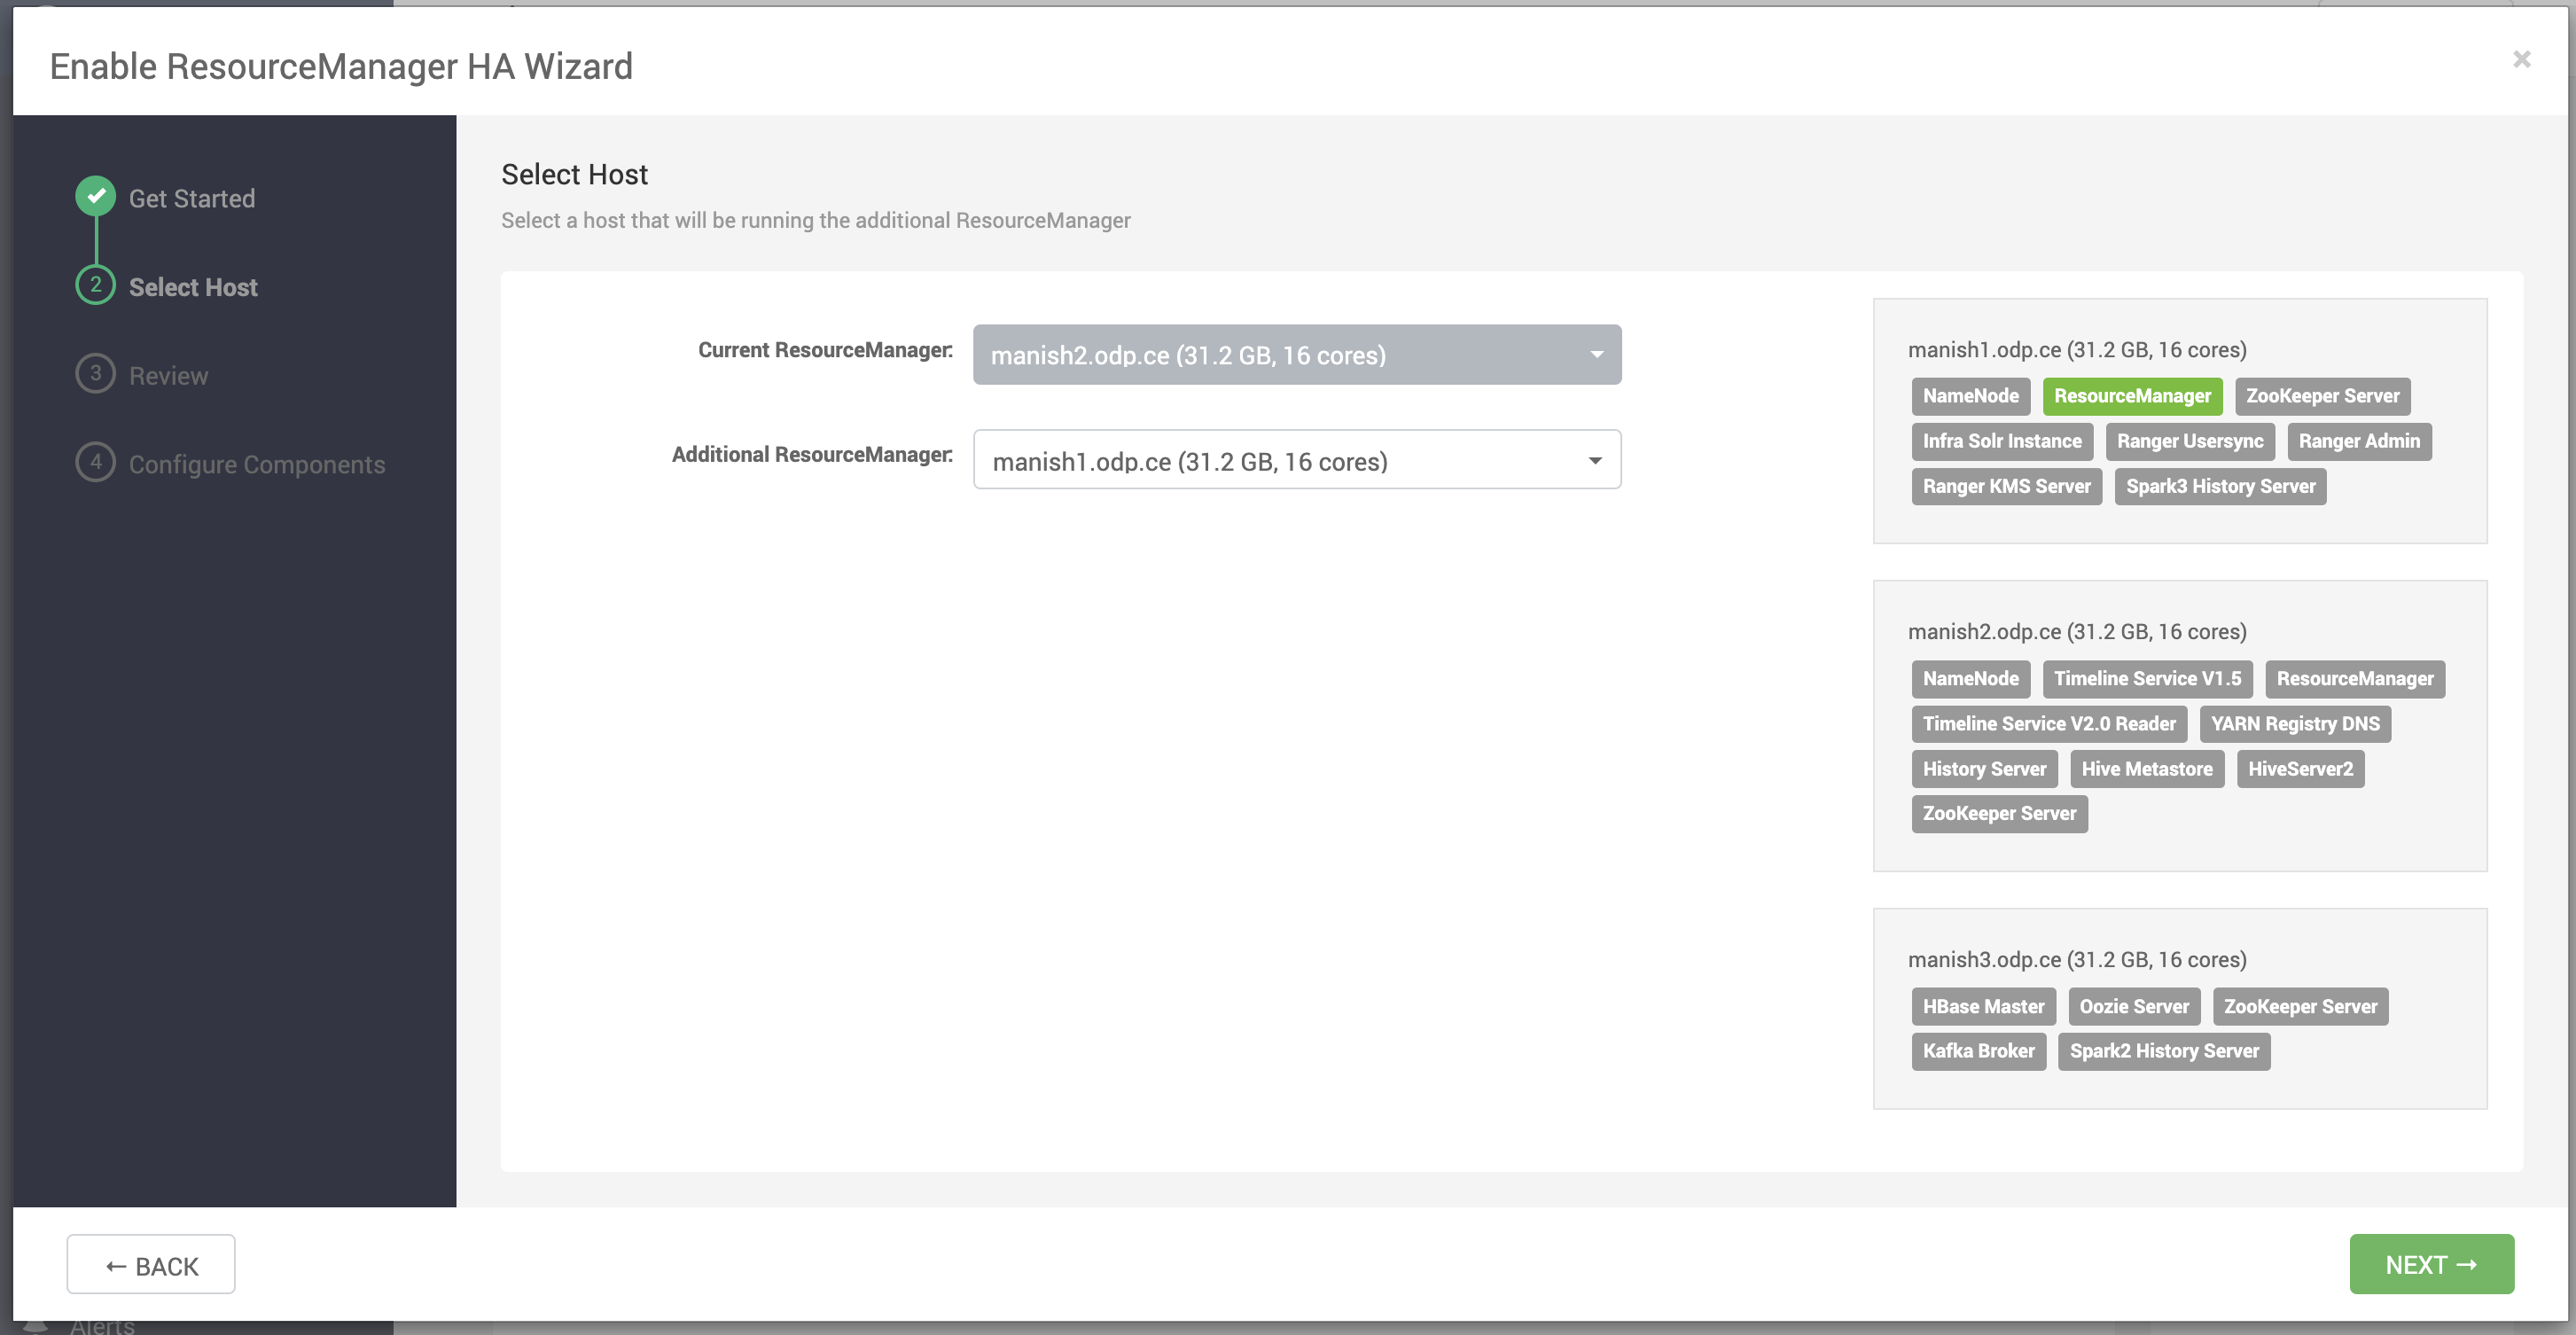
Click Next to proceed.
- On Review Selections, expand YARN if necessary, to review all the configuration changes proposed for YARN.
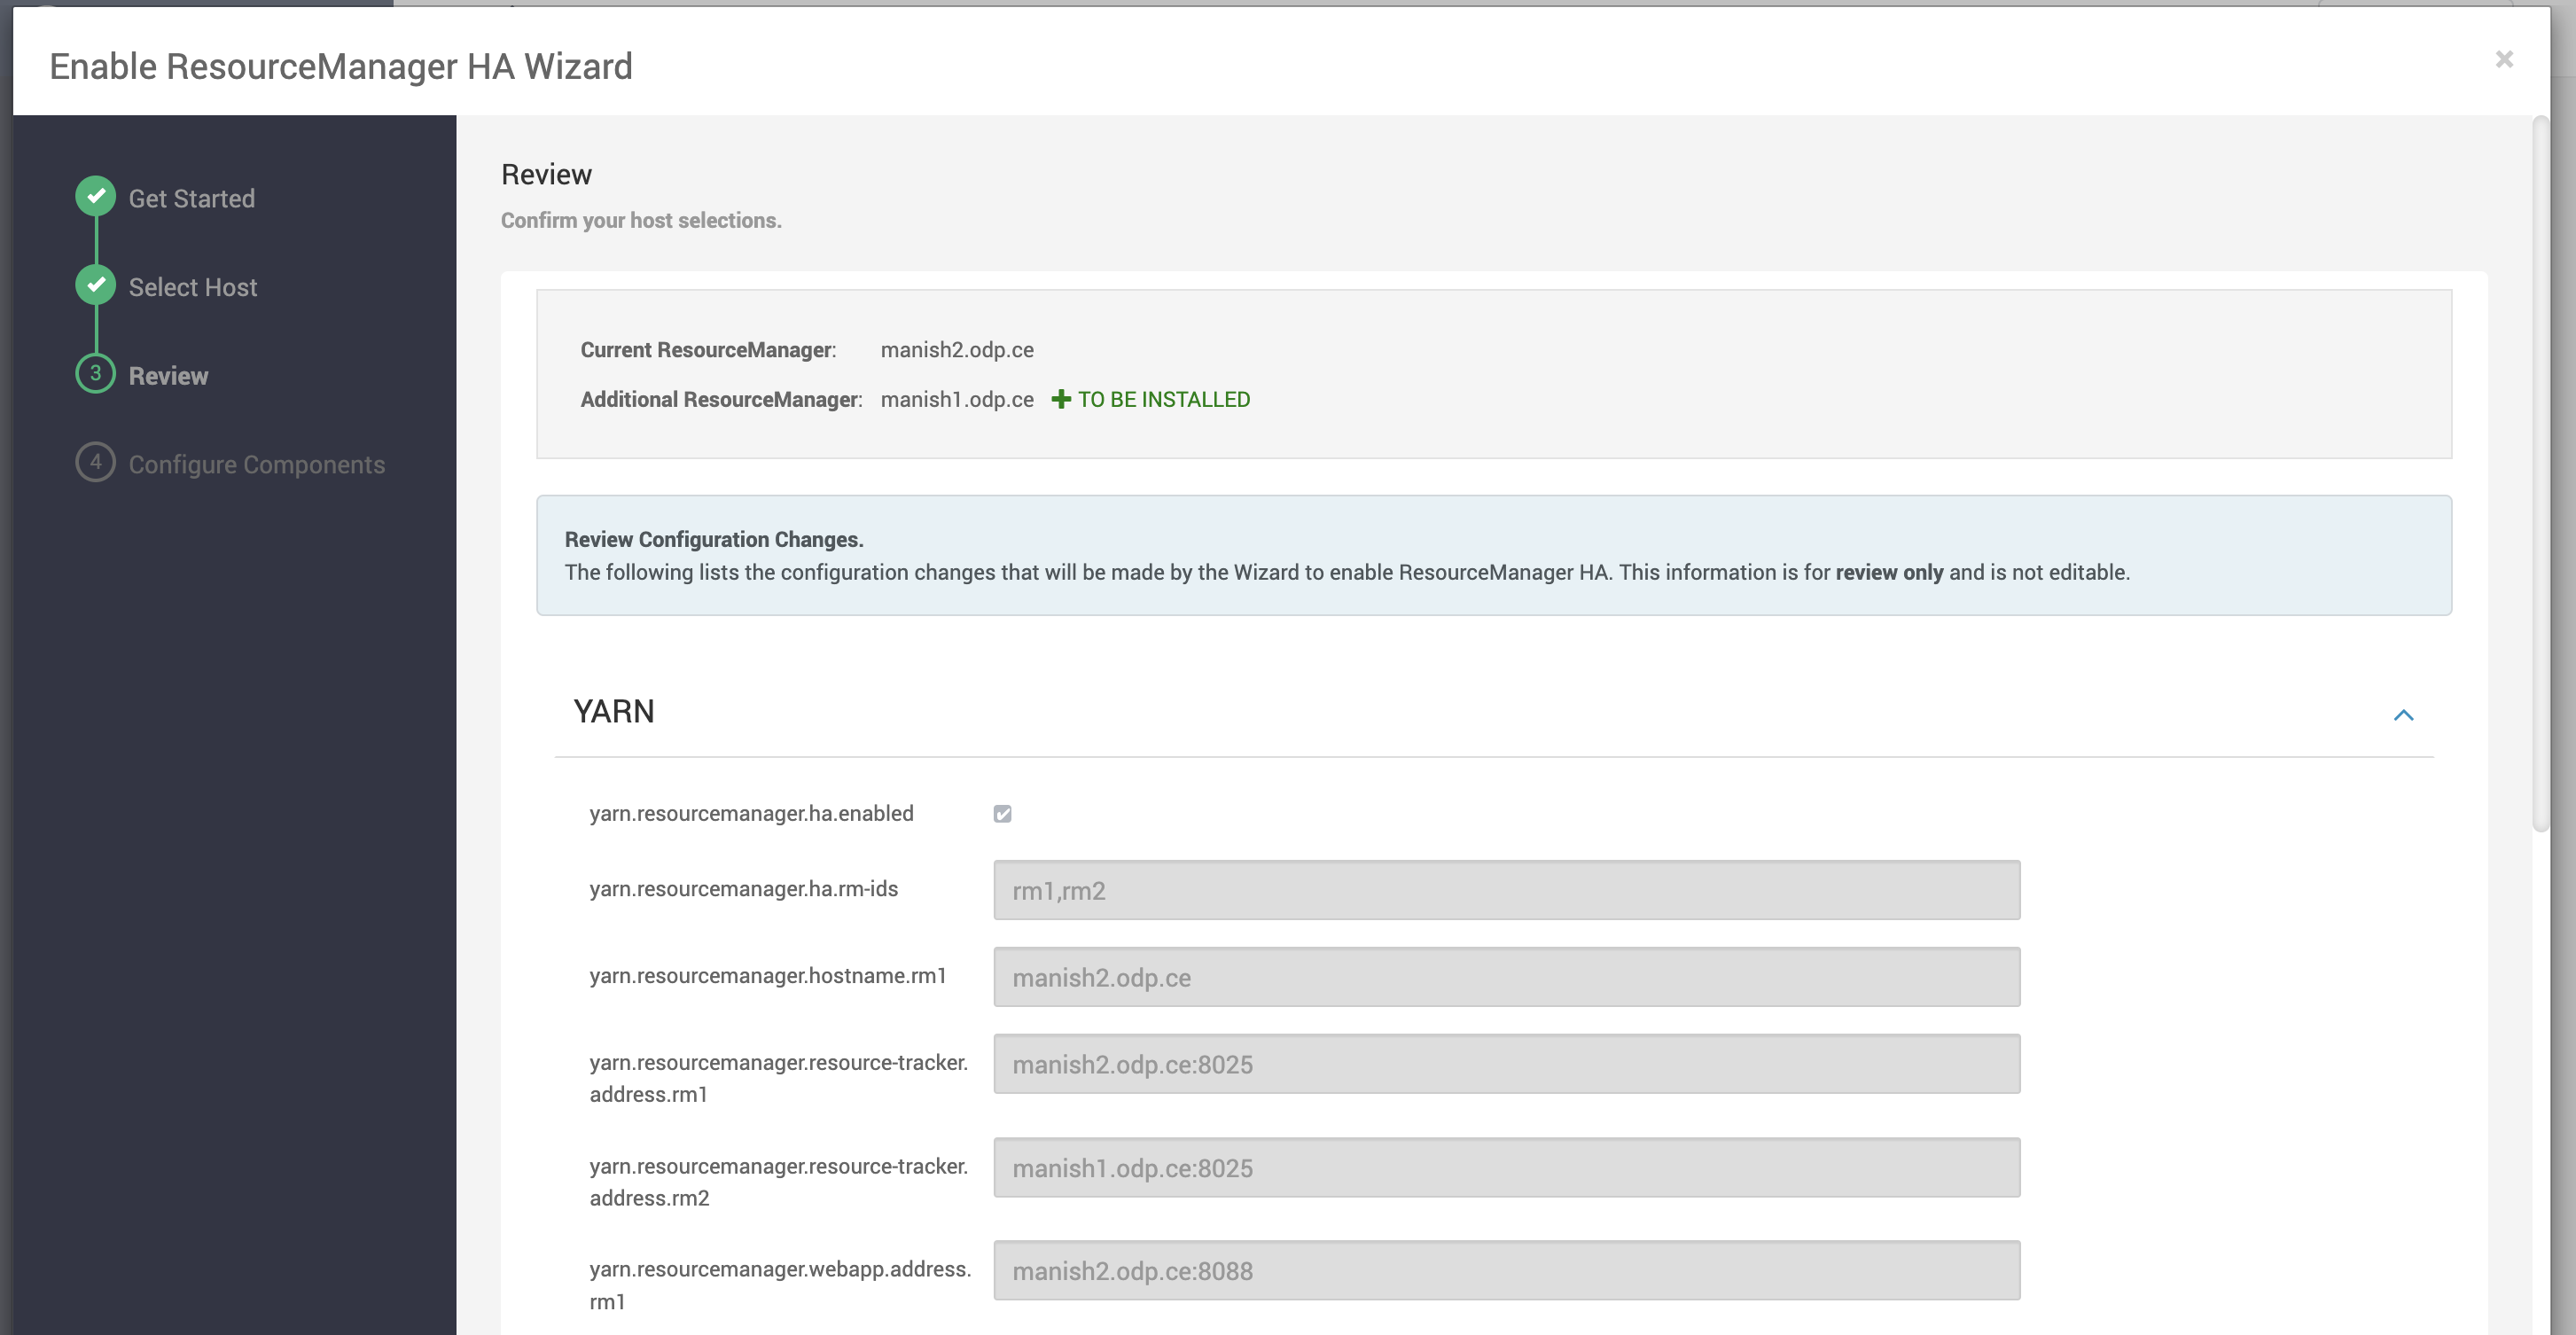
Click Next to approve the changes and start automatically configuring ResourceManager HA.
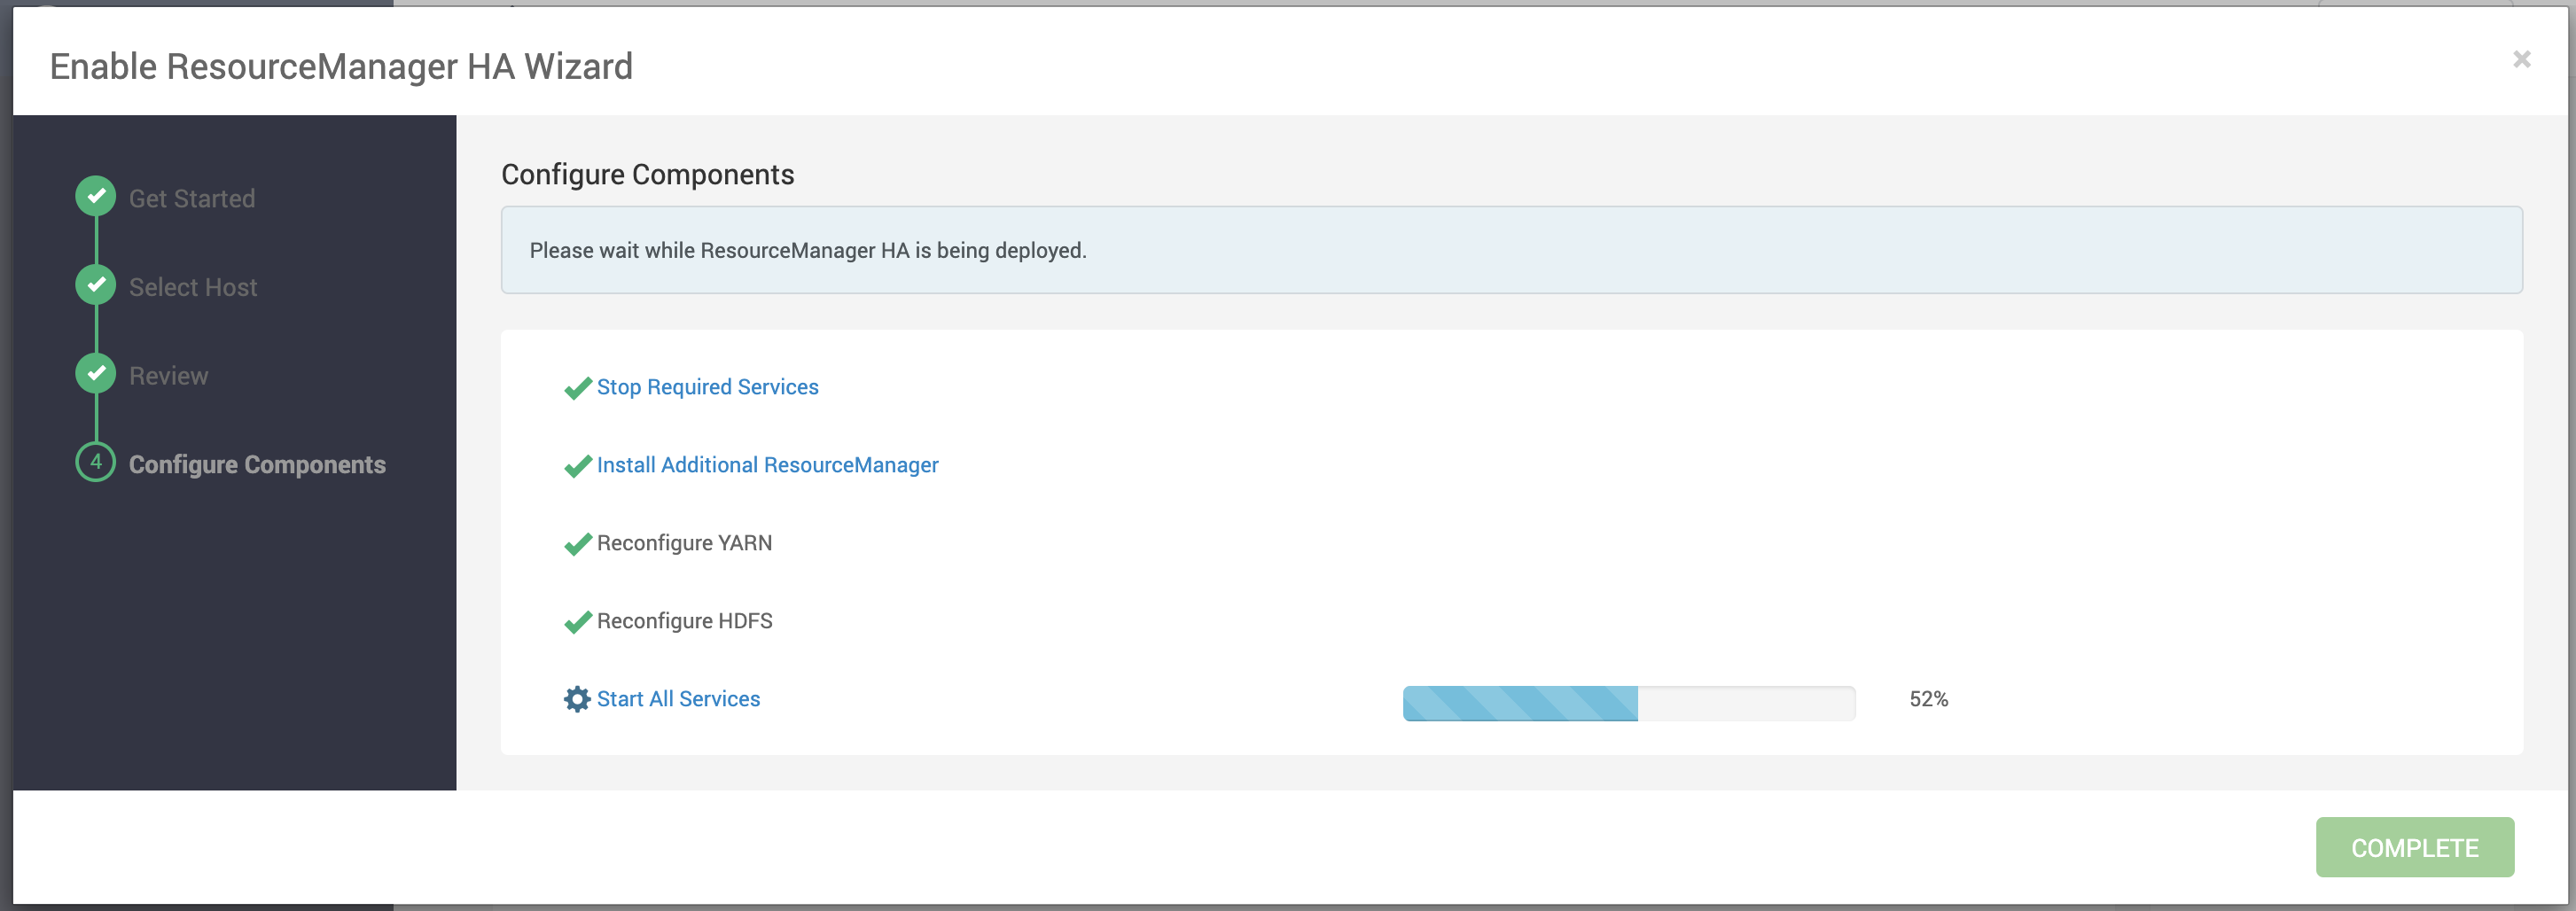
- On Configure Components, click Complete when all the progress bars finish tracking.
Disable ResourceManager High Availability
Using the Ambari API, delete the ResourceManager. Then, use the ZooKeeper client to update the znode permissions.
About this task
To disable ResourceManager high availability, you must delete one ResourceManager and keep one ResourceManager. This requires using the Ambari API to modify the cluster configuration to delete the ResourceManager and using the ZooKeeper client to update the znode permissions.
Before you begin
Because these steps involve using the Ambari REST API, you should test and verify them in a test environment prior to executing against a production environment.
Procedure
- In Ambari Web, stop YARN and ZooKeeper services.
- On the Ambari server host, use the Ambari API to retrieve the YARN configurations into a JSON file.
/var/lib/ambari-server/resources/scripts/configs.py --user=[ambari_user] --password=[ambari_password] --port=[port] --action=get --host=localhost --cluster=[CLUSTERNAME] --config-type=yarn-site --file=yarn-site.jsonIn this example, [AMBARI_SERVER]_ is the hostname of your Ambari Server and [CLUSTER NAME] is the name of your cluster.
- In the yarn-site.json file, change yarn.resourcemanager.ha.enabled to false and delete the following properties:
- yarn.resourcemanager.ha.rm-ids
- yarn.resourcemanager.hostname.rm1
- yarn.resourcemanager.hostname.rm2
- yarn.resourcemanager.webapp.address.rm1
- yarn.resourcemanager.webapp.address.rm2
- yarn.resourcemanager.webapp.https.address.rm1
- yarn.resourcemanager.webapp.https.address.rm2
- yarn.resourcemanager.cluster-id
- yarn.resourcemanager.ha.automatic-failover.zk-base-path
- Verify that the following properties in the yarn-site.json file are set to the ResourceManager hostname you are keeping:
- yarn.resourcemanager.hostname
- yarn.resourcemanager.admin.address
- yarn.resourcemanager.webapp.address
- yarn.resourcemanager.resource-tracker.address
- yarn.resourcemanager.scheduler.address
- yarn.resourcemanager.webapp.https.address
- yarn.timeline-service.webapp.address
- yarn.timeline-service.webapp.https.address
- yarn.timeline-service.address
- yarn.log.server.url
- Search the yarn-site.json file and remove any references to the ResourceManager hostname that you are removing.
- Search the yarn-site.json file and remove any properties that might still be set for ResourceManager IDs. For example, rm1 and rm2.
- Save the yarn-site.json file and set that configuration against the Ambari Server.
/var/lib/ambari-server/resources/scripts/configs.py --user=[ambari_user] --password=[ambari_password] --port=[port] --action=set --host=localhost --cluster=[CLUSTERNAME] --config-type=yarn-site --file=yarn-site.json8. Using the Ambari API, delete the ResourceManager host component for the host that you are deleting.
curl --user admin:admin -i -H "X-Requested-By: ambari" -X DELETE [AMBARI_PROTO]://[AMBARI_SERVER]:[AMBARI_PORT]/api/v1/clusters/[CLUSTER_NAME]/hosts/[HOSTNAME]/host_components/RESOURCEMANAGER9. In Ambari Web, start the ZooKeeper service.
- On a host that has the ZooKeeper client installed, use the ZooKeeper client to change znode permissions.
xxxxxxxxxx/usr/odp/current/zookeeper-client/bin/zkCli.sh getAcl /rmstore/ZKRMStateRoot setAcl /rmstore/ZKRMStateRoot world:anyone:rwcda- In Ambari Web, restart ZooKeeper service and start YARN service.
What to do next
Review and confirm all recommended configuration changes.
Configuring HBase High Availability
Ambari enables simple setup of multiple HBase Masters.
To help you achieve redundancy for high availability in a production environment, Apache HBase supports deployment of multiple HBase Masters in a cluster. Acceldata recommends that you use Ambari 2.7.6 to configure multiple HBase Masters.
During the Apache HBase service installation and depending on your component assignment, Ambari installs and configures one HBase Master component and multiple RegionServer components. To configure high availability for the HBase service, you can run two or more HBase Master components. HBase uses ZooKeeper for coordination of the active Master in a cluster running two or more HBase Masters. This means, when active HBase Master fails, the client will be automatically routed to standby Master.
Add a New HBase Master to an Existing Cluster
Procedure
- Log in to the Ambari management interface as a cluster administrator. admin/admin
- In Ambari Web, browse to Services > HBase.
- In Service Actions, click + Add HBase Master.
- Choose the host on which to install the additional HBase master; then click Confirm Add.
Results
Ambari installs the new HBase Master and reconfigures HBase to manage multiple Master instances.
What to do next
Add a standby HBase master to the cluster.
Add a Standby HBase Master to a New Cluster
During cluster deployment, you can add a standby HBase master when you add the active HBase master.
Procedure
- Click the + sign that is displayed to the right of the HBase Master host name. of the existing
The first host you add will be the active node. The second will be the standby HBase Master.
Setting Up Multiple HBase Masters Manually
Set up your active HBase master using the cluster deployment wizard. If necessary, add additional HBase masters manually.
About this task
You must configure the first node (node-1) on your cluster by following the instructions in the cluster deployment topic.
Configure Passwordless ssh Access for HBase
About this task
The first node on the cluster (node-1) must be able to log in to other nodes on the cluster and then back to itself in order to start the daemons. You can accomplish this by using the same user name on all hosts and by using passwordless Secure Socket Shell (SSH) login.
Procedure
- On node-1, stop HBase service.
- On node-1, log in as an HBase user and generate an SSH key pair.
$ ssh-keygen -t rsa
The system prints the location of the key pair to standard output. The default name of the public key is id_rsa.pub.
Create a directory to hold the shared keys on the other nodes.
- On node-2, log in as an HBase user and create an .ssh/ directory in your home directory.
- On node-3, log in as an HBase user and create an .ssh/ directory in your home directory.
Use Secure Copy (scp) or any other standard secure means to copy the public key from node-1 to the other two nodes. On each node in the cluster, create a new file called .ssh/authorized_keys (if it does not already exist) and append the contents of the id_rsa.pub file to it.
$ cat id_rsa.pub >> ~/.ssh/authorized_keys
Ensure that you do not overwrite your existing .ssh/authorized_keys files by concatenating the new key onto the existing file using the >> operator rather than the > operator.
- Use Secure Shell (SSH) from node-1 to either of the other nodes using the same user name. You should not be prompted for password.
- On node-2, repeat Step 5, because it runs as a backup Master.
Prepare node-1 for Hbase
Prevent the Region Server on node-1 from starting.
About this task
Because node-1 should run your active Master and ZooKeeper processes, you must stop the RegionServer from starting on node-1.
Procedure
- Edit conf/regionservers by removing the line that contains localhost and adding lines with the host name or IP addresseses for node-2 and node-3.
If you want to run a RegionServer on node-1, you should refer to it by the hostname the other servers would use to communicate with it.
For example, for node-1, it is called as node-1.test.com.
- Configure HBase to use node-2 as a backup Master by creating a new file in conf/ called backup-Masters, and adding a new line to it with the host name for node-2.
For example, node-2.test.com.
- Configure ZooKeeper on node-1 by editing conf/hbase-site.xml and adding the following properties:
xxxxxxxxxx<property> <name>hbase.zookeeper.quorum</name> <value>node-1.test.com,node-2.test.com,node-3.test.com</value> </property> <property> <name>hbase.zookeeper.property.dataDir</name> <value>/usr/local/zookeeper</value> </property>This configuration directs HBase to start and manage a ZooKeeper instance on each node of the cluster. You can learn more about configuring ZooKeeper at the Apache Zookeeper project site.
- Change every reference in your configuration to node-1 as localhost to point to the host name that the other nodes use to refer to node-1.
In this example, node-1.test.com.
Prepare node-2 and node-3 for Hbase
About this task
Before preparing node-2 and node-3, each node of your cluster must have the same configuration information. Node-2 runs as a backup Master server and a ZooKeeper instance.
Procedure
- Download and unpack HBase on node-2 and node-3.
- Copy the configuration files from node-1 to node-2 and node-3.
- Copy the contents of the conf/ directory to the conf/ directory on node-2 and node-3.
Start and Test your HBase Cluster
Procedure
- Use the jps command to ensure that HBase is not running.
- Kill HMaster, HRegionServer, and HQuorumPeer processes, if they are running.
- Start the cluster by running the start-hbase.sh command on node-1.
Your output is similar to this:
$ bin/start-hbase.sh node-3.test.com: starting zookeeper, logging to /home/hbuser/hbase-0.98.3- hadoop2/bin/../logs/hbase-hbuser-zookeeper-node-3.test.com.out node-1.example.com: starting zookeeper, logging to /home/ hbuser/hbase-0.98.3-hadoop2/bin/../logs/hbase-hbuser-zookeeper- node-1.test.com.out node-2.example.com: starting zookeeper, logging to /home/ hbuser/hbase-0.98.3-hadoop2/bin/../logs/hbase-hbuser-zookeeper- node-2.test.com.out starting master, logging to /home/hbuser/hbase-0.98.3-hadoop2/bin/../logs/ hbase-hbuser-master-node-1.test.com.out node-3.test.com: starting regionserver, logging to /home/hbuser/ hbase-0.98.3-hadoop2/bin/../logs/hbase-hbuser-regionserver- node-3.test.com.out node-2.test.com: starting regionserver, logging to /home/hbuser/ hbase-0.98.3-hadoop2/bin/../logs/hbase-hbuser-regionserver- node-2.test.com.out node-2.test.com: starting master, logging to /home/hbuser/hbase-0.98.3- hadoop2/bin/../logs/hbase-hbuser-master-node2.test.com.out ZooKeeper starts first, followed by the Master, then the RegionServers, and finally the backup Masters.- Run the jps command on each node to verify that the correct processes are running on each server.
Example1. node-1 jps Output
xxxxxxxxxx$ jps 20355 Jps 20071 HQuorumPeer 20137 HMasterExample 2. node-2 jps Output
xxxxxxxxxx$ jps 15930 HRegionServer 16194 Jps 15838 HQuorumPeer 16010 HMasterExample 3. node-3 jps Output
xxxxxxxxxx$ jps 13901 Jps 13639 HQuorumPeer 13737 HRegionServerZooKeeper Process Name
You might see additional Java processes running on your servers as well, if they are used for any other purposes.
The HQuorumPeer process is a ZooKeeper instance which is controlled and started by HBase. If you use ZooKeeper this way, it is limited to one instance per cluster node and is appropriate for testing only. If ZooKeeper is run outside of HBase, the process is called QuorumPeer. For more about ZooKeeper configuration, including using an external ZooKeeper instance with HBase, see the zookeeper project site.
- Browse to the Web UI and test your new connections.
You should be able to connect to the UI for the Master http: //node-1.test.com:16010/ or the standby master at http: //node-2.test.com:16010/. If you can connect through localhost but not from another host, check your firewall rules. You can see the web UI for each of the RegionServers at port 16030 of their IP addresses, or by clicking their links in the web UI for the Master.
Web UI Port Changes
In HBase newer than 0.98.x, the HTTP ports used by the HBase Web UI changed from 60010 for the Master and 60030 for each RegionServer to 16010 for the Master and 16030 for the RegionServer.
Configuring Hive High Availability
The Apache Hive service has multiple, associated components. The active Hive components are Hive Metastore and HiveServer2. The relational database that backs the Hive Metastore itself should also be made highly available using best practices defined for the database system in use and should be done after consultation with your in-house DBA.
Add a Hive Metastore Component
Before you begin
If you have ACID enabled in Hive, ensure that the Run Compactor setting is enabled (set to True) on only one Hive metastore host.
Procedure
- In Ambari Web, browse to Services > Hive.
- In Service Actions, click the + Add Hive Metastore option.
- Choose the host on which to install the additional Hive Metastore; then click Confirm Add.
Results
Ambari installs the component and reconfigures Hive to handle multiple Hive Metastore instances.
What to do next
Review and confirm all recommended configuration changes.
Add a HiveServer2 Component
Procedure
- In Ambari Web, browse to the host on which you want to install another HiveServer2 component.
- On the Host page, click +Add.
- Click HiveServer2 from the list.
Results
Ambari installs the additional HiveServer2 component.
What to do next
Review and confirm all recommended configuration changes.