AutoSys
Overview
The integration of AutoSys with the Acceldata Data Observability Cloud (ADOC) allows you to monitor and control your AutoSys job schedules within the ADOC platform. This guide provides step-by-step instructions on how to set up and use this new feature to enhance your data observability experience.
Ability to integrate AutoSys job scheduling and monitoring capabilities into the Acceldata Data Observability Cloud (ADOC). This feature allows you to seamlessly monitor, manage, and analyze your AutoSys jobs directly within the ADOC platform, enhancing visibility and control over your data pipelines.
Key Features:
- Comprehensive Monitoring: View real-time statuses of AutoSys jobs, including job dependencies, execution times, and failure alerts.
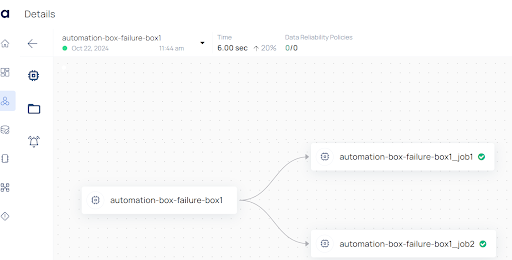
- Pipeline Visualization: Visualize nested box jobs and job hierarchies to better understand complex workflows.
- Custom Alerts: Set up alerts for job failures, delays, or other critical events to proactively manage your data pipelines.
- Easy Integration: Connect your AutoSys environment to ADOC with minimal configuration changes.
Pre requisite
AutoSys Environment: An active AutoSys environment with access credentials. Ensure that AutoSys server and agents are properly installed and configured.
ADOC Account: An Acceldata Data Observability Cloud account with Read level API access privileges.( administrative privileges.)
Network Access:
- Ensure network connectivity between your AutoSys server and the ADOC platform.
- Update firewall rules to allow communication between AutoSys and ADOC.
Firewall Configuration: Ensure that the necessary ports are open for communication (e.g., port 9443 for AutoSys API access).
Setting up and Managing AutoSys Integration in ADOC
1. Accessing AutoSys Data in ADOC
1.1. Firewall Configuration
To enable communication between your AutoSys server and ADOC:
Identify External IP Addresses:
- Determine the external IP addresses of your ADOC data plane nodes.
- For example, if your data plane is hosted on AWS or GCP, obtain the public IP addresses of the nodes.
Update Firewall Rules:
- Access your firewall management console (e.g., GCP Firewall Policies).
- Edit the relevant firewall rule .
- Add the external IP addresses of your ADOC data plane nodes to the Source IPv4 ranges.
- Enable the necessary ports (e.g., port 9443 for AutoSys API).
Enable Enforcement: Ensure that the enforcement option is set to Enabled.
Save Changes: Click Save to apply the updated firewall settings.
1.2. Access Credentials: Gather the necessary credentials for both UI and CLI access to your AutoSys environment.
- UI Access:
- URL: Example:
https://<your-autosys-url>:9443/AEWS - Username: Provided by your administrator.
- Password: Provided by your administrator.
- URL: Example:
Note: Depending on your infrastructure, you need to grant access to the data plane nodes that will interact with the remote AutoSys server.
2. Configuring the AutoSys Integration
- Access your ADOC account and log-in with your credentials.
- Go to the Register menu
- Click on Add Data Source and choose AutoSys from the list.
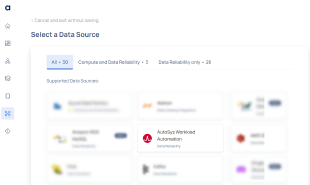
- Enter Connection Details: Fill in the required fields:
- Username: Your AutoSys username.
- Password: Your AutoSys password.
- Use Secret Manager: (Optional) If using secret manager for credentials, configure accordingly.
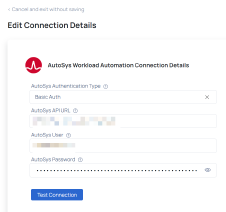
- Click on Test Connection to verify connectivity. After the connection is successful, save the integration settings.
3. Onboarding AutoSys in ADOC
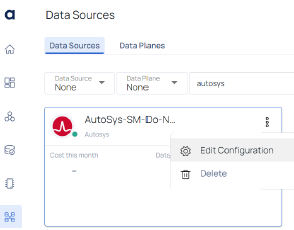
3.1. Adding the AutoSys Data Source
- Navigate to Data Source.
- Choose AutoSys from the list of data sources.
- Configure the Connection Details
- Meta JSON Configuration:
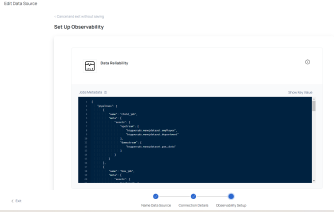
3.2. Configuring the Meta JSON
metachild_jobs_meta``
JSON Template:
{ "pipelines": [ { "name": "<<Parent Pipeline Name to be observed>>", "meta": { "assets": { "upstream": ["<<Asset UID as upstream>>"], "downstream": ["<<Asset UID as downstream>>"] } }, "child_jobs_meta": [ { "name": "<<Child Job Name for which meta needs to be added>>", "meta": { "assets": { "upstream": ["<<Asset UID as upstream>>"], "downstream": ["<<Asset UID as downstream>>"] } } } ] } ]}1. Syntax Used: <DataSource Name>.<Schema/Database>.<Table/View Name>
2. Asset UID is a unique identifier for an asset, which you can obtain from the Asset page for a table in ADOC.

Field Descriptions
Pipeline Fields
| Field | Type | Description | Example |
|---|---|---|---|
name | String | The name of the main job in the pipeline. | box_job |
meta | JSON (Optional) | Contains metadata about the main job, including assets information as upstream and downstream. | See Meta Fields |
child_jobs_meta | Array of JSON (Optional) | Contains metadata for sub-jobs associated with the main job, each defined as an object in this array. | See Child Jobs Meta Fields |
Meta Fields
| Field | Sub Field | Type | Description | Example |
|---|---|---|---|---|
assets | upstream | Array of String (Optional) | List of assets involved as input (upstream). | "meta": { "assets": { "upstream": [ "bigqueryds.sales.order", "bigqueryds.sales.transaction" ] } } Note: "bigqueryds.sales.order" is the asset uid per acceldata which we can get from the Asset page for a table. Syntax used as:<Datasource Name>.<Schema / Database>.<Table / View name> |
assets | downstream | Array of String(Optional) | List of assets which are the outcome of part of the job treated as downstream. | "meta": { "assets": { "downstream": [ "Bigqueryds.sales.order-output", "bigqueryds.sales.order-output", ] } Note: "bigqueryds.sales.order-output" is the asset uid per acceldata which we can get from the Asset page for a table. Syntax used as: <Datasource Name>.<Schema / Database>.<Table / View name> |
Child Jobs Meta Fields
| Field | Type | Description | Example |
|---|---|---|---|
name | String | The name of the child job for which metadata is to be added. | "child_job_1" |
meta | JSON (Optional) | Contains metadata about the child job, including | See Meta Fields |
Examples:
Simple Basic Job Meta
{ "pipelines": [ { "name": "data_processing_job" } ]}Basic Job with Upstream/Downstream Assets Meta
{ "pipelines": [ { "name": "data_processing_job", "meta": { "assets": { "upstream": ["source_dataset_1", "source_dataset_2"], "downstream": ["target_dataset_2"] } } } ]}Jobs with Child Jobs Metadata
{ "pipelines": [ { "name": "parent_job", "meta": { "assets": { "upstream": ["source_dataset_4"], "downstream": ["target_dataset_3"] } }, "child_jobs_meta": [ { "name": "child_job_1", "meta": { "assets": { "upstream": ["source_dataset_4"], "downstream": ["target_dataset_4"] } } }, { "name": "child_job_2", "meta": { "assets": { "upstream": ["target_dataset_4"], "downstream": ["target_dataset_5"] } } } ] } ]}Multiple Jobs with One Having Meta and Another Without
{ "pipelines": [ { "name": "data_processing_job" }, { "name": "data_processing_job_with_meta", "meta": { "assets": { "upstream": ["source_dataset_1", "source_dataset_2"], "downstream": ["target_dataset_2"] } } } ]}4. Steps to Configure Meta JSON
- Prepare the Meta JSON: Use the JSON template and examples provided to create your Meta JSON configuration. Ensure that the names in the Meta JSON match the actual job names in AutoSys.
- Input the Meta JSON: During the onboarding process, you will be prompted to enter the Meta JSON configuration. Paste your prepared Meta JSON into the configuration field.
- Submit the Configuration: Click Submit to add the AutoSys data source with your Meta JSON configuration.
Monitoring Jobs and Pipelines in ADOC
- Navigate to the Pipelines section in ADOC.
- Filter by Data Source: Use the filter options to select AutoSys as the data source.
- View Pipelines: The pipelines configured via the Meta JSON will appear. Click on a pipeline to view its details, including job hierarchies and execution timelines.
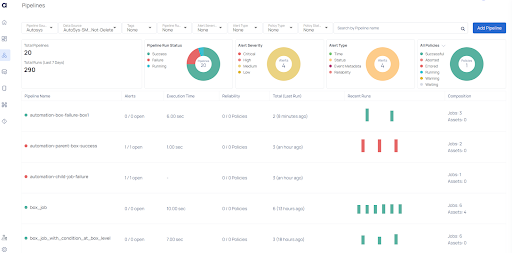
- Pipeline Visualization: Visualize job dependencies, including nested box jobs and conditional jobs. Navigate between parent and child jobs within pipelines.
Troubleshooting
If you encounter issues, consider the following steps:
Connection Issues
Firewall Settings: Revisit your firewall configurations to ensure ADOC can access your AutoSys server.
Network Connectivity: Verify network connections and DNS settings.
Authentication Errors
Credentials Verification: Double-check your AutoSys credentials entered in ADOC.
Permissions: Ensure the user account has the necessary permissions to access AutoSys data.
Data Not Appearing
- Job Configuration: Confirm that your AutoSys jobs are correctly configured and active.
- Integration Status: Check the integration status in ADOC for any error messages.