Public APIs for Pulse
This documentation contains instructions for using public APIs of Pulse.
- Obtain JWT Token:
- Open your terminal or command prompt.
- Use the following curl command to obtain the JWT token and role:
curl -i 'http://<pulse url>/login' \-H 'accept: application/json, text/plain, */*' \-H 'content-type: application/json' \--data-raw '{"email":"<username>","password":"<base64 encoded password>"}'Replace <pulse url>, <username>, and <base64 encoded password> with your specific values. The password should be base64 encoded.
- Example:
curl -i 'http://example.com/login' \-H 'accept: application/json, text/plain, */*' \-H 'content-type: application/json' \--data-raw '{"email":"john.doe@example.com","password":"<password_placeholder>"}'- Capture JWT Token and Role:
- After running the curl command, you should receive an output similar to this:
HTTP/2 200date: Thu, 13 Jun 2024 05:17:07 GMTcontent-type: application/json; charset=utf-8content-length: 63server: nginxaccess-control-allow-origin: *x-frame-options: DENYx-content-type-options: nosniffset-cookie: jwt=<jwt_token>; Max-Age=900; Path=/; Expires=Thu, 13 Jun 2024 05:32:07 GMTetag: W/"3f-Y6s9mpm2ANCRhWr9ueS4XY2nCP8"{"message":"Authentication successful!","data":{"role":"e30="}}- From this output, copy the jwt value and note down the role.
Set Up Cookie Modifier Plugin:
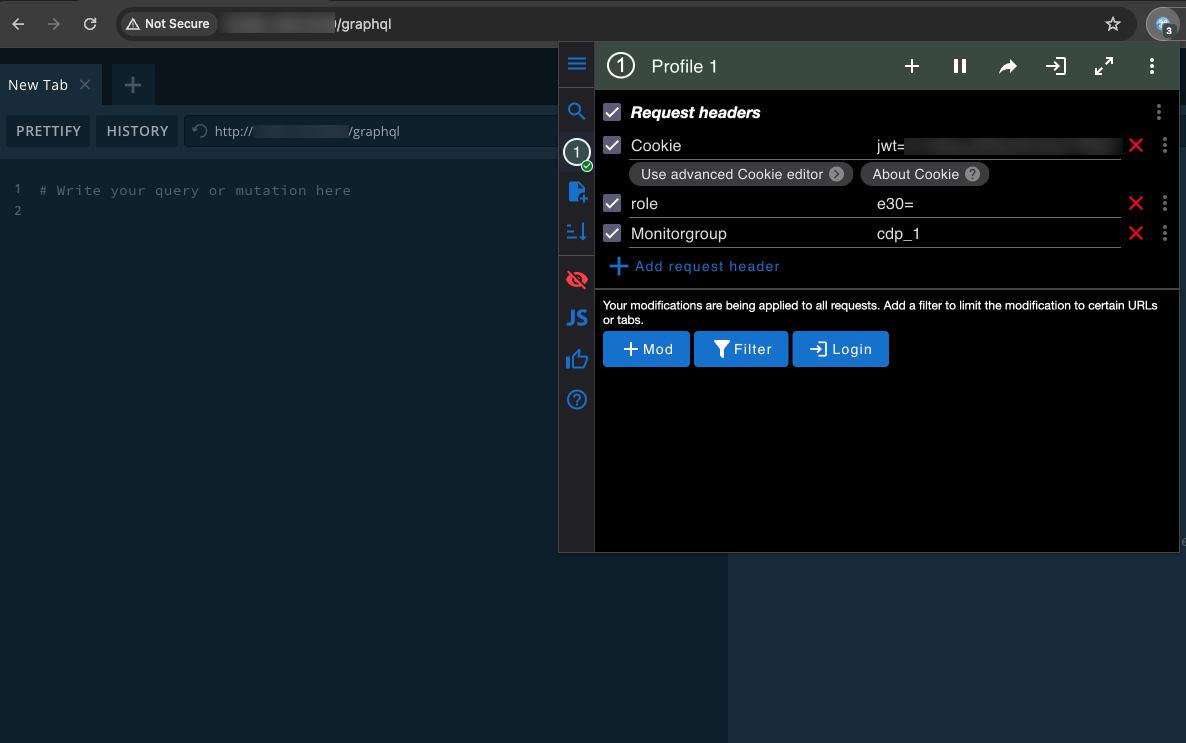
- Install a cookie modifier plugin in your browser (e.g., EditThisCookie for Chrome, Cookie Manager+ for Firefox).
- Add the following three cookies:
- jwt: Paste the JWT token obtained from the curl command.
- Other cookies specific to your API's requirements, if any.
Access GraphQL Playground:
- Open your web browser.
- Enter the following URL in the address bar:
http://<pulse url>/graphqlReplace <pulse url> with your actual API URL.
- Verify Access:
- If the cookies are valid and correctly set up, the GraphQL Playground should open up in your browser.
- You should now be able to interact with the API using GraphQL queries.
- Ensure that your JWT token is kept secure and not exposed unnecessarily.
- Update cookies as required if token expiration or session management policies change.
- Use a browser-based plugin, such as ModHeader or JWT Inspector to add an additional Json Web Token (jwt) header to the URL.

- The page must be refreshed after the header is added. On refreshing the page, the Documentation Explorer panel appears on the right side.

- Click on the Query hyperlink to view all the queries of the Pulse dashboard.
- Enter the name of the query in the Search Schema search bar to search for a specific query.
This allows you to access APIs for Pulse. For more information on accessing public APIs, contact support@acceldata.io.
Rest API
REST API’s allow the user to get status on the running application. The following are the Rest API:
API to Create Roles
The following describes the method to input Roles to the user interface (UI).
- Select any API testing tool to invoke an API.
- Include the additional JSON Web Token (jwt) header for authentication in the request, which is obtained in the during logging in to the API testing tool.
- Include the following argument:
Method -
{ "localUsers" : [ ], - optional "adGroupsMapped" : [ ], - optional "adUsersMapped" : [ ], - optional "clusters" : [ <list of cluster names>], - required "name" : “<role name>", - required "serviceQueues" : { - required “<cluster name 1>" : [<list of yarn queues>], “<cluster name 2>" : [<list of yarn queues>], . . }, "serviceUsers" : { - required “<cluster name 1>" : [<list yarn users>], “<cluster name 2>" : [<list yarn users>], . . }, "impalaUsers" : { - required if impala “<cluster name 1>" : [<list of impala users>], “<cluster name 2>" : [<list of impala users>] . . }, "permissions" : { - required “<component name>”: true/false, . . }}The following are the list of available components for permissions:
"dashboard" : true, "studio" : true, "dashplots" : true, "hdfs" : true, "yarn" : true, "spark-thrift" : true, "mr" : true, "tez" : true, "llap" : true, "hiveOnSpark" : true, "spark" : true, "hbase" : true, "kafka" : true, "ni fi" : true, "druid" : true, "impala" : true, "memsql" : true, "chargeback-reports" : true, "applications-explorer" : true, "databases" : true, "nodes" : true, "logs" : true, "alerts" : true, "actions" : true, "hdfs~fsanalytics" : true, "hdfs~ fileExplorer" : true, "yarn~services" : true, "spark-thrift~queries" : true, "spark-thrift~tables" : true, "spark-thrift~reports" : true, "mr~mr-queries" : true, "mr~mr-tables" : true, "tez~tez-queries" : true, "tez~tez-tables" : true, "llap~llap-daemons" : true, "llap~llap-queries" : true, "llap~llap-tables" : true, "llap~llap-reports" : true, "hiveOnSpark~hiveOnSparkQueries" : true, "hiveOnSpark~hiveOnSparkTables" : true, "spark~spark-jobs" : true, "spark~spark-streams" : true, "hbase~regions" : true, "hbase~tables" : true, "hbase~snapshot" : true, "hbase~proctor" : true, "hbase~services" : true, "kafka~topics" : true, "kafka~brokers" : true, "kafka~consumers" : true, "ni fi~process-groups" : true, "ni fi~flow-files" : true, "druid~services" : true, "druid~queries-dashboard" : true, "impala~impala-queries" : true, "impala~impala-tables" : true, "impala~impala-daemons" : true, "memsql~queries" : true, "memsql~user-queries" : true, "memsql~plan" : true, "memsql~tables" : true, "memsql~pipelines" : true, "chargeback-reports~nodelabels" : true, "databases~hivefsanalytics" : true, "alerts~incidents" : true, "actions~executions" : true, "spark-thrift~kpi~view" : true, "spark-thrift~kpi~createEdit" : true, "mr~kpi~view" : true, "mr~kpi~createEdit" : true, "tez~kpi~view" : true, "tez~kpi~createEdit" : true, "hiveOnSpark~kpi~view" : true, "hiveOnSpark~kpi~createEdit" : true, "spark~kpi~view" : true, "spark~kpi~createEdit" : true, "druid~queries-dashboard~queries" : true, "memsql~pipelineruns" : true, "memsql~pipeline files" : true, "alerts~kpi~view" : true,API to Create Bulk Users
The following describes the method to input bulk Users to the UI.
- Select any API testing tool to invoke an API.
- Include the additional JSON Web Token (jwt) header for authentication in the request, which is obtained in the during logging in to the API testing tool.
- Include the following argument:
Method -
{ "username": "<username>", - required "email": "<email>", - optional "password": "<password>", - required if not ldap user "role": “<role name>", - required "ldapUser": true/false, - required "catalogRole": “<catalog role>", - optional}API to Fetch Version Details
You can use the following API details and steps to fetch the Pulse version.
- Select any API testing tool to invoke an API.
- Include the additional JSON Web Token (jwt) header for authentication in the request, which is obtained during logging into the API testing tool.
- Include the following argument:
Method -
Endpoint URL: /get-pulse-version
GraphQL Query:
query getPulseVersion { getPulseVersion { imageTag version } }Response:
{"Image tag" : "3.x.x-xxxxxx""Version" : "3.x.x"}